According to the technical documentation, the alternator belt must be changed every 45-60 thousand km. You should also not forget about the quality of vehicle maintenance, since this directly affects the service life of the parts, in this case the belt. If you notice significant cracks or damage on it, do not hesitate, it is better to replace it.
Video material
The video will tell you how to change the Hyundai Accent attachment belt yourself
Determining the causes of the malfunction
The whistling sound of the engine when starting is familiar to many car enthusiasts. So, most Hyundai Accent owners can remember this sound when starting the engine in winter and not only. This meant the water pump belt needed to be tightened or replaced. With the development of the automotive industry, everything has changed. The number of such belts in vehicles has increased.
It is worth determining why a whistle is heard when starting the engine. The main reason is the failure or stretching of one of the engine drive belts. To determine the malfunction, you need to test each belt for tension. Maybe one of these drive elements needs to be replaced because it has exhausted its service life or turned out to be defective in manufacturing, which is not uncommon these days.
Elimination methods
A squealing belt is perhaps the only reason why a whistle may occur when starting the engine. This means that the drive element has stretched and is slipping along the pulley. So, this significantly increases the wear of the belt itself, which will inevitably lead to tragedy in the power unit, unless, of course, the situation is corrected in time. Let's consider repair and diagnostic operations to eliminate whistling in the engine.
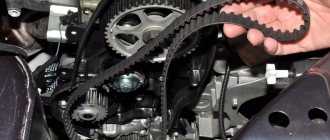
Timing drive
A whistling sound in the engine caused by a faulty timing belt is more than an urgent repair. If the part is not replaced in time, this will lead to a break in the drive, and at the same time to bent valves, which inevitably leads to costs.
The average, even the best belt should be changed no later than 50-70,000 km. Typically, car manufacturers indicate the maintenance interval for the timing belt unit in technical documentation and service books. In any case, the motorist must monitor the condition of the components and parts of the engine of his vehicle.
Step-by-step instruction
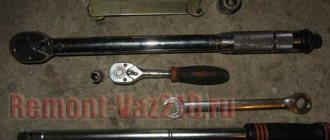
- Loosen the four bolts securing the pump pulley. Socket wrench 10.
To prevent the pump pulley from turning, engage fifth gear.
- Loosen the power steering pump. The top bolt can be unscrewed in two ways:
- open-end wrench 12 from above.
Power steering pump mount.
- head 12 through the window in the power steering pump pulley.
- We also loosen the fastening from below and move the power steering towards the cylinder block, thereby loosening the belt tension.
Power steering pump.
- We loosen the locking bolt of the generator belt tensioning mechanism and unscrew the adjusting bolt to the maximum. The key is 12. We move the generator towards the engine. Remove the drive belt.
Generator tensioning mechanism.
- Loosen the nut of the air conditioning compressor belt tension roller and unscrew the adjusting bolt. Head 14 and 12.
Air conditioner tension roller.
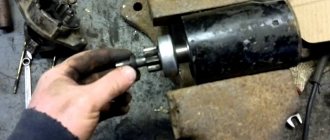
- Remove the pump pulley. Four 10mm bolts.
- We dismantle the upper protective timing cover by unscrewing the four bolts. Head for 10.
Upper timing cover.
Set top dead center (TDC)
- Rotate the crankshaft clockwise until the mark on the cylinder head matches the hole in the camshaft toothed pulley.
Important! Rotate the crankshaft only clockwise, otherwise increased force will be applied to the valve timing components.
- We block the crankshaft and unscrew the bolt of the auxiliary units pulley, also known as the crankshaft pulley.
To block the crankshaft, engage fifth gear and install a screwdriver in the ventilation hole of the front wheel brake disc below the caliper.
- Unscrew the fastening of the lower timing belt protective cover and remove it. Head for 10.
Lower timing cover.
- The marks on the crankshaft timing pulley and the oil pump must also match. If this is not the case, you can let them down by turning the brake disc without turning off fifth gear.
Crankshaft marks.
- We loosen the tension roller locking bolt and lift it up as far as possible and tighten it in this position.
- Remove the timing belt and tension roller.
Procedure for replacing Hyundai Accent engine belts
- The jack is installed under the right front wheel.
- Next, the engine crankcase protection is removed.
- Unscrew the bolts securing the water pump pulley (4 pcs.).
- Loosen the generator tension with the head by 12.
- Remove the alternator belt and install a new one in its place.
- Loosen and unscrew the bolts securing the power steering pump (the head must be inserted into the hole in the pump pulley to remove it).
- Replace the power steering belt.
- To replace the compressor belt, you must remove the wheel and wheel arch liner.
- Using the tension roller, release the tension, remove and replace the belt.
On a Hyundai Accent, the procedure for replacing engine belts can be determined from the manual. The job of replacing all belts usually takes 6 to 8 hours. There are no strict timing for replacing belts; usually such work is carried out after 60 thousand kilometers or when extraneous noise, whistling, or “rustling” appears in the systems. Also, a visual inspection will help determine the condition of the belts - there should be no cracks, stretch marks, or delaminations on the parts. If such defects are detected, the belt should be replaced.
Source
When is it necessary to replace?
Engine belts are quite durable and rarely need to be replaced. There are no clearly defined deadlines establishing the procedure for replacing belts on a Hyundai Accent - they change in the event of excessive stretching of the belt, cracks appearing on it, delamination and loosening of the surface. It is believed that it is necessary to systematically diagnose the condition of belts after a mileage of 60 thousand km. Since replacing belts is quite simple, you can purchase replacement kits in advance and always carry them with you.
Poly V-belts for the Hyundai Accent engine have a long service life and are rarely changed. More often than not, the power steering belt is the first to fail. If the power steering belt is faulty, an unpleasant chattering noise may appear under the hood. In such a situation, adjustment often helps, but if the belt is too stretched, it should be replaced. When replacing the power steering belt, you will also have to remove the alternator belt (which, in case of severe wear, can also be replaced).
Hyundai Accent generator: which one is installed, do-it-yourself replacement - AutoExpert
Service and operation
Manuals → Hyundai → Accent (Hyundai Accent)
Generator mounting elements
| 1 – adjusting bolt; 2 – generator 90 A; 3 – bolt, 20–25 N•m; 4 – bolt, 20–28 N•m; 5 – bracket; | 6 – bolt, 12–15 N•m; 7 – bolt; 8 – generator 75 A; 9 – adjusting bolt; 10 – bolt, 20–25 N•m. |
Removal
| EXECUTION ORDER |
| 1. Disconnect the cable from the negative terminal of the battery and the connectors from the radiator fan and condenser fan. |
| 2. Remove the radiator mounting bolts. |
| 3. Loosen the belt tension adjusting bolt and remove the generator mounting bolt. Raise the car. |
| 4. Disconnect the connector from the generator and the wire from the B+ terminal of the generator. |
| 5. Remove the bolt and nuts securing the generator. Raise the radiator and remove the alternator from the vehicle. |
Disassembly (75 A) Warning
Install soft protective pads on the jaws of the vice to prevent damage to the generator parts.
| EXECUTION ORDER |
| 1. Secure the generator in a vice and remove the three coupling bolts. |
| 2. Insert the blade of two flathead screwdrivers between the front cover and the stator core and remove the cover. |
| Warning Do not insert screwdrivers too deeply, as this may damage the stator winding. The rear cover may be difficult to remove due to the use of a ring that secures the outer race of the rear bearing. To make removing the back cover easier, heat it with a 200 W soldering iron. Do not use a hair dryer for heating, as this may damage the diode unit. |
| 3. Secure the rotor on the pulley side in a vice. |
| 4. Remove the pulley nut, then remove the spring washer, pulley, and spacer. |
| 5. Remove the front cover and two washers. |
| 6. Remove the rotor from the vice. |
| 7. Remove the screws securing the brush holder, rectifier and the nut securing terminal B. |
| 8. Remove the stator from the rear cover. |
| 9. Separate the oil deflector from the brush holder. |
| 10. Unsolder the three wires from the diodes and remove the stator. |
| Warning: Desoldering should take no more than 5 seconds, otherwise the rectifier diodes may be damaged. |
| 11. When separating the straightener from the brush holder, unsolder the two plates soldered to the straightener. |
Check (75 A) Rotor
| EXECUTION ORDER |
| 1. Using an ohmmeter, measure the resistance between the slip rings. If the resistance is extremely low, there is a short circuit in the rotor winding. If there is no continuity, then there is a break in the rotor winding, and the rotor must be replaced. Resistance: 3.1 ohm |
| 2. Using an ohmmeter, check the continuity between the slip ring and the rotor armature. If there is continuity, replace the rotor. |
Stator
| EXECUTION ORDER |
| 1. Using an ohmmeter, check the continuity between the stator coil wires. If there is no continuity, replace the stator. |
| 2. Use an ohmmeter to check the continuity between the stator coils. If there is continuity, replace the stator. |
Checking the rectifier unit
| EXECUTION ORDER |
| 1. Check continuity between the positive poles of the rectifier and the stator coil output terminal. The ohmmeter should show continuity in one direction only. If there is continuity in both directions, then the diode is broken and the rectifier must be replaced. |
| 2. Check continuity between the negative poles of the rectifier and the stator coil output terminal. The ohmmeter should show continuity in one direction only. If there is continuity in both directions, then the diode is broken and the rectifier must be replaced. |
| 3. Using an ohmmeter, check the continuity between the terminals of each of the three diodes. The ohmmeter should show continuity in one direction only. If there is continuity in both directions, then the diode is broken and the rectifier must be replaced. |
Part selection
For a complete replacement on a Hyundai Accent, the following belt is suitable:
| Vendor code: | Trademark: | Manufacturer country: | Width, m | Height, m | Length, m | Weight, kg |
| 6PK2137 2521225000 | Hyundai/Kia | South Korea | 0.2 | 0.025 | 0.23 | 0.245 |
Replacement belts: original poly V-belt from company 2521225000. Price 1,500 rubles.
But you can use more accessible analogues:
Belt analogue
| Manufacturer | vendor code | Prices in rubles |
| Dayco | 6PK2130 | 1500 |
| Hutchinson | 2140 K 6 | 1000 |
| Meyle | 050 006 2140 | 1000 |
| Bosch | 1 987 947 958 | 1000 |
| Finwhale | BP6PK2138 | 1100 |
| Flennor | 6PK2138 | 1200 |
| Contitech | 6PK2140 | 1200 |
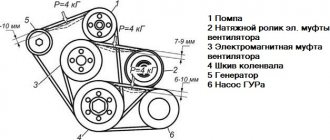
Location of belts on Hyundai Accent
1 – crankshaft pulley, 2 – tension roller, 3 – air conditioning compressor pulley, 4 – air conditioning compressor drive belt, 5 – alternator belt, 6 – power steering belt, 7 – power steering pump pulley, 8 – coolant pump pulley, 9 – generator pulley.
Compressor belt
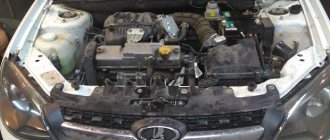
All engine belts are located under the hood. The air conditioning compressor belt runs from the crankshaft pulley to the compressor pulley. Its tension occurs due to the action of the tension roller (indicated in the photo).
Generator belt
The alternator serpentine belt grips the alternator pulley, crankshaft and water pump. This part is tensioned using a special tension mechanism that moves the generator.
Power steering belt
This V-belt grips the pump pulley and the power steering pump shaft; its tension occurs due to the movement of the power steering pump housing, which is mounted on a bracket and attached to the power unit.
Installing a new timing belt
- Before installing a new belt, be sure to check that the marks on the crankshaft and camshaft match. Install a new tension roller. We install a new timing belt in the following sequence. First, we put the camshaft pulley and tension roller on the crankshaft pulley.
We make sure that the descending branch of the belt, between the crankshaft and camshaft pulley, is tensioned.
- We release the tension roller locking bolt, thereby the tension spring will tension the belt, and tighten the bolt.
- We check all the marks again, and if they do not match, we repeat the procedure again.
- We turn the crankshaft two turns clockwise and make sure that the valves do not meet the pistons.
- We install all parts in the reverse order of removal. Everything is very simple.
Replacing drive belts on a Hyundai Accent
Replacing belts on a Hyundai Accent usually causes difficulties due to difficulty of access.
After all, there is not much space for replacing belts under the hood of the Hyundai Accent, and there are three drive belts. Air conditioning compressor poly-V belt (original number 97713-1E000), generator poly-V belt (25212-26021) and power steering V-belt (57231-29100). To understand how it all works, below we offer a diagram of the Accent drive belts. The air conditioning compressor belt runs from the crankshaft pulley to the air conditioning compressor pulley. The belt tension is provided by a special tension roller. The alternator belt rotates through the crankshaft, alternator and water pump pulleys. The tension of this belt is carried out by a tensioning mechanism that moves the generator. The power steering belt is thrown over the pump pulley and the power steering pump pulley; this belt is tensioned by moving the power steering pump housing on a special bracket that is attached to the engine. We look at the diagram of Hyundai Accent drive belts in the photo.
To replace or adjust the tension of the air conditioning belt in a Hyundai Accent, you need to remove the wheel and fender liner. Because there is no other access to this area. The tension roller, which regulates the tension, will allow you to loosen or tighten this belt. For clarity, we offer a photo. The arrow indicates the tension roller.
To remove the Accent generator belt, you need to loosen the generator tension mechanism. To do this you will need a 12mm head. The same mechanism is used to tension the belt.
But if poly-V belts for driving auxiliary units are quite durable, then the power steering belt is the first to fail. For the most part, it is he who chirps under your hood. Although the unpleasant sound can be eliminated by adjustment (by moving the power steering along the bracket from the engine), sometimes the belt is so stretched that there is simply nowhere to adjust it. Then only replacement will help. But to replace the belt we have to remove the alternator belt, without this there is no way.
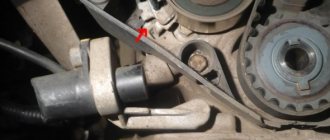
Let's say the alternator belt has already been removed. Now we need to loosen the bolt securing the power steering pump to the bracket and unscrew another one on the other side. In the next photo, the locations of the required bolts are marked with arrows.
If you can get to one bolt with almost any wrench, then the second can be unscrewed only with the head, pushing it through the hole in the power steering pump pulley.
In principle, no special devices or special tools are required when replacing Hyundai Accent belts. about replacing the Hyundai Accent timing belt here. You can read it, it will definitely come in handy.
Source