Replacing the VAZ 2107 heater motor.
Hello.
Over time, the grease in the bushings of the heater motor dries out, which causes creaking, whistling or howling. Or the stove stops blowing altogether because the windings of the stove motor are burned out. In these cases, the VAZ 2107 heater motor is replaced and how to do this, read on. I do not recommend lubricating the bushings of the heater motor because... The effect will not last long, and the procedure for removing the motor is quite lengthy. It is better to replace it immediately, so as not to climb into the same place twice. How to understand that it is the heater motor that is not working, and not a broken switch button or a blown fuse, read the article “The VAZ 2107 heater fan does not work”
Examination
To make sure that the motor is the cause of the heating system malfunction, you should carry out a simple but indicative procedure:
- Start the car;
- Turn on the first, second and third speeds of the stove alternately;
- If there are no sounds indicating the start of the fan operation, the motor has failed;
- If the fan did not turn on at speeds 1 and 2, but started working at speed 3, then the cause of the problem may be a switch or an additional resistor.
Causes of failure
The motor may not work for several reasons. Each of them requires separate consideration. Therefore, we invite you to familiarize yourself with the possible causes of fan failure in our table.
Depending on the problems encountered, you may need to replace the fan. Changing the motor is not difficult, although to do this you must have some skill or at least minimal experience in working with the electrical equipment of your car.
The first step when replacing the heater motor is to disconnect the battery.
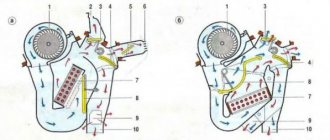
Motor location
How to remove the VAZ 2107 heater fan.
And so, let's start by removing the radio, if you have one. The next step is to remove the beard. Sequence of actions to remove it:
- We unscrew the 4 screws of the shelf, which is located at the feet on the passenger side.
- Remove the panel with the clock and cigarette lighter.
- Unscrew the two 10mm nuts.
- Unscrew the two screws screwed into the tunnel.
- We disconnect the pads from the buttons and the beard is removed.
Let me show you photos of where and what needs to be unscrewed.
Unscrew the four screws securing the shelf.
We remove the panel with the clock and the cigarette lighter by prying it with a flat screwdriver on both sides and pulling it out towards you.
Unhook all the wires from the clock panel and unscrew the two 10mm nuts.
Now at the bottom, where the buttons are located, on the side facing the rear passengers there is a plastic plug. We unscrew it with a flat screwdriver and see two screws. We unscrew them.
We disconnect the wires from the buttons and move the beard to the side, now nothing is holding it.
Here you can see the heater fan housing. To get it, you must first disconnect the side air ducts.
The stove motor is located in the lower part of the housing. To get it out, use a flat screwdriver to carefully remove the four iron brackets. Be careful when removing brackets ! They can fly away and get lost!
After removing the brackets, the stove body is simply pulled out.
The wires going to the heater motor will prevent us from completely pulling out the housing. We disconnect them.
The motor is attached to the body with two iron brackets, snap them off and you're done! You can replace the VAZ 2107 stove fan.
How to remove and replace the heater motor on VAZ-2107, 2105 and 2104
So, dear friends, today we will tell you in an accessible language how to get to the heater motor on a VAZ-2107 in order to replace it or repair it, depending on what forced you to take it out. Let us immediately note that if the heater motor on your seven began to squeal when cold, or squeal, then this will only get worse, the motors from the factory are bushed, lubrication will not lead to anything, it may return you silence for a short time, but not for long, so in this case only replacement. And ideally, replacing the heater with a bearing motor - it certainly won’t squeal. So, first we will need to remove the beard on our seven. First, we remove the gear shift knob, it will interfere with us, and we remove the radio from the shaft and disconnect the connectors. It’s different for everyone, some may not even have a radio.
First, let’s unscrew the shelf, everything is simple here, the action is in three photos:
To further remove the beard, we need to remove the panel with the clock and cigarette lighter, pry it off from the right or left side with a flat screwdriver and pull it out of the latches:
Then, we disconnect the wires from the clock, the cigarette lighter (for ease of assembly, I would advise marking them), remove the socket to the side and gain access to two nuts, here it will be convenient to use a 10 mm socket wrench
We unscrew the nuts, do not lose the washers, look down where the buttons are. There is a decorative plug on the side that looks at the rear passengers; we pry it off with a screwdriver, and under it we see two screws screwed into the tunnel:
We unscrew them, disconnect the pads from the buttons, the panel no longer holds anything. We move it to the side and gain access to the stove body:
Now, we disconnect the side air ducts and carefully remove them from the latches with a flat screwdriver (the photo shows how they snap into place):
We are interested in the lower and middle parts of the body of the stove 2107, in order to remove them you need to get close to the metal latches, there are only four of them - two on each side, here they are:
It can be problematic to snap them off with your hands, we recommend using a screwdriver, like in this picture:
After the latches are removed (be careful when removing, they may “shoot” and fly away in an unknown direction), the lower part of the stove body can be easily pulled out by hand:
Here we see our motor. The motor itself is held in the lower part of the case, also on two metal latches; we snap them off and disconnect the terminals
and remove our motor from the stove body:
That's all, assembly is carried out in the reverse order, about 40 minutes are spent on everything. By analogy, the heater motor is replaced on the VAZ-2105 and VAZ-2104, the only difference is in the beard itself and its fastenings. A little later we will tell you about the nuances of replacing the heater motor in these and other VAZ models. Good luck on the roads and don’t let your car break down. We will be glad to see you in our VAZ classics club on the forum.
How to install the heater motor in a VAZ 2107.
If you are faced with a choice: install a cheap one with bushings or a more expensive one with bearings - choose a better motor with bearings, it is a little quieter than a bushing motor and will last much longer.
Before installing a new motor, make sure that there is grease in the bushings or bearings; if there is no or little grease, then the bushings are lubricated with silicone grease, and the bearings with ordinary lithol.
Replacement and assembly are carried out in reverse assembly order.
That's all! If you have any questions, ask them in the comments.
Replacing the VAZ 2105 heater yourself
Many owners of the Five have tried and are trying to improve the heating system of their car. And not always only a complete replacement of the VAZ 2105 heater is the only correct solution. Often on a VAZ 2105, replacing the heater valve or other modifications is of great benefit. For example, you can independently seal the joints of the air exhaust hoses or redistribute the air flows, but still, this does not provide much efficiency.
Main malfunctions of the VAZ-2105 heating system
Let's consider the main reasons that cause the inoperability or decrease in the efficiency of the “five” heating system:
- Often the cause of deterioration in interior heating is a decrease in the level of antifreeze in the cooling system. If the car has been in use for a long time, this phenomenon can be considered quite natural, but if the level drops sharply, it is necessary to look for the reasons. If a leak is detected, it should be eliminated, coolant should be added and the air lock should be eliminated by pushing through the hoses with the power unit running;
- a malfunction of the thermostat, which is responsible for the possibility of coolant circulation through a large or small circuit, can also cause the inability to reach the required temperature regime, as well as a breakdown of the heater tap;
- A common cause of poor heating efficiency is a clogged stove radiator. The fault can be localized by touch while the power unit is running: in the place where the radiator honeycombs are heavily clogged, there will be a noticeable temperature difference;
- Finally, problems may arise due to the heater fan not working or not working at full strength.
Replacing the heater valve VAZ 2105
Heater valve VAZ 2105
Replacing the heater tap with a VAZ 2105 and other improvements are aimed only at maximizing the operation of the stove. As mentioned above, this replacement is carried out due to the improvement and modernization of the operation of the stove (a ceramic version can be installed) or if the old tap begins to leak. A leaking faucet can cause a lot of trouble for a car owner. Therefore, eliminating the leak will be the only correct solution, and this can only be done by replacing the tap.
Advice. We purchase a heater stove faucet in a store, preferably with two pipes. It is worth noting that the choice of cranes today is huge. Still, experts and experienced drivers advise buying a ceramic faucet. It has better equipment than the regular one. There are a lot of details in it.
- Rubber rings.
- Fastening nuts.
- Washers.
- Aluminium case.
- Ceramic filling and much more.
Ceramic faucets last much longer than regular metal ones. They practically do not stick like regular ones. We begin the replacement, armed with a jack, spanners and wrenches, sockets and an extension cord. We lift the car onto the inspection hole, which will greatly facilitate the work process. Let's get started:
- take some container and place it under the engine;
- unscrew the plug on the block and then drain the coolant;
- after this we remove the container, but not far, since it will still be needed;
- we find the pipes that go from the engine to the heater tap;
Pipes going from the engine to the tap
- loosen the pipe clamps;
- take a metal brush and clean the threaded connections of the two studs.
Advice. To avoid problems with loosening the nuts, it is recommended to moisten the connections with brake fluid. After all, studs are not ordinary bolts, but parts whose heads are buried in the plastic body of the faucet. The fastening nuts on the caps are self-locking and have plastic rings that are difficult to unscrew. Well, if you add corrosion to this, then everything becomes clear.
- remove the pipes while the threaded connections are acidifying (remember that you need to place a container under the pipes, since liquid flows from there);
- go to the salon;
- remove the side panel of the torpedo;
- then we find the pipe clamps;
- take a socket wrench with a cardan and unscrew the clamps;
- remove the pipes and replace them with new ones;
- after removing all the pipes, we climb under the car again;
- we find the nuts securing the heater valve;
- use a 10mm wrench to unscrew them;
- we return to the salon;
- pull the tap towards you;
- remove the spring clip;
- disconnect the control cable from the crane;
- install a new heater tap, first connecting the cable and attaching the tap to the body.
That's all! A new heater valve has been installed. The rest of the assembly is carried out in reverse order.
Repair and replacement of the VAZ 2105 stove
As a rule, restoring the functionality of the heating system of a VAZ classic is possible on your own - these models have been produced for over 40 years and have been studied quite well. Let's look at how to fix the main problems with the "five" stove with your own hands.
Thermostat repair and replacement
On the VAZ 2101-2107 family of models, the thermostat is a valve that regulates the way antifreeze circulates through the cooling system: in a large circle, including the radiator and the heating system circuit, or in a small circle. The valve operates when the coolant temperature at its inlet reaches 80-85 degrees. At this moment, it opens, passing the heated liquid into an additional circuit that serves to heat the interior. If for any reason the temperature of the antifreeze drops below the operating value, the valve is activated to close the large circuit. Common thermostat malfunctions:
- the valve opens partially or does not operate at all, which can cause the power unit to overheat;
- The thermostat valve does not close - this leads to very slow engine warm-up.
To check the operation of the unit, you should check the response temperature of the thermostat, as well as the stroke of the valve stem, but this requires special equipment. An easier way to verify that the device is faulty is to feel the thermostat while the engine is running.
If the thermostat is working properly, the lower radiator tank should heat up gradually after starting the power unit, until the arrow on the coolant temperature indicator reaches values close to the red zone (antifreeze heats up to 80-85 degrees). If heating occurs immediately after starting the engine, the thermostat does not close. If the engine quickly overheats, this indicates that the valve is sticking, that is, it does not open completely. In both cases, the thermostat must be replaced. It is carried out in the following order:
- drain the antifreeze from the system;
- loosen the clamp on the inlet pipe and the pipe going to the car radiator, disconnect both pipes;
- We perform a similar operation with respect to the pump pipes, after which the thermostat can be pulled towards you and the remaining pipes can be disconnected;
- You can try to restore the functionality of the thermostat by lowering it into a pan of boiling water for 5-10 minutes, then abruptly cool it by placing it in cold water. It is necessary to repeat the operation several more times. In some cases, this helps - the valve begins to operate. If such repairs do not help, you will have to fork out for a new thermostat;
- Installation in the original place is carried out in the reverse order; if necessary, replace unusable clamps with new ones.
Repair and replacement of VAZ-2105 faucet
If the tap does not work, you can try turning it by hand. If this does not help, or if the faucet is found to be leaking, it must be replaced with a new one. Currently, improved heater taps made of ceramics are available for sale. They are much more durable than metal ones, since they practically do not stick, do not sour, and do not rust even after the car has not been used for a long time. To replace the heater tap, removing the VAZ 2105 heater is not required, and the procedure itself is performed in the following sequence:
- place a pre-prepared container under the drain hole on the engine;
- unscrew the drain plug located on the power unit block and wait until all the antifreeze has drained, set the dishes with coolant aside;
- we are looking for pipes going from the “five” engine to the heater tap;
- loosen the clamps of the indicated pipes;
- using a stiff metal brush, carefully clean the threaded connections of the faucet mounting studs, moistening them with brake fluid (the operation should be carried out carefully, since a stud differs from a bolt in that its second end is fixed in the faucet body;
- We install our container under the faucet, since when removed, a small amount of antifreeze will spill out under the pipe;
- While the threaded connections moistened with brake fluid are acidifying, disconnect all pipes from the faucet;
- the next step is to remove the side panel of the dashboard from inside the car;
- access to the faucet will open from the side of the stove - we find the pipes, unscrew the clamps with a socket wrench, dismantle them (if the condition of the pipes is not trustworthy, replace them with new ones);
- go to the bottom of the engine compartment, use a 10mm wrench to unscrew the self-locking nuts holding the heater tap;
- again we go to the salon, since you can only pull out the faucet from the inside;
- by pulling the stove valve towards you, disconnect the lock together with the drive cable;
- If the repair of the faucet is not successful according to the algorithm described above, we install a new one, and all assembly operations are performed in the reverse order.
Repair and replacement of the fan and radiator of the VAAZ 2105 stove
A clogged heater radiator is usually flushed using a special liquid, but this does not always help. In addition, this method is only suitable for cleaning the inside of radiator honeycombs, and to perform the same operation with the outside, the radiator will have to be removed. However, as in the case of detecting radiator leaks. If the radiator is dismantled, the cooling system of the “five” will also need to be flushed, otherwise there is a risk that flushing will only have a short-term effect.
Unlike the heaters installed on most modern car models, in order to change the radiator of a classic car, it is not at all necessary to know how to remove the heater of the VAZ 2105 and the predecessors of the “five”. To do this, it is enough to prepare a container for draining the coolant, a standard set of tools, and purchase new clamps and gaskets for the stove faucet. The replacement itself is carried out in the following order:
- put the car on a pit (overpass, blocks);
- drain the antifreeze from the system;
- loosen the clamps of the radiator inlet/outlet pipes in the engine compartment (even if the OE has been drained, some liquid may remain in the radiator - be prepared for this);
- we dismantle the seal of the pipes, which is attached to the body partition between the passenger compartment and the engine compartment using two self-tapping screws - they need to be unscrewed;
- we move into the interior, remove the protective casing of the stove fan;
- disconnect the electric fan rod;
- We remove the radiator, making sure that no remaining antifreeze spills out of the seats for the pipes (it is recommended to cover the floor of the cabin in the area of the stove with a sufficient amount of rags).
If you plan to install an old radiator, it is recommended to perform a leak test after flushing it. The check is quite simple: close the inlet hole tightly, connect the outlet of the compressor unit to the outlet. We turn on the compressor and lower the radiator into a container of water. The presence of air bubbles will indicate where the device is sealed.
If we talk about fan malfunctions, it should be noted that repairing the VAZ 2105 interior heater often involves installing a more powerful fan. The “five” is equipped with an electric power drive, powered by a current of 4.6 A and allowing the impeller to spin up to 3 thousand revolutions/minute. On the VAZ 2107, the motor is much more powerful - it runs on a current of 14 A, spinning the shaft up to 4100 rpm. True, it is slightly different in size from the quintuple fan, so when installing it you will need to trim the motor in some places. A good option would be to install a five-blade fan installed on a classic – its motor is both lighter and much more powerful. Algorithm for removing the VAZ 2105 heater fan:
- remove the negative terminal of the battery;
- set the heater lever to the right all the way, blocking the side dampers of the air ducts;
- dismantle the dashboard, glove box and audio system panel;
- disconnect the terminal coming from the handle for switching the operating modes of the electric fan motor;
- From the engine compartment side, unscrew the nut with a size 7 wrench, which secures the drive of the heating system control levers. We disconnect the rod by removing it from the lever axis;
- unscrew the nut securing the protective plastic fan casing, on the same stud we see the ground wire terminal - remove it too;
- disconnect the air ducts (unscrew the corresponding nuts and press out the holders with the tip of a flat screwdriver);
- Use a screwdriver to pry out the fasteners of the fan casing and remove the protection;
- In the fan housing there is a hole for supplying electrical wiring, closed with a plug - remove it and push the harness inside. From the additional resistor, which serves to change the speed of rotation of the impeller, we disconnect the red wires;
- Now you can proceed directly to dismantling the fan, for which we disconnect the casings;
- using a screwdriver, remove the locking bracket that holds the impeller on the shaft;
- We also remove the adjusting washers located on the same shaft (there may be one or two of them);
- We disconnect the fan mounting brackets and remove it from its regular place along with the rubber cushions.
Assembly is carried out in reverse order. If we install a V8 fan, it is recommended to replace the additional resistor - in this case, the fan will operate almost silently.
Heater repair and replacement
The question of how to disassemble the stove on a VAZ 2105 often arises due to the occurrence of many other malfunctions of the heating system. The sequence of actions is almost the same as when dismantling the fan. Installation of a repaired or new heater is carried out in the reverse order, with special attention should be paid to installing the sealing gasket - the efficiency of heating the interior will depend on the quality of this operation, even if all components of the heating system are in good condition. The gasket is installed between the stove radiator casing and the “five” body. Before connecting the stove to the VAZ 2105, it is necessary to adjust the control of the stove.
As you can see, dismantling, repairing and replacing most components of the VAZ classic heater can be done independently, without resorting to the services of service centers and service stations, where prices are high. We hope that the step-by-step instructions on how to change the stove on a VAZ 2105, or its individual components, will be useful and informative for you.
Radiator and heater fan
You should know that in order to always keep the interior of a five-wheeler warm and cozy, especially on winter days, you need to be able to increase the amount of heat supplied. Which part is directly responsible for supplying warm air? Of course, the radiator. But there is a problem - at the top five the fan is so loud that it makes you laugh. It is very small and simply not capable of creating the required flow. What to do? First, let's compare the fans on the VAZ 2105 and the VAZ 2108. The first motor consumes 4.5 A current and has a rotation speed of 3000 rpm, and the second one 14 A, but spins 4100 rpm. This already says something. It is recommended to replace the fan with another one.
Replacing the heater fan VAZ 2105
Replacing the heater fan on a VAZ 2105 is carried out as follows:
- the lower part of the stove is removed (this is a simple casing, on top of which a regular electric fan is installed);
- the old fan is removed;
- we cut off one of the aerodynamic ridges that supply air to the legs of the driver and passenger (this is done due to the fact that the fan motor of the VAZ 2108 is much longer);
- the impeller is also removed, which will not allow the fan from the VAZ 2108 to sit in place;
- Instead, a homemade one is installed.
Advice. In order not to remove the impeller, but to leave everything as is, you can use another fan. A standard five-bladed fan for classics, which has a motor several times more powerful, is suitable. And its weight is much lighter, and the rotor of the new motor rotates stronger than even that of the VAZ 2108.
- increase the diameter of the impeller hole;
- we insert a new shaft there (we do this very carefully so as not to break the impeller);
- connect the fan and check its operation;
- adjust the resistor and assemble everything in reverse order.
Heater VAZ 2105 fan replacement
Advice. It is recommended to replace the resistor on the five by installing the eight version. The new resistor must ensure quiet operation of the fan. The fan switch should also be replaced.
Replacing the heater VAZ 2105
Replacing the heater VAZ 2105
What does the stove consist of?
Before you start replacing, it is useful to familiarize yourself with the design of the VAZ 2105 stove. It consists of:
- control lever bracket;
- internal ventilation air ducts;
- special control lever handles;
- air ducts for heating side windows;
- from flexible rods;
- from a clamp;
- rubber hoses;
- tap;
- pipe seal;
- air duct damper;
- air distribution cover.
Removal and installation
If you decide to completely replace the stove, then this is done as follows:
- the ground wire is disconnected from the battery;
- the instrument panel and receiver panel are removed;
- the heater valve control lever is moved all the way to the right;
- Coolant is drained from the heating system;
- the clamps are loosened;
- the rubber hoses are disconnected from the heater pipes (they control the supply and removal of fluid);
- the seal is removed (it is recommended to watch a detailed video before removing);
- two bolts securing the bracket are turned out (they are located inside the engine compartments);
- the bolts of the fastening brackets are loosened;
- the rods are disconnected and the bracket is removed;
- the nozzles are removed on the left and right;
- nut fixing the right air duct for heating the side windows;
- the left air duct is removed in the same way;
- we find four spring-type holders and remove them;
- remove the heater fan casing assembly;
- loosen the radiator casing nuts;
- the ground wire is disconnected and the casing is removed;
- the air duct is removed;
- the old heater is removed;
- The new heater is installed in the reverse order (photo below).
New heater for VAZ 2105
Advice. When installing the heater, pay attention to the installation of the sealing gasket. It is located between the car body and the radiator casing. Also, the heater control should be adjusted during installation.
You can do a lot with your own hands in a way that no specialist can do. The step-by-step instructions given above will help novice motorists do everything on their own. In addition, you can save a lot of money, because the price for these services is high today.
VAZ stove fan squeals
Owners of classic Zhiguli cars know that when the heater is turned on, it can make a heart-rending squeal. This sound is produced by a fan whose rotor is distorted in the bushings. What can be done?
In old fans that were installed on “sixes”, “fives”, “sevens” and other classic “Zhiguli” vehicles, the rotor is mounted in bushings. This is not the best solution and leads to the fact that over time the bushings break and the rotor begins to jam during operation. Later, new fans began to be installed on the “classics”, which had bearings instead of bushings. Such fans are quieter and blow better.
This is done by lubricating the rotor. To do this, you need to get to the fan. How to disassemble the stove on a classic is described using the example of a “six”, in the article how to flush the heater radiator on a VAZ-2106. When the heater halves are disconnected, you need to disconnect the battery (to prevent the fan from suddenly starting for any reason) and unscrew the nut that secures the impeller to the heater fan motor. There is no need to remove the fan itself.
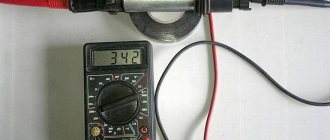
We remove the impeller, remove the felt washers from the shaft and carefully spray the shaft where it enters the engine housing with an aerosol lubricant, such as WD-40 or Unisma. The goal is to force the lubricant inside. Aerosol lubricant is penetrating, meaning it easily passes through cracks, so a few presses on the sprayer are enough. The lubricant will flow along the rotor shaft and lubricate the bushings.
You can check whether the lubricant is useful right away. Install the washers and impeller on the shaft, tighten the fastening nut, connect the battery and press the heater fan switch on first at low speed and then at high speed. If the squealing persists, repeat the lubrication procedure. Ideally, the squealing should disappear completely.
This repair is very dubious, from the category of “done on the knee”. However, fans lubricated in this way operate without squealing for more than a year. In conditions where it is not possible to install a new fan, this is a good solution.
To remove the electric motor we will need: a screwdriver and a 14mm wrench. If everything is there, then we will begin the repair.
The first step is to remove the lower console; to do this, unscrew the two screws that secure the lower part to the car body.
Remove the storage shelf located under the dashboard. The shelf is secured with four screws.
After removing the shelf, unscrew the screw securing the console to the front of the body.
Next, remove the additional instrument panel from the console and unscrew the two screws securing the console.
Remove the console while holding the additional panel with your hand.
Remove the air duct by unscrewing the two screws securing it.
Disconnect the four radiator and fan shroud holders and, moving slightly to the side as far as the wires allow, disconnect the fan shroud.
Remove the fan motor switch from the instrument panel, disconnect the wires going to the electric motor from it, and label them before disconnecting them. Next, push the wires into the switch hole.
Now we need to remove the fan impeller casing and disconnect the wires from the resistor.
Unscrew the nut located on the right under the instrument panel where the casing is attached to the car body and remove the ground wire.
Now you can remove the fan motor cover from the car.
Sources
- https://russia-avto.ru/remont/salon/vizzhit-ventilyator-pechki-vaz
- https://vz06-up.ru/otp/ventilyator-pechki-vaz-2106.html
mooncat › Blog › Replacing the heater valve and heater fan VAZ-2104/2107
Over the past months, quite a lot of manipulations have been carried out with the car; there was no time to sit down and write. Now I’ve decided that I need to start airborne at some point.
You probably can’t be called a full-fledged owner of a Lada if you haven’t changed the heater faucet and fan :))))
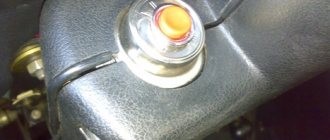
At the time of buying the car, it was scary to turn the heater fan on to second speed - there was a grinding and crackling sound, but at low speed it was tolerable. The stove valve did not close because the cable was removed. The cables were all hanging loose, that is, nothing was adjustable. The photo shows that the fasteners of the cable sheaths were unscrewed (this was the case when the panel was removed, I had not unscrewed anything yet) and therefore the cables moved entirely together with the braid.
I decided to start by restoring everything - tightening it as it should and checking that now everything moves, opens and closes. And although the thought crept into my head that, taking into account the fact that the heater valve was still original, it would be better not to move it, but it was too late. The very first trip after 10 minutes showed the correctness of that idea. Something gurgled on the right, and then antifreeze poured onto the shelf on the right, and the windows began to fog up, but I got to the “spare parts”. The faucets on sale are ball, ceramic, and standard (which leak). Of course, I didn’t buy a regular one, but there was a debate about the difference between a ball and a ceramic one and which one is better, although I read it, but I couldn’t find out which one was better, so I took the one that I liked best in appearance, it was in the original packaging and was cheaper - the ball one ( rubber gaskets included). The only thing missing is a bolt for fixing the control cable, while the bolt from the standard faucet does not fit - the diameter is different. It’s good that the box with various fasteners contained the required bolt.
Then I thought that going back and continuing to pour antifreeze into the cabin was not entirely right, so I bought a plastic tube of a suitable diameter, took off the heater hoses in the engine compartment in half (fuck them tape clamps!) and connected them directly through this tube, and that’s how I got there .
I pulled into a warm parking lot and spent half an hour using a rag to blot and squeeze out the antifreeze that had spilled on the carpet into a bucket. Well, then the replacement - I removed the shelf, took out the glove compartment, the air duct... I tore it out along with the damper (I didn’t have a manual at hand), unscrewed the cable, removed the tap. Nothing came out of the radiator anymore. To read these two lines quickly, otherwise, in an unnatural position lying on the threshold in the open door, it took a little longer. Here in the photo the crane is still old:
When I took everything off, I thought, why couldn’t I have installed a faucet in the engine compartment? Well, a little further there. But this is how all cars do it! If a faucet leaks, then antifreeze will flow not into the cabin, but onto the road, and it would be easier to change, although I think this question is asked by everyone who has at least once changed this faucet.
Well, now the assembly. I screwed a short tube to the new faucet, stuck it into the engine compartment, attached the faucet, and now I need to get the bolts into the holes, and the faucet itself prevents the top ones from getting where they need to go. That is, you need to somehow hold it, use your other hand to reach it by looking through the glove compartment or by touch.
Then I thought, why not make hairpins there? I put a faucet on them and tightened them with nuts, simple and convenient. Well, or the mounting bolts on that side... but no, there are holes there, you need to get into them.
Well, okay, I hit the top bolt, tightened it, inserted the bottom one, fortunately it’s in plain sight, it’s easy to hit there, but why doesn’t it tighten? And it doesn’t tighten because the caged square nut, which is on that side, fucking falls out and falls down onto the fan casing when you unscrew the bolt when removing the faucet!
Many warm words were said about the design and its Italian designers. I didn’t want to scold Soviet designers out of patriotism.
I unsnap the two latches on the side of the faucet, push the halves of the heater housing as far apart as possible and look for the nut with my finger, I found it! Now you need to contrive to insert the nut into place through the narrow gap, tighten it with something so that it does not fall out, and then insert the bolt and tighten it. Let me say this, the nut fell out 3 more times, but I finally got it done! The manual advises, in my opinion, to coat it with plasticine and stick it there. But I wasn’t ready for this; I don’t take plasticine with me. Well, then assembly in reverse order. And now I’m already driving and adjusting the temperature not by opening the window, but by using the temperature control knob! Convenient as hell!
**************** Once you've made a faucet, you need to make a fan. I read the Internet and realized that it is best to buy a fan assembled with an impeller, always with bearings, and it is better if it is LUZAR Lfh0101. I’ll say right away that I didn’t want to improve the design, tuning, or replacing the fan on the “eighth”, although I found and read all this on the Internet. I just want to assemble a normally standard structure.
So we start by removing the “seventh beard”, everything is simple and described everywhere - remove the shelf on the right, then take out the panel with the clock, unscrew the nuts on top, the screws on the bottom and pull it out. Next you need to unclip the air ducts (here I am already a scientist and I snapped them correctly, without tearing them out along with the dampers), disconnect the damper adjustment cable, then unclip the 4 latches and the lower part of the heater can be removed. Oh, no, the ground wire from the motor is in the way, it needs to be disconnected. And it is connected somewhere far in the depths behind the central air duct. To unscrew the mass, you need to feel for this nut with your hand along the wire, then insert the 10-point socket there, remove the nut, and it is better to unscrew it by hand. Because the long pipe with the head feels inconvenient to work with - it comes off. By the way, it’s also inconvenient to climb with your hand, it’s cramped there, there are some pieces of iron sticking out all around, but after scratching my hand and bleeding, I finally unscrewed this nut. Apparently there was no closer connection point for the mass.
Many warm words were said about the design and its Italian designers. I didn’t want to scold Soviet designers out of patriotism.
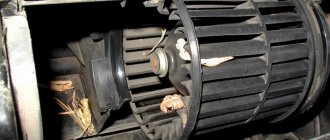
And now the casing along with the fan is removed
and I hold it in my hands. The reason for the cracking is immediately clear - the impeller is touching the casing; in the photo at the top there are traces of this touching.
I take out the fan, for some reason its seat is oval and therefore the motor warps and begins to touch the casing. I turned the impeller with my hand and a squeal was heard, although it did not occur when the fan was running at first speed. But in any case, the need for replacement is obvious.
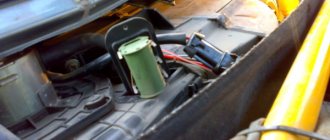
The new fan, installed in its place, also began to touch the casing with the impeller! Well, let’s slip in a piece of paper, the warranty card is just right for this.
Now the fan stands level, the impeller is clearly in the center and does not touch anything. Now we connect the wires to the resistor. Oh my, what kind of design is this - all the wires hang freely and can easily fall out, they can be pinched by the bottom flap, a strange solution. Well, would they at least make some kind of eyelet or clamp there? In general, I improved the arrangement of the wires to the best of my ability - I tied them together with a tie. The casing from the Luzar had to be cut so that the red wire could reach the resistor without bending the rest.
Then assemble in reverse order. Before installing the beard, try turning it on and... it doesn’t work! Oh your mother, I didn’t connect the mass! Then I remembered the designers again, looked at my scratched hand and, what should I do, I reached into the bowels of my hand to screw it on, screwed it on, the fan started working, the crackling and squealing disappeared, well, great, all that remained was to assemble it.
Faucet - 270 rubles, fan motor - 650 rubles. Work is priceless :)))
Replacing the VAZ 2107 stove fan with your own hands
Owners of a VAZ 2107 should know how to replace a stove fan with their own hands, because often problems arising in this unit lead to the loss of functionality of the heating system. We will tell you how to remove a non-working fan and perform repairs, and also show the sequence of actions in the video.
If you know how to handle the tool and understand the procedure, you can perform such repairs yourself. To ensure that you can replace the fan of the VAZ 2107 stove with your own hands correctly, we recommend that you familiarize yourself with the layout diagram of the device. This is necessary in order not to disrupt the switching structure.
Work order
Before starting work, you need to fully read the instructions on how to repair the device. A complete understanding of the process will allow you to act more confidently. The technician must first understand how to remove the fan. First you need to prepare the car for work: remove the gear shift lever, remove the radio and all the blocks with wires. Now you can start working:
- To gain access to the device, carefully remove several parts. First you need to remove the shelf on the passenger side, it is secured with 4 bolts.
Now you need to remove the panel with the cigarette lighter, it is removed with a screwdriver, you need to pry the corners one by one until it clicks.
Then you need to dismantle the console with the buttons; it can be easily lifted with a screwdriver and moved upward. This makes the two fasteners located underneath accessible; they need to be removed. Now the part is completely free, it can be removed and put aside.
- Also, access to the motor cooler is blocked by air ducts; to dismantle them, you need to pry off the plastic latches with a screwdriver. But you need to understand that the fasteners are made of fragile plastic and must be bent carefully. Access to the bottom of the heater is now open. There are four latches on the stove - two on each side. You can bend them with your fingers or a screwdriver, but be careful - the latches spring strongly and fly off far away.
- Now access to the required unit is open, and you can begin to remove the VAZ 2107 heater fan. The electric motor and cooler are secured with two steel latches, one on top, the other on bottom.
You can bend them with a screwdriver with a thin and long tip. The dismantled unit is removed and a new device is installed in its place. - Now you can perform assembly in the reverse order of disassembly.
You can also see the procedure for replacing the stove fan on a VAZ 2107 in this video: