I bring to your attention an article on repairing a 5-speed gearbox of a new type (the so-called “torn package”) Some of the photos of the process will be repeated, please do not kick too much, the photos were mainly taken during assembly, since the gearbox and parts were washed, and the camera remained clean: ). What additional tool will be required? A retainer for the input shaft (I made it from an old clutch disc hub), a high 30" socket for loosening the output shaft nut, a pair of powerful screwdrivers, a circlip remover, an impact screwdriver with a hammer and, ideally, a torque wrench.
It’s unlikely that anyone will have a special stand at hand for repairing a gearbox; in principle, you can sort it out on a table, or you can also carefully clamp it in a vice. So, we drain the oil from the gearbox, remove the gearbox from the car, remove the elastic coupling, the rear gearbox mount along with the yoke and remove the clutch fork with boot and release plate. We thoroughly clean the gearbox from dirt using a metal brush, a suitable tool such as a screwdriver, and ideally blow it out with a compressor.
Even though the oil has been drained, there is still some oil left in the gearbox, so we take this fact into account when disassembling. Remove the lower gearbox cover.
We remove the rubber boot of the coupling from the secondary shaft, the stopper from the secondary shaft, using a suitable drift we knock out the centering sleeve of the coupling. If you cannot “pick up” the sleeve, then unscrew the secondary shaft nut as much as possible and screw it back. At the same time, the bushing will almost come off its place. We engage any gear, fix the input shaft, and unscrew the secondary shaft nut to “30”. Remove the conical spring washer.
If you don’t have a primary shaft lock at hand, you can use an aluminum spoon by inserting its handle between the gears of the primary and intermediate shafts. Don't be afraid for the gears, the luminaire won't harm them. Remove the flexible coupling flange.
Turn off the reverse light switch. Be careful not to lose the copper sealing washer.
Unscrew the nut and remove the speedometer drive
We engage second gear and remove the gear shift lever housing by unscrewing the three nuts along the outer radius.
Unscrew the two nuts securing the trouser bracket to the gearbox
We remove the bracket and take out the mounting bolt with a square head located under it.
Unscrew the five nuts securing the rear cover on the outside and one on the inside.
We remove the back cover, sometimes you have to tap it lightly with a hammer. The bearings may become separated, part of the bearing remains on the shaft, part in the back cover, no problem.
Remove the inner bearing race (hereinafter referred to as P) from the secondary shaft, then remove the speedometer drive gear. AHTUNG! There is a small ball under the drive gear, don't lose it!
We remove the oil deflector washer. We inspect it; there was a case when the washer came off the bushing.
Using a screwdriver, set the 1-2 gear shift rod to the neutral position. We fix the input shaft and use the “17” head to remove the bolt securing the gear block. Then it will move by hand, but do not unscrew it yet.
Now you need to remove the clutch cover (aka bell). We unscrew one nut to “13” and six nuts to “17”.
We remove it and put it aside. A spring cone washer remains on the input shaft or in the bell. We inspect it for wear and cracks. Sometimes, instead of a cone washer, there may be a thick ring.
Holding the input shaft with the clamp, unscrew the front bolt of the intermediate shaft (hereinafter referred to as the washout) with the head set to “19”.
We unscrew the two bolts of the plate that holds the springs of the gear shift rod clamps.
Under the plate there are three springs, two of the same length (for the 1-2 and 3-4 gear rods) and one longer (for the 5th gear and reverse rod). We take out the springs.
There are three balls under the springs; they are in oil and do not fall out on their own, but still keep an eye on them during further disassembly.
Now unscrew the gear block bolt and remove it. Now we take out the gear block. Move backwards and sideways. The 5th gear gears move back a little.
A spacer ring is installed between the gear block and the rear shaft shaft. It sometimes sticks to the gear block and falls off at the most inopportune moment.
We remove the 5th gear assembly from the secondary shaft with the 5th gear shift rod, the Z.H. gear, and the clutch.
Remove the spacer ring.
Using a suitable thin object, push the retainer ball out of the socket. I use a tube from VD 40, it is flexible.
Now, using pliers, we open the retaining ring of the 5th gear synchronizer clutch hub and remove it.
Remove the hub from the secondary shaft of the gearbox.
Remove the spring washer. It faces the Z.H. gear.
Removing the reverse gear
Now you need to remove the wash shaft. To do this, you need to remove the front bearing. Sometimes it is enough to catch the locking ring with screwdrivers and the P. will come out.
Sometimes it doesn’t want to come off, then you have to screw the bolt a few turns into the groove and, creating a stop with a screwdriver, lightly tap the bolt with a hammer and move the bearing out of place. Sometimes the bearing is disassembled, no big deal, it can be reassembled.
Now we remove the rear P. shaft by pushing it out of the housing with a screwdriver.
We unscrew the bolt securing the 3-4 gear fork to the 3-4 gear shift rod with the head set to “10”.
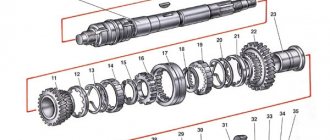
Primary shaft of the VAZ 2107 gearbox
In total, the design of the “seven” gearbox has three shafts:
- primary;
- secondary;
- intermediate (through which the first two shafts interact).
However, the leading role is assigned to the primary one, since it is through it that the interaction of all the gears in the machine on other shafts begins.
The input shaft of the VAZ 2107 gearbox is manufactured together with a constant mesh gear. This element has oblique splines, which allows it to cling to the shaft teeth as clearly as possible. In addition, in addition to four gears, a synchronizer is also installed on the shaft, which allows the shaft to move simultaneously with the helical gear.
There are splines on the front of the product - it is on them that the clutch disc is located. To allow the input shaft to rotate easily, it is equipped with two roller bearings:
- front - at the end of the crankshaft;
- rear - in the front wall of the gearbox housing.
The input shaft of the VAZ 2107 has strictly verified dimensions:
- total length of the cylinder - 160 mm;
- shaft length to spline disk - 87 mm;
- diameter - 25 mm.
Gear ratios at the gearbox
The seventh model of the Zhiguli received a good version of a five-speed gearbox. The designers of the Volzhsky Automobile Plant took a box from a VAZ 2105 as a prototype, replaced the gear ratio of the main gearbox pair from 4.3 to 4.1, then to 3.9 and obtained the following gear ratios.
| home | 1st gear | 2nd gear | 3rd gear | 4th gear | 5th gear | Reverse |
| 4,1/3,9 | 3,667 | 2,100 | 1,361 | 1,000 | 0,820 | 3,530 |
The gear ratio is the ratio of the number of teeth on the driven gear to the number of teeth on the drive gear.
Primary shaft
The input shaft transmits torque from the engine crankshaft through the clutch disc to the gearbox. The disc is located on the splines of the front part of the shaft. A constant mesh gear is rigidly mounted on the shaft.
For free rotation, it is placed in two bearings. One bearing is located at the end of the crankshaft, the other is in the front cover of the gearbox.
Secondary shaft
In a complex gearbox mechanism, the secondary shaft is the final stage in converting torque and transmitting it to the cardan. The gears of the first three speeds move freely on this shaft. At a certain gear, they engage with the intermediate shaft gears and provide the required torque.
The shaft is placed in bearings, there are three of them. One is pressed into the end of the input shaft, the other into the box body, and the third into the rear cover.
Intermediate shaft
The intermediate shaft transmits rotation from the primary shaft to the secondary shaft.
He plays the role of a satellite. The gears and shaft are made from a single piece. It is installed on three bearings. The gears for fifth and reverse speed are located on it.
Forks
In the process of switching speeds, forks are involved, which move gears along the shaft to a certain place.
The gear shift lever moves the forks.
How to remove the input shaft from the box
The gearbox must be installed on a flat surface so that nothing prevents its disassembly. Before starting work, it is important to clean the housing from dirt and liquid leaks so that debris does not accidentally get inside the housing.
To work you will need standard tools:
- set of wrenches;
- flat screwdriver;
- a thick bolt or a screwdriver with a powerful blade.
You need to pull the input shaft out of the gearbox strictly according to the regulations:
- Pull the oil level indicator out of the box body.
- Remove the bolt with flat washer and two nuts that hold the clutch cable bracket. Remove the cable mechanism from the gearbox.
- Unscrew the four bolts from the box cover and remove the cover.
- Unscrew the bolt with spring washer that secures one part of the input shaft.
- Before you start working with the input shaft, you will need to prevent the shafts from spinning among themselves. To do this, they need to be fixed: for example, insert a thick screwdriver between the teeth.
- Unlock the input shaft securing nut. It is very firmly planted and can take a long time to remove.
- After this, carefully pull the shaft out of the gearbox housing.
Photo gallery: main stages of work
Even after unscrewing the bolts, the cover will fit tightly to the body, so effort will be required to remove it. The most difficult stage of work is when you have to unscrew this nut. The input shaft must be pulled out of the box very carefully so as not to damage both the shaft itself and adjacent elements.
For further work It will be necessary to wipe all the mechanisms in order to be able to carry out troubleshooting.
Accordingly, installation of the input shaft into the gearbox is carried out in the reverse order of removal.
Rejecting the input shaft
When the car and gearbox are operating normally, the driver, as a rule, does not have any suspicions about the exhaustion of the shaft and its elements. However, if the car starts to “strange things”, for example, the gear does not work or the speed starts to switch on in an arbitrary order, then you need to make sure that the box and, in particular, the input shaft are working.
Rejection is carried out with the gearbox removed, since only in this way can you carefully examine all the shaft parts and determine their suitability for further use.
The correct culling procedure is carried out according to the following scheme:
- Visual inspection of the input shaft for abrasions and deformations.
- General condition of the retaining rings and locking ring springs.
- Wear of splines.
- Scuffs and burrs on gears.
That is, a routine inspection of the mechanism allows you to determine the degree of wear of each element and, if necessary, replace them. It is important that the gears and the splined part of the input shaft do not have even the slightest damage, otherwise new parts will have to be installed.
Main shaft bearing
The “Seven” gearbox has amazing “survivability”: for example, the gearbox can “survive” one or even two engine overhauls, after which the car owner will have to repair it. However, there are a lot of small parts in the design of the box, which, unfortunately, cannot boast of their service life. Most often, the driver has to slightly modernize the gearbox design by replacing the bearings.
Open type metal bearings with the following characteristics are mounted on the input shaft of the VAZ 2107 gearbox:
- manufacturer - VPZ 23 Vologda;
- article - 2107–1701033/2101–1701068;
- length - 120 mm;
- width - 95 mm;
- height - 95 mm.
The main function of the input shaft bearing is to act as a rolling support, that is, to allow the shaft to move easily along its axis.
When Vologda bearings reach the end of their service life, drivers sometimes purchase products from other Russian companies. As practice has shown, imported bearings are distinguished only by their higher cost, and not by their high quality, so there is no point in overpaying for them. And the domestic manufacturer fully meets all the quality and durability requirements that motorists place on them.
When choosing a manufacturer, you should keep in mind that a higher price per unit of goods does not mean impeccable quality. However, four Russian factories already have a reputation as a supplier of reliable and affordable products:
- VPK plant - the approximate price for 1 bearing is 270 rubles;
- GPZ plant - the cost of the product is 190–200 rubles;
- the SPZ plant (3 gas processing plants) produces the most expensive analogue of Vologda bearings, price from 450 rubles;
- SPZ-4 plant - the pricing policy is quite loyal, a bearing for the input shaft will cost 220 rubles.
How to determine bearing wear
Being a composite device, any bearing can begin to fall apart over time. Therefore, its wear can be determined without disassembling the gearbox by ear and by those malfunctions in the operation of the gearbox that the driver will immediately notice.
Signs of malfunctioning bearings of the input shaft of the VAZ 2107 gearbox can be considered:
- Extraneous noises and crunching noises when the engine is running, even in neutral gear.
- Impacts in the cavity of the box while driving, even at low speed.
- Arbitrary switching on or off of gears.
- Inability to engage the clutch pedal due to the fact that the bearing on the shaft is jammed.
Any of these signs cannot be ignored: if the bearing fails, this can lead to serious consequences for the control of the machine. In addition, bearing misalignments will quickly affect the operation of adjacent devices.
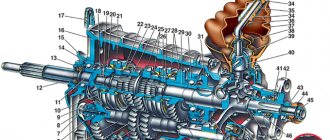
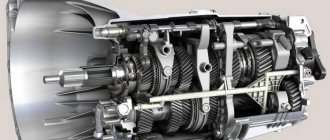
Gearbox device
In general, the concept of “remaking” the box is not entirely correct, since the design of the VAZ-2105 gearbox with 4 speeds was practically no different from the same gearbox 2101. The 2105 gearbox has a three-shaft layout, with constant gear meshing and manual control. Externally, the Kopeika and Pyaterki checkpoints can be distinguished almost only by the markings on the body of the box.
The VAZ-2105 gearbox diagram with 4 stages is presented below, and structurally it does not differ from modifications 2101 and 2106:
| 1 | Bottom cover; | 40 | Needle bearing of the front end of the secondary shaft; |
| 2 | Filler and inspection plug; | 41 | Synchronizer spring thrust washer; |
| 3 | Intermediate shaft second gear gear; | 42 | Fourth gear synchronizer ring gear; |
| 4 | Intermediate shaft third gear gear; | 43 | Sliding clutch for synchronizer of third and fourth gears; |
| 5 | Intermediate shaft; | 44 | Third and fourth gear synchronizer sliding clutch hub; |
| 6 | Front intermediate shaft bearing; | 45 | Synchronizer retaining ring; |
| 7 | Clamp washer bolt; | 46 | Synchronizer locking ring; |
| 8 | Intermediate shaft front bearing clamp washer; | 47 | Synchronizer spring; |
| 9 | Intermediate shaft constant mesh gear; | 48 | Third gear synchronizer gear and ring gear; |
| 10 | Constant mesh gear of the input shaft; | 49 | Second gear synchronizer gear and ring gear; |
| 11 | Spring washer; | 50 | Secondary shaft; |
| 12 | Retaining ring; | 51 | First gear synchronizer gear and ring gear; |
| 13 | Rear input shaft bearing; | 52 | First gear gear bushing; |
| 14 | Input shaft oil seal; | 53 | Secondary shaft intermediate bearing; |
| 15 | Transmission front cover; | 54 | Intermediate bearing lock plate; |
| 16 | Bearing mounting ring; | 55 | Secondary shaft reverse gear; |
| 17 | Clutch housing; | 56 | Elastic cushion for gear shift lever damper; |
| 18 | Gearbox input shaft; | 57 | Damper rubber bushing; |
| 19 | Reversing light switch; | 58 | Damper spacer; |
| 20 | Intermediate shaft reverse gear; | 59 | Damper locking sleeve; |
| 21 | Reverse intermediate gear; | 60 | Inner gear shift lever cover; |
| 22 | Reverse fork; | 61 | Secondary shaft rear bearing oil seal; |
| 23 | Gear shift lever release spring; | 62 | Flange of the elastic coupling of the propeller shaft; |
| 24 | Tension spring bolt; | 63 | Screw; |
| 25 | Gear shift lever guide cup; | 64 | Centering ring seal; |
| 26 | Ball joint of the lever; | 65 | Centering ring retaining ring; |
| 27 | Spherical washer; | 66 | Centering ring; |
| 28 | Spring; | 67 | Rear secondary shaft bearing; |
| 29 | Gear shift lever; | 68 | Drain plug; |
| 30 | First and second gear shift fork; | 69 | Mud deflector; |
| 31 | Third and fourth gear shift fork; | 70 | Speedometer drive gear; |
| 32 | Fork rod for first and second gears; | 71 | Speedometer drive; |
| 33 | 3rd and 4th gear fork rod; | 72 | Rear gearbox cover; |
| 34 | Locking blocks; | 73 | Reverse idler gear axis; |
| 35 | Reverse fork rod; | 74 | Rear intermediate shaft bearing; |
| 36 | Rod lock ball; | 75 | Intermediate shaft first gear; |
| 37 | Retainer spring; | 76 | Gearbox housing; |
| 38 | Retainer cover; | 77 | Sliding clutch for synchronizer of first and second gears. |
| 39 | Breather; |
Since the box from the VAZ-2105 is structurally similar to the 2101, the kinematic diagram of the gearbox is the same. But the gear ratios are different; on 2105 gearboxes they are:
- 1st – 3.67;
- 2nd – 2.10;
- 3rd – 1.36;
- 4th – 1.00;
- Rear – 3.53;
As for the differences in the design between gearboxes 2105 and 2101, they mainly come down to different numbers of teeth on different gears. So, on the intermediate shaft of the gearbox, a 1st speed gear with 14 teeth is used (15 for 2101), and their inclination angle is greater. The constant mesh gear of this shaft has 28 teeth (29 for 2101). The input shaft uses an 18-tooth gear (19 for 2101). Because of these features, the shafts with gear blocks of these two gearboxes are not interchangeable if you try to install them separately. But in the case of a complex replacement - the input shaft along with the intermediate shaft and all gear blocks, then installation is quite possible. As for the secondary shaft, modification 2105 differs from shaft 2101 in the first gear gear (its teeth have a different angle, although their number is the same, and its diameter is also slightly larger).
Replacing the bearing of the input shaft of the VAZ 2107 gearbox
The easiest way to replace a worn element is on the removed box. On the VAZ 2107 it is possible to remove the bearing from the input shaft directly from the gearbox in the car, but this procedure is very labor-intensive and time-consuming.
A bearing is a device that cannot be repaired or restored. Therefore, in case of breakdowns and wear, it is necessary to replace the bearing with a new one.
To work, you need to prepare the usual tools for any driver:
- screwdriver with a powerful flat blade;
- hammer;
- puller if necessary.
REPAIR
The VAZ 2107 has a 5-speed gearbox, which, despite the comparative simplicity of its design, can become unusable for reasons classic for manual transmissions:
- wear and tear due to natural reasons: high mileage, irregular operation and depletion of the service life of components, weather conditions not meeting the desired ones, and as a result - a decrease in service life, etc.;
- non-compliance of the working fluid with standards suitable for normal operation of the transmission;
- non-original spare parts included in the box;
- damage to the gearbox housing due to mechanical impact;
When it comes to the gearbox, even if it is a Zhiguli, the best option would be to entrust diagnostics and maintenance to specialists at a service station. Fortunately, repairing it will not cost too much, except in rare cases that require a complete replacement of the entire mechanism, when it would be more advisable to purchase the same new car.
Replacing the Primary Shaft of the VAZ 2107 gearbox
The gearbox on the classic VAZ (called the “seven”) is especially reliable. Sooner or later there comes a time when it is urgently necessary to replace the input shaft bearing of the VAZ 2107 gearbox. Often the gearbox is “subjected” to 1-2 engine repairs before it is repaired. But at some point it was her turn. One of the parts of the gearbox, most often, is the need to replace the VAZ 2107 input shaft bearing . Replacing the silent blocks of the front levers on VAZ 2101. 2107. is not an easy task. Changing the oil in the gearbox of a VAZ LADA 2107 yourself. The reason for its premature failure may be a factory defect or extreme driving style. Changing the oil in the transmission and rear axle of a VAZ 2106. If you “break the gear shift lever”, constantly overload it with sudden accelerations or heavy loads when towing, even a high-quality bearing cannot last long. Another reason for bearing failure may be neglect of regular maintenance of the gearbox, which is regulated by the manufacturer.
Many people believe that replacing the primary shaft bearing requires complete disassembly of the gearbox and prefers to entrust this operation to specialists in a car service center. Replacing the alternator belt for cars 16 shaft VAZ 2110 with 16 valves VAZ-2112. But practice has shown that complete disassembly of the gearbox is not required. Repair of the VAZ 2107 gearbox Remove the front gearbox shaft from the intake shaft hole. Change the bearing yourself Input shaft
this is possible without serious disassembly of the gearbox and the work does not require the highest qualifications and special devices and tools.
Symptoms of primary failure of the VAZ 2107 gearbox shaft bearing
There are several signs of bearing failure:
- When the engine is running at neutral speed, an unusual noise is heard that changes as the speed increases.
- The gearbox periodically knocks when the car is moving. And there is a knock in any gear.
- Gears switch on or off spontaneously.
- The clutch does not engage with the removed bearings.
The problem cannot be ignored: displacement of a faulty bearing will damage the clutch basket. And even if there is no misalignment, a worn part will cause the transmission and/or clutch to fail.
Bearing replacement can only be done with the gearbox removed. This is where the work begins.
Removing the VAZ 2107 gearbox
You will need a pit or lift to remove the transmission. Changing the oil in the gearbox (gearbox) of a VAZ 2101. Replacing the bearing of the input shaft of a VAZ 2107 gearbox. The procedure is as follows:
Gearbox VAZ 5-speed. repair
Disassembly, defect and assembly. Help the project "Avtoznahar Group VKontakte":.
Disassemble the classic 5st
For those who repair the car themselves. Replacing the front brake pads of a VAZ 2107 yourself. The article contains detailed video instructions and tips from professionals. This video shows a step-by-step breakdown of the 5CT. VAZ gearbox
2105.
- Disconnect (better remove) the battery.
- Place the gear in neutral, release the handbrake, and raise and raise the rear axle.
- Unwind the universal joint bolts and gearbox flange, disconnect the universal joint.
- Remove the exhaust manifold exhaust pipe by unscrewing the bolts.
- Disconnect the oxygen sensor.
- Remove the starter.
- In the cabin, remove the console and shift knob.
- Remove the gearbox.
- Remove the clamp that connects the catalytic converter to the intake pipe.
- Remove the clutch slave cylinder.
- Unscrew the speedometer cable, remove the cover and the reverse speed sensor wire.
- Remove the power take-off shaft.
- Unscrew the gear while holding it.
- Unscrew and remove the gearbox.
replacing the primary bearing of the VAZ 2107 gearbox shaft
Remove the bells and latches from the disassembled box. No further disassembly is required. Description of the input shaft of the VAZ 2107 gearbox. Replacing the rear and front brake pads on the VAZ 2107 video. Changing the oil in the VAZ gearbox. Checkpoint. YouTube failure, malfunction. How to change a bearing. The procedure looks like this:
- Use a powerful screwdriver to secure the groove on the VAZ 2107 gearbox input shaft bearing . This will take a lot of effort, so the screwdriver should be chosen as securely as possible so that it does not break or bend.
- Pull the transmission input shaft forward using the bearing. shaft as support
- Slowly remove the bearing from the main bearing shaft by tapping it with a hammer. The shaft should rotate slightly between hammer blows to prevent the bearing from becoming askew.
Knocking in the bearing takes from 5 minutes to half an hour. It all depends on the skill of the mechanic and how well the bearing is “connected” to the shaft.
The new bearing is pressed onto the shaft with a light hammer. Change the oil in the VAZ 2107 engine. The blow should be applied to the inner race of the bearing. Replacing the silent suspension of a VAZ 2107 is not an easy task. How often you should do this directly depends on the operating conditions of the vehicle, the quality of the parts, etc. This should be done carefully and evenly, pulling the input shaft forward.
The advantage of this method is that there is no need to disassemble the inside of the box, risking balancing it. Also replacement
bearing without disassembling the entire gearbox saves a lot of time.
After replacing the bearing, all that remains is to install the gearbox. repair of VAZ 2107 gearboxes, disassembly and assembly of the gearbox. main blow. Given its weight, it is advisable to work together. The operations are performed in the reverse order of removing the box and do not cause any difficulties.
Transmission repair: when to do it
Repair of the VAZ 2107 gearbox may be required in the following cases:
- Excessive noise is produced when the box operates. This noise is caused by increased wear of bearings, gears and synchronizers.
- It becomes difficult to change the transmission. The reasons for this consequence are hidden in the wear of the lever, the lack of lubricant inside the box, and the deformation of the gearbox lever. Also, the cause of this phenomenon may be jamming of the blocking cracks or damage to the coupling splines.
- Spontaneous transmission shutdown. The reasons for this consequence are wear of the ball holes on the rods, jamming of the clamps, blocking rings and the synchronizer itself.
- Oil leakage occurs. Repair of the VAZ 2107 gearbox must be carried out when oil leaks are detected on it. The causes of leakage can be either serious damage or simple wear of oil seals and seals.
In any case, disassembling the gearbox will be required if one of the above symptoms occurs, which will allow us to identify the exact cause of the malfunction and eliminate it. If even the slightest malfunction of the gearbox is detected, it is necessary to begin repairing it, which will prevent unforeseen consequences in the form of complete failure of the gearbox.
Features of repairing a gearbox on a VAZ 2107
The design of the gearbox is no more complicated than the design of the engine itself, but in order to carry out repairs correctly, a certain sequence must be followed. We will find out in more detail in what sequence the disassembly and assembly of the gearbox is carried out.
- Initially, the gearbox should be removed from the vehicle. We will not consider how to remove the gearbox, since there is appropriate material for this. One has only to note that first you need to drain the oil from the gearbox. We will begin repair work immediately.
- The box is dirty and oily, so it is recommended that you take your time with the repair and clean the outer surface of the product.
- Using a screwdriver, you need to pry off the cover of the fork, which is used to disengage the clutch. The fork is moved to the side. To remove the plug, you need to rotate it 90 degrees and remove it from the hole.
- The gearbox disassembly scheme is common for both 4 and 5 mortars. You need to unscrew the clutch housing mounting nuts, then unscrew and remove the spring washers. These washers are located directly behind the nuts.
- When the fasteners are removed, you can continue to disassemble the gearbox. To do this, you need to pull the crankcase, disconnecting it from the main device.
- There is a sealing element behind the crankcase that also needs to be removed. If the gasket is worn, it should be replaced. There is a spring washer on the shaft, which also needs to be removed.
- Using a “10” wrench, you need to unscrew the 10 nuts securing the crankcase cover. After unscrewing all the nuts, remove the spring washers located behind these nuts. The cover also needs to be removed.
- Behind the cover there is a seal, which should also be removed by prying it off with a screwdriver.
- The photo below shows the nuts that need to be unscrewed. These nuts secure the rear engine mount to the gearbox housing. Behind the nuts there are washers that must be removed, as well as a cushion complete with a cross member.
- Do-it-yourself disassembly of the gearbox continues with unscrewing the speedometer drive nut. After unscrewing this nut, it is necessary to dismantle this drive.
- The VAZ 2107 transmission is a mechanism with a set of gears and forks through which the vehicle moves. Having turned the gearbox over to the other side, you need to remove the reverse light switch.
- The bolt securing the fork, which is responsible for switching third and fourth gears, is unscrewed.
- You need to turn on the first transmission using the gearshift lever on the VAZ 2107.
- At the same time as first gear is engaged, fourth gear must also be engaged. Using a screwdriver, move the synchronizer clutch to the side to connect it to the gear.
- You may ask, why is it necessary to engage 2nd gears at the same time? This is done in order to block the rollers from turning.
- The retaining ring is dismantled by prying it with a special puller on the secondary shaft.
- Using chisels and a hammer, bend the locking plate securing the flange nut.
- The nut must be loosened by 2-3 turns, which will allow the coupling centering ring to be removed. After moving the ring, you need to screw the nut.
- Using a special kind of puller, you need to dismantle the coupling ring.
- After removing the ring, it is necessary to dismantle the centering ring seal.
- Now you can use a wrench to unscrew the nut.
- There is a retaining ring behind the nut that also needs to be removed.
- Using another puller, it is necessary to dismantle the flange.
- The gearshift lever must be set to the neutral position, and then the sealing collar must be pulled up.
- Behind the cuff there are nuts that need to be unscrewed. After unscrewing them, the lever or rocker is dismantled.
- Behind the scenes there is a seal that must be removed.
- The gearbox on the VAZ 2107 is further disassembled by unscrewing the two nuts securing the exhaust pipe.
- There is a bolt behind the bracket that should also be removed.
- To remove the back cover of the box, you need to unscrew the 5 outer nuts.
- Another nut secures the cover from the inside, so after unscrewing the 5 outer nuts, you should proceed to the last one - the inner one.
- It is necessary to disconnect the back cover and the box housing, which requires moving the back cover. The fastening nut is unscrewed, and then the washer is removed.
- After unscrewing all the nuts, it is necessary to remove the rear cover from the crankcase, rocking it. The crankcase cover will come off on its own.
- After removing the cover, it is necessary to remove the inner ring from the secondary shaft. Behind the ring is the speedometer drive gear, which must also be removed.
- The cover of the clamps is found, after which the two bolts securing it are unscrewed. After removing the bolts, you must remove the cover.
- There is a gasket under the cover that needs to be removed.
- The spring clips are removed.
- The gearbox must be turned over, thereby removing the retaining balls.
- You need to find the drive gear retainer ball and remove it. The oil deflector washer also needs to be removed.
- You should continue further if two gears are engaged at the same time. With two gears engaged, it is necessary to unscrew the bolt securing the 5th gear gears. As you guessed, this procedure is performed for the VAZ 2107 5 mortar gearbox.
- The fastening of the 5th gear shift fork, as well as the reverse gear, is unscrewed. After unscrewing, you must remove the plug.
- By holding the rod of the 5th gear, as well as the reverse transmission, you need to remove the rod from the crankcase and the shift fork.
- The gear block of the 5th gear and reverse gear is dismantled manually.
- The gear bushing is removed in the same way from the secondary shaft.
- Once the bushing is removed, you will need to remove the gear, ring gear, locking ring and synchronizer clutch for the five-speed transmission.
- The 5th gear synchronizer clutch hub is removed.
- The reverse control gear is also removed.
- From the inside, the intermediate shaft bearing is pressed out. To do this, you will need to take a hammer and a punch, and apply light blows.
- Next, the bushing is removed from the secondary shaft. It is also necessary to remove the outer ring from the rear bearing.
- Using a puller, you need to unclench the locking ring and remove it.
- Two gears are engaged at the same time - first and fourth. The bearing securing bolt is unscrewed.
- Place a screwdriver between the outer side of the ring and the shaft gear, thus removing the bearing ring together with the balls.
- The rear inner ring is pressed out.
- The intermediate shaft is removed.
- The locking block of the transmission rod 3 and 4 is removed.
- Crackers vary in size, so remember their location.
- The shift rod 3 and 4 of the transmission is removed.
- The 3rd and 4th gear shift fork is removed.
- The bolt securing the fork 1 and 2 of the transmission is unscrewed.
- The transmission rod 1 and 2 is removed.
- The locking block 1 and 2 of the transmission is removed.
- The fork for selecting these gears is removed.
- The complete input shaft is removed.
- The needle bearing is removed.
- It is necessary to unfold the locking plate until it disengages from the groove.
- The reverse gear axis is removed.
- The intermediate ring is removed.
- The key is removed from the groove of the secondary shaft.
- The intermediate bearing is removed.
- The secondary shaft is recessed into the inside of the crankcase, thereby removing it.
- Using a hammer, it is necessary to press out the secondary shaft bearing.
- The sealing gland is removed.
- The bearing from the 5th gear can be removed with a screwdriver, using it as a lever.
How to change the input shaft on a VAZ 2107
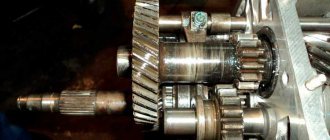
I think many car owners have encountered a problem when, when the clutch is released while standing still, noise begins to be heard from the gearbox. These are usually symptoms of a worn input shaft bearing. Therefore, today we will tell you how to replace a noisy or humming input shaft bearing of a VAZ gearbox without disassembling the gearbox itself. Of course, the box will have to be removed from the car, but almost any car owner with the slightest bit of experience in repairing classics can remove it. But not everyone can sort through a box, so we simplify the task. After removing the transmission from the car, we need to remove the bellhousing and then remove the retaining rings. We will see something like this:
Possible breakdowns with the gearbox
The car should be sent for diagnostics if problems with gear shifting begin to be noted and a characteristic noise appears. One of the reasons for the presence of these manifestations is a failure of the input shaft bearing. Also, if this component fails, the following symptoms may occur:
- knocking noise from the gearbox when moving;
- spontaneous activation of speed limits;
- The clutch does not engage.
All these faults can be eliminated yourself by purchasing a set of gearbox bearings.
Replacement procedure
Replacing the bearing of the input shaft of the VAZ 2107 gearbox is necessary if this element has severe wear. The reason why bearings lose their working condition is an aggressive driving style.
You can replace this consumable with your own hands, without resorting to rebuilding the gearbox. However, this requires some experience, since the gearbox must be removed from its original location.
To remove this component, it is necessary to remove the bell from the gearbox, with which the box is attached to the block. Retaining rings are subject to removal. A set of tools is required: screwdriver, hammer. Using a screwdriver, you need to pick up the ring groove, applying some effort. As a result, the gearbox input shaft moves forward, after which the bearing should be tightened. To do this you will need a hammer. This procedure requires caution. When tapping with a hammer, the shaft should be rotated slightly. The duration of this procedure is influenced by the skill of the person.
Installing a new spare part also requires attention and professionalism. To install it in its original place, use a hammer. In this case, all blows must be applied to the inner ring of the consumable. At the same time, you need to pull the input shaft forward. As soon as the mechanism is in place, the removed box is installed on the vehicle.
Thus, the fact that the driver neglects the established rules for operating a Lada car has a negative impact on the input shaft bearing. In particular, a quick start occurs and heavy loads occur during towing.
Gearbox seals and their replacement
Oil seals in any mechanism where they exist act as gaskets. In this case, they are designed to seal the holes from which the primary and secondary shafts come out. Previously, oil seals were cast from rubber.
Currently made from modern composite materials, more resistant to temperature changes and aggressive environments.
Input shaft oil seal
The oil seal, which is installed on the input shaft, has the following dimensions:
- • outer diameter – 47 mm;
- • internal diameter – 28 mm;
- • width – 8 mm;
- • weight – 20 grams.
It is installed in the shaft output hole in the clutch housing and serves to prevent lubricant from flowing through the shaft.
There is no difficulty in replacing the oil seal, but the gearbox will have to be removed.
The order of work to change the oil seal is as follows:
- Remove the clutch cover from the gearbox.
- Remove the release bearing and clutch fork.
- Remove the used oil seal by picking it up with a screwdriver or knife.
- Clean the place where the oil seal was located and wipe it dry.
- Install the new oil seal in its original place.
- Replace all the parts that were removed from the box in reverse order.
Secondary shaft oil seal
The oil seal, which is installed on the secondary shaft, is larger and has dimensions:
- outer diameter – 56 mm;
- internal diameter – 32 mm;
- width – 10 mm;
- weight – 10 grams.
It is installed at the output of the secondary shaft at the rear of the box.
The order of work to change the oil seal is as follows.
- Unscrew the nut securing the flange, having previously secured it.
- Remove the centering metal ring from the shaft.
- Remove the flange and washer using a puller.
- Pull out the old oil seal using a tool.
- Clean and wash the seal area.
- Install a new oil seal.
Replacing the secondary shaft bearing
To replace the shaft bearing (secondary), it is also necessary to remove the gearbox. After this, the gearbox should be disassembled, after draining the fuel from it. Next, you can begin to remove the spare part using a special puller.
Replacing the input shaft bearing of a VAZ 2107 video
VAZ-2107 cars are equipped with a reliable and low-maintenance gearbox. There are often situations when the engine has been repaired once or twice, but the gearbox continues to perform its tasks. Despite such reliability, the gearbox still has to be repaired at some point.
The most common cause of problems is shaft bearing. You, it breaks down for two reasons - due to extreme driving style and another defective part. For example, if you jerk the gear selector sharply, overload the gearbox with fast acceleration, or often tow other cars, replacement
The input shaft bearing will be needed very soon. There is the following reason for unit failure - improper maintenance of the gearbox and non-compliance with the manufacturer’s regulations.
KEY-DOP
Tips that will help you not think about replacing a manual transmission for a long time
Despite its relatively high reliability, a manual transmission requires compliance with certain operating rules. This is necessary for the long service life of the unit and its uninterrupted operation throughout its entire life.
- Driving style. Jerky acceleration at high speeds contributes to the failure of not only the manual transmission, but also the car engine. Therefore, gears should be changed smoothly, in accordance with the current speed. This ensures comfortable and dynamic transmission of torque from the engine to the wheels, reducing wear on the engine and gearbox by reducing the load.
- Timely maintenance of manual transmission. Transmission oil is changed at least once every 3 years or every 40-50 thousand kilometers (for some car models this interval is increased). The period for replacing the fluid is set by the manufacturer and is indicated in the operating manual for the specific vehicle.
- Quality of transmission fluids and spare parts. Changing the oil of a manual transmission and repairing this unit are performed quite rarely. Therefore, you should not skimp on purchasing high-quality spare parts and recommended fluids.
- Timely maintenance. It is advisable to check the transmission fluid level every six months of operation or upon reaching 15 thousand kilometers after the previous check. If necessary, oil should be added to the required level. If the car is used in extreme conditions or the driving style is quite aggressive, the period between checks can be shortened.
By following these simple rules, you will ensure long-term operation of your car's manual transmission. Moreover, unlike an automatic transmission, a manual transmission is not so demanding in maintenance.
How to determine whether a bearing is faulty?
Problems with the input shaft bearing on the VAZ gearbox2107
, is easy to recognize by a number of signs:
- When the car is moving, knocking noises appear in the gearbox. Extraneous sound occurs sometimes, and does not even depend on the position of the speed selector.
- When you move the gearshift knob to the neutral position, you hear a suspicious noise, the volume of which increases as the vehicle speed increases.
- Speeds are switched on or switched off spontaneously, without driver intervention.
- The bearing jams, which is why the clutch cannot be engaged.
Replacement of the gearbox input shaft oil seal 2101-07.
I created this video
for help from YouTube Video Editor ()
Any of the mentioned signs indicates a problem in the gearbox, which is not recommended to be ignored. If you do not immediately replace the primary shaft bearing, there is a high risk of the part being misaligned and the clutch basket failing. If misalignment can be avoided, then wear of the bearing will one day lead to breakdown of the clutch and (or) gearbox.
Please note that replacement of a faulty part is carried out on a removed gearbox. Therefore, start repair activities with this work. Details: How to remove a gearbox, video
Input shaft bearing replacement process
When the dismantling of the VAZ-2107 gearbox is completed, install a new part. The replacement process should be organized as follows:
KEY-DOP
- Remove the retaining rings and bell from the dismantled gearbox.
- Take a screwdriver and use it to pry up the ring groove of the bearing. Please note that the job will require considerable effort, so use a screwdriver with a strong blade. Otherwise, the tool may bend or even break.
- Move
transmission
input the shaft bearing
as support when performing this work - Tap the bearing with a hammer and gradually pull it off the shaft. After each hammer blow, rotate the part slightly to avoid distortion.
The procedure for tightening the bearing takes from five to thirty minutes. Here, a lot depends on the “fusion” of the bearing with the shaft, in addition to the skill and experience of the performer. Now proceed to the replacement.
Video: How to press the input shaft bearing out of the crankshaft if there is no puller?
If the video does not show, please refresh the page or » style=»color:#CC3333″>click here
To install a new input shaft bearing, place the part on the shaft and gradually hammer it towards the area using a hammer (the blows are light). Hit the inner ring of the part. Proceed carefully and gradually pull back the primary
shaft forward.
Which game slots have for replacing a faulty input shaft bearing in such a matter that there is no need to sort out the gearbox. Naturally, there is no risk of unbalancing its nodes. Already today, installing a new part, without disassembling the gearbox, saves personal time.
KEY-DOP
When the replacement work is completed, return the gearbox to its original position. Remember that the gearbox has a decent weight, so get an assistant to do the work. Next, install the gearbox, which is done using the reverse algorithm.
Replacing the input shaft bearing of a VAZ 2107
Transmission VAZ 2107
The gearbox on the VAZ classic (which includes the “seven”) is particularly reliable. Often the gearbox “survives” 1-2 engine repairs before it has to be repaired. But sooner or later, her turn comes. One of the gearbox parts that most often requires replacement is the VAZ 2107 input shaft bearing . The reason for its premature failure may be a factory defect or extreme driving style. If you “tear the gearbox lever”, constantly overload it with sudden accelerations or heavy loads when towing, even a high-quality bearing will not be able to hold out for long. Another reason for bearing failure may be neglect of regular gearbox maintenance regulated by the manufacturer.
Signs of a malfunction of the input shaft bearing of the VAZ 2107 gearbox
There are several signs that indicate a bearing is faulty:
- When the engine is running at neutral speed, extraneous noise is heard, which changes with increasing speed.
- The gearbox periodically taps while the car is moving. And the knock is present in any gear.
- Gears switch on or off spontaneously.
- The clutch does not engage due to a stuck bearing.
The problem cannot be ignored: misalignment of a faulty bearing will lead to breakage of the clutch basket. And even if misalignment does not occur, a worn part will cause rapid failure of the gearbox and/or clutch.
Bearing replacement can only be done on a removed gearbox. This is where the work begins.
Removing the VAZ 2107 gearbox
To remove the gearbox you will need a pit or a lift. The procedure is as follows:
- Disconnect (better remove) the battery.
- Engage neutral gear, disengage the handbrake, raise and hang the rear axle.
- Unscrew the bolts securing the cardan and the gearbox flange, and disconnect the cardan.
- Remove the exhaust manifold pipe by unscrewing the bolts.
- Disconnect the oxygen sensor.
- Remove the starter.
- Inside the car, remove the console and gearshift knob.
- Remove the gearbox protection.
- Unscrew the clamp connecting the catalyst to the exhaust pipe.
- Remove the clutch slave cylinder.
- Unscrew the speedometer cable, remove the boot and the reverse speed sensor wire.
- Remove the driveshaft.
- Unscrew the traverse while holding the gearbox.
- Unscrew and pull out the gearbox.
Self-replacement of the VAZ 2107 gearbox
The gearbox is the key unit of the car, transmitting torque from the engine to the wheels. Over time, transmission parts wear out and it may require repair or replacement.
Replacing a VAZ 2107 gearbox does not require the use of non-standard tools, but the large mass of the unit makes the operation quite dangerous
Removal and installation should be done carefully to avoid injury or damage to the vehicle.
- Signs of the need to replace (repair) the VAZ 2107 gearbox
- List of required tools
- Removing the VAZ 2107 gearbox
Signs of the need to replace (repair) the VAZ 2107 gearbox
- Increased noise and vibration in the unit.
- Difficulty shifting or spontaneous gear disengagement.
- Oil leak from gearbox.
- Wheel lock.
- No rotation of the cardan when the gear is engaged and the engine is running.
To eliminate most problems, a complete replacement of the gearbox is not required, but repairs require its removal and installation.
List of required tools
- A set of wrenches (preferably heads with cardan joints) for 10, 13, 19 mm.
- Screwdriver and pliers.
- A long block that can be used to support the box (alternatively, a short strong block and a jack).
Removing the VAZ 2107 gearbox
First you need to roll the car onto a pit or onto a lift and remove the negative battery cable. This must be done so that when the starter is disconnected, a short circuit does not occur.
When placing in a pit, apply the handbrake and support the rear wheels with shoes or bricks. Otherwise, the machine may roll during operation. This is not required when using a lift.
You can start work by removing the decorative cover of the gear shift lever. Then you need to remove the lever spacer sleeve, for which it is better to use a thin screwdriver or an awl, and remove the lever together with the sleeve.
To avoid losing parts, it is better to insert the spacer back into the gearshift lever.
Under the decorative mat there are four self-tapping screws that secure the cover. They are unscrewed with a Phillips screwdriver, after which the cover should be removed along with the foam seal to avoid damage when removing the gearbox.
Next, you should go into the pit (lift the car on a lift).
First, remove the exhaust pipe from the muffler and the starter.
To remove the cardan, it is necessary to unscrew the bolts securing the cardan suspension to the body and connecting the cardan to the rear axle gearbox. After this, the cardan is easily removed from the coupling splines.
Now you need to find the block of wires connected to the reversing light sensor and disconnect it. It is attached to the right side of the box. Then you need to unscrew the speedometer cable nut using pliers and remove it, then unscrew the bolts securing the clutch housing cover and remove them.
To avoid injury or damage to the vehicle, you should be safe by supporting the gearbox. When working from a pit, this can be done with a short, strong block and a jack, or with a long block if using a lift or pit. It is better to play it safe with a support or to involve partners in the work who will support the gearbox during the dismantling process. All that remains is to remove the clutch slave cylinder and remove the gearbox.
Replacing the bearing of the input shaft of the VAZ 2107 gearbox
Remove the bell and retaining rings from the dismantled box. No further disassembly is required. The procedure is as follows:
- Using a powerful screwdriver, pick up the bearing of the input shaft of the VAZ 2107 gearbox by the annular groove . Serious efforts will be required, so you need to choose a screwdriver that is as strong as possible so that it does not break or bend.
- Push the transmission input shaft forward using the shaft bearing as a support.
- Slowly pull the bearing off the input shaft by tapping it with a hammer. Between hammer blows, the shaft must be rotated slightly to avoid bearing misalignment.
Knocking out a bearing takes from 5 minutes to half an hour. It all depends on the skill of the mechanic and on how closely the bearing is “affined” with the shaft.
The new bearing is pressed onto the shaft using a light hammer. The blows must be applied to the inner ring of the bearing. This should be done carefully and evenly, pulling the input shaft forward.
The advantage of this method is that there is no need to sort through the insides of the box, risking unbalancing it. Also, replacing a bearing without disassembling the entire gearbox significantly saves time.
After replacing the bearing, all that remains is to install the gearbox in place. Given its weight, it is advisable to carry out the work together. The operations are carried out in the reverse order of removing the box and do not cause any difficulties.
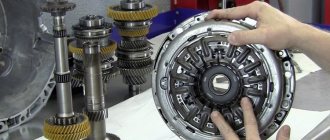
Changing the bearing
When the box is dismantled, the bell and retaining rings are removed. You won't have to disassemble anything else.
The new bearing is pressed in by gently hitting its inner ring with a small and light hammer. During the process, the shaft must be pulled forward. In this case, there is no need to tinker with the insides of the gearbox, risking upsetting their balance. And replacing the input shaft bearing of a VAZ 2107 gearbox using the described algorithm takes much less time than using the traditional one. You will save at least 3 thousand rubles. (and most auto repair shops ask for more).
Changing the bearing of the manual transmission input shaft on a VAZ 2107 car
In manual transmissions, bearing units act as support bearings. When they fail, the rotation of the shafts becomes difficult, multidirectional beats, extraneous noise and noticeable play occur.
External manifestations of a malfunction include:
- Strong bearing noise that increases when the clutch is disengaged;
- Difficulty switching gears;
- The gearbox spontaneously switches from one gear to another;
- When you press the clutch pedal, you can hear extraneous knocking noises.
Possible causes of PPV failure may be:
- Malfunctions of mating units. Such as clutch, axles, release bearing;
- Lack of lubrication or severe contamination of the internal cavity of the bearing;
- Aggressive driving style;
- Installation of a product of inadequate quality;
- Expiration of service life.
In order to clarify the occurrence of a malfunction associated specifically with the breakdown of the PPV, you can verify this by checking how easily it rotates and conducting a visual inspection (integrity of the races, separator, condition of the raceways).
If the product is externally in good condition, measure its clearances in different directions (axial, axial) to determine the actual play.
Removing the faulty PPV bearing
The work must be performed by driving the car onto a lift or onto a viewing hole. If it is impossible to fulfill this requirement, you should use strong supports (stops) and a jack. However, this is quite dangerous.
Before starting work, stops are installed, neutral gear is set, and the car is put on the handbrake.
The “-” terminal from the battery is disconnected.
After this, you can proceed directly to dismantling, according to the following work algorithm.
- Remove the cardan shaft from the coupling;
- The intake pipe of the manifold (another name, exhaust), which is held on a three-bolt connection, is dismantled.
- Unscrew the working cylinder from the gearbox.
- Disconnect the wires connecting the rear dimensions, then the ground cable.
- The speedometer cable is dismantled, after which the lower housing is removed from the clutch.
- The rocker lever used to change gears is dismantled. Why do you need to remove a special plastic sleeve with a screwdriver?
- The bolts securing the box are unscrewed.
- The back of the box rests on a traverse. To complete dismantling, you need to unscrew a couple of nuts from the studs.
Do not forget to first lay a block between the engine and its protection. Otherwise, after removing the box, it may sag.
- We remove the starter and remove the box.
- Please note that on a VAZ classic, you can dismantle the bearing that we are going to change (PPV) without disassembling the box. However, you still have to remove the clutch bell.
- Having approached the bearing Open: 6-50706AU Closed: 6-180502K1US9, remove the retaining ring (with round pliers).
- The bearing assembly is removed.
- The small fixing (circlip) ring located in the groove of the cage, which secures the bearing to the shaft, is removed.
- The product to be removed is pressed from the neck.
Installation of a new PPV
The mounting surface is wiped and lubricated (input shaft). A spring ring is then installed into the bearing.
We install the end part of the shaft into the bearing bore (make sure there are no distortions) and press it in (evenly tapping it with a hammer).
Put on the small retaining ring and insert the assembled assembly into the gearbox (by hitting it with a hammer through a wooden spacer).
Before installation, you must ensure that the shaft is oriented correctly in relation to the secondary assembly inside the box.
Reinstall the clutch bell. Install everything else in reverse order.
Signs and causes of box malfunctions
The gearbox on the VAZ 2107 is considered a fairly reliable unit, however, during long-term use, some of its elements may fail for one reason or another. If the first disturbances in the operation of the gearbox appear, in order to avoid more serious breakdowns, it is necessary to diagnose and fix the problem as quickly as possible.
The list of main breakdowns of the VAZ 2107 manual transmission, the causes of their occurrence and methods of elimination are varied. It is important to pay attention to the following signs, as well as choose the right repair methods:
- The gears are engaged randomly or not at all (wear of the moving parts of the gearbox (spring, hinges), wear of the locking rings on the synchronizers, wear of the synchronizer spring, wear of the teeth on the gears). The problem is eliminated by replacing faulty parts, or by carrying out a major overhaul of the box;
- The gear is knocked out when switched on, the engine is subjected to heavy loads (the clutch is not fully engaged, the hinge on the shift lever is jammed, the shift lever is faulty, the forks in the gearbox are deformed).
The problem is eliminated as follows: adjusting the clutch mechanisms, cleaning the hinge joints, replacing the lever or replacing a whole set of forks; The occurrence of uncharacteristic sounds (noise, crunching) while the car is moving (noise of bearings, wear of teeth on gears, lack of lubricating fluid, movement of shafts along their axis). The problem is solved by replacing a deformed or worn part or by identifying a leak and replacing/topping up working fluid; - Leakage of working lubricating fluid (wear of oil seals and gaskets, loosening of crankcase fastenings). The problem is eliminated by changing the rubber products or adding oil to the required level (for the VAZ 2107 gearbox, approximately 1.6 liters of oil are required), if necessary, tighten all the crankcase mounting nuts.
VAZ 2107 box repair
Taking into account all the design and operational features of the VAZ 2107 gearbox, carrying out repair work independently is only possible if you have extensive experience in servicing and repairing such units. If the box on a VAZ 2107 needs repair, the main stages of repair work are:
- preparation (availability of the necessary tools, pit or overpass);
- installing the car on a pit/overpass, draining the oil from the gearbox, etc.);
- dismantling the box;
- disassembly and troubleshooting;
- trouble-shooting;
- assembly and installation of the box in place.
Required tools:
- socket wrench at “10” and “19”;
- Phillips-blade screwdriver;
- tweezers and two screwdrivers with a thin flat blade;
The general procedure is as follows:
- install the car on a viewing hole or on an overpass;
- by disconnecting the wire from the negative terminal on the battery, drain the gearbox lubricating fluid (gear oil);
- Having removed the radio panel and pressing the lever, insert a flat-head screwdriver into the hole in the locking sleeve of the box to bring it out;
- Having removed the rod from the lever, use tweezers to remove the elastic rubber insert of the damper from the lever;
We also recommend reading the article on how to replace transmission cables. From this article you will learn when and how to change manual transmission cables in a cable gearbox, as well as what subtleties and nuances you should pay attention to as part of this procedure. - Unclamping the damper petals using two flat-head screwdrivers, remove them from the lever, and then remove the damper lever itself and, accordingly, all its bushings;
- Having moved the upholstery mat on the floor of the car, use a Phillips screwdriver to remove the four screws on the gearbox cover;
- Having removed the gearbox cover and the exhaust pipe of the muffler from the lever, use a Phillips screwdriver to disconnect the block with the clutch;
- Having removed the cable harness and the cardan transmission from the speed device, disconnect the flexible shaft;
- Using a socket wrench set to “10”, unscrewing the two fastening bolts of the side cover of the gearbox, install the support under the box;
- Using a socket wrench set to “19”, unscrew the four fastening bolts connecting the crankcase to the engine block;
- by inserting a flat-head screwdriver into the gap between the block and the crankcase, simultaneously pressing them out, complete the dismantling of the gearbox;
- disassemble the box, troubleshoot, replace parts, etc.
- Having completed the necessary repair work, assemble the unit, install the box on the car, reassembling in the reverse order.