When I bought the car, I didn’t understand at all what else was what (now I have a little more knowledge, but far from perfection of course)), but the leaking washer reservoir was terribly annoying.
It was decided to buy new rubber seals for the motors. Bottom line: it didn’t help. I decided to remove the tank and look for a leak. Removing it is not a problem, we disconnect all the wires and just lift it up. Having washed the tank of dirt and the area under it, I plugged the holes from the motors and filled it completely with water, looking for cracks. There weren’t any, then all the shoals flew onto the rubber seals under the motors. I thought about it for a long time, but found a solution in a medical tourniquet. Unfortunately there are no photos, so I will again resort to my art of drawing in paint. ))))
There were layers of electrical tape on the motors from the old owners, apparently for sealing, so I removed them for nothing and threw them away.
And now, in order. Figure I shows how the rubber seal is attached to the tank. Figure II schematically shows a piece of medical tourniquet. We take this tourniquet, select the strip on the spot, I don’t remember. Fold it in half and, as shown with a cross, make a cross-shaped cut with a stationery knife, you don’t need too much, otherwise when putting it on, the elastic will not fit tightly and will come off, but you can’t do too little, otherwise it will break. Then, as in Figure III, we take and put the elastic band on the seal, it turns out that we put the lower cut hole on the lower part of the elastic, but not too much, but so that it remains on the cone and does not jump into the recess. Then, as in Figure IV, having first placed the tourniquet on the rubber band from below, insert the rubber band into the tank and then, as in the picture, wrap the upper piece of the rubber band with a slot over the hole in the seal and insert the motor until it stops. The result is not long in coming. I had the procedure done about 5 months ago and there is still not a drop left.
Design features and principle of operation of the VAZ 2114 windshield wiper
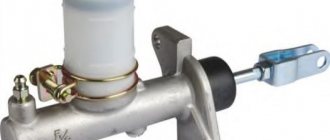
The reservoir is just one element of the windshield wiper system. It includes the following main parts:
- container for liquid;
- washer jets;
- injection pumps;
- hoses between the pump and jets;
- liquid level sensor;
- tee;
- mounting bracket.
The washer reservoir sensor on the VAZ 2114 reports the fluid level in the container and helps control its timely topping up if necessary.
Pressure pumps have motors. In the “Samara” model they are located on the body of the tank in the amount of two pieces. The motors increase the pressure of the fluid in the tank and ensure its supply to the windshield through special hoses. One of them is responsible for washing the front part (windshield), and the other is responsible for cleaning the rear window of the car.
Frequently asked questions from car owners
How and where to add windshield washer water?
- In the cabin, open the hood handle
- Finally open and secure the hood
- Unscrew the large cap on the windshield wiper reservoir, the one without wires
- Pour liquid into the tank. Approximately five liters will fit in this canister
What liquid is recommended to be poured into the washer reservoir of the VAZ 2114?
Different times of the year require different windshield wipers to clean glass. In winter, at low temperatures, it is recommended to fill in an antifreeze additive. It will protect the tank from freezing, and with it the parts of the windshield wiper system will not burst from temperature overloads. In summer, it is recommended to add a cleaning additive to the water. During this period, abundant sediment of exhaust gases, oils, and car paint care products accumulates on the glass.
Advice: for the best effect, you should first pour the additive into the tank, and only then ordinary water. This will allow the liquids to mix better.
How can you heat the windshield wiper reservoir in winter?
Option one: homemade
Materials: 1 meter of 8 mm copper tube, 2 meters of 8 mm wrapped hose, 2 reservoir cuffs and 4 clamps.
Heating installation technology: two holes for cuffs are drilled in the tank lid. A copper tube is already inserted into them, which must be given the reliefs of the tank in advance. At the exit, the tube should be in a horizontal position. The hoses are connected to the throttle body and thermostat.
Option two: in the form of a coil
Technology: the same copper tube as in the first option. But here it is given the shape of a coil using a soldering iron. The resulting coil is not attached, as usual, to the tank instead of a lid. It is soldered to a textolite plate. Afterwards, the homemade coil is installed in the tank as low as possible so as not to interfere with the liquid level sensor.
Holes for the thermal device are cut using a soldering iron. This way they turn out neat. Their diameter is 3 millimeters. The edges should be lubricated with sealant. The best fastening for the device is stainless steel screws. When installing, they should be heated with a soldering iron - this way they will be better fixed in the windshield washer reservoir.
Option three: ready
This is a ready-made heating system for the Geyser tank washer. Operating principle: as it passes through the coil, the temperature of the coolant begins to rise. Accordingly, the degree of liquid in the tank also increases.
Price is an issue
You can find out how much a VAZ 2114 washer reservoir costs in local stores in your city, or through an Internet search engine. The average price in online stores for a windshield washer reservoir is 250 rubles.
Features of tank operation
Operating the tank does not require special skills. The main task is to add washer fluid in a timely manner. As such, you can use either ordinary water with a special cleaning additive or antifreeze washer.
The choice of a specific type of cleaning fluid depends on the time of year. So, for the summer period, when there is a sufficient amount of contaminants in the air (dust, gasoline vapors, soot), it is better to use water with a cleaning additive. However, in winter this type of cleaner is no longer suitable. Negative temperatures will cause the water in the tank to freeze and expand, which will lead to its rupture. Therefore, a washer with an antifreeze additive is ideal for the winter period.
The nuances of operating the device “by season”
What you need to know about operation:
- In the warm season, it is allowed to use a washing solution or water with the addition of a special additive.
- In winter, you need to fill in a special anti-freeze liquid, since the water can freeze and ruin the container itself. You can find the appropriate fluids in domestic auto stores.
- Use heated washer fluid reservoir. As practice shows, most cases of cracks in tanks are due to consumables freezing in them. To prevent this, you can use a heated washer reservoir, which is installed on cars as standard or as additional equipment.
Windshield washer system replacement and repair
But even with proper use of the tank and careful attention to the type of liquid being filled, it can fail.
see also
There may be several reasons for this.
- The liquid has run out. In this case, you just need to top it up by unscrewing the tank cap.
- The container body is damaged. These can be either cracks or through holes. If there are such liquids, the liquid does not linger in the tank. This means that in this case the tank needs to be repaired.
- Problems in the functioning of the motor. If this element stops working, then most likely this is due to the fact that the contacts, which are also located on the container body, have come loose. In this case, they need to be cleaned.
- The problem is in the washer supply hose. This element is subject to wear and tear during operation. If this is the cause of the washer malfunction, the hoses must be replaced.
Many owners of the Samara model are interested in the question of how to change/remove the washer reservoir of a VAZ 2114. This procedure is extremely simple and does not require special tools. Only the presence of a screwdriver.
The container itself is attached using a special bracket and groove and is removed by lifting it up.
The algorithm of actions is as follows:
- Open the hood and secure its position.
- Drain the liquid from the reservoir. This can be done using part of the hose.
- The structure is removed from the grooves and set aside slightly to the side so as not to interfere with further dismantling.
- To remove the motor, you need to lift it with a screwdriver and pull it upward.
Installing the washer fluid reservoir is done in the same way, only in reverse order.
Car enthusiasts often complain that when installing a tank, difficulties arise in installing the hose on the pipe. In this case, you can use a lighter or other heating element, for example, an electric hair dryer. When heated, the rubber will become softer and more pliable, which means installation of the hose will be easier.
How to change a plastic tank
To replace or install a new plastic tank, you need an algorithm of five simple steps:
- Lift the hood up
- We drain the remaining liquid from the tank into a separate container, sequentially removing the pipes on the motors. Don't forget that they have polarity: white is positive and black is negative.
- Having freed the tank, we take out the liquid level sensor
- We take out the tank itself, carefully but forcefully, pulling it up
- Using a straight-slotted screwdriver, remove the electric motors
Removing windshield washer motors for VAZ 2114
This is the procedure for removing the tank. If you need to install a new windshield washer reservoir, the steps will be the same, but in reverse order. If during installation difficulties arise with the electric motors, it means that the rubber seals are interfering with them. In such a situation, regular soap will help.
After installing the tank and electric motors, there may be a problem with installing the injector pipes. They are difficult to fit onto the motors. The process will be easier if you heat the tip of the tube with a flame from a regular lighter. When heated, the walls of the pipes will become softer and more flexible.
Electrical tape is suitable for tightly fixing the motor. It should create additional volume.
Removing and installing the washer reservoir
1. Disconnect the connector with the wire from the washer fluid level sensor.
2. Disconnect the connectors with wires from the electric pumps for the windshield and tailgate washer.
3. Remove the washer reservoir from the bracket and disconnect the hoses from the fittings of the electric pumps.
4. Overcoming the resistance of the sealing bushings, remove the electric pumps from the tank.
5. Carefully pry off the sealing sleeve...
6. ...and remove it from the hole in the tank. If the bushing has lost elasticity or is torn, replace it.
7. Unscrew the cap and remove the washer fluid level sensor from the tank.
8. Connect a test lamp to the sensor terminals and apply a voltage of 12 V. When the float is lowered, the lamp should be on.
9. Then lift the float - the lamp should go out. Otherwise, the sensor is faulty and must be replaced.
10. Install the washer reservoir and all removed parts in the reverse order of removal.
Characteristics of the element of the windshield washer system - tank
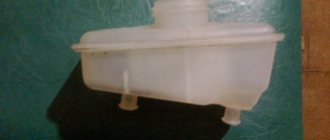
Before we tell you how to remove the washer reservoir and repair it, we suggest you understand the main characteristics of this element of the system. It is a container, usually white, designed to hold cleaning liquid.
Design Features
In addition to the container itself, the BO includes in its design the following components:
- nozzles through which liquid is supplied to the glass;
- an electric motor used to supply consumables to the glass;
- small-diameter hoses located between the nozzles and the electric motor, through which liquid is supplied;
- depending on the car, the system can be supplemented with a sensor designed to measure the volume of consumables in the container and warn the driver about a critical level;
- washer reservoir cap and retainer;
- tee for connecting pipes.
Characteristics of the element of the windshield washer system - tank
Before we tell you how to remove the washer reservoir and repair it, we suggest you understand the main characteristics of this element of the system. It is a container, usually white, designed to hold cleaning liquid.
Design Features
In addition to the container itself, the BO includes in its design the following components:
- nozzles through which liquid is supplied to the glass;
- an electric motor used to supply consumables to the glass;
- small-diameter hoses located between the nozzles and the electric motor, through which liquid is supplied;
- depending on the car, the system can be supplemented with a sensor designed to measure the volume of consumables in the container and warn the driver about a critical level;
- washer reservoir cap and retainer;
- tee for connecting pipes.
Location
Where is the washer reservoir located? Inexperienced motorists often confuse BO with expansion tanks for antifreeze or brake fluid. But in fact, finding this element is easier than ever. For example, in most domestically produced cars this component is located in the engine compartment, to the right or left of the engine. There can also be two of them - for the front and rear glass.
In foreign-made cars, the BO is usually located under the front bumper or under the windshield. As a rule, a special symbol in the form of a watering can is applied to the lid of the container - this is how BOs are marked.