A generator is a kind of power plant that provides energy to all engine systems: power, cooling, ignition, so its failure will inevitably lead to other malfunctions. To prevent breakdowns, it is necessary to systematically diagnose it, and if problems cannot be avoided, repair it immediately.
In this article we will talk about how to check the generator for performance without resorting to the help of specialists. But first, let's look at the symptoms of its possible malfunctions.
Main signs of generator malfunction
The following signs will indicate that the generator has failed or there are problems with its operation:
- constant lighting of the warning light in the form of a red battery on the dashboard, which indicates that the generator is not charging or is producing insufficient current;
- constantly discharging battery;
- interruptions in the operation of electrical equipment (lighting and alarm units, multimedia, heating and ventilation) while the engine is running;
- the appearance of a characteristic burnt smell in the cabin (engine compartment);
- excessive heating of the generator stator;
- hum (rustle, whistle) of the generator.
The appearance of such signs is a serious reason to conduct a diagnosis. To do this, it is not at all necessary to go to a service station, since it is quite possible to check the generator’s functionality on your own, especially if you have even the slightest skills in handling a car tester. But first, let's talk about the main breakdowns.
What to consider when choosing a new battery
According to the passport, the battery is designed for 3-5 years of active use (in reality it turns out to be less). Therefore, over time, it becomes necessary to buy and connect a VAZ 2107 battery instead of a failed one.
When purchasing a new battery, you should consider a number of parameters and characteristics. Battery type: serviced and maintenance-free. The first option allows you to check and replenish the electrolyte level. This makes it possible to use the battery longer.
The next question is: what power will the battery on the VAZ 2107 be most efficient. Batteries with a capacity of 50–60 Ah are suitable for this model. However, given that modern cars are equipped with energy-intensive equipment, it is better to opt for more capacious batteries. In addition, carburetor VAZ models require more powerful batteries - they consume more energy when starting. In terms of dimensions, the VAZ 2107 requires power supplies with dimensions of 242*175*190 mm. The vast majority of samples available on the market fit them.
When choosing a battery, you should also take into account the place of residence of the owner of the “Seven”. For those who live in the south, you can purchase a less powerful battery. Northerners are advised to prefer a battery with a higher capacity: in the cold, the car starts with high energy consumption.
Main faults
The generator may have malfunctions of both mechanical and electrical nature. These include:
- failure of the voltage regulator;
- malfunction of the diode bridge (rectifier unit);
- short circuit of the rotor field winding;
- short circuit of the stator windings;
- brush wear;
- bearing wear.
Next, we will talk about how to test the generator for performance yourself, based on the symptoms present and possible malfunctions.
First stage
To check the generator stator winding, use the ohmmeter indicated above. Measure the resistance of the generator field winding. Measurement results should be between 5 and 10 ohms. If the results are different, then there may be a break in the winding.
Now you need to check the insulation resistance of the generator. To do this, connect one of the ohmmeter probes to one of the stator contact rings, and touch the stator housing with the other probe.
The measurement result should be infinite resistance. If not, then the winding is “broken” and shorts to the housing (ground).
After the stator, it is necessary to check the generator rotor using the same method.
Checking the voltage regulator
The regulator is designed to stabilize the generated voltage before supplying it to the vehicle's on-board circuit, including the battery for recharging it. The only way to determine its serviceability yourself is to check the charging of the generator, or rather, the amount of voltage it supplies to the battery terminals. Depending on the make and model of the machine, it can range from 13.5 to 15.5 V. Therefore, before checking the operation of the generator to ensure that the regulator is working properly, you need to find out exactly what voltage it should produce. This information can be obtained from the vehicle's owner's manual.
How to test a generator with a multimeter? To do this, switch the device to voltmeter mode and, observing polarity, connect its probes to the battery terminals with the engine not running. A voltage between 12-12.8 V is considered normal. Next, start the engine and repeat the procedure. The voltage at the battery terminals should increase to 13.5-15.5 V. Only in this case can the regulator be considered operational. An increase or decrease in voltage, on the contrary, indicates that it is faulty.
Differences in the repair of carburetor and injection versions
From a repair point of view, the carburetor and injection versions of the VAZ 2104 engine differ in that:
- a carburetor engine is easier to repair in the field, but it breaks down more often;
- The VAZ 2104 injection engine fails less often, but it is more difficult to repair without the appropriate infrastructure.
The carburetor engine of the VAZ 2104 has a device that has been familiar to consumers of domestic automotive products since pre-war times. The air-fuel mixture is prepared in the carburetor, enters the engine cylinder, ignites from the spark plug and pushes the piston. If the VAZ 2104 engine stalls while driving, if the idle speed fluctuates, if the engine reacts sluggishly to pressing the accelerator pedal, there is only one recipe. I pulled the suction towards myself and off to repairs. Gasoline consumption will increase, but you will get to the nearest auto repair shop in a VAZ 2104 with a carburetor engine.
When an engine with multiport injection needs to be repaired, things are not so simple. The operating modes of the injection engine are controlled by the electronic control unit (ECU). To understand what exactly the fault is that requires repair, you need computer diagnostics, reading error codes from the computer. This is not the case on the road. Get the cable, ask for a trailer or call a tow truck.
Both versions of the VAZ 2104 engine have pros and cons. The trend in the global automobile industry is the transition from carburetor to injection engines. Our time is the time of the injector. So, compared to a carburetor engine, an injection engine has more advantages than disadvantages. And it's not just a matter of repairs.
Injection engines are more economical, reliable and environmentally friendly.
How to check the diode bridge of a generator without removing it from the car
The diode bridge acts as a kind of rectifier, converting the alternating current generated by the generator into direct current. It usually consists of six semiconductor diodes, three of them are “positive”, the other three are “negative”, i.e. the first pass current in one direction, the second in the other. The rectifier can be checked either with the generator removed or without dismantling it. Let's consider both options.
Before checking the diode bridge of the generator without removing it, it is necessary to disconnect all wires from it and from the voltage regulator, having first disconnected the ground terminal from the battery. First, let's check the rectifier for a short circuit. Turn on the multimeter in ohmmeter mode, connect the positive (red) probe to terminal “30” of the generator (positive contact of the bridge), and the negative one to the generator housing. With a working rectifier, the device readings will tend to infinity. If the resistance is several ohms, the rectifier is faulty.
Read also: Tacheometer electronic principle of operation
Now let's talk about how to check the generator diode bridge for breakdown. Let's start with the positive diodes. Again, connect the positive probe to the corresponding bridge contact (pin “30”), and the negative probe to the rectifier mounting bolts (brackets). In this case, the resistance should also tend to infinity. Otherwise, one or more diodes are broken.
Let's move on to "negative" semiconductors. We attach the red probe of the tester to the rectifier mounting bolts, the black probe to the generator housing. Resistance tending to infinity is a sure sign that the diodes are intact.
Diagram of low, high and fog lights VAZ 2104
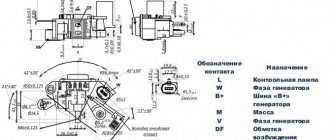
Description of the elements of the headlight and rear PTF activation circuit:
- Block lights.
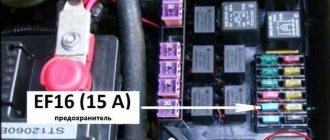
- Mounting device with fuses.
- Switching element for lighting optics in a three-lever switch.
- toggle switch to activate and deactivate external light.
- Switching device for rear fog lights.
- Rear optics of the car.
- Safety element for the rear PTF electrical circuit.
- The fog lamp indicator light installed in the control lamp unit.
- High beam optics indicator mounted on the speedometer.
- Ignition switch.
P5 is a relay designed to activate and deactivate high beam optics, and P6 is for low beam.
A - view of the main light connector:
- Low beam block.
- Output for connecting high beam lighting.
- Ground connector.
- Side lamp block.
Electrical circuit of optical devices for low and high beam lighting, as well as PTF
B is the output for connecting the 30th terminal of the generator device, and B is the contact of the printed circuit of the taillight:
- For connection to ground.
- To the light source of the stop signal.
- To the side light bulb.
- To the PTF light source.
- To the light bulb that turns on when reverse gear is activated.
- To the turn signal light source.
Checking the rotor winding
A common malfunction of a car generator is short-circuiting of the windings. This can happen as a result of a sudden voltage surge, water ingress, brush wear, etc. Since you can check the generator with a multimeter for the integrity of its windings only by gaining full access to them, you will need to dismantle the entire assembly. We will not describe this process, since it differs for different cars. Before checking the removed generator for operability of the rotor winding, it naturally needs to be disassembled.
After removing the rotor, we find slip rings on its shaft. There are only two of them. Having turned on the multimeter in ohmmeter mode, we connect its probes to these rings. The device should produce a resistance within 2-5 Ohms. These are normal indicators for a working rotor. A higher resistance indicates poor contact between the rings. In the opposite case, when the instrument readings approach zero, an interturn short circuit most likely occurs.
How to check the generator for the operability of the stator windings
Let's move on to the stator. It has several windings, each of which must be checked separately. But before this, you must definitely disconnect the wires connecting the terminals of the windings and the diode bridge.
We connect the probes of the multimeter, switched on in ohmmeter mode, to the terminals of each of the windings in turn. The working winding should have a resistance of about 0.2 Ohm.
Next, you need to measure the resistance between the common terminal (zero) of the stator and the terminal of any of the windings. It should be at least 0.3 Ohm.
Generator bearing wear
A car generator has two bearings. One of them is fixed to the rotor shaft, the second is pressed into the central part of the cover. A hum or whistle coming from the generator while the engine is running is a sure sign that one of the bearings has given up its life. A related symptom may be heating of the generator housing. If you notice these signs, hurry to replace the bearings. Otherwise, this will lead to distortion of the rotor shaft or jamming with all the ensuing consequences.
You can check the bearings by removing the alternator belt and turning its shaft by hand. If the rotor rotates easily, without jerking or play, the bearings will still serve. If rotation is difficult or there is play in the shaft, do not delay replacing the bearings.
The generator is a miniature electrical station that supplies power to many components of the car: ignition, cooling, electrical wiring. Therefore, its failure will certainly entail other malfunctions. To prevent problems, you need to have this part diagnosed and repaired from time to time.
It will be useful for any motorist to know how to check the operation of a generator in a car, but first you need to understand the possible signs of a breakdown.
Download
LADA car bodies. Technical requirements for acceptance for repair, repair and release from repair by enterprises of the service and sales network of JSC AVTOVAZ TU 017207.255.00232934-2006, control dimensions of the body, design, diagnostics, design features of VAZ Car bodies general information (Lada 1970-2015) These technical conditions repairs apply to car bodies produced by JSC AVTOVAZ and their components for repair (disassembly and assembly,
Sources
- https://divide.doitwork.ru/skachat-vaz-21043-shema-montazhnogo-bloka.html
- https://camp.provelsk.ru/skachat-vaz-21043-inzhektor-shema-elektrooborudovanija.html
- https://mobiauto.pp.ua/page/2842/
Symptoms of malfunction
may indicate a generator malfunction :
- the warning light on the dashboard is constantly on;
- The battery began to discharge quickly, and recharging does not save the situation;
- there are malfunctions in the functioning of electrical equipment (ventilation and heating, multimedia devices, alarm system and lighting), even if the motor is working properly;
- there was a smell of something burnt in the car interior;
- the generator began to whistle or rustle.
If you notice these symptoms, you should immediately go to a car service center for a thorough diagnosis. However, you can check the functionality of the generator on your own, especially if you have the skills to use an autotester.
Common breakdowns
Generator faults can be electrical or mechanical. These include:
- loss of functionality of the voltage regulator;
- breakdown of the rectifier unit (diode bridge);
- short circuit of stator windings;
- current short circuit in the rotor winding;
- wear of bearings and brushes.
Read also: Why does the reducer on a gas cylinder hum?
Voltage regulator
The purpose of this unit is to normalize the voltage before feeding it into the automotive electrical circuit. You can check the serviceability of the regulator by checking the voltage that it supplies to the battery terminals. This indicator depends on the model and brand of the vehicle and varies between 13.5-15.5 V. Therefore, you should find out in advance what voltage your particular type of regulator produces. This can be done by studying the manual for using the machine. For example, you can take a VAZ 2107 or 2110 car, since these vehicles have the most typical faults associated with the integral and relays.
Using a Multimeter
To check the VAZ 2110 generator with a multimeter, you need to switch the device to voltmeter mode. Then you need to connect its probes to the battery terminals. The most important thing is to observe the polarity and turn off the car engine. The voltage normally varies from 12 to 12.8 V. Next, the procedure should be repeated, but with the engine running. The voltage readings should rise to 13.5-15.5 V. Lower and higher voltage values indicate a malfunction of the generator.
Checking the generator without removing it from the car
A bridge of diodes performs the functions of a kind of alternating current converter. It contains three negative and three positive diodes.
Before checking the bridge, you need to disconnect all the wires coming from it and from the voltage regulator. You also need to remove the ground anchor from the battery in advance. First you need to check the rectifier for short circuits. We activate the ohmmeter mode on the multimeter and connect the red (positive) probe to the positive contact of the diode bridge, and the negative probe to the surface of the housing of the generator itself. If the rectifier is fully operational, then the readings of the measuring device will go to infinity. In other cases, the rectifier will be inoperative.
Testing of stator and rotor windings
A common breakdown of a car generator is a short circuit in the windings. It occurs when current surges are too intense, brushes wear out and liquid gets in.
So, you need to remove the rotor and find a pair of slip rings on its structure that will need to be ringed. Having started the ohmmeter mode on the multimeter, we connect the probes to these rings. Normal resistance is 2-6 ohms. If you get large values, then there is a loss of contact between the slip rings. If the device shows lower values, then an interturn short circuit has occurred.
The starter has several windings at once. They need to be checked separately. However, first you need to disconnect the wires that connect the diode bridge and the winding terminals.
Then you should measure the resistance between zero and the terminals of the windings. The normal value is no less than 0.3 Ohm.
Wear of brushes and bearings
If you have already disassembled the generator, then it is advisable to check the condition of the brushes. They can wear out or break due to misalignment of the rotor shaft. If the brushes are damaged, they should be replaced with new ones.
Inside a car alternator there are a pair of bearings. One is fixed on the rotor shaft, the other is in the center of the cover. The whistling and hum of the generator when the engine is running is a clear sign of bearing wear. In this case, the generator housing can become very hot. If you notice such signs, it is better to replace the bearings immediately, otherwise you may encounter more serious problems.
You can check the bearing by removing the belt from the generator and trying to rotate its shaft with your own hand. If the part rotates freely and easily, then everything is in order. If it is difficult to rotate the rotor, then you should not delay replacing the bearings.
How to check the generator for performance? Self-check and repair of the generator
A generator is a typical electrical station that provides energy to all engine systems: power, cooling, ignition, so its failure will inevitably lead to other malfunctions. To prevent breakdowns, you need to systematically diagnose it, and if problems cannot be avoided, repair it immediately.
In this article we will talk about how to check the generator for performance without resorting to the help of professionals. But before that, let's look at the symptoms of its possible defects.
Total information
The appearance of the VAZ 2104 station wagon on the domestic market was justified by several reasons:
- Firstly, its predecessor, the VAZ 2102, was based on a penny chassis, while the automaker was already mass-producing more modern models (see, for example, VAZ 21213: nuances of operation).
- And secondly, the country needed transport that would allow ordinary citizens to provide themselves with a universal vehicle that could be used to transport simple belongings over long distances.
The video presented in the article clearly demonstrates its capabilities as a multifunctional vehicle capable of not only transporting passengers within the city, but also as a means of active tourism:
- travel to mountainous areas;
- trips to nature;
- long-distance routes to sea coasts, etc.
The model turned out to be popular in the countries of the socialist camp.
It was supplied there from 1984 to 2009 inclusive, and was offered under the trade names:
- Lada Estate,
- Lada Combi or Lada Nova Combi,
- Lada Riva Break.
The export version has always been distinguished by high-quality paint.
You can read about other differences between AvtoVAZ export models in the article - how much better the Samara Baltic version is than its domestic counterparts.
Main signs of generator malfunction
The following signs will indicate that the generator has failed or problems have arisen in its operation:
- constant lighting of the warning light in the form of a reddish battery on the dashboard, which indicates that the generator is not charging or is producing insufficient current;
- constantly discharging battery;
- interruptions in the operation of electrical equipment (lighting and alarm units, multimedia, heating and ventilation) while the engine is running;
- the appearance of a corresponding burnt aroma in the cabin (engine department);
- excess heating of the generator stator;
- rumble (rustle, whistle) of the generator.
Read also: What is measured in microns
The appearance of similar symptoms is a serious reason to conduct a diagnosis. To do this, it is absolutely not necessary to contact a service station, because you can completely check the generator for operability on your own, especially if you have even the slightest ability to use an auto tester. But first, let's talk about the main breakdowns.
What is important to remember
When checking in this way, it is extremely important to be careful and follow safety precautions. If a would-be auto electrician confuses the plus of the battery with the minus, then as a result it may well fail. As a result, the “specialist” will be additionally “punished” with a ruble.
Also, do not touch bare areas of the wiring with your hands when the electrical circuit has already been assembled. Electric shocks themselves are quite unpleasant. And if you are very “lucky”, for example, to get hit while standing in a puddle in shoes that conduct electricity well, then the situation can generally turn out to be lethal. Therefore, if a car owner strongly doubts his technical abilities, it is better to entrust the diagnosis to specialists.
Subscribe to our Social networks
Checking the voltage regulator
The regulator is designed to stabilize the generated voltage before supplying it to the vehicle's on-board circuit, including the battery for recharging it. There is no other way to find its serviceability without the help of others than to check the charging of the generator, or more precisely, the amount of voltage it supplies to the battery terminals. Depending on the make and model of the car, it can range from 13.5 to 15.5 V. Therefore, before checking the operation of the generator to ensure that the regulator is working properly, you need to find out exactly what voltage it should produce. This information can be obtained from the vehicle's owner's manual.
How to test a generator with a multimeter? To do this, switch the device to voltmeter mode and, observing polarity, connect its probes to the battery terminals with the engine not running. The usual voltage is 12-12.8 V. Then start the engine and repeat the function. The voltage at the battery terminals should increase to 13.5-15.5 V. Only in this case can the regulator be considered operational. An increase or decrease in voltage, on the contrary, indicates that it is faulty.
How to check a VAZ generator
Checking the VAZ 2101 generator
-2107: 1. Checking the positive and negative valves of the rectifier unit
Reason for lack of battery charge on VAZ 2101 How to find
Make money on YouTube by connecting to the Channel Group affiliate program.
Differences in the repair of carburetor and injection versions
From a repair point of view, the carburetor and injection versions of the VAZ 2104 engine differ in that:
- a carburetor engine is easier to repair in the field, but it breaks down more often;
- The VAZ 2104 injection engine fails less often, but it is more difficult to repair without the appropriate infrastructure.
The carburetor engine of the VAZ 2104 has a device that has been familiar to consumers of domestic automotive products since pre-war times. The air-fuel mixture is prepared in the carburetor, enters the engine cylinder, ignites from the spark plug and pushes the piston. If the VAZ 2104 engine stalls while driving, if the idle speed fluctuates, if the engine reacts sluggishly to pressing the accelerator pedal, there is only one recipe. I pulled the suction towards myself and off to repairs. Gasoline consumption will increase, but you will get to the nearest auto repair shop in a VAZ 2104 with a carburetor engine.
When an engine with multiport injection needs to be repaired, things are not so simple. The operating modes of the injection engine are controlled by the electronic control unit (ECU). To understand what exactly the fault is that requires repair, you need computer diagnostics, reading error codes from the computer. This is not the case on the road. Get the cable, ask for a trailer or call a tow truck.
Both versions of the VAZ 2104 engine have pros and cons. The trend in the global automobile industry is the transition from carburetor to injection engines. Our time is the time of the injector. So, compared to a carburetor engine, an injection engine has more advantages than disadvantages. And it's not just a matter of repairs.
Injection engines are more economical, reliable and environmentally friendly.
How to check the diode bridge of a generator without removing it from the car
The diode bridge plays the role of a typical rectifier, converting the alternating current generated by the generator into constant current. Usually it consists of 6 semiconductor diodes, three of them are “positive”, the other three are “negative”, i.e. the first ones pass current in one direction, the second ones - in the other. The rectifier can be checked either with the generator removed or without dismantling it. Let's look at both options.
Before checking the diode bridge of the generator without removing it, you need to disconnect all the wires from it and from the voltage regulator, having previously disconnected the ground terminal from the battery. First, let's check the rectifier for short circuit. Turn on the multimeter in ohmmeter mode, connect the positive (reddish) probe to terminal “30” of the generator (positive contact of the bridge), and the negative one to the generator housing. With a working rectifier, the device readings will tend to infinity. If the resistance is several ohms, the rectifier is faulty.
Now let's talk about how to check the generator diode bridge for breakdown. Let's start with the positive diodes. Again, connect the positive probe to the corresponding bridge contact (pin “30”), and the negative probe to the rectifier mounting bolts (brackets). With all this, resistance must also tend to infinity. Otherwise, one or more diodes are broken.
Let's move on to “negative” semiconductors. We connect the reddish probe of the tester to the rectifier, the dark one to the generator housing. Resistance tending to infinity is a sure symbol that the diodes are intact.
Lada 2104 ★ Sputnik ☭ › Logbook › No charging
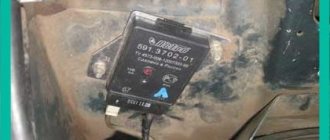
Comrades, we need your help. My generator burned out. My car is a VAZ 2104, 1990. I'm the third owner. The car had a G222 generator. It's not a fact that it's normal. Then it was either filled with antifreeze, or with acid from a frozen Akum - this was before my time, well, in general, the voltage regulator died and in 2007 we converted it into a G221 with an external launch vehicle on the wing. Everything worked smoothly. RN Astro maintained a voltage of 14.5-14.7V, dropped to 14V with all consumers turned on. Normal in general, although the Akum sucked at charging. At the same time, the old mounting block burned out and I replaced it with a new one 2105-3722010-08. In March 2022, the gene died completely. I didn't bother to fix it. I decided to buy a new one. I bought a G222 and I’m looking, but I’m missing one wire to connect it (terminal 15 remains empty). I don't have a warning light relay. I looked at the Murzilka - they write 37.3701 should be there. G222 was exchanged in the store for a VAZ-2108 65A generator (LKD-ATE-1) /372.3701R/ - analogue of 37.3701. It has more current - 65A. Installed it, connected it - no charging. I checked the circuit, rang the wires, checked the light bulb - everything was fine. Will replacing the standard LV with LV VTN 1702.3702-01 with wiring from terminal B to terminal 30 help? Another point - the pink wire goes to terminal 61. After turning the ignition key, + should appear on it. This wire is connected in the mounting block to the brown-white one that comes from the light bulb on the dash. Why it was necessary to change the color under the hood is a mystery. So, what else. The control light is working, but does not light up when I turn the key in the lock. It also doesn't light up when the engine is running. If you connect it to ground, it burns in both cases. Charging does not occur at any speed. Maybe the brushes haven't gotten used to it?
Problem solved The wires in the mounting block were mixed up. The wire to the excitation winding was sticking out in the wrong chip. In yellow instead of black. I don’t know how this happened. I didn't change them. It's also pink instead of brown and white. Well, it doesn't matter. The main thing is that now the generator is working, the light comes on when you turn the ignition key, and as soon as the engine starts, it goes out.
Source