September 25, 2015 Lada.Online 165 661 2
AVTOVAZ equips modern Lada cars (Granta, Kalina, Priora, Vesta and Largus) with engines of various powers, among them there are both 16 valve and 8 valve power units (for example, VAZ-11183, VAZ-11184, VAZ-11186 engines, VAZ-11189, VAZ-21116). In this article we will show you how to change the timing belt on an 8-valve engine.
How to change it yourself?
You can replace the belt on an 8-valve VAZ 2114 with an injector engine yourself or by ordering the appropriate service at a service station. During the shift process, there are nuances that must be taken into account when performing the task. If you make mistakes and do not change the strap correctly, this can lead to rapid wear and breakage. Below are instructions for replacing the belt in a VAZ 2114 8 valve.
Tools
If you change the belt yourself, prepare the following:
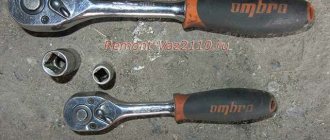
- a set of open-end wrenches, you will need tools for 13 and 17;
- long flat blade screwdriver;
- 10mm ring wrench, you can use a ratchet head;
- key for installing the tension roller;
- wheel wrench;
- jack.
User Pro Remont shared a video that describes in detail the procedure for replacing the timing belt pulley and timing belt in a VAZ 2114 car.
Algorithm of actions
How to change a belt correctly:
- Drive the car into a garage with a pit. The surface on which work is performed must be level. Switch the gear selector to neutral position.
- Loosen the bolts on the front right wheel. Place this part of the car on a jack so that the wheel can be rotated.
- Open the hood of the car. Using a 10mm wrench, remove the three screws that secure the plastic strap protector.
- Using a 13mm wrench, you need to loosen the bolt that secures the tension roller. Remove the device.
- You can see a mark on the camshaft gear; it is made in the form of a rectangular protrusion on the edge. When performing work, it is necessary that this mark coincides with the protrusion located on the fastening of the strap casing. If these marks do not match, you need to turn the wheel until they match.
- Then find the rubberized plug installed on the top of the clutch housing; it is located to the right of the power unit’s BC. The part is carefully pryed off with a screwdriver and removed from the seat. Under the plug you can see the flywheel crown; there is a mark on this device. It should be opposite the triangular protrusion located on the left. If the marks do not match, then take a 17mm wrench and loosen the tensioner. Using a pulley removal wrench, turn the device counterclockwise to loosen the timing belt.
- When the upper part of the belt is removed from the gear assembly, take a 17mm wrench and turn the crankshaft until the flywheel marks are opposite each other. The flywheel itself must be secured in this position; to secure it, use a screwdriver and install it between the teeth. If you have an assistant, ask him to hold the tool to prevent it from turning.
- Now you can remove the right wheel. Unscrew the screws that secure the arch protection and dismantle it.
- Using a 17 mm wrench, unscrew the nut securing the generator set pulley. When unscrewing, make sure that the flywheel does not turn.
- Dismantle the generator pulley and remove it from its seat.
- Remove the timing belt from the crankshaft disc.
- Using a 17mm wrench, completely unscrew the tensioner pulley lock and remove it from its seat. If you loosen the fastening, the belt can be removed.
- Install the new product onto the crankshaft disc. When installing, make sure that the marks are not broken. Install the generator set drive pulley by first placing a strap on it.
- Place the product on the gear of the mechanism. Install the tension roller.
- The strap is being installed. During installation, the tension roller must be turned with a special tool purchased in advance at the store. If you don't have one, you can use two self-tapping screws and a screwdriver. Self-tapping screws are installed in the grooves, and a screwdriver secures them. Turning is done counterclockwise. Tension the belt using the tension roller and tighten the screw that secures the roller.
- It is necessary to set marks if they are lost during the work process. The installation procedure for all components is performed in reverse order.
Photo gallery
Photos of belt replacement are shown below.
Remove the screws securing the timing belt guard.
The mark on the camshaft gear must coincide with the mark on the housing mount
Loosen the strap tension roller by turning it counterclockwise
Remove the belt from the pulleys and install a new product
Unscrew the nut securing the generator shaft
Put on the new belt and tighten the roller
Checking the set ignition
To check the ignition on an 8-valve engine, an injector, you should prepare:
- Multimeter.
- Set of keys and screwdrivers.
- Pliers (necessarily with insulated handles).
Attention! Due to the lack of special equipment, the described method can only test the operation of the circuits. Diagnostics of the microprocessor part will not be available.
The process is:
- When the ignition is turned off, check how tightly the high voltage wires are seated and what contact is in the module.
- Remove the connector from the module, connect a multimeter (monitoring mode should be low AC) to pins C and B, make sure there is voltage. Check the coil (2nd and 4th contacts).
Checking the presence of power on the ignition module
- Check the functionality of high-voltage wires. Install a working spark plug in each cap in turn, attach one end to the block and crank the engine with the starter. The presence of a spark signals that everything is normal. Its absence on each wire means the module is faulty.
Checking high voltage wires
If you managed to set the ignition correctly on the VAZ model and this was confirmed by the test, but problems are still observed, you need to check the power system.
Why does the timing belt slip?
Water pump The cause may be one or several in combination. Let's look at them in order.
1. The belt itself may be to blame, or rather, the faulty manufacturer. A belt that has different rigidity across widths begins to float towards less rigidity almost immediately after installation. Diagnostics in this case is simple, remove it, turn it the other way, install it, and if it starts to creep in the other direction, then the culprit has been found. This belt is definitely for scrap. To be fair, this is much less common now. Tip: Always keep timing belts and alternator belts in your trunk.
Preparatory operations
It's immediately obvious that the owner loves his car.
VAZ engine 8 valves.
If you plan to replace the pump, then let the engine cool, remove the protection and then drain the antifreeze. It is enough to drain only from the cylinder block.
Plug on the cylinder block.
Jack up the car and remove the front right wheel and plastic mudguard.
Choosing a quality timing belt
Often the problem of a belt coming off is associated with the poor quality of the product itself. For this reason, knowledge on choosing the right belt will be of great benefit.
First of all, it should be noted that today there are several popular belt manufacturers. Their products are worth buying, but again not thoughtlessly, but carefully checking, since no one has ruled out fakes and defects.
So, let's move on to choosing a good timing belt.
Conteg
Belts are supplied to almost all countries of the world, and the main consumers of this company’s products are such automotive industry giants as Volkswagen, Fiat, Opel and others.
Contitech timing belt
As you know, Contitech has recently purchased several subsidiaries in the Middle Kingdom, which indicates an expansion of its sphere of influence in Asia and throughout the world. Today, almost everything is done in China, you just need to be able to distinguish between official Chinese ones.
So, Kontiteg products with a Chinese logo are expected to appear on the market soon, but this is unlikely to affect the quality.
Today, timing belts from Kontiteg are considered the best for installation not only in foreign cars, but also in domestic cars. They are reliable, rarely break, and last a long time.
This does not mean at all that by installing a belt from Koniteteg, you can forget about service life and proper care. Despite the high reliability of products of this brand, if operating instructions are not followed, problems cannot be avoided.
Installation process
The timing belt itself is a rubber product closed with teeth inward, which synchronizes the torque between the camshaft and crankshaft. Ignoring its wear will not lead to anything good, because in the best case, your engine will stall while driving, and in the worst case, the entire wheelbase will jam, which can lead to the most unpredictable incidents on the road.
The replacement and debugging itself is carried out in two stages, in the first stage the main repair and debugging work is carried out, and the second stage carries the function of monitoring the work done.
First stage
- The assistant gets into the car and puts 5th gear in the gearbox, and at this time you remove the front belt protection.
- Insert the ratchet into the place allocated for it and begin to turn the crankshaft, you need to do this until you see that the mark located on the camshaft has not moved to remove several teeth from the control antenna of the rear cover. (this action is necessary to reduce the degree of belt tension).
- We dismantle the drive pulley on the crankshaft and return the mounting bolt to its place.
- The assistant switches the gearbox to “neutral”.
- Again, we begin to carefully turn the crankshaft until the mark on the VAZ 2114 flywheel is in the central position.
Coincidence of the mark on the flywheel with the slot in the bar
- We check that the installation mark of the rear cover matches the mark located on the camshaft pulley; if they match, then you can unscrew the roller nut, then remove the belt itself.
- We install a new belt - we start with the roller, then we put it on the pump pulley and lastly on the crankshaft pulley.
- We adjust the tension by turning the adjusting roller counterclockwise.
- Carefully turn the crankshaft again so that the marks are in their previous position (they will 100% go astray when putting on a new belt and adjusting the tension).
Mark on the crankshaft pulley
Second stage (control-final)
- Before checking the timing marks on the VAZ 2114, you need to fix the pulley on the generator and tension the belt with a roller to the maximum.
- Now we check all the matches, if nothing is wrong anywhere, then we install the protection back and clean the workplace.
Looking under the hood of your car, with knowledge of this information, you will understand that there is nothing difficult in this procedure, but its success is quite dependent on the skill of the performer. Therefore, if something doesn’t work out the first time, just repeat the operation, you may even need to do it twice. Don’t be discouraged, because after the difficult first time it will only take you a few minutes, like a seasoned professional.
conclusions
As practice shows, setting the ignition on a VAZ-2114 is quite simple, but not every motorist can do it. So, it is necessary to have knowledge of the operation of the engine and its design. Therefore, if a motorist is not able to do this type of repair on his own, he must contact a car service center.
For proper operation of the engine, the timing marks must be correctly set after performing various actions - complete replacement of the mechanism or repair. The service station charges a small amount for such services. But you can save money and set the timing marks yourself. How to complete the procedure on VAZ cars will be discussed further.
Signs and causes of timing belt eating
It is very easy to find out that the timing belt has begun to be “eaten up.” Upon visual inspection, it will immediately become clear that it (and most often one of its sides) has become thinner and turned into rags. For obvious reasons, it is simply unacceptable to continue to use such a belt, since due to severe wear, it can break at any time.
But there is also no need to rush to install a new belt, since in a short time it will come to exactly the same condition as the old one. First, you need to figure out why the timing belt on the VAZ-2114 is eating.
In most cases, such severe belt wear is preceded by the replacement of components that directly affect its tension and operation, namely:
- pulleys;
- tension roller;
- pump
If you carried out a timing belt repair, and immediately after that the belt started “eating,” then the very first thing you should check is whether the indicated elements are installed correctly (for example, when turning the roller and pulleys there should be no crunching or other extraneous sounds, but they themselves should rotate softly and smoothly).
The next thing to pay attention to is the tension of the belt. If it is weaker than required, then there is a high probability of the belt periodically slipping through several teeth, which can cause it to quickly be eaten
Otherwise (if the tension is excessive), there is a possibility of it breaking due to excessive load.
Checking whether the belt is tensioned correctly is very simple. It is enough to take it with two fingers and try to twist it (turn it in the transverse direction). If the belt has the correct tension, it can be turned no more than halfway. Otherwise (if the belt rotates more than 180 degrees or vice versa - it almost does not change its position, its tension should be adjusted).
This is done as follows (along with installing a new belt):
- Using a 17 key, turn the crankshaft until the marks on the engine and on the upper pulley match.
- After removing the plug, check the coincidence of similar marks in the crankcase.
- If there is a coincidence, immediately secure the flywheel with a screwdriver.
- Loosen the mounting screws and unscrew the alternator belt tension adjusting screw by 80%.
- Unscrew the generator pulley fixing screw.
- Loosen the nut on the timing belt tension pulley.
- Remove the old belt and install a new one.
- Having fixed the tension roller motionless using a fork wrench (or a lock ring remover), tighten the adjusting nut with a wrench until the desired timing belt tension is obtained (how to measure it was described above).
If the already installed timing belt is in good condition and you only need to adjust its tension, you only need to follow the last point of the instructions. In most cases, after correctly tensioning the belt, the problem with it “eating” disappears, but not always
In this situation, you should pay close attention to the condition of the gear teeth.
You can determine the wear of the gears by eye - if some teeth are ground down, broken off, or missing altogether, then this is a direct indication for their replacement; there are no other options. In some cases, the situation can be aggravated by an oil leak - when it gets on the belt, it (like many other petroleum products) causes it to corrode and quickly peel off the teeth.
Consequences of incorrectly setting timing marks
If the ignition is set incorrectly, the following negative aspects are possible:
- If the engine has 16 valves, then they become deformed or bent during operation, accumulating damage.
- The previous problem causes damage to the cylinder head.
- The guide bushings may also become unusable.
- Cracks may appear in other engine components.
Crack in the cylinder block
- The motor overheats.
- The engine piston mechanism can burn out.
- Oil residue may appear on the spark plugs.
Oil deposits on spark plugs
- The fuel mixture loses its ignition moment.
Note! If the engine has 8 valves, then the consequences are not so critical - traction disappears, the belt quickly wears out and breaks.
After repairs, the following factors most often indicate an incorrectly set ignition:
- The car accelerates worse.
- Frequent overheating of the motor.
- The craving became much worse.
Timing belt VAZ 2114 8 valves: functions, location and signs of malfunctions
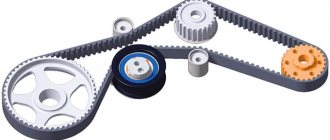
So, the belt is under a protective cover on the crankshaft pulley side. The belt itself is a ring structure, made of reinforced rubber, and has an internal tooth structure so that the teeth on the crankshaft pulley and timing gear can engage with the belt.
Engaging with the crankshaft and camshaft with its toothed side, the belt ensures synchronous rotation of the shafts, and with its smooth side it drives the water pump shaft of the internal combustion engine cooling system. The required timing belt tension is maintained by a tension roller.
If the timing belt is torn or has become dislodged/flipped off or jumped, the vehicle’s internal combustion engine stalls or operates extremely unstably. Possible signs of timing belt failure:
- the engine stalls;
- the car does not start;
- “phase sensor error” lights up - failure of the timing belt (displacement or slippage of the belt).
It is important to understand that, subject to constant wear and various loads (including temperature), the timing belt 2114 may fail ahead of schedule
For this reason, it is important to pay attention to signs of problems with this element.
For example, the timing belt on a VAZ 2114 “chews”. There may be several reasons why the timing belt is chewing. This is either mechanical damage to the teeth of the crankshaft or pulley, sagging of the belt, displacement of the axes of the pump roller and tension roller, etc.
Another such reason may be the belt slipping or moving to the side relative to its working position. This can lead to damage to the timing belt structure (contact with metal parts, abrasion on the edge of the tension roller) and, accordingly, disruption of the car engine.
The main reasons for belt displacement can be:
- manufacturing defect of the product (different rigidity across the width);
- failure of the water pump bearings (play, lack of lubrication, poor cleaning of the seat);
- deformation of the tension roller mounting pin (improper tightening or errors when replacing elements).
A few tips before you start replacing the timing belt
Firstly, it is recommended to immediately change the tension roller along with replacing the timing belt. Secondly, before installing a new timing belt, you need to check whether there is grease on the roller and whether there is any play in the pump. Thirdly, if after replacing the timing belt you hear a characteristic whistle, then its tension needs to be slightly loosened. It is worth noting that the operation of replacing the timing belt is not complicated and therefore you don’t have to pay the technicians at a car service center, but carry out all the work yourself. The timing belt replacement process is divided into two phases, which we will discuss below.
All the steps to replacing the timing belt “from start to finish”
Before replacing, you need to make sure that: neutral gear is engaged, the car is stopped, the minus terminal is removed from the battery (key “10”). The plastic cover is removed from engine 11183 and the part is carefully pulled up. Then remove the drive casing:
- Unscrew the three fastening screws and remove the plastic part (see photo).
Timing casing on motor 2111 and 11183
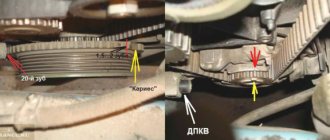
Using the “17” key, rotate the crankshaft and see when the marks on the upper pulley and on the engine coincide. Then, opening the plug, we check the alignment of the marks in the clutch housing. Immediately fix the flywheel with a screwdriver.
Marks on the pulley and flywheel
An alternative way to “break” the timing belt
It is impossible to replace the timing belt on a VAZ-2114 without removing the alternator belt. loosen the upper and lower fastening screws, mark the position of the adjusting screw and unscrew it by 80%.
How to move the generator to the engine
Using a 17mm wrench, unscrew the screw securing the generator drive pulley. During installation, you will need to ensure that the marks match (see photo). The screw tightening torque is 99-110 N*m.
Generator pulley on engine
Loosen the nut on the roller, turn it and remove the belt. Now you can replace the roller itself.
The final step for dismantling
When installing a new belt, the upper pulley is once again aligned according to the marks (see above). The locking screwdriver is removed after installation.
New timing belt installed
How to adjust tension?
If everything was done correctly, it means that the belt can be turned half a turn with two fingers, but no more (as in the photo).
Correct tension setting
A fork wrench is used to make adjustments. If you don't have such a wrench, circlip pliers will do. Hold the roller with a wrench and tighten the nut.
The holes for the key should be located under the nut from below. This is the correct position of the roller.
Recommendations
- Before installing a new belt, wipe all pulleys, that is, the teeth on them, with white spirit. And the adjusting screw can be treated with a rust solvent.
- There is no point in protecting a new belt with silicone lubricant. By the way, according to the regulations provided for the VAZ-2114, the timing belt must be replaced every 60,000 km or if necessary. And the need can even be caused by oil products getting on the rubber.
Apparently, an assistant must fix the flywheel: the clutch housing and timing drive are located on two different sides.
2108-1006120 – roller
Attention. parts 2108-1006120 and 2112-1006120 are not interchangeable!
2108-1006129 – pin for the roller;
2108-1006040-10 – belt;
2108-1006149 – seal under the casing;
2108-1006146 – plastic casing.
Analogs of belts
- GATES 5521 or 5521XS (heavy duty), recommended
- FINWHALE BD-111
- BOSCH 1 987 949 559
- LEMFORDER 58-111-19 or 14458 01
- CONTITECH ST-527
- GOOD YEAR G1474 (semicircular tooth) or G1485 (trapezoid tooth)
- DAYCO 111x190/1
- HANSE HZ 011 008
- BRTI 21080-1006040-10
- TOYOTA 13568-19035
- RENAULT 7701462019
- OPEL 636359
- ROVER GTB1124
- AYWIPARTS AW2110560
- PROCODIS FRANCE 05CD27
- FAI 40305
- GK 791170
- MAGNETI MARELLI 340018181434
- MAPCO 43080
- HEPU 29-0165
- OPTIMAL R-1113
- SCT G124
- WILMINK WG1151273
- VEYANCE G1474
- OPTIBELT ZRK 1123 (3 pcs.)
- TRISCAN 8645 5521 (2 pcs.) or 8645 5124 (2 pcs.)
- FLENNOR 4410 (2 pcs.) or F904410 (belt + roller)
- LYNXauto 111CL19 (1 piece) or PK-1236 (belt + roller)
Analogues of the video
- GATES T42042 or T42042A (2 pcs.)
- MAPCO 23081
- FLENNOR FS99018
- LUK 531 0671 20
- OPTIMAL 0N1917
- BREDA LORETT TDI3009
- TORQUE 830900AE2
- ESPRA 2108-1006120/ES0108
- INA 531075010
- CORAM C747
- VPZ-23 830900AE1
How to change the timing belt yourself
You can replace it in a VAZ-2114 car (8 valves) yourself if you read the operating instructions, in which everything is clearly described. It is recommended to change this element no less than after 35-45 thousand km, but it is better to be guided by the situation. After all, replacement may be needed earlier, and if you wait for the “recommended kilometers” to run, you can only wait for the belt to slip off the gears, fray, burst, or even break completely. In the VAZ-2114 car, you can install a special injector that will notify you when the timing belt comes off or breaks. Before deciding whether it needs to be replaced, it is necessary to inspect it, and if it is in poor condition, then it is not recommended to delay replacement. Information on which belt is best to choose can be found in the instructions for the VAZ-2114.
To change the belt yourself, you must have:
- new belt;
- a set of keys;
- new tension roller.
Replacement instructions are as follows:
- The car is put on the handbrake in fourth or fifth gear.
- Next, the cover protecting the camshaft drive is unscrewed and removed.
- The next step is to loosen the generator drive belt, and then it is removed from the crankshaft along with the pulley. The bolt holding it in place must be left in place.
- Afterwards the car can be put into neutral gear.
- Now we need to do the labels. The crankshaft rotates clockwise, while you need to observe the marks and the flywheel. The shaft should be turned until the mark stops parallel to the middle division on the scale.
- When the mark on the pulley is exactly opposite the mark on the protected cover, you need to slightly loosen the fastening nut on the tension roller. If the need arises, the roller must be changed.
- Next, using a roller, you need to loosen the belt, which will make it possible to remove it.
- Afterwards, install a new part on the crankshaft pulley, then pull the leading branch of the product onto the camshaft pulley to avoid sagging.
- Then the crankshaft is turned one and a half to two turns, and the marks are set. If they do not match, the belt is removed again and reinstalled.
- After the marks are set, the bolt on the crankshaft is unscrewed, and the generator pulley returns to its place, secured with the bolt.
- In order to adjust the timing belt and put on the alternator belt, you need to turn the tension roller counterclockwise.
- Upon completion of the replacement, you will need to turn on the engine and, based on the sound, determine whether it is necessary to adjust the tension of the timing belt. Also, if all repairs have been carried out correctly, there should be no noise. If it is pulled too tight, a hum will be heard from the roller. It is necessary to loosen it and turn it about 15 degrees to the left, and then fasten it again.
What is timing belt?
Timing mechanism diagram
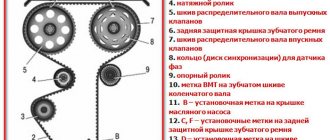
The gas distribution mechanism is a mechanism in which the valve timing of the power unit is controlled. For normal engine performance, there are special marks by which the timing belt must be set.
Some are on the block, while others are on the pulleys. When the cylinder is in the first upper position, all these marks must coincide.
The timing marks are misaligned if the drive toothed belt is broken or if it is replaced incorrectly. So, in these cases, the engine will not work correctly and the marks will need to be re-set. Doing this is quite problematic and not everyone can do it.
Signs of a faulty timing belt and their causes
Some experts say that belt replacement is required after approximately 75,000 km under standard vehicle operating conditions, or after 60,000 km under heavy-duty conditions. At the same time, experts often recommend periodically diagnosing the car anyway, since in fact, replacing it with a VAZ-2114 may be necessary earlier due to the following defects:
- The appearance of swelling;
- Cracks;
- Various structural defects due to constant corrosion by oil;
- Fraying the ends.
If any of these defects appear, we can confidently say that an urgent replacement of the timing belt in the VAZ-2114 is necessary. When it finally breaks while driving along a highway or road, this can ultimately cause very serious consequences, since the valves collide with the pistons and, accordingly, become deformed, which will require extremely expensive repair work.
In the vast majority of cases, this all arises due to:
- Unskillful or aggressive driving;
- Purchase of low-quality consumables;
- Operation of transport in rather specific climatic conditions;
- Incorrect installation of the belt during the previous replacement.
Noticing that the engine has stopped starting normally, stalls during operation, or a phase sensor error appears, all this indicates a malfunction with the timing belt. If you plan to replace the timing belt in a VAZ-2114 yourself, there will be no difficulties if you follow simple instructions.
Special attention should be paid to the fact that often the cause of belt chafing is the rollers, and this is quite easy to determine, since it has noticeable damage on one side, which is why it eventually breaks. To avoid such troubles, it is recommended to check the condition of the rollers from time to time.
Diagnostics
Diagnostics must be carried out every 20,000 km of the vehicle. To do this, remove the protective cover and inspect the belt. The belt should not have chips, tears or cracks. Also, it should not have unraveling threads, etc. After inspecting the belt, it is necessary to inspect the rollers and listen to them with the engine running for noise.
Old cracked timing belt
It is necessary to inspect the alignment of the belt relative to the camshaft pulley, crankshaft, pump and rollers.
When is it necessary to replace the timing belt and set the marks?
Without exaggeration, a worn timing belt can be called a “ticking time bomb.”
The importance of this element in the car system is difficult to overestimate. Usually it is made of high-quality rubber, the service life of which is designed for 50-60 thousand kilometers.
But, if the vehicle is operated in unfavorable conditions, the replacement interval will be different.
In most cases, the replacement interval is indicated by the manufacturer in the documentation for the vehicle. In addition to the resource built into the belt, it is worth considering the following factors that shorten the service life of the rubber element:
Related article: Error P0171 – mixture too lean
- Engine oil getting on the surface of the timing belt
- Leakage of the front crankshaft oil seal
- Tension roller malfunction
- Pump jamming
As you can see, there can be a sufficient number of breakdowns in the car system that directly affect the service life of the belt. If the scheduled replacement time has come, or its resource has been prematurely exhausted, it is not enough to simply replace the old mechanism with a new one - you also need to take care of the correct installation. To successfully do all the work, it is enough to arm yourself with the necessary tools and know how to align the belt with the marks.
When is replacement required?
The belt has a resource - a set service life. If this period has expired, the spare part must be replaced even if it looks normal. After all, a break can happen at any moment.
When asked how many kilometers it is necessary to replace the belt so that the belt does not break, experienced car enthusiasts give different answers. Some believe that after 50–60 thousand kilometers. Others clarify: this replacement period is relevant for an 8v (eight-valve) engine. If a 16v (sixteen-valve) engine is installed, then replacement must be done after 30–45 thousand kilometers.
In the video, a practitioner shows what timing belts look like after a long run and whether advertising should be trusted. Filmed by ExpertR channel.
Other causes of timing belt wear
One of the camshaft teeth is broken.
As a rule, such a problem can be noticed with the naked eye, and belt failure begins with the peeling of the teeth themselves from the belt.
A more significant cause of such a malfunction can be oil leakage from the engine, which gets onto the belt during operation, thereby wearing it out faster. An oil leak is also easy to notice, but eliminating it will require certain skills.
Such problems in the form of oil leaks can damage the timing belt.
It also happens that the cause of a belt rupture may be poor-quality material from which it is made. It often happens that when producing belts from reputable manufacturers, fakes are encountered.
Which belt to buy
The efficiency of the car engine depends on the quality of the parts used in the timing mechanism drive (tensioner roller, belt). When repairing or servicing a car, it is advisable to use original parts, but in some cases, non-original spare parts for automobile components have worked well.
The article number of the original timing belt is 21126–1006040 , which is produced by the RTI plant in Balakovo. Experts recommend confidently using parts from Gates, Bosch, Contitech, Optibelt, Dayco. When choosing, you should be especially careful, since under the brand name of well-known manufacturers you can buy a fake.
How to replace the tension roller on a VAZ 2113-VAZ 2115?
Removal: 1) At the beginning of the operation, install the entire timing mechanism according to the marks, detailed information in details and pictures on how to do this is explained in the article called “Setting the valve timing according to marks” so go to this article and do everything as described in it , by the way, just above we indicated in this article about the cover that will need to be removed in order to get to the timing mechanism, so read about how to remove this cover in the same article to which the link is given in this paragraph.
2) Go ahead and move on to point 2, now you will need to remove the tension roller itself from the car, but before removing it, remove the timing belt from the camshaft and from the tension roller itself, to do this, slightly loosen the nut that secures this roller (This nut in the photo above is indicated by a blue arrow, by the way, we’ll run straight ahead behind it, there will also be a washer located behind this nut, so don’t lose it when you completely unscrew the nut) and turn the roller by hand so that the belt loosens (the roller itself is made in the form of an oval, that’s why he regulates the belt tension, that is, at some point he strongly pulls the belt, and at some point he doesn’t pull it at all), after which remove the belt from the camshaft as shown in the photo below (Just do everything carefully), and well also remove it from the roller itself and let it hang (To completely remove the belt, you need to unscrew the bolt that secures the generator drive pulley, you also need to remove the belt itself from the generator, in general there are a lot of brands and so as not to completely remove it, just like we already indicated a little higher, remove it from the camshaft pulley, from the tension roller and let it hang from you).
3) Well, at the end of the operation, when the belt is no longer in the way, completely unscrew the nut that secures the tension roller, remove the nut and the washer located behind it, and then remove the roller itself along the shaft as shown in the photo below, after the roller will be removed, check its bearing, to do this, grab the central part of the roller with your hand and rotate the outer part of the roller, it should not jam and should spin normally, there should be no play, and grease should not leak from the bearing (B In this case, the roller will be contaminated with grease).
Note! When the roller is removed, a spacer ring will be installed behind it, which we also recommend that you remove and check for defects. If it is in good condition, that is, not crimped or cracked, then you can not replace this ring with a new one and install it on your place again, by the way, due to this ring, as you already understood, the fact how the tension roller will stand depends, for example, if the ring is installed large, then the roller will come out a little and the belt will not stand straight, but at an angle, so if The belt doesn’t eat you up, and if it doesn’t fly off while driving, then you don’t even have to touch this roller, since it does its job, as they say, with a bang!
Installation: The new roller is installed in its place in the same way as it was removed, but only the entire operation is performed in the reverse order of removal, in addition, the roller must also be installed in such a way that the two holes that are on it (see photo below) are directed not inwards, but outwards, by the way, if you look closely at the tension roller which is shown in the photo below, you can even notice with the naked eye that it is covered in lubricant, such a roller needs to be replaced and cannot be reused, because there is a possibility that it will soon time, the bearing will jam, but a jammed tension roller will not lead to good things (Either the timing belt will fly off in this case, or it will break), after you install the new roller and secure it with a nut, be sure to put on the timing belt and adjust it, in more detail For information on how to do this, read the article: “Replacing the timing belt,” point 1.
Additional video clip: We have attached a very interesting and visual video clip for you just below, so that you can watch it and see in more detail how the process of replacing this tension roller is carried out, so watch this video clip and delve into it.
- Electrical equipment
- Engine
- Brake system
- Other
- Steering
- Transmission
- Suspension
- Tuning
- VAZ 2110 Other
- Engine
- Steering
- Electrical equipment
- Transmission
- Brake system
- Suspension
- Tuning
- Electrical equipment
- Steering
- Video publications
- VAZ tuning photo stream
- Operation and repair manuals
Checking the condition of the belt
First, remember that you need to check the condition of the belt once a year, or every 10-15 thousand kilometers. Replacement is carried out after every 50 thousand kilometers.
To examine the status of an item, follow these steps:
- Remove the plug from the protective front timing cover;
- Remove the alternator belt so that it does not interfere with you;
- Unscrew the six bolts, which will allow you to remove the cover;
- Access the belt and examine it.
Removing the timing belt cover
If you notice any of the following, be sure to proceed with replacing the belt:
- The element has bulges or cuts;
- Broken threads and traces of delamination appeared on it;
- There are abrasions, cracks or folds;
- Oil is leaking.
