Some car enthusiasts love their favorite car so much that they cannot live a day without it. And considering that many people live in huge cities, it takes a lot of time just to get to work and back. If you add traffic jams, you can spend almost half your life in a car. It’s good that at least the Lada Largus has modern acoustics at its disposal. This feature allows you to brighten up a little downtime in long lines, when your last nerves give out.
Head unit
But it also happens that we have a standard Lada Largus radio, but understanding all its functions is not an easy task.
How to connect a radio
Connecting the head unit depends on the vehicle modification. When installing the radio, you need to firmly snap the ISO plugs in place, and then reinstall the antenna connector.
If the product is equipped with a wired remote control, it is located on the steering column or the front of the instrument panel. The wire is laid inside the panel along the standard lines of the electrical harnesses.
With 2 speakers
The 2-speaker circuit is used only on cargo vans; the loudspeakers are located in the doors under the plastic panels.
The radio is ready for use immediately after connecting to the standard connectors. The car owner can install additional speakers in the cabin by laying separate speaker wires to them.
With 4 speakers
On passenger versions, 4 speakers are used, which improves the sound quality in the cabin. The wiring has a separate harness leading to the speakers in the rear doors.
The connection does not require any additional modifications to the vehicle wiring.
No speakers
The layout without speakers is found on the basic configuration. The car has connectors for connecting the radio and front speakers, as well as an antenna output. After switching the radio, you need to disassemble the door trims, which will allow you to mount the speakers in their standard places.
Loudspeakers are attached to factory mounting points, and wooden adapter rings may be used. After installing the elements, it is necessary to return the removed parts to their place.
Installation of the radio. . . There is nothing complicated, you need to select the wires. I bought the wires on the white tower in the first boutique I came across, with music.
Read also: How to choose springs for Opel Astra H
In short, I subconsciously believed that there were some cheap speakers at the door.
In the hope that the music will play. . . Fuck you and not the speakers.
In the previous Largus I had four speakers and somehow I didn’t bother with it at all, the music was playing and I didn’t worry.
On the Lada Largus, audio preparation is present on all modifications, but a radio and speakers are equipped only as options on the “norm” and luxury trim levels.” Next, let’s try to figure out what the manufacturer understands by the word “audio preparation” and what connectors the standard Lada Largus radio has.
- Audio preparation of the Lada Largus includes an antenna with a cable, an interference suppressor, a wiring harness for the radio, a wiring harness for connecting the front door speakers. AvtoVAZ awarded this list to all Lada Largus configurations.
- The wiring harness for connecting the rear speakers (doors) is found on all station wagons and is missing on the van.
- The standard Lada Largus radio with CD-MP3+AUX+USB+Bluetooth+Hands Free functions is installed optionally on the “standard” and “luxury” trim levels.
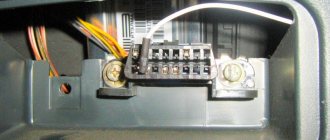
On versions without a radio, a shelf is installed instead. If you remove the shelf, the wires for connecting the radio will be inserted into its rear part. One plug is used to connect power to the radio, the other to connect two front and two rear speakers.
It is worth considering that the connectors for the audio system differ from the usual ISO standard. Therefore, to connect a non-standard radio, you will have to use adapters, which have the name: car radio socket/adapter Renault Duster/Sandero/Logan > 2012 - ISO (euro).
Adapters will also be needed to connect the speakers in the car doors and the antenna (by the way, the standard speakers are 13 cm in size). The connector for the rear speakers should be found in the pillar behind the driver's seat (near the passenger's feet).
Read also: Do-it-yourself powder coating chamber
If there are no adapters for connecting a radio or speakers, you can cut off the connectors and connect the wires according to the diagrams presented below. However, in this case you will have to think about maintaining the warranty on the radio and the car.
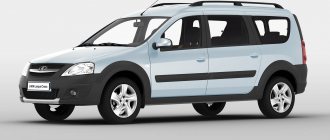
LADA Largus - model description
Lada Largus is a high-capacity station wagon passenger car developed jointly by Renault-Nissan and AvtoVAZ.
In Latin, the word largus means "generous." AvtoVAZ says that this word became the basis for the name of the new model. The owners also believe that largus is consonant with the English large (large) and the Spanish largo (long) - this, however, is also not far from the truth!
The Lada Largus station wagon is a licensed copy of the Dacia Logan MCV. The model was developed jointly with the Renaul-Nissan concern. Car enthusiasts are offered several options: a five- and seven-seater station wagon, as well as a van with an all-metal body and two seats for a driver and a passenger.
Lada Largus is not much different from Dacia Logan MPV. The basic package includes ABS, air conditioning, audio system, airbags. The car is offered to buyers with a manual transmission. An automatic transmission is not yet available, but an all-wheel drive version is planned.
The car interior is spacious and functional. The seats fold in a variety of ways. The exterior is simple but attractive: strict lines, rectangular shapes, wide moldings on the sides. The model was conceived as a utilitarian car for commercial purposes and transportation of large items, and the developers managed to fully realize all their ideas.
History of the creation of Lada Largus
Lada Largus was first introduced to customers in 2010. Mass production began in the spring of 2012, and the car went on sale in July. More than seventy percent of the components for the new model are produced in our country. This has become one of the reasons for the popularity of the car, since the presence of domestic parts makes it affordable both for purchase and maintenance.
According to surveys, Lada Largus is one of the best models offered by AvtoVAZ since the 80s, and the first car that can be called relevant without exaggeration. All equipment meets modern European standards. Based on the road realities of our country, the design of the suspension arms and front brake mechanisms have been strengthened.
Technical features of Lada Largus
The car can be purchased with one of two 1.6-liter engines with 87 and 105 hp. (both engines are from Renault Logan). One of the engines is eight-valve, the second has two camshafts and sixteen valves. The Renaul Logan platform on which the car is produced was developed as a budget one, and its capabilities have already been repeatedly tested in practice. What matters for car owners is that the engines have already shown their best performance in practical use.
The car is equipped with a simple and reliable five-speed gearbox assembled from French parts. Springs and shock absorbers are specially selected taking into account the load capacity and poor quality of roads.
The Lada Largus design uses a front subframe. The engine is installed on it, and it also serves as a mounting location for the power steering rack. The rear suspension uses a torsion beam, allowing separate configuration of the spring and shock absorber. This design makes it possible to increase the distance between the arches of the rear wheels, which makes it possible to make the volume of the luggage compartment as large as possible, and its bottom flat, since there are no “cups” of racks at the rear, which take up space in the trunks of cars with independent suspension.
The shape and type of body provide a large volume of not only the trunk, but also the interior. The car is offered to buyers in cargo-passenger and passenger configurations, designed to carry 5 or 7 passengers. Even if you are tall, you can sit comfortably in the second row and not rest against the back of the driver’s seat. Thanks to the high roof and square opening, you can easily get to the third row without bending over. The third row can comfortably accommodate two people 180 cm tall.
Device characteristics
It can't be called complicated. In addition, the instructions and user manual supplied with the system will help you understand the structure, functionality and characteristics of the device. Structurally, a car can be equipped with either a conventional 1 Din or 2 Din radio. The differences between them are minimal and lie in the location of the buttons and inscriptions.
To reproduce high-quality sound, the audio system provides four speakers:
One of the main features and at the same time advantages of this device is the ability to connect to a smartphone via Bluetooth wireless channel. In addition to comfort and convenience, this function provides passive safety, since the Hands free system allows you to talk on the phone while driving without using your hands. The quality of communication is decent, communication with the interlocutor is not associated with difficulties, the driver does not need to raise his voice, and passengers hear him well.
The standard radio on Largus does not have much functionality and advanced capabilities, for some this is quite enough, but for others the characteristics of the radio are not enough. In terms of appearance, the device blends harmoniously with the standard car interior. All buttons and other controls are easy to use, and the inscriptions are easy to read and intuitive. The device is tightly fixed in the seat, there is no play or other defects.
Capabilities of standard audio device
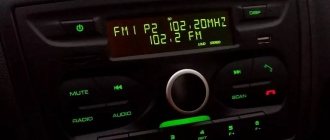
Music in the car can be played both through removable media and via the Bluetooth wireless communication channel. At the same time, the genre of music does not matter, the sound quality remains at the proper level. To listen to radio stations, a standard antenna is provided, which can pick up even a weak and unstable signal. If necessary, you can save up to 6 radio stations in the device’s memory for quick playback, in each of the available bands.
The radio supports most popular formats, for example:
Via the Bluetooth channel, you can control playback, i.e. pause the song or rewind to the desired segment. For convenience, it is possible to display the artist of the song and its title on the monochrome display. The radio can also recognize Russian fonts.
There are several connectors for connecting removable devices:
The unit is also equipped with several inputs for playing sound through third-party gadgets. The panel of the standard head unit is not removable, but this is no longer considered a disadvantage, since most car owners store the removable panel directly in the car rather than carry it with them. The purpose of each button, which is quite small, usually does not cause any difficulties. It would be much more informative to consider here other hidden features that are not mentioned in the detailed user instructions.
“Secret” menu of the Lada Largus radio
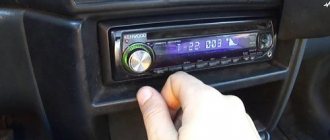
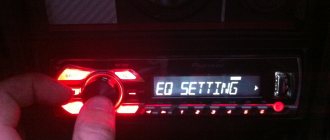
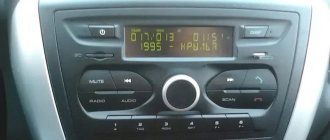
To go to the section with individual settings, use the SET button located on the front of the radio panel. Not every car owner knows that this button has hidden capabilities. Just press this key and hold for 6–7 seconds. The device will go to the engineering menu, where a number of special settings become available. The instructions included with the standard radio contain no information about such a tab.
The “secret” menu opens three sections (“Diagnostics”, “Configuration”, “Radio Monitor”). On the right is a rotating knob, which allows you to navigate up or down between these sections. To select the desired one, press the handle. To go to the previous level, press the “Back” key, which is located to the left of the rotary knob.
In the “Radio Monitor” section you can see the current frequency at which the received signal is located and some other data. In the “Diagnostics” section there is an additional subsection with the items “Autotest”, “Monitor” and “Errors”. The “Errors” block was created to inform the driver about existing problems in the BC (on-board computer). If there are no problems, the display will be blank. The “Autotest” item contains information about the current state of the equipment (OK on the screen means “functional equipment”).
Instructions
Storage
Usually a user manual is included with the radio. There are detailed characteristics of how it is used, what to press and when, and most importantly, why.
According to the diagram in the instructions, two versions of the radio are indicated:
- double din (2 din);
- standard.
There is nothing complicated about the first category, it’s just the name that is incomprehensible. These two versions differ only in different buttons and what is written on them. The most useful and practical feature is the ability to pair with some wireless devices via Bluetooth, such as connecting to a mobile phone. In this case, the standard radio on the Lada Largus will provide you with the opportunity to talk on the phone even without using your hands, thereby not violating traffic rules. If you think that you will have to talk very loudly or shout so that the interlocutor can hear clearly, then nothing like that. A normal tone of voice will be sufficient.
Radio malfunctions and methods for diagnosing them
As you know, the Lada Largus is equipped with an audio system with a set of speakers already from the factory (depending on the configuration). The amplifiers are located in the front and rear door panels. To connect non-original speakers, several wiring harnesses are provided (including for increasing power using an amplifier when connecting a subwoofer). Since the connector plugs do not comply with the current standard, to connect another head unit you will need to additionally purchase adapters.
A standard car radio sometimes brings not only the pleasure of listening to music, but also some problems. The device may not work or function incorrectly for various reasons. In general, the list of faults includes only those that an ordinary driver (without special knowledge of electrical engineering) can fix with his own hands, without the need to contact a specialized center.
When it comes to repairs, it can often be cheaper to replace the device. Especially considering the availability of alternative options in different price categories and with different capabilities. At a cost of no more than 6,000 rubles, repairs can cost half this amount.
Main problems
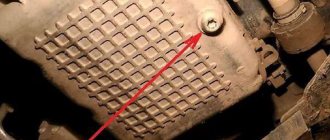
If, when you press the power button, the head unit does not respond and does not turn on, then first of all you should pay attention to the mounting block, checking the 15A fuse in socket F28. Through it, the electrical circuit of the device’s memory is connected with the saved settings.
The mounting block cover is located on the front panel on the left side at the end. You can understand that this fuse has blown by the absence of signs of operation of the instrument cluster panel, interior lighting and trunk lighting, since their electrical circuit is also powered by F28. If the fuse has not blown, the next check point will be the condition of the connecting contacts and the integrity of the wire that goes from the fuse to the A4 power connector on the back of the radio.
In this case, the fault may also be the fuse, but F38. It supplies power to audio output devices. A faulty fuse is also indicated by a non-functioning cigarette lighter. If the latter works, then the fuse is intact. The lack of sound can also be caused by a violation of the integrity of the wire running from the fuse to connector A7 on the radio. And if only the rear speakers do not work, the culprit may be a broken connection in the block, which is located directly behind the driver's seat between the front and rear doors.
The cause of the malfunction may be the absence of ground - this is the black wire going to the radio (terminal A8). In all other cases, intervention in the electrical circuits of the device will be required. Without appropriate knowledge in this area, there is a high probability of complete failure of the radio. When contacting specialists, repairs can cost at least 1,000 rubles, not counting diagnostics.
Removing and installing the radio
If a device fails, you will need to dismantle it to install another one. Removal will also be necessary if it is necessary to connect speakers, repair, clean terminals or reflash. Visually, there are no latches or keys for removal on the front panel.
In fact, on the front of the radio there are four holes into which you need to insert 4 rods of suitable diameter (about 2 mm). The dismantling process is as follows.
- Two rods are inserted into the holes on the left side.
- Two more - on the right.
- Now you should simultaneously press all the rods at once.
- At the same time, pry it with a suitable plate, for example, a plastic card.
- After characteristic clicks indicating that the latches are loosened, you can remove the device.
Firmware for audio device on Lada Largus
The standard head unit on cars of this model does not look very presentable, but at the same time the functionality is complemented by a large number of possibilities. Unfortunately, despite the decent quality of the technical part, the manufacturers did not pay enough attention to the software. It's no secret that modern audio systems have a full-fledged electronic control unit, which is a kind of computer. There is a processor, devices for reading removable media, various connectors and other functionality. In addition, the standard radio is combined with the on-board computer.
On the other hand, the more complex the audio system, the greater the likelihood of failures and malfunctions. The radio installed on the Lada Largus is no exception to the rule. The software has not been properly tested, so malfunctions are not uncommon. The most common problems are the inability to recognize the file format, reproduce high-quality sound, or identify the removable storage device. Also on Largus, incorrect display of Russian fonts on the display is often encountered. As a result, instead of the usual Cyrillic alphabet, the driver sees incomprehensible symbols. It is in these cases that updating the device firmware will help solve the problem.
Where to download and how to install
You can find out the firmware version directly on the device case, on the back side. The manufacturer regularly releases updated, i.e. improved firmware. You can find them either on the official website of the developer or on specialized thematic forums. If necessary, please contact your authorized dealer.
Preparation for the procedure
A firmware update may not be necessary if you try to reset the current settings to factory settings. The procedure is simple, but in most cases ineffective. If you update the firmware to a new version, you can expect a significant improvement in device performance. Typically, an official update is released rarely and always turns out better as testing is done and bugs are fixed.
Updated version V2030 released in 2022. To install, you will need a flash drive or adapter with other removable media. Before you begin the procedure, you should prepare the media and find the appropriate firmware. You can download the firmware on the official AvtoVAZ website or on thematic official forums for Renault cars.
The file with the firmware is in the archive, so you need to first unpack it into a separate folder on your PC. The unpacked firmware provides a special archive that does not need to be unpacked further. The flash drive must be clean and formatted in FAT format. The unpacked CAB firmware archive is placed on it.
Update process
Now you can connect the media to the radio in your car.
- Before starting the procedure, be sure to turn on the ignition. Otherwise, the radio will automatically turn off and the firmware process will be interrupted, which may lead to device failure.
- When reading information on the media, the radio will determine that the contents on the drive are material for flashing. After analyzing the information, the device will offer to update the software. You should select "Yes" to refuse to click "No".
- Confirm the information by clicking the “OK” button.
Connection diagram
The procedure for connecting the car radio may differ slightly due to the modification of the car. The audio device sometimes comes with a remote control. It is installed on the steering column or the front of the dashboard. The cable is laid along the length of the electrical harness lines.
The exact wiring diagram may vary due to the number of speakers. Therefore, it is advisable to remember the following information:
- With 2 columns. Two loudspeakers are used exclusively on trucks. Speakers are most often placed in doors under plastic panels. After installation, the radio can be used immediately for its intended purpose. You just need to connect it to the sockets. You can install other speakers in the cabin. Then you will need to lay a separate speaker cable.
- With 4 speakers. In passenger versions, a device with two pairs of speakers is more common. The electrical wiring contains a special harness connected to the rear door speakers. Connection does not require any modifications to the vehicle wiring.
- There are no speakers. The scheme is typical for the basic configuration. The car has connectors for connecting the device and front speakers. Additionally there is an antenna output. When the car radio is connected, you need to disassemble the door trim. This step will help you get the speakers in place.
The speakers need to be fixed to the factory points. You can use wooden adapter rings. After installing the parts, the removed elements must be returned to their original place.
Radio in action
It is clear that there is no friend for taste and color, as they say. Some people like the standard audio system, but others don't like it at all. Let's figure out what Lada Largus owners actually acquire along with the car.
Visually, the design of the radio tape recorder fits perfectly into the interior of the cabin. Its buttons and controls are quite convenient, and the symbols are intuitive. No loosening, backlash or failures are observed. Everything is adjusted very clearly.
Music in Lada Largus via Bluetooth:
As for playback, any genre of music will sound great. If you want to listen to radio stations, then an excellent antenna allows you to catch the signal even where it is too weak. It is possible to save certain radio stations in the amount of 6 stations in each band.
You can listen to music from existing CDs, flash drives, or simply from your phone or player via Bluetooth. The audio system reads formats such as CD, MP3, AAC, WMA and WAV. If this is Bluetooth playback, then pause and rewind control is available not only in albums, but also within songs.
The charge indicator of the Bluetooth device is visible on the display of the radio. There is also RDS - this is when the title of the song and its artist are displayed on the display. The device understands Russian fonts in ID Tag. The audio system has several options for connecting additional devices: Jack connector, USB connector and Bluetooth connection.
The radio has various inputs for reading music from external devices
Many car enthusiasts are not happy that the standard radio panel is not removable. However, there is nothing to worry about, because drivers often store the removable panel of their audio systems directly in the car, either in the glove compartment or under the seat. Therefore, if someone decides to steal a radio, it is unlikely that the main criterion when choosing a device will be the absence of a removable panel.
Summarizing all of the above, we can conclude that the standard radio in the Lada Largus car is quite good. It has a sufficient number of functions so that drivers do not have any difficulties when using it. And detailed instructions will help you easily master all the capabilities of this audio system.
Specifications:
| Basic | |
| operating system | Android 8.1.0 |
| Processor CPU | 4 cores |
| Platform | Spectrum 8141E |
| Screen | |
| Diagonal | 7 inches |
| Permission | 1024×600 |
| Matrix | TFT |
| Screen type | Sensory |
| Memory | |
| Inner memory | 16 GB |
| RAM | 1 GB |
| USB support | Yes, 2 USB inputs are output to the glove compartment |
| MicroSD support | Yes, connector on the front panel |
| Sound | |
| Amplifier | TDA 7850 MOSFET class AB (Hi-Fi class by signal-to-noise ratio) |
| Equalizer | There is 3-way + DSP 15-way |
| output power | 4x45W (peak) |
| External amplifier support | 4xRCA LP+PP+ZL+ZP |
| Radio | |
| Module | NXP TEF6686 |
| Saving stations | Eat |
| Navigation | |
| GPS/Glonass antenna | Yes (remote) |
| Support for navigation programs | Yes (Yandex.Maps, Yandex.Navigator, Navitel, etc. from the Play Market) |
| Voice address dialing | Yes (with Internet connection) |
| Traffic jam function | Yes (with Internet connection) |
| Internet | |
| WiFi | Eat |
| SIM slot | Yes (optional) |
| Front/rear camera | |
| Rear view camera support | Eat |
| Front view camera support | Eat |
| Support for up-to-date camera operation | Yes (optional, camera switching unit required) |
| Support original rear view camera | Yes (need to check before purchasing) |
| Multimedia | |
| CD/DVD | No |
| Bluetooth - speakerphone | Eat |
| Bluetooth - music playback | Eat |
| Bluetooth - contact book | Eat |
| USB | Yes (displayed in the glove compartment) |
| MicroSD | Yes (on the front panel) |
| Format support | MP3 / MPEG4 / WMA / JPEG / MP4 / MOV / AVI / MKV etc |
| Microphone | Built-in + external |
| TV tuner support | Eat |
Equipment:
- Car radio Farcar LY832
- Fastening in the seat
- GPS/GLONASS Antenna
- RCA tulips
- Microphone
- 2 USB connectors
- Instructions
- Warranty card
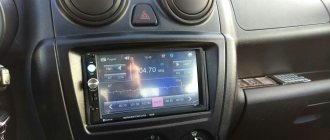
Lada Largus › Logbook › Installing a 2 Din radio on Android + joystick (setup, programs)
The article will be long, I even wanted to break it into several. Final result:
A long time ago (about 4 years ago) I was impressed by the GU on Android from Romario-163 here, but somehow I couldn’t get around to buying it, but the toad was choking me. And then I saw that Android radios now cost around 3 thousand for 7 inches, so I decided to order one. Moreover, on 4pda there is a topic here about this radio “Head unit ML-CK1018 and similar ones, based on the MT/AC8227L processor” Characteristics:
Radio connection diagram
Largus radio block diagram
Delivery took about a week (I ordered from the Russian Federation), delivered by courier. With delivery in the Russian Federation, it was possible to buy only with a universal connector, but I already had an ISO adapter - FR-12 and ISO-Ant1, the wires on the radio were all labeled, so connecting it was not difficult. By the way, the connector on the Android 2DIN radio is called Alpine, if anyone suddenly needs to buy an adapter at an auto parts store. I ordered a frame on Avito for 2,500 rubles (the Largus shop also has it, but the wait is long). Fits perfectly, I had to cut the panel a little.
I glued the GPS sensor on double-sided tape to the upper right windshield. I ran the wires along the rack. It picks up satellites well.
On the plus side, the screen is 7 inches, the play market works, I installed Yandex navigator, YouTube and other programs, installed a 128 GB flash drive, now I have a multimedia archive with cartoons and music in the car.
But the standard launcher on this radio is something like a cross between a Pavasonic and Abibas radio. Fortunately, there is a free, advertising-free Car Launcher (4pda.ru/forum/index.php?showtopic=672503) and similar ones. Setting up the radio - in the standard launcher you can change the default Navigator and player. In the settings, look for the “Developer Mode” item, password 8888
You can change the default navigator and player. There are still a bunch of settings. You can set the automatic download of some programs when you turn on the radio. I set the Navigator, the store and the DVR to turn on automatically.
from the programs I installed: Car Launcher (the actual shell) Torgue (but could not connect the OBD adapter yet) Yandex Navigator (the radio has Google maps) Total Commander Dimmer (to automatically reduce the screen brightness using a timer) MX player (for video) VLC ( for video) MapcamDroid (radar detector) MultiGO (list of gas stations with prices, I drive on gas is very important for me) Waze (navigator-social network) *Everyone praises it very much, but I haven’t figured out the settings yet, in my opinion, it’s some kind of hat
The radio is blocked How to find out and enter the code from the Renault radio Answer Here Code generator
How much does Lada Largus weigh?
Those who know what to do can immediately use the code generator; those who don’t, read the article.
Renault radio unlock code generator online directly on the Dustershop77 website:
Generate unlock code:
The PRE code looks like f330 (letter and 3 digits) . It happens that the generator produces three or even two numbers instead of four. Add 0 to this number at the beginning
(543=0543 or 43=0043)
So, after disconnecting the battery, you have a problem - the radio does not turn on, you need to enter a code.
This code may be written down in your service book that came with the car, but if it is not there, then you can
1. Get it from the Dealer
2. Generate with a special program (link to the program)
We will not consider the option of obtaining a code from the Dealer, but will consider obtaining the code independently through the RENAULT PRE-CODE CALCULATOR program.
In order to receive the code, you need to install the RENAULT PRE-CODE CALCULATOR program and run it, after launching you need to enter PRE-CODE, based on which the program will issue a digital 4-digit unlock code, which is used to revive the radio.
To find out PRE-CODE:
— with the radio turned on, simultaneously press buttons “1” and “6” for 3-5 seconds
— the message “pre code xxxx” appears on the display; it contains one letter and three numbers
- this is the PRE code of your radio
If your buttons do not work, or for some reason the radio does not display the pre code value on the screen, then you need to remove the radio and find the pre-code on its case.
The code is circled in red, contains one letter and three numbers, write it down
— enter the pre-code into the RENAULT PRE-CODE CALCULATOR program window
The program will respond with Code = XXXX, where XXXX is the 4-digit unlock code for your radio.
The Lada Largus model is a joint brainchild of the designers AvtoVAZ and Renault-Nissan. Its design is based on the popular universal public car Dacia Logan MCV. When creating this car, the main focus was on the category of practical and family car enthusiasts, because the set of technical and operational features of the model fully correspond to its image.
The basic version of the equipment of the Lada Largus implies the presence of a standard radio, which the Korean company Daewoo kindly shared with Tolyatti residents. However, sometimes the firmware of the radio is required. In addition to the head unit, the developers addressed 4 loudspeakers located around the perimeter of the interior space, or rather in the door panels. Owners notice that this device fits harmoniously into the interior and has quite simple and convenient functionality. All controls and buttons are intuitive and do not cause “stupor” even for “wild” drivers. The high-quality fit of all components of the audio complex is also noted, since during operation it was not possible to find any backlashes or squeaks in the buttons.
To study in detail the full range of functions of this radio and how to control them, you should watch this informative and useful video:
Note that the consumer radio kit includes convenient instructions, which are designed to provide a quick acquaintance with the device and its functionality. In this article we will tell you how to unlock the Largus head unit.
How to decode the head unit
The procedure involves determining the radio code, entering which allows you to activate the head unit in the Lada Largus. Such actions should be resorted to when the word “CODE” appears on the display, and the owner does not know its digital version. Let's consider the option of how to unlock the radio, as well as how to enter the code correctly.
Here you will need access to a special code generator applicable to Renault and LADA Largus radios. You can get this service by registering for free on the corresponding website on the network.
The decoding process involves an algorithm consisting of several stages.
- We simultaneously press and hold the “1” and “6” buttons present on the keyboard (for 5-6 seconds).
- After this, the display will display the inscription “pre code xxxx”, where the last four characters indicate that same “pre code”. It is necessary to gain access to the secret code combination, by entering which the radio will be instantly decoded. The radio code itself is formed from one letter and 3 numbers.
- If this operation fails, you will need to dismantle the radio. For this purpose, you need to acquire two pullers “7711381821” or four pins. These devices are inserted into special holes present on the front panel of the audio device. Simultaneous pressing on the integrated removable components allows you to remove the radio from the landing shaft. Now disconnect the cable connector and antenna wire.
- There is a sticker on the back wall of the device on which the manufacturer has applied a special barcode and other information related to this product. There you can also find the same “PRE-CODE”.
- We go to a site with a code generator and enter the “PRE-CODE” read on the sticker into a special window for this service.
- Now we confidently click on the “Generate” button, after which we get the code we need.
- Next remains the method indicated by us to enter encoded information into the radio.
Attention! Before dismantling the device, we recommend disconnecting the power supply by removing the terminals from the corresponding terminals of the LADA Largus battery.
Sound via bluetooth
A standard car radio in combination with dynamic speakers “reads” music programs equally well, “digesting” any genre without much difficulty. The manufacturer has addressed radio lovers with a powerful antenna device that allows them to pick up a signal of even minimal power. The radio allows you to memorize 6 stations in each frequency range.
Renault Sandero DIY repair
Renault Sandero wiper blades
Compare Renault Captur and Hyundai Creta
Listening to music is available via CD drives or flash devices. Also for the same purposes, switching using Bluetooth is possible.
Recognized formats:
- "CD" and "MP3";
- "AAC" and "WMA", as well as "WAV".
With a wireless connection, it is possible to rewind not only between music programs, but also directly within a track.
The display clearly displays the charge level indication (if “Bluetooth”), as well as the “RDS” line. There is a Russified font in “IDTag”.
Other methods of connecting to this device are the “Jack” and “USB” sockets.
Functions of the standard Largus audio radio
The audio device that is present in the Lada Largus allows the owner to acquire such useful options as:
- search and memorize radio stations broadcasting in the traditional FM or AM bands;
- the ability to display the names of tuned stations with a convenient “RDS” function;
- playback of audio programs recorded in the following formats: “MP3” and “WMA”, as well as “AAC” and “WAV”;
- connecting external sources to the head unit for the purpose of subsequent playback of information programs through standard speakers (for this, the radio has “USB” and “Jack” connectors, as well as a “Bluetooth” option;
- switching with the “Hands Free” wireless kit, which allows telephone communication with subscribers while driving.
Also, we should not forget about the presence of a security coding function in the radio, which allows you to increase the degree of protection of the device from theft attempts.
Replacing car radio Lada Largus
We take out the radio. Suddenly you have decided to replace the device.
Or maybe you just want to clean it, change the firmware, install a code, or repair a tired standard device. Another relevant question arises: how to remove the Lada Largus radio without any visible external latches, keys and locks? If you have seen the removal process on Renault cars, then you know that there are four holes along the perimeter of the front panel. This is where the tricky latch and the answer to the question of how to remove it are hidden. You will need 4 short rods at once, something similar to metal knitting needles or wire 2-2.5 mm thick. You need to first insert our two pins into the left side, and then the remaining two into the right. By simultaneously pressing all four, you need to pry the plastic card from below, and the radio will come out of its grooves. Now you can do anything with it: change the firmware, program the code, repair, etc. You will especially need this procedure when you disconnected the battery terminals.
After this procedure, you need to enter the code again, and if you don’t know it or don’t remember where you put the documents, you will need information from the back panel. There we will find a barcode, the last four characters of which we will need in order to generate a new code for the Lada Largus radio. It is advisable not to forget it. Without the correct code, the radio will not even turn on.
Exterior of standard car radio
To paraphrase a well-known saying, it should immediately be noted that in terms of taste and color characteristics you will not find two identical people. This also applies to the radio in the Lada Largus. Some owners will zealously prove its superiority, elevating it to the rank of ingenious devices, while others, on the contrary, will sarcastically criticize it, wanting to find more shortcomings. In general terms, we will say that the device harmoniously combines with the design of the panel and does not cause a feeling of rejection. Its functionality is convenient, and all elements (buttons) are located in optimal places, which allows you to make switches and other manipulations on an intuitive level. There are no backlashes, squeaks or other negative factors here. The fit is excellent.
Other unlock options
There is an alternative way to unlock the Lada Largus radio. You will need to contact an authorized dealer. Specialists send the car's VIN number to the manufacturer. The dealership receives a password from the factory for the installed car radio. The method will not work if the device was replaced with a similar one under a warranty card or personally by the driver. Most often, the official representative removes the radio. The dealer reads the information on the label. He determines the code using a calculator.
The first Largus models had a device that broadcast a preliminary password. To see the code, you need to immediately press keys 1 and 6. Hold the buttons for 5 seconds. An explanation will appear on the screen, followed by a four-digit password. It must be entered into the calculator as described above.
Nowadays such equipment is rare. There are no other ways to unlock the radio. Some car owners reflash the software. But this will not help decode the stereo device.
Why do you need a PIN code?
A head unit is equipment for playing music and more, which is purchased along with the car. Some cars are sold without a radio, but this is a rare situation. The radio may break during operation and will have to be repaired, possibly replaced. Of course, the stock radio should work for a long time. But this is not a car, a more fragile part.
There are a lot of electronic elements in the radio. It consists of boards. It has an operating system. Don't expect it to work as long as the car. Contacts oxidize, destroy, melt. Overheating, dust, hypothermia, moisture - anything can cause a breakdown within six months or a year after use. There are cases when the radio tape recorder works even longer than the car. However, you need to prepare for the worst - you will have to tinker with it. This is why you need to know the code.
Without it, any actions or manipulations with the radio will be blocked. A corresponding request will appear on the screen. Only by entering the PIN code will you be able to continue making settings and fixing problems. Finding out the radio code is not an easy task. How to do this?
Level two. Replacing standard speakers
This is where you need to be very careful. This is a field with a rake; you can’t run with your eyes closed. This upgrade option is not always applicable. If you replace only the speakers and leave everything else, then it is far from a fact that the system will “sing.” Moreover, in some cases the result may be completely negative. Although the standard audio system itself is not of a high class, everything in it is matched to each other and balanced.
It is clear that the audio system is far from a priority element when designing a car, but sometimes the methods for installing standard speakers are simply surprising. The photo shows a standard BMW speaker, which was simply attached to the inside of the upholstery and covered with a light casing
One of the tricks that automakers resort to is reduced acoustic impedance. In general, the most common acoustics in car audio are 4-ohm ones, but in “standard” speakers they often use 2-ohm ones. All in order to boost the dead standard amplifier and slightly increase the volume headroom. Replace these speakers with more conventional 4-ohm ones and you get a quiet system, and any attempts to increase the volume will be accompanied by an increase in distortion.
But that’s okay, there are plenty of aftermarket acoustics with 2-ohm ones. Don't step on another rake - a corrected signal. This, by the way, is one of the “tricks” of many branded standard systems - it’s not the components that are better, but correction that compensates for the features of cheap speakers and the shortcomings of their acoustic design. Replace the dynamics in such a system, and such a correction will no longer be appropriate.
But there is no need to be scared and completely discard this option. Today you can find many acoustic kits that are tailored specifically for certain brands and models of cars. Mainly for European ones, in this part of the world such an upgrade is most in demand.
The video demonstrates the ease of upgrading a standard audio system by simply replacing the OEM speakers with a set specially designed for a specific car brand:
Speakers in Largus size
When I first saw the Lada Largus, I immediately decided for myself: I will have it.
The sound from the standard speakers began to irritate me. .(
Less than a year has passed since the purchase of TRIFON, when the standard acoustics began to slowly “order to live long”! .) Strumming, metallic jingling, etc. began to appear. It all started with the front right speaker, then the rear left... And in order not to wait, it was decided to replace the standard speakers with something better than the standard ones. The budget for purchasing 2 sets of speakers was limited to $60. It was also decided to install speakers of standard size – 5.25″ (130mm). I turned to my friend. Outlined the situation. They inspected the speaker seats. The budget has been announced. And then it started. .) For the rear doors I was offered the following kit: Coaxial speaker system DLS Matador M125G.
Characteristics: Type: Coaxial speaker Size: 130mm. (5.25″) Number of bands: 2 Rated power: 40 W. Maximum power: 60 W. Sensitivity: 90 dB (W/m) Frequency range: 60 – 20000 Hz Impedance: 4 Ohm
Tweeter Dimensions: 16mm. (0.63″)
Woofer Size: 130mm. (5.25″) Installation depth: 52mm. Installation hole: 120mm. (4.7″) Built-in filter.
I started replacing the standard acoustics. I started with the right rear door.
From above, I used a plastic spatula to pry off the standard protective mesh.
Released the top latch.
And carefully, pulling the protective mesh towards himself, he freed it from the hooks of the remaining latches.
I unscrewed the 4 screws that secure the speaker in the basket. And he took out the speaker.
This “miracle” is installed as standard acoustics.
As you can see in the photo, the standard speakers are connected with a specific chip (Renault). And in order to connect a third-party speaker system to the standard wiring, you need to buy special adapters! And since: “Our hands are not for boredom. ". And the price for these adapters is very steep, so I decided to make them myself. (Since I already took out one standard speaker, I made 4 adapters in advance.)
Replacing the standard MMC Kalina 2 Lux
First, I ordered an adapter frame for 2DIN from Alamar and, in addition, some small things, like an overlay for the rear bumper:. Then I ordered the radio from DNS: www. Here is a good review of this shaitan machine: club. And in February, all this disgrace was already in hand, but there was no warm garage... I had to contact through friends and the warm box was paid for. By this time, I already suspected that not everything was so simple... The thing is.
Let's figure out how to install navigation in the standard radio of the Lada Granta. I would immediately like to talk about the electronic connection of the radio. Now, when installing a radio, there is no need to run wires to power the radio and for the speakers; all this is included in the standard audio preparation of the car. How to connect a radio in a car, installation instructions.
Car radio for Lada Largus
There are quite a lot of owners who, by the will of fate, are destined to spend a long time at the “wheel” of their car. For example, these are residents of megacities who get stuck in traffic jams every day. The Lada Largus model is equipped with a modern standard car radio, which allows the driver to escape from the hustle and bustle of the world and relax a little while listening to pleasant music.
Next, we will look at the list of audio device capabilities that the manufacturer kindly endowed his brainchild in the form of the universal Lada Largus. I would also like to add that many owners of this model believe that the standard car radio is not very good and requires the installation of a new device. Those who know how to remove a radio can easily cope with the task with their own hands; a connection diagram can also be used for these purposes. In this case, the installation will be more successful and faster.
What speakers are there in Largus?
Video on the topic of the size of the standard speakers of the Lada Largus - click. Do you want to learn how to repair a car yourself? Then watch the free lesson. How to repair a car yourself at home. We will help you with repairs and repair the car yourself. We know how to restore a car with minimal investment. I have attached video instructions.
Category: Auto repair instructions
Laughter on the topic: - Why does everyone call you Lightning? - Do you see this brutal scar on your neck? - Yes. - I got it when I was buttoning up my down jacket.
Published by Admin: at the request of Andokid
Car owner review: Consumption about 6 liters per 100 is excellent
Lada Largus cars are available in several modifications, which differ in equipment. Basic versions do not have air conditioning and a standard head unit. Connecting a radio to a Lada Largus does not require the owner to have knowledge of electrical engineering or car design and can be done independently.