Today we will talk about the pinout of the diagnostic connector.
With the advent of electronic control systems from microprocessors in cars, the need also arose to check the operating parameters of the units themselves and the connecting electrical circuits. For this purpose, equipment was invented, called OBD (On Board Diagnostic), initially it only provided information about the malfunction, without any clarification.
In modern cars, using an OBD connector with a standard pinout of the diagnostic connector, you can connect a special adapter or scanner to the on-board computer and carry out a complete diagnosis on your own for almost any motorist. Since 1996, the second concept of the OBD2 standard has been developed in the USA, which has become mandatory for newly produced cars.
Determine the purpose of OBD2:
- type of diagnostic connector;
- connector pinout for diagnostics;
- electrical communication protocols;
- message format.
The European Union has adopted EOBD, which is based on OBD2. It has been mandatory for all cars since January 2001. OBD-2 supports 5 data exchange protocols.
Knowing the location and standard pinout of the OBD2 connector, you can check the car yourself. Thanks to the widespread implementation of OBD2, when diagnosing a car, you can get an error code that will be the same regardless of the make and model of the car.
The standard code contains the X1234 structure, where each character carries its own meaning:
- X is the only letter symbol that allows you to recognize the faulty system (engine, gearbox, electronic components, etc.);
- 1 - represents the general OBD2 standard code or additional factory codes;
- 2 - clarification of the location of the malfunction (power or ignition system, auxiliary circuits, etc.);
- 34 is the serial number of the error.
The pinout of the OBD2 diagnostic connector has a special power plug from the on-board network, this allows you to use any scanners and adapters without additional electrical circuits. If earlier diagnostic protocols showed only general information about the presence of a problem, now, thanks to the connection of the diagnostic device with the electronic units of the car, more complete information about a specific malfunction can be read.
Each connected diagnostic equipment must comply with one of three international standards:
- CAN;
- SAE J1850;
- ISO 9141-2.
The location of the OBD2 diagnostic connector and pinout for diagnostics can vary greatly from vehicle to vehicle. There is no single standard for location; the car's operating instructions or sleight of hand will help you here.
Below are a few common points for easy reference:
- in the slot in the lower casing of the instrument panel in the area of the driver’s left knee;
- under the ashtray installed in the central part of the instrument panel (some Peugeot models);
- under plastic plugs on the bottom of the instrument panel or on the center console (typical for VAG products);
- on the rear wall of the instrument panel behind the glove box body (some Lada models);
- on the center console in the area of the parking brake lever (found on some cars
- in the lower part of the armrest niche (common on French cars);
- under the hood near the engine shield (typical of some Korean and Japanese cars).
Many motorists also sometimes intentionally move the OBD2 pinout connector to another not always standard place; this may be due to electrical wiring repairs or to protect the car from theft.
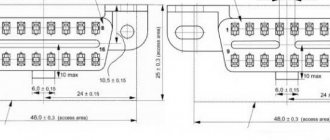
Pinout options
Depending on the operating protocol, pinout options are allowed:
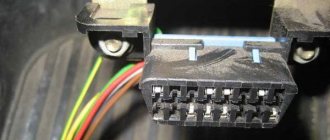
When using the standard ISO 9141-2 protocol, it is activated via pin 7, while pins 2 and 10 in the connector are inactive. For data transmission, pins numbered 4, 5, 7 and 16 are used (sometimes pin number 15 can be used).
With a protocol like SAE J1850 in the VPW (Variable Pulse Width Modulation) version, pins 2, 4, 5, and 16 are used. The connector is typical for American and European General Motors cars.
Using J1850 in PWM (Pulse Width Modulation) mode provides additional use of pin 10. This type of connector is used on Ford products. The J1850 protocol in any form is characterized by the non-use of pin number 7. Start of form
Of course, for many, such diagrams and descriptions of OBD2 connector pinouts are very complex and unnatural. Often, motorists prefer to periodically take their car to a specialized car service center and not even think about diagnostic connectors and, especially, about their pinouts. But it is still worth recognizing the usefulness of self-diagnosis. Experienced motorists say that it is necessary for every car owner to have a diagnostic scanner in their car to quickly check their doubts about the operation of the car, check for errors, settings and the like, which, first of all, will save significant money.
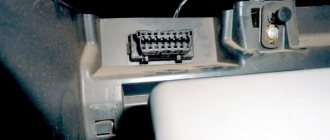
Using the diagnostic connector, it is easy to obtain all the data coming from the powertrain condition monitoring system to the electronic control unit of any car. Largus in this sense is no exception. Until relatively recently, the device in question was used only by car service workers, but now special adapters (both wired and non-wired) allow you to monitor engine performance even using a smartphone. Let's tell you in more detail where the diagnostic connector is located on Largus, and how to use it.
Lada Largus diagnostic connector
The Lada Largus speedometer knob is connected to the vehicle's diagnostic connector. Cars Lada Largus, Reanault Logan, Sandero, Duster, Nissan Almera are made on the same Renault Logan platform of the 2005 model. In the glove compartment of all these cars there is an OBD2 diagnostic connector, to which the speedometer knob .
To operate the speedometer knob for Lada Largus, you need to connect one wire from the instrument panel to the diagnostic connector. This modification is a prerequisite for the operation of the speedometer twist for the Lada Largus ; without it, the winder will not work. .
The installation process of the Largus winder is shown in detail in the video clip that we have prepared for you.
You can purchase this device in our store for 2500 rubles. This price already includes all transportation costs, so no matter what region you are in, the cost will not change. The coiler comes with everything you need for connection: a wire with a contact for the diagnostic connector and a detailed diagram with pictures.
Prepayment is NOT required to order. Payment for goods occurs upon receipt at the post office.
You can place an order through the website's shopping cart or by calling our FREE phone number. You can also write to us on Viber or WhatsApp at 89206843692. You can also do this in the JivoSite chat in the lower right corner.
Rewinding the Largus speedometer in OBD2 or in the cigarette lighter, which is better?
Unlike the cheaper cigarette lighter twisters that other sites offer for this car, our winder connects to the OBD2 diagnostic connector and has a more complex circuit design, created specifically for this car. The advantage of our solution is the connection method. In our version, there are no “left” wires hanging from under the panel and going nowhere in the car. The crank works not only while on the move, and to use it in a parking lot you do not need to break any wires. In addition, our company, one of the few, provides everything you need for connection, provides technical support, and does not just try to sell something that you will then have to think about how and where to connect. Think about it!
Similarly, for the speedometer to work, modifications to the wiring on Skoda Octavia, Skoda Rapid, and also UAZ Bukhanka cars are required. It is worth noting that most of the cars on which the speedometer twist is mounted are new cars that are covered by a factory warranty. If all modifications are made carefully, this will not be detected by the official dealer and will not affect the warranty.
Briefly: you need to remove the instrument panel, connect an additional wire to the instrument panel wiring harness, bring the additional wire to the diagnostic connector, insert a new contact with the wire into the diagnostic connector, insert a twist for Lada Largus into the diagnostic connector for testing.
Why is it necessary?
During the inspection process, the vehicle is tested in many respects, which allows us to determine its suitability for further use. Among other things, data is also recorded from the car’s on-board computer. Connection to it is made using the diagnostic connector.
Connecting an external reading device makes it possible to quickly detect malfunctions in the electrical and other systems of the machine and identify virtually any deviations from the norm.
To correctly interpret the data received through the Largus diagnostic connector, you need to know the decoding of all error codes. If you don’t understand this, then it’s better to entrust the task to a professional from a car service center.
However, if the malfunction is minor, then the information stored in the on-board computer may be useful to an ordinary owner who is not experienced in the nuances of car maintenance.
Lada largus. vehicle technical check
Where is the diagnostic connector located on Renault Logan?
To ensure traffic safety and increase the service life of the car, it is necessary to periodically carry out external and internal inspection of the car. The length of the inspection depends on how well you know your car and how often you use it.
While operating your car, you will learn about the rate of oil consumption in the engine and gearbox, brake and coolant, and the reliability of various systems and devices. This will allow you to plan your actions and time to inspect the car in the future.
If after a month there is no visible change in the oil level, you can limit yourself to a monthly check. The more familiar the car inspection activities become for you, the less time you will spend on them.
We check the outside of the car
: – air pressure in the tires and inspect them for damage; – tightening the wheel bolts; – serviceability of lighting and alarm devices. You can check the operation of the brake signals without an assistant by pressing the brake pedal and watching in the rearview mirror for the reflection of the signal light from a wall, such as a garage; – no traces of leakage of oil, coolant, fuel and brake fluid.
We check in the engine compartment
: – engine oil level; – liquid level in the expansion tank of the cooling system; – level of working fluid in the hydraulic brake reservoir; – the level of working fluid in the power steering reservoir; – presence of liquid in the windshield washer reservoir; – tension of the auxiliary drive belt; – condition and fastening of battery cable terminals.
We check inside the car
: – serviceability of the vacuum brake booster; – operation of the clutch and gearbox drives; – the amount of travel of the parking brake lever; – serviceability of the sound signal; – serviceability of the window cleaners and washer; – serviceability of instrumentation; – fuel level in the tank; – adjustment of rear view mirrors; – serviceability of door lock mechanisms.
When the car's mileage is more than 150 thousand km, maintenance procedures should be carried out at the frequency indicated in the table. During the operation of a vehicle, its technical condition changes due to wear of the working surfaces of parts, violation of regulatory parameters, and aging of plastic and rubber products.
To keep your vehicle in good working order, you may need to perform some of the described operations more frequently. If the car is operated in dusty conditions, low ambient temperatures, used for transporting a trailer, frequent trips at low speeds or over short distances, then maintenance must be carried out more often (see the car’s service book and maintenance regulations).
What you need to use
As noted above, the machine controller stores all errors on the memory card in the form of specific codes. It is quite difficult to understand them, but decoding helps not only the ECU itself, but also the adapters attached to the diagnostic connector.
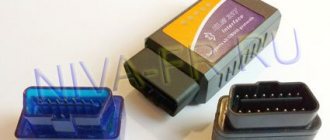
Inexpensive options for the latter:
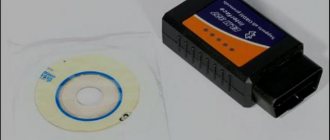
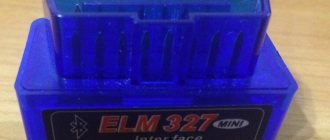
- ELM327;
- AutelMaxiScan MS309;
- VAG COM 409.1.
Moreover, most car enthusiasts usually choose the first one. It is manufactured in three modifications, differing only in the type of connection. Available working via Bluetooth, USB, Wi-Fi.
Additionally, you will need to install software and a special driver on your smartphone (Android only) or laptop.
In the first case, the software is called “mini-elm327”, and in the second – “ScanMaster-ELM”.
What can the adapter do? In fact, much more than the stock ECU. With its help it is easy:
- get all (standard and special, used only by the manufacturer) error codes;
- organize their decoding;
- reset data;
- turn off the Check Engine indicator;
- get acquainted with the sensor readings.
The latter will help determine what:
- maximum and minimum engine speed;
- fuel consumption, pressure, etc.;
- motor load;
- antifreeze temperature;
- speed;
- air pressure and flow;
- ignition advance;
- throttle valve position.
It is also not difficult to find out whether Largus injectors work well.
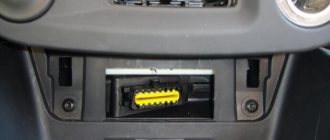
How to use
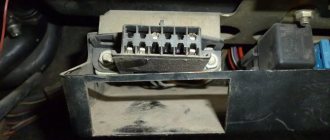
The diagnostic connector, as noted above, is covered with a cap on the Largus. It unlatches easily and flips to the left.
Be sure to turn off the ignition before use. Next, insert the adapter - thanks to the trapezoidal shape, it is impossible to do this incorrectly. The red diode on it will flash - this means that the device is working.
The device connects automatically, and all you have to do is establish a connection with the selected gadget. An important point is that you won’t be able to use Apple tablets and smartphones, since there is no software for them. In the case of Android and Windows, everything is simpler. There is, in addition to the previously mentioned, universal software called Torque.
When the adapter is connected to the diagnostic connector, the ignition is activated. After that, enter the application by clicking on its shortcut (it shows a microcircuit).
If the adapter works via Bluetooth, then connect using the standard functionality of a laptop or smartphone. In the program itself, you need to click on the communication button - a plug with a wire is drawn on it.
By establishing a connection via the diagnostic connector only once, you will be able to receive all the latest data constantly.
General car diagnostic algorithm
For diagnostics, you will need a car scanner, an information display device (laptop, smartphone) and appropriate software. The procedure for carrying out diagnostic work:
- The OBD cable is connected to the vehicle diagnostic connector and the auto scanner. When connected, the signal LED on the scanner should light up, indicating that 12 Volts are supplied to the scanner. If the 12 Volt pin on the connector is not connected, diagnosis is impossible. You should look for the reason for the lack of voltage at pin 16 of the diagnostic connector. A possible cause could be a faulty fuse. The scanner (if it is not a separate device) is connected to the laptop. Software for diagnostic work is loaded on the computer.
- In the interface program, the car make, engine, and year of manufacture are selected.
- The ignition is turned on, the completion of the self-diagnostic work of the car is expected (while the lights on the dashboard are blinking).
- A static error scan is launched. During the diagnostic process, the scanner will indicate the diagnostic process by blinking LEDs. If this does not happen, the diagnosis will most likely be unsuccessful.
- At the end of the scan, the program displays error codes. In many programs they are accompanied by Russified decryption; sometimes you should not completely trust them.
- You should write down all error codes before clearing them. They may disappear and appear again after a while. This often happens in the ABS system.
- Remove (or rather erase) errors. This option is available in all scanners. After this operation, inactive errors will be deleted.
- Turn off the ignition. After a couple of minutes, turn the ignition back on. Start the engine, let it run for about five minutes, it is better to make a test drive of about five hundred meters with the obligatory turns right and left and braking, reversing, turning on the light signals and other options for maximum interrogation of all systems.
- Rescan. Compare the newly “filled” errors with the previous ones. The remaining errors will be active and must be resolved.
- Turn off the car.
- Re-decrypt errors using special programs or the Internet.
- Turn on the ignition, start the engine, perform dynamic engine diagnostics. Most scanners allow you to measure injection parameters, ignition angle, and others in dynamic mode (with the engine running, changing the position of the accelerator pedals, brakes, and other controls). This information more fully describes the operation of the vehicle. To decipher the resulting diagrams, the skills of an auto electrician and mechanic are required.
Diagnostic connector protection
The car owner should take care to limit free access to the communication node in question, which Largus is equipped with.
The thing is that software is often installed through the connector, allowing you to control the operation of the immobilizer. In essence, this is an electronic master key that makes it possible to steal a car without the slightest difficulty by using the “left” key.
Employees of private workshops often engage in such fraud. The installation of a special metal block that works like a safe helps protect the car from them. It closes with a secure lock and is mounted without much difficulty. The cost varies from 2,500 to 4,000 rubles.
Hi all! Updated: By popular demand, I am posting a link to the seller from whom I bought this particular adapter: Search here For those who don’t know, this device allows you to independently scan the “brain” of your car for errors, read the current values of many parameters, and also acts as a the role of a trip computer in conjunction with a tablet or mobile phone. If anyone is interested, you can google the useful properties of this device))) In my opinion, the main advantage of this device is that you can save five or even one and a half dollars on scanning errors when the check light comes on, and if you have direct hands and a brain, you can fix the problem yourself...
Preface
I bought a cheap Chinese OBD2 brain scanner a long time ago and finally recently tested it in Largus))) I’ll note right away that I don’t have a link to the seller, but you can find this miracle on Aliexpress simply by using the search. Link for the lazy In short, this is a universal OBD2 scanner for all cars with the appropriate connector, working via bluetooth. There are both USB and Wi-Fi versions (for an amateur), but I like bluetooth, because... I can connect it to my mobile phone, tablet, laptop and computer without any problems. For mobile and tablet, I used the Torque program, which, in my opinion, is the best for these purposes. If you use a laptop or computer as a scanner, I recommend the ScanMaster program.
Connection
The installation of this device does not involve any difficulties and is done in a matter of seconds, provided that the glove compartment is uncluttered... I had just such a problem in an extremely neglected version (((All the trash removed from the glove compartment was analyzed and filtered)))
Next, you just need to insert the ELM327 adapter into the diagnostic connector. The lights on it should blink and the red signal should come on.
Now you need to turn on Bluetooth on your device and find the device named OBD2. When you try to connect, you will be asked for a password, which will be either 1234 or 0000. Next, we launch a pre-configured program for working with the car’s brains (in my case, Torque) and connect to the control unit.
Everything works fine. Now all that remains is to test all operating modes of the program and draw conclusions, which is what I will probably do in the near future. PS I tried to connect to cars Hyundai Getz, KIA Magentis, Hyundai XG300 (Grander), KIA Sorento, FORD Focus1... On all cars the connection is successful, errors and parameters are readable)))
VAZ cars have a fault diagnostic system that allows you to read and decipher error codes. Most VAZ-2110 cars have an old type “January-4” controller installed. The activation of “CHECK ENGINE” is considered a malfunction detection signal. Troubleshooting in such a controller is simple - error codes are calculated starting from the number 12 and ending with 61. For more modern VAZ models, ELM-327 electronic adapters with the OBD-II program are suitable.
Diagnostic process using a laptop
We will not describe the diagnostic procedure for each software separately, since in general, regardless of the software, this process is identical.
The general diagnostic procedure is described below:
- First, you need to install the software on your computer. If you know how to use the Internet, then this step will not cause you any problems, since there is nothing complicated in its implementation. If your adapter comes with a disk with drivers, then they must also be installed, otherwise the computer simply will not recognize the device.
- Then you need to open the cover in front of the gearshift lever or remove the protective trim on the right side of the center console, depending on the version of the car. You should obtain and ensure unobstructed access to the K-Line output to which you will connect the laptop.
- Next, take the purchased cable and connect it - one side to the computer, the other to the output.
- After the cable is connected, you need to make sure that the computer recognizes it, to do this, check for connection. Alternatively, to do this, you can go to the Windows Task Manager and go to the Hardware tab. If the operating system recognizes the device, this information should be noted in this tab.
- If the connection is successful, then you need to run the test program on the laptop. After launching, the utility should ask you which components you want to diagnose (transmission, engine, etc.). If this does not happen, then navigate the menu - there should be a “Start diagnostics” button somewhere, perhaps in the File menu. All existing faults will be shown in the table in the form of error codes.
- If you go to the Parameters tab, you can see how the general condition of the vehicle is described here. In the Codes tab, all faults identified by the diagnostics should be noted.
- All you have to do is decipher the resulting combinations of numbers and start troubleshooting. As practice shows, quite often during testing, sensor malfunctions pop up - usually such problems are caused by broken wiring or poor connection of controllers. Therefore, if you encounter this, do not rush to change the sensors - try to clean the contacts on the connection connectors, and also check the integrity of the wiring.
- After the faults have been eliminated, you need to reset the control unit memory to remove all error codes from it. You can reset the unit's memory through the diagnostic program - usually this function can be found in the Management section.
Where is the diagnostic connector located?
On different cars of the VAZ family, the socket is located in different parts of the car. Let's look at a few models as an example:
- on the VAZ-2112, as well as on the 2110, as well as 2111, the socket is located to the right of the driver’s seat, immediately under the column;
- on models 2108\, 2109 and 21099, the socket you need is located under the glove compartment, on a special shelf;
- on cars with a europanel it can be found in the center of the console, near the cigarette lighter. A special decorative cover is used to disguise it;
- on Lada Kalina cars the connector is near the gear shift lever, it is also hidden under a special cover;
- On a Lada Priora, look right behind the glove compartment, on the wall.
How to diagnose a car
- Connect contact “B”, which has the diagnostic block and “ground”;
- Turn the ignition key to the third position, do not start the car;
- First, the “CHECK ENGINE” lamp displays code 12 with 3 flashes. It shows that the diagnostic programs are working. On the VAZ 2110 this happens in this order: the lamp blinks briefly 1 time (which should be considered the designation of number 1). After a pause lasting at least 2 seconds, it flashes 2 times in a row (two). So we got the number two. And this is repeated 3 times so that the driver understands these signs;
- After the diagnostic program has declared its serviceability, it will begin to display error codes, if there are any, of course. In the same way - flashes and pauses.
Deciphering error codes
The first character is a letter and indicates a fault block:
- B - body;
- C - suspension;
- P — engine (ECM, gearbox);
- U - data exchange bus.
The second character is a number, code type:
- 0 — SAE (standard);
- 1.2 - OEM (factory);
- 3 - reserved.
The third character is a number, system:
- 1, 2 - fuel system;
- 3 - ignition system;
- 4 — reduction of exhaust gas toxicity;
- 5 - idle;
- 6 - ECU or its circuits;
- 7, 8 — transmission (automatic transmission).
The fourth and fifth characters are numbers, the error code itself.
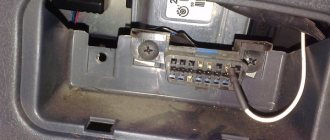
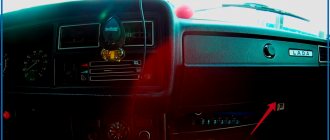
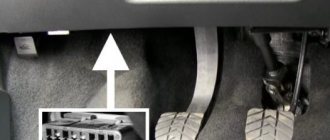
The diagnostic connector is located in the glove box