How to diagnose Granta yourself?
For self-diagnosis of Granta, a regular K-Line adapter is not enough.
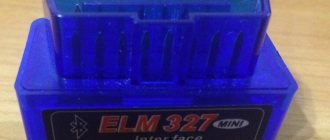
The ECU installed here is of a different design than on other VAZs; it requires a special adapter. At the moment, it is popular to use equipment such as the ELM-327 diagnostic adapter and various paid and free software for it (for example, Scan Master, Torque). Photos of the ELM-327 adapter can be found in reference books or on the Internet. Employees of official servers use the “dealer scanner” DST-14 (diagnostic scanner-tester). It is unlikely that you will be able to carry out a complete diagnosis yourself, since this is a complex procedure that includes both software and hardware parts, and not just a K-Line connection. Moreover, it requires certain knowledge and experience. In other words, you need to be able to compare the instrument readings with the real situation.
Self-diagnosis of control unit errors is only a search for possible faults, but it can save the car owner time and money. To do this, you can use a special diagnostic tester (adapter), laptop or smartphone with a special program. During operation, the diagnostic program will collect and provide the user with information about engine parameters in 1-2 minutes.
Some types of software contain transcripts of a significant list of errors. But the ECU may not produce errors, which does not mean their absence. An acceptable deviation is considered if a particular parameter differs from the basic one by no more than 20%. If the deviation is greater, you should look for a malfunction. The most important values include UACC (battery voltage), THR (throttle position), crankshaft speed, mass air flow, coolant temperature.
Decoding combinations
Well, now it’s time to tell you about decoding fault combinations.
Diagnostic connector for connection to the on-board computer
Decoding codes after diagnostics with a scanner
As stated above, if the measured characteristics do not differ from the standard ones by more than 20%, then everything is in order with the car. What are the standard parameters?
Parameter Meaning UACC Shows battery voltage. To understand whether there is an error in this case, it is necessary to activate all devices that consume the most voltage. Allowable voltage is from 13.9 to 14.5V. If it is less, then it is necessary to check individual circuits of the network. THR Throttle position parameter. As a rule, if it is faulty, the driver will know about it without diagnostics, since the car will move jerkily and the engine power will constantly drop. Press the gas pedal without starting the engine, but turning on the ignition. The TPS readings should gradually increase to 90% (or slightly less). If everything is so, then the sensor is working; if not, it needs to be replaced. FREQ Parameter of crank pulley rotation speed. The rotation speed is up to 840 rpm. If this sensor fails, the operation of the motor will be impossible. AIR Mass air flow parameter. It should not exceed 12 kg/hour. Start the engine and press the gas pedal so that the number of revolutions increases to 5 thousand per minute. In this case, the parameter should increase to approximately 250 kg/hour. Naturally, if the device is working properly, then the indicator will be like this. UOZ Represents the ignition timing angle. It should change in the range from 6 to 15 degrees. INJ This bk parameter represents the duration of the injection pulse (the time required to open each injector for gasoline to enter the cylinder). Ideally, this parameter should be between 3 and 5 milliseconds when driving at neutral speed. If the readings obtained during diagnostics are much higher, then, most likely, the injectors are already clogged and need to be cleaned. Or it indicates low gasoline pressure as a result of a clogged gasoline filter or pump. Press down the gas pedal sharply. The injection time should increase to 20 ms. Ideally, accurate diagnosis of injectors is only possible using a test bench. FSM Idle speed sensor performance indicator. Ideally, this parameter should not exceed 50-60. If you press the gas pedal sharply, it can increase to 160-180. ALAM 1 Shows the voltage level recorded on the oxygen level monitor. When the car engine is warmed up, this indicator should increase from 0.007 to 0.7 V. If this indicator differs, then something is wrong with the circuit. LUMS_W This coefficient indicates the rotation of the crank pulley. Ideally, it should vary around 4 revolutions per second. If it is slightly larger, then this already indicates a misfire in the engine cylinders
This means that you should pay attention to checking the spark plugs (whether they are working, filled or not), as well as the condition of the high-voltage wires. QT Gasoline consumption coefficient. With the engine running and idling, it should not exceed 0.9 liters per hour.
Quick tips on maintenance and operation of the Lada Granta
Apply insulation to prevent chafing of the washer reservoir
Where is the diagnostic connector located on the Priora?
Over time, the washer reservoir wears out, because... Due to vibrations, it constantly rubs against the body. It is enough to glue the space under the tank with isolon (or any noise or vibration insulation material).
Eliminate the possibility of moisture entering the interior from the engine compartment
Through the section of the wiring harness from the branch to the crankshaft sensor to the entrance to the body, moisture may enter the interior. Wrap electrical tape around the specified section of the wiring harness.
Eliminate the possibility of moisture entering the interior from under the bottom
There is often no plug in the bottom, through which moisture can enter the interior. Purchase a 30 mm plug (2108-5112090), apply mastic or sealant to it, and install it in the specified location.
Wheel hub corrosion protection
Over time, water seeping under the disc plugs causes corrosion. And at the most inopportune moment, the nut may not come off. To avoid this, generously lubricate the hub nut. We also coat the contact points between the hub and the wheel disk with the thinnest layer to prevent the disk from sticking to the hub.
Where is the ECU diagnostic connector located on the grant?
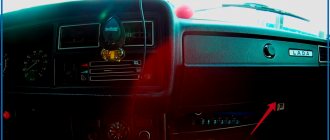
The diagnostic connector is located in the center console area, under the glove compartment. If you stick your head into the front passenger's feet and look up, you will see this picture
Disabling the seat belt warning light on the grant
To turn off the buzzer of the seat belt warning light once, you need to turn on the ignition, press and hold the daily mileage reset button, and fasten and unfasten the driver’s seat belt twice within no more than 10 seconds. The one-time lock will be disabled if the ignition is turned off for more than 60 seconds.
To turn off the alarm buzzer (sound) of unfastened seat belts for permanent locking, you need to turn on the ignition, press and hold the daily mileage reset button, and fasten and unfasten the driver’s seat belt twice with an interval of no more than 5 seconds. To turn the alarm (sound) back on, you need to do the same thing, but three times.
This morning I looked at the engine temperature data through the OBD2 Torque program and did not find the diagnostic connector the first time. Before searching, I googled that the diagnostic connector is installed “on the front passenger side in the area of the center console.” I looked all over the center console and couldn't find any traces of the connector.
https://youtube.com/watch?v=95ognGQ4zIY
Generalization
Granta is easy to diagnose - the connector is not covered by anything and is accessible from the passenger compartment. For VAZ 2110, 2111, 2112 you can make a simple adapter or buy a ready-made one from China.
We use the connector itself to connect a scanner and work with errors, or to connect an on-board computer.
Instructions for working with the ELM327 scanner and the course of action if the “check” lights up are here.
A complete table of error codes on Grant is available at this link.
When I posted about TO1, I wrote that the electrician could not find the diagnostic block in the car and excused himself with the phrase “wherever they put it.” I wanted to take a couple of photos, maybe it will help someone, or maybe a “specialist” from the salon will look here to increase their knowledge about the car.
So. Where is the ECU diagnostic connector located on the grant?
The diagnostic connector is located on the front passenger side in the center console area, under the glove compartment. If you put your head between your feet and look up, you will see this picture
I would like to touch on a topic that is interesting to me. I think the topic is interesting not only to me. AUTO DIAGNOSTICS via diagnostic connector. A little background. When I just bought my previous car in 2009 (Nissan Wingroud 2003 QG18 4WD), I immediately bought a new product for that time - a Multitronics RI-500 trip computer. The thing turned out to be very useful and cool for me. After some time, I decided to update the firmware on it. This required a special adapter - K-Line. I successfully bought it via the Internet, updated the Multitronics firmware, and then the fun began. As it turned out, using this adapter it was possible not only to update the Multitronics firmware. Quite the contrary. The main purpose of this K-Line adapter was to diagnose the car. I spent days reading the Internet, spending tens and hundreds of megabytes downloading all sorts of programs - all for nothing. The diagnosis did not work. Without getting into the weeds, I will say that the problem turned out to be that MOST Japanese cars for the domestic market use THEIR SPECIAL protocol for diagnostics, and any programs that support the OBDII standard were absolutely unable to connect to these cars. I accidentally came across a thread on the drome with the ONLY program at that time running under DOS. I don’t even remember its name right now. Then, again, there was one single program for Nissans for Windows - OBD SCAN TECH. The process has begun. The TECU project (then JOBD) began to develop, then programs for smartphones began. At the moment everything is fine with the programs. Diagnostic experience is also present. For those interested, you can read the basics and download the programs on the pages www.wingroad.ru/threads/D...ez-obdi-obdii.213/page-61 (first post) and also vdiag.net/. So why am I all this?
I got a new car - Lada Granta. Naturally, I wanted to diagnose her. I thought that in our time, and even with a Russian car, this is not a problem at all. Well, yes. Of course. Everyone ran away to write programs. The first thing I came across was the OpenDiag program. I’ll make a reservation that I was primarily interested in programs for Windows, as they are more promising for diagnostics, because... looking at tiny graphs on a smartphone screen is still a pleasure. So. OpenDiag program has been downloaded. It turned out that the program is paid. An outdated version is available for free use. Anyway. The program was previously tested on a Niva 2012 - it cleared the errors, draws graphs - fine. I connect to Granta. Oppa. Ambush. The free version DOES NOT SUPPORT CAN BUS! And the grant's engine hangs on this tire. Let's look for a hacked version of the program. HAVE NOT FOUND! OK. Let's look at programs with OBDII support (back then I thought Grant was diagnosed using standard OBDII). It worked a little with programs like ScanMaster-ELM v2.1 and ScanXL™Professionalv3_5_1_2770. But it worked so crookedly that there was no talk of normal diagnostics. All sorts of programs like “Uncle Vasya diagnostician” and the like might work, but they ONLY work with their own adapters, which cost money. I didn't want to pay money. Especially for some incomprehensible special adapter that won’t fit anywhere else. At that time I had universal adapters K-Line, K+CAN, ELM327 and CONSULT-1 (a purely Nissan theme). Going beyond Windows programs, the OpenDiag Mobile program for Android was downloaded. The initial disdain that I would have to look at everything on the small screen of a smartphone led to the fact that after playing with the program, I gave up diagnostics a little. Well, there is no normal program. I even thought about buying paid OpenDiag, but I was afraid that I would pay money and not like the program. It was somehow familiar with the TECU-3 program for Nissans. For OpenDiagMobile, of course, it was written that log analyzers could be used, but somehow it didn’t work out. Now it hangs, now it shows Abru-Kadabra... I don’t like it, that’s all. And then recently I decided to check again to see if the errors had been corrected. I download new versions and make logs. Damn, it OPENS! And everything works! Anyway, if anyone is interested. For convenient (for me) diagnostics of the Lada Granta, I needed: 1) ELM327 adapter. I have Wi-Fi. There is also bluetooth, but it works worse. MANDATORY version NOT HIGHER than 1.5. Details on the program forum. 2) OpenDiag Mobile program. 4pda.ru/forum/index.php?showtopic=585411&st=2460 . There's also information about checking the adapter. 3) ReadLogs program - log analyzer. The link is on the OpenDiagMobile page. 4) A computer with a normal screen for viewing graphs. 5) The desire to delve into the topic, because “I pressed a button and the program said what to change” - that won’t work. You need a desire to learn and practice. A bunch of re-read literature is welcome.
Install the OpenDiag Mobile program on your Android device. We connect ELM327 to the car. Turn on the ignition. Launch the program and establish a connection. If you need to read or reset errors, we do it directly from your smartphone. You can also view some parameters from your smartphone. But the analysis of engine operation - corrections, lambda operation, MAF, interaction of sensors and parameters - is more convenient to do on a computer. To do this, we include LOGS FOR ANALYSIS in the program. We perform the necessary manipulations with the car, which we then analyze (We accelerate, drive uphill, or whatever we need). Turn off the log, close the program. We send the logs to the computer. Launch the ReadLogs program (latest version, now 3.3.3). We select the M74CAN profile in it. Open the log. By studying the capabilities of the program, reading literature, asking questions, we conduct an analysis. We remove unnecessary columns, export to EXCEL, draw graphs...
Self-diagnosis Grants
What is the obd diagnostic connector
To diagnose the Lada Grant, a standard K-Line adapter is not enough. It provides for the installation of an electrical control unit of a different configuration than on other VAZ vehicles, and it requires a special adapter. Today, the most popular is the use of the ELM-327 diagnostic adapter and various software for it, for example, ScanMaster, Torque.
It’s worth looking at what the ELM-327 adapter looks like in specialized literature or on the Internet.
Specialists on official servers use the dealer scanner DST-14T. It is unlikely that you will be able to perform diagnostics on Grant yourself, since this is not a simple procedure. It includes software and hardware components, and not just connection via K-Line
It is important to be able to compare the device readings with real circumstances
Diagnosing ECU errors on a Grant is only a search for probable faults, but thanks to it, the car owner will be able to save money and time. For this purpose, it is appropriate to use a diagnostic adapter, a computer or a telephone with a special program. During the process, the diagnostic program collects and provides the user with data regarding engine parameters within 1-2 minutes.
The Granta engine has characteristic features that have permissible deviations. In the diagnostic program, which is displayed on the monitor in the form of a table, you must first check the stored errors (indicated by DTC). If you see the “error 505” line, you should resort to decoding it to a website/forum dedicated to automotive or to an expert. In turn, some types of software contain transcripts of an impressive list of errors. However, the ECU sometimes does not generate errors, let alone the absence of any.
Deviation is allowed when certain parameters differ from the basic one by a maximum of 20%. With a larger deviation, it makes sense to troubleshoot. The most important values are:
- UACC (battery voltage);
- THR (throttle position);
- mass air flow;
- crankshaft speed;
- coolant (coolant) temperature.
How to independently and correctly diagnose Granta’s on-board network?
Diagnostic connector VAZ 2114: purpose, location and preparation for diagnostics
In order for the diagnostics to be complete, the use of a “K-Line” format adapter will not be a sufficient measure, since the ECU is endowed with a different design that differs from other representatives of the VAZ model family. In this case, the use of a different adapter is required. The role of such a tool can be the ELM-327 diagnostic device, paired with which you need to use paid or free specialized software (for example, Scan Master or Torque).
The image of “ELM-327” can be easily found on the Internet or in a directory. Masters of official representative offices use the so-called “dealer scanner” “DST-14” as a diagnostic tool.
Using this method, diagnosing yourself is not easy, since the procedure is associated with certain difficulties associated with the presence of not only the software, but also the “hardware” part. And this is no longer an ordinary connection, like via K-Line. This situation presupposes that the person performing the diagnosis has certain experience and relevant knowledge. Here the main role is given to the ability to compare the device data and the real situation.
Self-diagnosis allows you not only to find errors present in the unit’s memory, but also to save the owner financial resources. To implement the process, you can use a regular laptop, the memory of which already contains a pre-purchased scanning program. Within 1-2 minutes, this software will check the car system and provide results for all parameters of the engine and other components, and indicate where the fault is located.
The engine of a Lada Granta car is initially endowed with specific characteristics, the values of which allow minor deviations. In the table displayed on the display showing the diagnostic results, the presence of errors (designated as “DTC”) is first checked. If line information is displayed in the form of symbols: “error 505”, then you will need to find an interpretation of the decryption on the corresponding website or forum. If your search is unsuccessful, we recommend contacting a professional.
Many software options are equipped with transcripts of a sufficient list of possible errors. Sometimes the ECU simply does not generate errors, which does not at all indicate their absence. The acceptable standard deviation for a specific parameter is a difference within 20% of the regulated value. If this deviation exceeds the permitted limit, then troubleshooting should be done.
The most important parameters are:
- “UACC” (voltage at battery terminals);
- “THR” (throttle valve position);
- the frequency at which the crankshaft rotates;
- mass fraction of the consumed portion of air;
- temperature parameter in the cooling circuit of the Lada Granta engine.
Location of the diagnostic connector on the Lada Granta
Diagnostic connector for Lada Granta
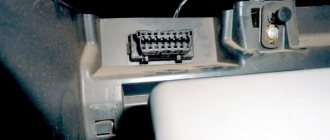
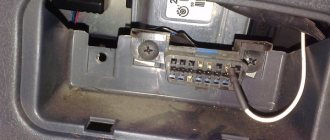
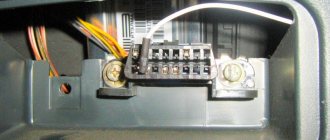
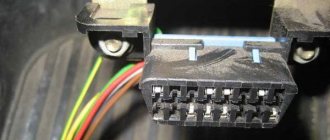
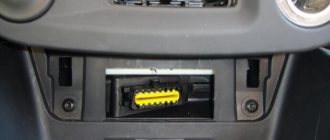
The diagnostic connector of the Lada Granta car is designed according to the OBD-2 standard. On the Lada Grant, the diagnostic connector allows you to read almost all the information about the composition of the mixture and other data stored in the car controller. This is the operating mode of the fuel correction, the temperature of the coolant and intake air, and other data. The connector has 16 contacts and is located in the passenger compartment, to the left of the glove box, at the passenger’s feet, next to the ventilation deflector.
The arrow in the photo indicates the location of the diagnostic connector. It’s not that difficult to remove and install the Diagnostic Link Connector yourself. To remove the ECU yourself, disconnect the negative cable of the on-board battery and remove the screw securing the floor covering. Next, you need to peel back the upholstery and soundproofing coating to directly see the block itself, secured with 3 nuts.
How to use the diagnostic connector
The diagnostic connector allows you to read various information from the internal memory of the vehicle computer. With its help, a specialist can carry out diagnostics by examining error codes. In addition, data from sensors that display engine operation is also received through the diagnostic connector.
This connector also includes an on-board computer and a scanner. With their help, error codes and various vehicle parameters are read. If during the diagnostics you have received error codes for some parameters, you should contact a specialist. The documentation should describe what exactly this error means.
Early Grant models did not have an engine temperature indicator on the dashboard. Therefore, the diagnostic connector was often used precisely to monitor this particular indicator. In general, it is most often used to display various engine parameters in digital form. Given the complexity of diagnostics, few car owners take it seriously.
Sometimes diagnostic connectors are used by car thieves. The fact is that the circuit provides a contact for monitoring the immobilizer. However, this method is used extremely rarely. If you still want to protect yourself from it, you should purchase a special circuit that distributes contacts differently. In this case, the hijacker will not be able to disable the protection.
- Directly to destination. To diagnose a car using an adapter that is connected to a computer or phone, or to a special diagnostic device.
- For the purpose of having fun. Connect the adapter and install the Torque program on your phone, connect to it using a Bluetooth connection, and you can view the data online. And if you have a phone with GPS, then you can measure acceleration to 100 km/h, time to cover a section, etc.
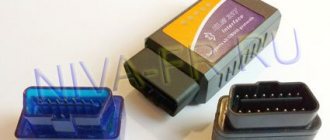
Diagnostic connector with connected adapter ELM327
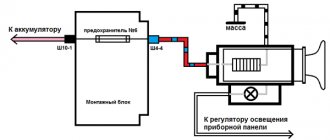
To carry out diagnostics and connect to the “masses” of a car with an injector, you need to know where the OBD2 diagnostic connector is located. Also, to select a scanner for diagnostics, you should know the pinout of not only the OBDII output, but also the ECU (electronic control unit).
VAZ engineers, when developing the Lada Granta, provided for a not very convenient location of the diagnostic block, placing it on the right side of the central column, on the passenger side.
How to check the engine control unit? several ways from the masters
Any car owner should know how to check the engine control unit. It contains too many different sensors, the main task of which is to optimize the operation of different components and their harmonious interaction with each other. If the harmony is disturbed, at a minimum you will lose speed, maneuverability, service life of spare parts, fuel consumption - and, ultimately, money. At most, at a certain stage your car simply won’t start.
How to check the engine control unit? In principle, it is not very difficult, even if you are not very friendly with electricians. You just have to push yourself a little. In any case, if you suspect the ECU is not working correctly, the service station will not simply take it for repair - you will have to clearly outline your complaints. Reasons for the errors generated by the ECU The simplest option is that the conductor has flown.
If this is the case, breathe a sigh of relief: having “ringed” the control unit and found out which one, you can replace it (often yourself). In any case, craftsmen won’t charge much for most of them. It's much worse if the firmware is broken. There have been cases when the owner, locked tightly in a car, was taken to a service station by a tow truck. You won't be able to reflash the microprocessor yourself - unless, of course, you are an expert in this area.
So checking the engine control unit is in your own interests: in the initial stages of a software failure, such disasters do not occur, and in the future they can be prevented in time. Procedure The only thing you will need is a multimeter and a wiring diagram for the unit. The first one will have to be purchased (it is not included in the package of cars of all brands), and the latter must be included in the documents supplied with the car. You will have to study the diagram carefully.
Error code: Do-it-yourself car diagnostics via a laptop: scanners, programs, work procedure, adapters based on the ELM327 and VAG chip -
If the ECU does not produce random data, but points to a specific block, find it on the diagram and begin to “ring” it. If accurate data is not available, the entire system will have to be checked. Having found a breakdown, measure the resistance again and determine where exactly the wire is attached.
In this case, sighing heavily, stomp to the service station. Possible signs of failure of the control unit If you are still new to the automotive business and do not know what to do if problems arise, the following signs may tell you that it is the ECU that is capricious.
- The scanner that checks the condition of your car is silent or produces implausible data;
- The "check" does not light up. Alternatively, it does not turn on immediately or blinks. True, first of all it is advisable to check whether the light bulb has burned out;
- The engine malfunctions, starts every once in a while, or even starts smoking for no apparent reason;
- The ignition misfires;
- The fan turns on without a command;
- Fuses fly, and repeatedly;
- Signals from the sensors do not come or arrive irregularly;
- The gas pedal reacts slowly or slowly (a true sign, unless this has not been noticed before with the pedal).
Practical advice To avoid such difficulties, you should take care of the engine control unit in advance. Remember: electronics are delicate things, and they are susceptible to dust, temperature changes, and moisture. If you value your four-wheeled horse, learn the block diagram like a multiplication table, and call him at the slightest problem.
It doesn’t show fuel consumption - you can live without these indicators (some people manage to estimate it by mileage). However, the failure of this sensor may foreshadow more severe problems to come. If you already know how to check the engine control unit, do not be lazy to use your skills. Preventive measures can prevent major problems and significant costs.
Quick tips on maintenance and operation of the Lada Granta
Apply insulation to prevent chafing of the washer reservoir
Over time, the washer reservoir wears out, because... Due to vibrations, it constantly rubs against the body. It is enough to glue the space under the tank with isolon (or any noise or vibration insulation material).
Eliminate the possibility of moisture entering the interior from the engine compartment
Through the section of the wiring harness from the branch to the crankshaft sensor to the entrance to the body, moisture may enter the interior. Wrap electrical tape around the specified section of the wiring harness.
Eliminate the possibility of moisture entering the interior from under the bottom
There is often no plug in the bottom, through which moisture can enter the interior. Purchase a 30 mm plug (2108-5112090), apply mastic or sealant to it, and install it in the specified location.
Wheel hub corrosion protection
Over time, water seeping under the disc plugs causes corrosion. And at the most inopportune moment, the nut may not come off. To avoid this, generously lubricate the hub nut. We also coat the contact points between the hub and the wheel disk with the thinnest layer to prevent the disk from sticking to the hub.
Where is the ECU diagnostic connector located on the grant?
The diagnostic connector is located in the center console area, under the glove compartment. If you stick your head into the front passenger's feet and look up, you will see this picture
Disabling the seat belt warning light on the grant
To turn off the buzzer of the seat belt warning light once, you need to turn on the ignition, press and hold the daily mileage reset button, and fasten and unfasten the driver’s seat belt twice within no more than 10 seconds. The one-time lock will be disabled if the ignition is turned off for more than 60 seconds.
To turn off the alarm buzzer (sound) of unfastened seat belts for permanent locking, you need to turn on the ignition, press and hold the daily mileage reset button, and fasten and unfasten the driver’s seat belt twice with an interval of no more than 5 seconds. To turn the alarm (sound) back on, you need to do the same thing, but three times.
This morning I looked at the engine temperature data through the OBD2 Torque program and did not find the diagnostic connector the first time. Before searching, I googled that the diagnostic connector is installed “on the front passenger side in the area: from the stock firmware to chip tuning?
The dilemma associated with the rationality of performing firmware on the “native” software in the ECU excites the minds of many owners.
Here it is worth highlighting the optimized dynamic firmware version for the 1.6-liter 8-valve Lada Granta, which has the “M74” module and meets the toxicity standard according to “E2”.
What preferences does this firmware have? After performing a certain list of manipulations and returning the ECU to its rightful place, optimization of the parameters of fuel supply and ignition distribution is observed. Also, one of the purposes of the firmware is to ensure that the settings of the throttle assembly are adjusted.
Chip tuning allows you to physically disable the 2nd DC (“lambda”) in combination with the catalyst. The implementation of such firmware leads to an increase in the dynamic capabilities of LADA Granta.
The role of the stock firmware is to form the parameters characteristic of normal driving conditions. Let us remind you that the “native” version of the firmware is included in the warranty package. Self-correction of the firmware version without any alternative leads to the cancellation of warranty coverage.
Today, so-called commercial versions of firmware software are available to the mass consumer, including the following:
- “AY_I484GG30”, the product is intended for the 1.6-liter 8-valve Granta modification with the present control module “M74 11186-1411020-22”;
- “I484GI06-STR”, software is offered for Grant with similar motors and blocks in version “11186-1411020-22”, plus compliance with the Euro-2 standard;
- “AY_484GP12”, the firmware is used with controller versions “M74 11186-1411020-22” and motors that comply with “E3/E2” regulations.
I bought it in an online store, with delivery it came out to 3120.
Here are the first photos of the purchase.
Instructions for 49 sheets - so far I have only briefly read them. I’ll probably install it on the weekend, while I don’t have time to connect it. I also need to think about where to install the temperature sensor (so that the engine doesn’t heat it up and so that water/snow doesn’t get in and the sun doesn’t affect it - I don’t even know where yet, in order to fulfill all the conditions. Moreover I’m thinking of trying to look at the mini-USB to see what’s being configured there (immediately to know, so that later I can configure it for myself).
I downloaded the program params32.exe from the site - to work with it via mini-USB
It is imperative to select the protocol manually on the grant: M74CAN! The default is Auto and is defined as CAN, which is why some parameters are simply not available (including ECU reset, fuel level (in the “Not calibrated” mode of the FLS ECU) , injector injection time, perhaps many other things. But in the default screens, most of the parameters were. I had already been driving in Auto mode for two days and already wanted to calibrate the tank (fill to the neck, start calibration). According to one of the tips here (I don’t remember the link) to Grant set 53 liters for an uncalibrated tank - in relation to this number, it seems that the readings in liters will be close to those taken from the ECU.
Generalization
Granta is easy to diagnose - the connector is not covered by anything and is accessible from the passenger compartment. For VAZ 2110, 2111, 2112 you can make a simple adapter or buy a ready-made one from China.
We use the connector itself to connect a scanner and work with errors, or to connect an on-board computer.
Instructions for working with the ELM327 scanner and the course of action if the “check” lights up are here.
A complete table of error codes on Grant is available at this link.
When I posted about TO1, I wrote that the electrician could not find the diagnostic block in the car and excused himself with the phrase “wherever they put it.” I wanted to take a couple of photos, maybe it will help someone, or maybe a “specialist” from the salon will look here to increase their knowledge about the car.
So. Where is the ECU diagnostic connector located on the grant?
The diagnostic connector is located on the front passenger side in the center console area, under the glove compartment. If you put your head between your feet and look up, you will see this picture
I would like to touch on a topic that is interesting to me. I think the topic is interesting not only to me. AUTO DIAGNOSTICS via diagnostic connector. A little background. When I just bought my previous car in 2009 (Nissan Wingroud 2003 QG18 4WD), I immediately bought a new product for that time - a Multitronics RI-500 trip computer. The thing turned out to be very useful and cool for me. After some time, I decided to update the firmware on it. This required a special adapter - K-Line. I successfully bought it via the Internet, updated the Multitronics firmware, and then the fun began. As it turned out, using this adapter it was possible not only to update the Multitronics firmware. Quite the contrary. The main purpose of this K-Line adapter was to diagnose the car. I spent days reading the Internet, spending tens and hundreds of megabytes downloading all sorts of programs - all for nothing. The diagnosis did not work. Without getting into the weeds, I will say that the problem turned out to be that MOST Japanese cars for the domestic market use THEIR SPECIAL protocol for diagnostics, and any programs that support the OBDII standard were absolutely unable to connect to these cars. I accidentally came across a thread on the drome with the ONLY program at that time running under DOS. I don’t even remember its name right now. Then, again, there was one single program for Nissans for Windows - OBD SCAN TECH. The process has begun. The TECU project (then JOBD) began to develop, then programs for smartphones began. At the moment everything is fine with the programs. Diagnostic experience is also present. For those interested, you can read the basics and download the programs on the pages www.wingroad.ru/threads/D...ez-obdi-obdii.213/page-61 (first post) and also vdiag.net/. So why am I all this?
I got a new car - Lada Granta. Naturally, I wanted to diagnose her. I thought that in our time, and even with a Russian car, this is not a problem at all. Well, yes. Of course. Everyone ran away to write programs. The first thing I came across was the OpenDiag program. I’ll make a reservation that I was primarily interested in programs for Windows, as they are more promising for diagnostics, because... looking at tiny graphs on a smartphone screen is still a pleasure. So. OpenDiag program has been downloaded. It turned out that the program is paid. An outdated version is available for free use. Anyway. The program was previously tested on a Niva 2012 - it cleared the errors, draws graphs - fine. I connect to Granta. Oppa. Ambush. The free version DOES NOT SUPPORT CAN BUS! And the grant's engine hangs on this tire. Let's look for a hacked version of the program. HAVE NOT FOUND! OK. Let's look at programs with OBDII support (back then I thought Grant was diagnosed using standard OBDII). It worked a little with programs like ScanMaster-ELM v2.1 and ScanXL™Professionalv3_5_1_2770. But it worked so crookedly that there was no talk of normal diagnostics. All sorts of programs like “Uncle Vasya diagnostician” and the like might work, but they ONLY work with their own adapters, which cost money. I didn't want to pay money. Especially for some incomprehensible special adapter that won’t fit anywhere else. At that time I had universal adapters K-Line, K+CAN, ELM327 and CONSULT-1 (a purely Nissan theme). Going beyond Windows programs, the OpenDiag Mobile program for Android was downloaded. The initial disdain that I would have to look at everything on the small screen of a smartphone led to the fact that after playing with the program, I gave up diagnostics a little. Well, there is no normal program. I even thought about buying paid OpenDiag, but I was afraid that I would pay money and not like the program. It was somehow familiar with the TECU-3 program for Nissans. For OpenDiagMobile, of course, it was written that log analyzers could be used, but somehow it didn’t work out. Now it hangs, now it shows Abru-Kadabra... I don’t like it, that’s all. And then recently I decided to check again to see if the errors had been corrected. I download new versions and make logs. Damn, it OPENS! And everything works! Anyway, if anyone is interested. For convenient (for me) diagnostics of the Lada Granta, I needed: 1) ELM327 adapter. I have Wi-Fi. There is also bluetooth, but it works worse. MANDATORY version NOT HIGHER than 1.5. Details on the program forum. 2) OpenDiag Mobile program. 4pda.ru/forum/index.php?showtopic=585411&st=2460 . There's also information about checking the adapter. 3) ReadLogs program - log analyzer. The link is on the OpenDiagMobile page. 4) A computer with a normal screen for viewing graphs. 5) The desire to delve into the topic, because “I pressed a button and the program said what to change” - that won’t work. You need a desire to learn and practice. A bunch of re-read literature is welcome.
Install the OpenDiag Mobile program on your Android device. We connect ELM327 to the car. Turn on the ignition. Launch the program and establish a connection. If you need to read or reset errors, we do it directly from your smartphone. You can also view some parameters from your smartphone. But the analysis of engine operation - corrections, lambda operation, MAF, interaction of sensors and parameters - is more convenient to do on a computer. To do this, we include LOGS FOR ANALYSIS in the program. We perform the necessary manipulations with the car, which we then analyze (We accelerate, drive uphill, or whatever we need). Turn off the log, close the program. We send the logs to the computer. Launch the ReadLogs program (latest version, now 3.3.3). We select the M74CAN profile in it. Open the log. By studying the capabilities of the program, reading literature, asking questions, we conduct an analysis. We remove unnecessary columns, export to EXCEL, draw graphs...
In general, this turned out to be a completely acceptable option for me. Although many parameters and their meaning are a dark spot and raise questions, the process has begun. I will study the factory manuals for checking sensors and read the Internet. If possible, I will add additions to the post.
What can be done to protect the connector?
However, the location of the connector does not seem perfect
If the plug is removed and an adapter is connected to the connector, any careless foot movement by a seated passenger may render it unusable. After all, while sitting in the passenger seat, it is possible to hit quite hard (and absolutely accidentally) on an open connector, which will lead to damage to both it and the connected adapter
So it is better to not allow anyone to occupy the passenger seat to the right of the driver when turning it on. If the presence of a passenger cannot be avoided, you should not disembark him. He'll just have to ride from behind. Or, if he insists on being in the front seat, let him not move his legs too much. Although the remedy is effective, it is not always helpful. So many car enthusiasts are of the opinion that it is better to pay the technicians at a car service center, but they will be able to move the diagnostic connector to another place that is less accessible to careless movements of passengers and the driver. Although this operation will most likely cost the owner of the vehicle a pretty penny. But here it’s worth agreeing with the proverb about the miser who pays twice, which was not in vain.
A device with the functions of the ELM 327 adapter.
This adapter is characterized by its rather small size and ability to easily connect to the connector and, due to its miniature size, to be quite inaccessible to accidental movements of the passenger (mentioned above). This adapter, insignificant in size, but not in its functions, connected to the connector, transfers all the necessary information from the car’s memory via the Bluetooth interface to a program on the vehicle owner’s smartphone (the owner can especially be recommended to use the Torque program, which meets all modern requirements with its functionality). If, as a result of the diagnostics carried out, the owner of the car receives the corresponding error codes for some parameters of the functioning of his vehicle, he can contact the specialists of any car service center with them. Moreover, in the documentation supplied by the manufacturer to the manufactured car, all the interpretations and designations of error codes are clearly presented.
What are the advantages of an auto scanner?
“Scanmatik-2” is naturally appreciated by many professional diagnosticians. Having tried this kit once, the owners were very impressed by its functionality, which allows them to diagnose the ECU not only in representatives of the family of domestic cars, such as the Lada Granta, but also in some foreign cars.
The “OBD-2” connector stably supplies power to the adapter terminals. In emergency situations, it is possible to power the Scanmatik-2 from the passenger compartment cigarette lighter.
This device is noted as very convenient for self-scanning. It also has a protective function that levels out on-board voltage surges. For example, if you power the system from the cigarette lighter socket at a time when it does not need this action, then no excesses will appear.
Any type of device has its positive and negative aspects. Hijackers today have learned to use almost the entire range of such parts as the diagnostic connector for their unfriendly purposes. In most situations, criminals use this block to disable the standard immobilizer.
If you need to protect yourself and your Lada Granta car, we recommend that you resort to the common solution of replacing the original block with a “re-pinned” version that has a different arrangement of the contact group, you now know where the required element is located. The adapter includes a “male” (fake connector) and a “female” (i.e. standard block), which implies preliminary removal.
What types of ECUs are available to Granta and what is the principle of their operation?
Sometimes the Lada Granta model is identified with an exclusive car. Why is she given such status? It's simple. "Lada" has a unique control unit, which is called "Itelma 11186-1411020-22" and cannot be combined with previous modifications of "VAZ". The primary difference of this module is the integrated “CAN bus”. Previously produced models used the “K-channel” to ensure the transmission of pulses. If you set out to experiment and replace the Itelma with a similar device with functionality in the K-channel, then in the end the devices on the panel will certainly “fall asleep”.
Where is the ECU located and what is its operating principle? It is based on a special type of algorithm, the formation of which occurs on the basis of software pre-integrated into memory. This allows the module to process signals from all sensors present in the ECM in real time.
The process associated with processing streaming information allows the control unit to subsequently carry out corrective actions regarding the functioning of such systems:
- nozzles;
- ignition system coils;
- throttle mechanism;
- sensor-regulator of idle modes, etc.
To be able to identify the type of device in a LADA Granta car and the firmware version of its software, a special marking code is applied to the body, which allows for the correct selection of an analogue if there is a need for replacement, and in some cases pinout of the ECU is required.
How to use the diagnostic block
1 . Directly to destination. To diagnose a car using an adapter that is connected to a computer or phone, or to a special diagnostic device.
2. For the purpose of having fun. Connect the adapter and install the Torque program on your phone, connect to it using a Bluetooth connection, and you can view the data online. And if you have a phone with GPS, then you can measure acceleration to 100 km/h, time to cover a section, etc.
3. View engine temperature. Since the first versions of the car did not have an engine temperature indication on the instrument panel, many owners used a diagnostic connector to connect on-board computers, which show many parameters, including engine temperature. And since most Grant owners complain about the low operating temperature of the engine, on-board computers are a very popular solution to this problem.
Self-diagnosis allows you not only to find errors present in the unit’s memory, but also to save the owner financial resources. To implement the process, you can use a regular laptop, the memory of which already contains a pre-purchased scanning program. Within 1-2 minutes, this software will check the car system and provide results for all parameters of the engine and other components, and indicate where the fault is located.
Most common mistakes
Error code 4 on the dashboard
Below is a breakdown of the most common error codes encountered when diagnosing a Lada Granta.
| Error code | Description of the malfunction |
| P0106 | The error code indicates an incorrect wiring signal coming from the absolute motion sensor. |
| P0107, P0108 | These error codes indicate a very low or high signal coming from the intake manifold pressure control device. |
| P0112, P0113 | These error codes on the State X1 on-board computer indicate a breakdown of the intake air flow temperature control device. Or this may indicate an incorrect sensor signal. |
| P0115 - P0118 | One of these error codes may indicate that the refrigerant temperature sensor is not functioning properly. In addition, this may indicate an incorrect signal coming from it. You should check the circuit and operation of the sensor itself. If it shows too high a result, and the antifreeze in the expansion tank does not boil, then most likely the problem is with the sensor. |
| P0122, P0123 | Incorrect signal from the TPS, the device and its circuit should be checked. |
| P0131 - P0135 | These error codes on the on-board computer indicate a breakdown in the operation of the oxygen level control device before the converter. As in previous cases, it is necessary to check the circuit, and then diagnose the sensor itself. |
| P0171, P0172 | We are talking about too low or high level of the combustible mixture. |
| P0301 - P0304 | The Lada Grant's on-board computer tells the owner that a misfire has been registered in one of the engine's four cylinders. |
| P0325 | The knock sensor is not functioning correctly or the Lada Grant on-board computer has detected a break in its circuit. |
| P0645, P0647 | BC reports the need for additional diagnostics of the climate system clutch relay. It is possible that the relay itself may break down or the circuit may break in one of the sections, which requires additional testing. |
| P0660 - P0662 | A failure or open circuit of the intake system channel length control valve is reported. |
| P0830 | Damage to the clutch system. Perhaps the pedal switch itself or another element of the system is faulty. But in this case everything will be fine with the chain. |
| P1102 | The oxygen sensor heater gives a too low signal, which the on-board computer warns the car owner about. |
Diagnostics and testing of the electronic gas pedal
VAZ supplies LADA GRANTA cars with an electronic gas pedal (E-gas) to comply with modern environmental standards.
If the pedal is malfunctioning (no responsiveness or increased engine speed when changing speed on the gearbox), then before dismantling and checking the unit with a multimeter, read the errors through the OBD2 connector.
Typical errors related to the accelerator pedal:
- The “Check Engine” light came on on the dashboard (error 0504);
- Error: Low/High signal level of the first accelerator pedal sensor.
Features of the Scanmatic-2 scanning kit
The designated set can be easily found in the retail chain. It fits such a thing as the diagnostic connector on a Lada Granta car, but will require the use of a laptop. The Scanmatik-2 package initially includes a scanning program. The cost of such a device (set), according to the official website, is 13,700 rubles. In terms of applicability to domestic cars, this is the best option for scanning, as evidenced by many reviews from diagnosticians.
To diagnose it yourself, first of all we boot up the laptop and activate the required program. Using a “USB” format cable, we connect the computer with the vehicle’s diagnostic socket. In the dispatch menu of Windows devices, we find the appearance of a “fresh” “COM” port, which we “register” in the settings. We insert a cord with an “OBD-2” connector into the diagnostic connector, which is connected with a “USB” cable using the adapter included in the delivery kit. We control the glow of the green lamp, which is equipped with the OBD diagnostic connector, which indicates the correct connection. After launching the special program, activate the “Engine” tab and click on the “Auto-detection” symbol. This allows the program to identify the on-board car computer on the Lada Granta.
If identification is not carried out automatically, then it is possible to manually select the name of the modification (in our version, “VAZ”) from the versions present in the software registry. A menu will appear on the display allowing you to select the ECU. There are cases when the program fails to determine the brand of the on-board controller, for example, when the software was previously “reflashed”.
After communication has been established between the ECU and the diagnostic tool, a list containing diagnostic modes is displayed on the screen. We enter the working window and get the opportunity to view the list of parameters, as well as adjust their settings. This point helps not only to find the fault, but also to improve the configuration of any system. To implement this action, you will need to enter the section called “Settings”. The “View” menu allows you to adjust the settings of the “Blutooth” function in case of using a wireless switching method.
The user of a Lada Granta car can create a set of parameters, which can subsequently be extracted from a list of values pre-present in the program. For example, using this method you can create a specific set that allows you to check the idle speed of the engine, and then save the data and use it an unlimited number of times in the future.
Upon completion of the diagnostic process, we return to the program menu for selecting the ECU and deactivate the ignition.
Electric power steering
When the EPS diagnostic light comes on or the electric power steering switches on/off after a certain period of time, you first need to check the EPS using the diagnostic connector. Open Diag (application) together with an OBD-2 adapter or scanners will help here:
- Scanmatic;
- Motor Master;
- ScanDoc.
The diagnostic process is designed to indicate where errors are located and decipher them for further repair based on the type of malfunction. In addition, it is quite possible to perform the check without a scanner:
- There is an 8-pin connector (black) under the ignition switch under the steering wheel. It is necessary to dismantle the casing at the steering column (unscrew the fastening screws from below).
- Insert the paper clip, closing the two contacts.
- Turn on the ignition and observe the warning lamp.
- The first signal will be the continuous burning of the lamp (“1”).
- It is necessary to count subsequent short signals, that is, if there are 3 short ones, then “3”.
- In our case, the code “13” should be formed.
Where is the diagnostic connector on the Lada Granta?
Regardless of the year of manufacture of the LADA KALINA, the diagnostic entrance is located to the right of the driver, next to the heater ventilation grille, at the passenger’s feet (to the passenger’s left). The location is indicated on the diagram by number 7.
Diagnostic connector for Lada Granta
The diagnostic connector of the Lada Granta car is designed according to the OBD-2 standard. On the Lada Grant, the diagnostic connector allows you to read almost all the information about the composition of the mixture and other data stored in the car controller. This is the operating mode of the fuel correction, the temperature of the coolant and intake air, and other data. The connector has 16 contacts and is located in the passenger compartment, to the left of the glove box, at the passenger’s feet, next to the ventilation deflector.
The arrow in the photo indicates the location of the diagnostic connector. It’s not that difficult to remove and install the Diagnostic Link Connector yourself. To remove the ECU yourself, disconnect the negative cable of the on-board battery and remove the screw securing the floor covering. Next, you need to peel back the upholstery and soundproofing coating to directly see the block itself, secured with 3 nuts.