Such a seemingly insignificant part of the car as the temperature sensor of the Lada Granta is one of the most important control and measuring instruments of the car. The safe operation of an internal combustion engine (ICE) depends on its serviceability. A timely identification of the cause of a sharp increase in coolant temperature will save the vehicle owner from troubles on the road and large unexpected costs.
Lada Granta:
Old dashboard
This instrument panel was installed before June 15, 2014.
Find the engine temperature indicator here?
There is no engine temperature indicator on the old instrument panel. There is only an overheating warning light. On my previous cars, which did not have a temperature gauge, there were at least two warning lights: “cold engine” and “engine overheating”.
On the Grant, as planned by AvtoVAZ engineers, the engine should not be warmed up, and you can immediately start driving. Interesting savings. On our website there was a whole battle about this in the article: Is it necessary to warm up the engine before driving?
Car manufacturers allow the car engine not to warm up, citing global standards to prevent environmental pollution and save gasoline.
Read more about fuel consumption standards for the Lada Granta family of cars in the article: Grants fuel consumption on the passport and in reality, what is it like?
Ways to solve this problem
There are several ways to solve this problem. The simplest of them is to just hammer and drive like that. Most people do just that. You can flash the instrument panel, the result will be like this.
But in this car there is a hypothetical problem of the engine not heating up to operating temperatures, although AvtoVAZ management does not consider operating temperatures below 80 degrees a problem.
Installing a separate engine temperature indicator
The easiest and cheapest way is to install a separate temperature indicator instead of the standard free button plug.
Temperature gauge installed in place of the standard plug next to the cigarette lighter
Installing such a digital indicator will not take much time.
Make it a rule to always turn off the power to your vehicle when doing any electrical work!
- You will need to remove the panel trim (if you don't have air conditioning, the ideal location would be to the side of the heated rear window button).
- Next, disconnect the ground from the battery.
Disconnect the ground from the battery - We remove the glove compartment lid and pull out the diagnostic connector so that we have free access to it.
Diagnostic connector - We insert the digital indicator instead of the plug and connect the wires according to the instructions to the diagnostic connector using clamp terminals.
Connect the indicator to the diagnostic connector - We connect the ground, start the car and check the operation of the device.
Checking the operation of the indicator with the car running - Carefully put everything back together in reverse order.
This indicator is sold in most car stores, the cost does not exceed 600 rubles.
Viewing the temperature using a smartphone (tablet)
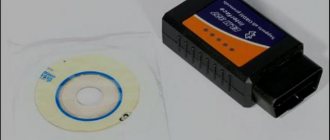
This method will require you to purchase a diagnostic cable that works via bluetooth. You will also need an Android device that supports bluetooth connection.
- Remove the diagnostic connector.
- Connect the diagnostic cable there.
- Install the “Torque” program or a similar one on your cell phone.
- Launch the program on your phone, start the engine and try to establish communication with the adapter.
- Once the connection is established, you can view the data that is transmitted from the sensors to the ECU.
New instrument panel
New instrument panel combination (from June 16, 2014)
If your car was manufactured after June 15, then the engine temperature should be displayed in the on-board computer. If it is not there, then you need to reflash the instrument panel.
Source: https://carfrance.ru/kak-posmotret-temperaturu-dvigatelya-lada-granta/
Lada Granta 2349 2011 - 2016
Lada Granta engine temperature sensor guarantees the reliability, controllability, mobility and safety of your car on the roads. Original and branded spare parts are always available in warehouses at reasonable prices.
However, speaking of repairs, even more important for driving safety is regular maintenance and timely repairs, subject to vehicle maintenance regulations:
- works well,
- does not lose its performance over long runs,
- more reliable and safer to operate
We make it easy to keep your car in good condition and provide great deals on our entire range of parts. Everything you need for service and repair can be found right here in our digital warehouses. Instead of endlessly searching for a retail auto parts store near you that doesn't necessarily have the parts you need, just pick up the phone and we'll deliver the auto parts you need to your door.
The main emphasis when selecting spare parts is based on the company’s experience.
It is profitable and safe to buy from us for a number of main reasons:
- Autocompas.ru is one of the leading online stores of auto parts, with daily traffic on the site of more than 30,000 people,
- Certified and reliable suppliers provide a full range of auto parts within access to their warehouses,
- The system has more than 500 suppliers and manufacturers who regulate prices with an eye on competitors and strive to make their goods more profitable to purchase.
Why look for the Lada Granta engine temperature sensor somewhere else, wasting time? We have competent staff, payment, delivery and support services.
Replacing the coolant temperature sensor on Grant
The coolant temperature sensor (not to be confused with the engine temperature indicator sensor) is installed on the Lada Granta car - directly on the thermostat housing.
It is this sensor that is responsible for the cold start of the car and prepares the mixture depending on the coolant temperature.
In other words, at a lower temperature of the coolant (in frost), one mixture is required, at a higher temperature, another.
If problems with starting are observed in different temperature ranges, it is necessary to check this particular sensor on the Grant. To do this you will need the following tool:
- Phillips screwdriver
- The head is 19 mm deep
- Extension
- Ratchet handle
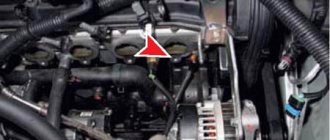
Replacing the DVT on a Lada Granta car
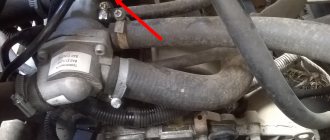
To understand where this sensor is located, its location is clearly shown in the photo below.
So, the first thing you need to do is disconnect the power connector from the sensor itself, first bending the latch to the side, and the result of this action is shown in the photo below.
Next, you can begin to unscrew the sensor using a deep socket and an extension with a ratchet.
It is worth noting that for greater convenience it is necessary to move the inlet pipe to the side by unscrewing it from the mass air flow sensor.
After the old coolant temperature sensor is removed, you need to install a new one, first apply thread locker.
We install the new one in the reverse order. The price of the sensor is no more than 300 rubles for the original one produced by AvtoVAZ. Then we connect the chip into place and start the engine to check the functionality of the system.
Source: https://zarulemvaz.ru/zamena-datchika-temperatury-ozh-na-grante/
Recommendations for care and maintenance of sensors
- Strictly follow the manufacturer's recommendations regarding vehicle maintenance schedules;
- Preferably buy parts with original catalog numbers. The exact data is indicated in the instruction manual for your technical device;
- Carry out preventive maintenance, install consumables and spare parts in certified service stations. This is especially true when the car is under factory warranty. There are frequent cases of warranty cancellation due to third-party intervention.
- When the first signs of engine malfunction appear, contact a service station.
Grant engine temperature sensor. We install it ourselves
Every owner of a Lada Granta car has encountered its main drawback - the absence of an engine temperature sensor on the panel. The task of the AvtoVAZ management was to make Grant accessible, the engineers did it “excellently”, saving even on this device. The emphasis was on cheapness, so we tried.
Soon, however, everything was corrected - on models of a higher price and advanced configuration of the Lada Granta liftback 21911, 21912, 21917, an engine temperature sensor has already appeared and helps monitor the condition of the internal combustion engine.
However, what should owners of earlier models do? The overheating indicator lamp installed on cars is not informative enough.
In winter, it is impossible to determine whether the engine is warm enough to start driving, and in summer, the overheating warning light may come on too late.
The thermostat is the weak point of Lada Granta cars, and it would be much more effective to determine its malfunction at a very early stage by assessing the behavior of the TD sensor needle, but...
It was these problems that prompted some motorists to look for answers to the question: “How to install an engine temperature sensor on a Grant?” You can, of course, contact dealers. For a fee, specialists will equip everything you need. But there's no need to rush. It is not at all difficult to equip your car with this device yourself. To make sure of this, let's look at the whole process step by step.
First, you should purchase an installation kit for the coolant temperature sensor (engine). If you don’t want to go to a car store far, or don’t want to, you can easily order the necessary kit in an online store with home delivery. It includes:
- temperature indicator,
- plastic case for it,
- the sensor itself;
- fastening clamps.
Once you have the kit in your hands, it's time to head to the car. To see the place where the Grant engine temperature sensor will be attached, the negative terminal is removed from the car battery, and behind it the air filter is disconnected and removed.
This will open an overview of the pipe that leads from the thermostat. Coolant circulates through it during operation.
It is necessary to carefully cut the pipe and insert the temperature sensor inside along with the adapter (buy at a car store), then securely tighten it with clamps.
The wires are dealt with as follows: the first is the ground wire, it is attached to the engine (body), the second is pulled directly into the cabin.
An indicator with an arrow for the temperature sensor can be installed on the dashboard near the windshield next to the instrument panel. Visually this is very convenient, because... It is located close to eye level, and a quick glance will be enough to control the temperature level.
But what should you do if you may need to fix the navigator in approximately this place? The second option for mounting the sensor indicator is even more aesthetically pleasing.
Many motorists install the device in a cup holder next to the gearbox, but the panel itself will need to be slightly modified.
Of course, in this case you will have to look for a place for a glass of coffee, but this will be a huge plus: the sensor indicator in your cabin looks very harmonious. Now you can fully control the engine temperature and monitor how the thermostat behaves.
Sensors on the Lada Granta engine
To ensure the normal operation of all vehicle components, modern cars use many different regulators. In this article we will talk in more detail about domestic Lada cars. Where is the speed sensor, coolant and other controllers on the Lada Granta and what functions do they perform - read below.
Sensor locations
Where is and how to find this or that regulator on Grant, Priora, Vesta or Largus? In fact, the location of the devices on these car models is identical. Below is a diagram identifying all devices.
Characteristics of sensors
Speeds
The Lada Granta speed sensor is located on the gearbox housing. This regulator is directly related to the transmission of data about how fast the vehicle is moving, how the car is idling, and what kind of gas mileage it is driving at.
To find this controller on a Priora or Grant, you need to open the hood and remove the air supply hose that goes from the air filter element to the throttle. Having done this, at the bottom of the gearbox housing you can see the controller with a wire connected to it. To replace the device, you simply need to disconnect the wiring and remove it from the installation location, and then replace it with a new one.
Removing DTOZH from a car
A coolant temperature sensor is necessary to measure the temperature of antifreeze in the cooling system. In accordance with the data from the temperature regulator on the Grant, the control unit adjusts the crankshaft speed, adjusts the composition of the combustible mixture, as well as the ignition timing.
As practice shows, such a device rarely fails, but in some cases it can give incorrect readings. Located in the engine compartment, in particular, in the thermostat cover, the controller has its own “diseases”. The wiring at the base of the connector may fray, resulting in the need to replace the DTOZH.
The mass air flow controller is located behind the air filter element of the power unit, it is also often called a flow meter.
The main purpose of the device is to monitor the volume of air flow that enters the vehicle engine.
In accordance with the data received, the on-board computer determines the required volume of gasoline, which is necessary to maintain a normal air-fuel ratio.
The idle speed sensor is one of the regulators designed to monitor and control the operation of the power unit. If the device breaks down, the motor immediately begins to work incorrectly - it will trip and the power will decrease.
In turn, the needle on the tachometer will jump sharply from one value to another. The element itself is located on the throttle, in particular on its lower part.
To get to it, you need to free the throttle valve from the pipes, there are four in total.
To replace and install a new IAC, you will need to disconnect the wiring from the regulator itself, as well as the throttle position controller.
Sveta
As for the light sensor, it is installed in the same housing with the rain regulator. Its purpose is to activate and deactivate lighting based on the current state.
For example, if it gets dark outside or you enter a garage or poorly lit tunnel, the device should automatically turn on the headlights along with the side lights.
The controller itself is not repairable, so if it fails, the only option is to replace it.
Clutches and brakes
The clutch sensor allows you to determine the position of the pedal. When the pedal is not depressed, the regulator turns off the load adjustment on the power unit. The device is located in the pedal assembly, in the same place where the brake sensor is located.
The operating principle of the latter is quite simple:
- when the pedal is released, the rod is located inside and clamps the floating contact to the top;
- when the pedal is depressed, the rod clamps the contact to the bottom of the group.
As practice shows, one of the main problems of this controller is the poor quality of the contact itself. It can simply catch on the spring, and ultimately the control unit will receive an impulse to apply the brake.
The vast majority of modern cars, including the Lada Granta, are equipped with digital sensors. “Scanners” transmit readings online to the electronic control unit of the ECU.
The on-board computer compares the received data with the programmed ones. In case of discrepancy, an error is indicated on the dashboard. The owner of the car, seeing a system error, decides on the nature of the breakdown and visits a service station to order a comprehensive diagnosis.
ATTENTION! A completely simple way to reduce fuel consumption has been found! Don't believe me? An auto mechanic with 15 years of experience also didn’t believe it until he tried it. And now he saves 35,000 rubles a year on gasoline! Read more"
What temperature sensors are installed on the Lada Granta, where are they located, price
In total, over ten digital and mechanical sensors are installed in the Lada Granta. The following deserve special attention and control from the driver:
- Coolant temperature sensor (hereinafter referred to as DTOZH);
- Environmental DT (hereinafter referred to as DTOS).
The functionality of the devices and the accuracy of data display depend on the condition of the technical equipment and the safety of driving a car.
DTOZH is designed to monitor the temperature of antifreeze in the cooling system circuit of the power unit. After receiving data about the “degree” of the engine, the ECU increases or decreases the speed of the power unit in order to adjust the temperature.
The quality composition of the fuel mixture depends on the accuracy of the DTOZ readings. The service life of the sensor is unlimited, with the exception of mechanical damage or manufacturing defects.
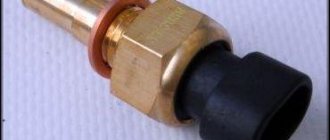
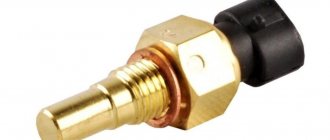
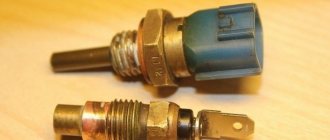
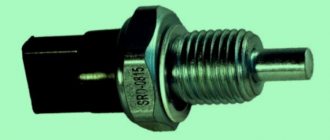
The standard installation location is the thermostat cover. The base part is screwed into the thermostat housing. Two power supply cables extend from the top.
A melting element is installed inside the DTOZh base. As soon as the antifreeze temperature reaches 90, the contacts close and the on-board computer signals an error.
Catalog articles, prices of temperature sensors for Lada Granta
| DTOZH (original) | 21911-3858452-05 | from 250 |
| DTOS (original) | 21911-1168234-11 | from 350 |
Installed at the front bumper mounting location, to the left of the central air duct. The DTOS shape is conical with two contacts on the back side.
The fuse in the mounting block at number 32 is responsible for the operation of the DTOS. The first sign of a malfunction is the absence of temperature readings on the dashboard.
How to independently replace temperature sensors on a Lada Granta car
- Set of automotive tools, key set to “19”;
- Rags;
- Additional lighting as needed;
- New measuring device.
- We install the technical equipment within the perimeter of the repair area;
- We turn off the engine, open the hood;
- We provide priority safety measures: block the rear row of wheels with wheel chocks, squeeze the parking brake;
- Remove two terminals from the DTOZH
- Use the key to “19” to unscrew the DTOZH;
- We insert a new sensor in place of the faulty one and put on two terminals.
We start the engine and check the operation of the equipment. We replenish the missing amount of antifreeze (optional).
- Automotive tool set;
- Rags;
- Additional lighting as needed;
- New DTOS.
- We install the machine on a level platform, provide priority safety measures, secure the rear row of wheels with wheel chocks;
- We hang the front part of the car with jacks. We use a hydraulic lift if available;
- Unscrew the six screws along the lower perimeter of the front bumper;
- We remove the wheels, unscrew three screws on each side in the wheel arches;
- We also unscrew the five fasteners in the center of the front bumper;
- Remove the bumper;
- Carefully disconnect the contacts, limit switches from the dimensions, lighting, turn signals;
- Lower the front bumper to the floor;
- To the left of the center of the cooling system radiator, a DTOS is installed on a torsion beam;
- Carefully disconnect the power terminals;
- We snap off the sensor at the base;
- We are removing the fastening. Replace with a new one as needed;
- We install a new measuring device;
- We put on terminals and limit switches;
- We assemble the front bumper, screw the fasteners, put on the lighting system terminals;
- We start the engine, although you can limit yourself to activating the ignition to test the DTOS functionality. DIY replacement completed.
DTOS
Installed at the front bumper mounting location, to the left of the central air duct. The DTOS shape is conical with two contacts on the back side.
The fuse in the mounting block at number 32 is responsible for the operation of the DTOS. The first sign of a malfunction is the absence of temperature readings on the dashboard.
Lada Granta displays temperature data on the instrument panel
As you know, AVTOVAZ removed the internal combustion engine temperature scale from the panel on the new Grants and Kalinas and left only the overheating light, but if it lights up, then this is already the beginning of the end.
Therefore, in luxury trim levels, the coolant temperature display was added to the on-board computer readings, and for all others, only a collective farm is assumed in the form of installing additional screens in place of button covers or external On-board computers.
To fix this problem, you can update the dashboard firmware of Lada Granta and Kalina 2 cars.
First, we find out what version of the firmware is embedded in the instrument panel.
For this:
- With the ignition off, press the daily mileage reset button on the panel and, without releasing it, turn on the ignition, the service mode of the panel is activated, in which all the indicators light up and the arrows begin to move
- release the button and press again. Numbers will appear on the display, this is the software version
Now let's decipher them
The first numbers (2190 or 2192) indicate the car model (Granta or Kalina 2). This is followed by the numbers 00, 20 or 40, which stand for “standard”, “norm” or “lux”, respectively.
Now, using the table below, you can see if it is possible to flash your panel so that it displays the temperature.
FIRMWARE VERSIONS OF INSTRUMENT PANELS LADA GRANT AND KALINA 2
| Equipment | Firmware version | DTNV | DTOZH | What is needed for firmware | Note |
| Granta Standard | 015 | No | No | Changing the display and working with a soldering iron | Old board |
| 029-040 | No | No | Changing the display and working with a soldering iron | Updated board | |
| Granta Norma | 053, 060, 076, 087 | No | No | Work with a soldering iron or use modified firmware 2190-20_092_for_076 | |
| 090, 091 | Yes | No | Suitable 092 and 009 or 012 from Kalina | ||
| 092-095 | Yes | Yes | |||
| Granta Lux | 032, 038, 042 | Yes | No | Firmware 046 is suitable | |
| 046 | Yes | Yes | Shows the transmission number | ||
| 047 | Yes | Yes | |||
| Kalina Norma | 007 | Yes | No | Suitable firmware 009 or 012 | |
| 014 | Yes | Yes | Added on/off gear shift sound | ||
| Kalina Lux | 009 | Yes | Yes | Firmware 012 is suitable | |
| 012 | Yes | Yes | Shows the transmission number | ||
| 014 | Yes | Yes |
- Here is an example of firmware for the Grants Norma panel. Initially, the panel is sewn with firmware 090
- We take out the panel, remove the back cover, and connect the programmer to a special connector on the panel board.
- We upload the new firmware and go try it in the car. As you can see, the version has been updated and now firmware 092 is installed
- And using the buttons on the right switch we switch the on-board computer readings and see that the temperature display has appeared.
Source: https://avtosfera74.ru/lada-granta-temperatury-na-panel-priborov/
Installing an outside temperature sensor on a Lada Granta
The outside air temperature sensor, despite its apparent simplicity and low usefulness, is actually quite an important element of driving safety. In spring or autumn, when the roads are often filled with melt water, driving a car at zero temperatures is especially dangerous.
From the driver's seat, the asphalt may appear dry or simply damp, when in fact the asphalt is coated with a glaze of ice.
The outside air temperature sensor will help predict these events, because if it shows the temperature below zero and the roads are wet, then most likely the asphalt will be extremely slippery and you will need to choose a different driving style and increase the distance to the car in front.
However, in order to save money, AvtoVAZ does not equip its cars with an outside temperature sensor in the basic configurations of the Lada Granta and Lada Kalina, but the ability to install it yourself is present in a number of cars.
To check the possibility of installing an outside temperature sensor on your car, you will need to check the firmware version of the instrument cluster.
To do this, with the car turned off, press the daily mileage reset button on the instrument panel and turn on the ignition. The instrument panel will go into self-diagnosis mode.
Press the odometer button again once and you will see the instrument cluster firmware version.
If your version is 090 and higher, then the instrument cluster is available for installing an outside temperature sensor. All versions that have a serial number below 090 do not provide for the installation of the corresponding sensor.
If in your case the instrument cluster is available for installing an outside temperature sensor, purchase the required sensor DVT-2115-3828210-03 from a car store.
The manufacturer provides a standard mounting location for the temperature sensor; it is located in the lower part of the engine cooling radiator on the frame of the bulkhead amplifier. The mass for the sensor is taken in the same place, there is a corresponding nut nearby.
The installation location is clearly visible with the front bumper removed. We marked in red the installation location of the outside air temperature sensor, and in black the installation location of the sensor mass.
We will need to run the power wire into the car interior and connect it to the instrument panel. You can insert the wire into any available rubber plug on the front panel, for example, into the clutch cable plug.
Having removed the instrument panel, we connect the positive wire to the 25th leg of the instrument panel connector. The installation location is marked with an arrow.
If the work is carried out correctly and according to our instructions, then when reassembling and connecting the instrument panel, the on-board computer menu item will contain a corresponding item displaying the temperature outside the car.
If the temperature indications do not appear, unscrew the negative terminal from the car battery for 5-10 minutes to reset the settings of the instrument panel and electronic control unit, after such a procedure the temperature indications should appear.
Source: https://olade.ru/ustanovka-datchika-naruzhnoj-temperatury-na-ladu-granta
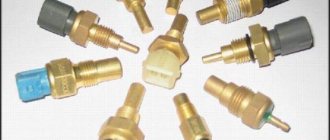
Overview of types of DTOZH: design and principle of operation
Let's take a closer look at the operating principle and types of controllers.
Magnetic
Such controllers consist of coils located on the sides of a steel armature. The arrow of the controller located on the instrument panel in the cabin is connected to the latter. The first coil is connected to the vehicle's on-board network, and the second to a cable with varying resistance. This parameter changes according to the temperature values in the engine. The voltage passing through the coils creates a magnetic field that controls the armature. The element displacement parameter is determined by the field difference depending on the current value.
Replacing the coolant sensor Lada Priora
For the cooling system of any car, including the popular Lada Priora, it is not the most pleasant moment to be stuck in a traffic jam for a long time. When the car moves without long periods of downtime, the temperature load is removed by the oncoming air flow. There is no such flow when idling. When overheating, the radiator fan automatically turns on, but only if the coolant temperature sensor is working properly. This is a very necessary functional device for a car.
If the sensor does not work, replacement is required. In this material we will analyze in detail how the device works and where it is located. No less useful will be information on how to change this sensor on a Lada Priora. To replace, you will need a certain set of tools; such a tool is not a problem for a hundred; it is available in any car service center.
How the cooling system works on Priora
The system we are considering in the popular Lada Priora works by circulating fluid, as expected, through the radiator. The temperature decreases solely due to airflow. What types of blowing are there:
- The look is natural. As the name implies, in this case the natural air flow cools the radiator while driving.
- Kind of forced. When excessive heating occurs, the built-in fan is activated.
Grant temperature sensor: where is the DTOZH located on the Lada
First, it’s worth understanding why temperature meters are needed in a car. It is completely clear what internal and external air temperature meters do.
They carry out their measurements, transmit a signal to the car’s ECU, and thanks to their work, the car either carries out climate control, or regulates the operation of the car’s mechanisms, or simply displays the obtained measurements on the dashboard (however, this is often done bypassing the ECU altogether).
Why, for example, do you need a coolant temperature sensor (DTOZH)? His work, although it seems just as obvious, is actually deeper in nature.
So, before antifreeze enters the engine, it passes through a meter, which records its temperature and sends it to the main computer. These measurements serve as analytical data for the processor, giving it an understanding of the efficiency of the heatsink.
After all, the coolant travels a long way, through the engine to the radiator, and then, wobbling through its tubes, returns to the engine, where it is re-measured.
The radiator is designed in such a way that air flows counter to the car cool the antifreeze without unnecessary costs on the part of the car. However, in hot weather or standing in a traffic jam, this may not be enough, and then the computer decides to turn on additional cooling in the form of fans located inside.
At the same time, the Lada Granta DTOZH, with its measurements, helps the computer determine the need for additional fuel injection. Although more often devices that measure incoming air or outgoing air (exhaust) are responsible for this.
As a result, the main positive criteria for the work of the DTOZh include:
- reduction in fuel consumption;
- reducing wear on machine mechanisms;
- improving vehicle performance and avoiding overheating.
This can also include bonuses such as notification to the driver or analysis of the operation of one or another form of coolant. But this already depends on the ability of the drivers themselves to recognize such signals.
How does the Grant temperature sensor work?
The coolant temperature detector in the Lada Granta is installed on the thermostat housing. To work with it, you will need standard tools like a Phillips screwdriver, two pairs of hands, and perhaps a 19 mm deep socket to simplify the work.
The dismantling of the meter in the Lada Granta itself takes place in several stages:
- we find where the device is located, remove the air filter that prevents us from getting to it;
- disconnect the wires from the meter;
- remove the connector from the detector;
- Let's start unscrewing the device.
Advantages of the E39 temperature sensor
Before dismantling, be sure to turn off the power to the car by removing the terminal from the battery. After this, be sure to drain the coolant. Failure to comply with any of these conditions poses a threat to your life and health.
Installation of a new device occurs in reverse of its dismantling. That is, they screwed it in, put the wires back in place, and put the air filter back. After that, we poured back the antifreeze and connected the electricity.
However, two installation nuances should be remembered. The first is to convince yourself of the quality of the seal of the new sensor or add your own sealant (coolant should not leak out while the car is running).
Well, the second comes out of the first - start the car and make sure there is no antifreeze leakage.
Bottom line
Repairing the Lada Granta DTOZ is easy and simple. At the same time, the benefits of the device are difficult to overestimate. Therefore, the logical conclusion is made that you should not neglect replacing a failed meter. Replacement should be done immediately.
The absence of a working DTOZh leads to the immediate activation of the additional cooling system, even if there is no need. As a conclusion, this leads to unjustifiably high fuel consumption during vehicle operation.
Source: https://alertok.ru/oborudovanie/datchiki/kak-zamenit-datchik-temperatury-na-grante.html
How to check functionality?
To check functionality you will need the following tools:
- thermometer (necessarily with a maximum permissible temperature of over 100 degrees, it is better to use a digital one);
- multimeter (to measure the resistance of the thermistor);
- a container of water (which will need to be slowly heated to boiling point).
When the sensor has cooled to room temperature, you need to connect a multimeter to its contacts and switch it to resistance measurement mode. At a temperature of 20 - 30 degrees Celsius, the initial resistance should be about 1300 - 2200 Ohms.
Next, the sensor with connected probes is placed in a container of water and slowly begins to warm it up. As the temperature rises, the resistance should gradually drop. The optimal indicators are as follows:
- 40 degrees - about 1000 - 1200 Ohms;
- 50 degrees - 1000 Ohm;
- 60 degrees - 800 Ohm;
- 80 degrees - about 270 - 380 Ohms;
- 100 degrees - about 170 - 180 Ohms.
At a temperature of 110 degrees or higher, the thermistor switches to “protection” and the circuit breaks. In this case, the resistance becomes infinite (the ECU recognizes this signal as overheating and turns on the cooling at full power).
If the multimeter readings differ radically from the above, this will be a clear sign that the sensor has failed. It cannot be repaired, so it is simply replaced. In rare cases, thorough cleaning of contacts and threads from traces of corrosion helps, but this is only a temporary solution. If the controller “fails,” it is recommended that it be completely replaced; it will not cost much.