The bumper on any car is a body element that most often takes light impacts. I got caught on a curb while parking, accidentally ran into a small snowdrift, drove into a hole on an uneven road and hit the ground: such moments often happen in the life of a car enthusiast. In case of severe damage, it may be necessary to replace the front bumper of the VAZ 2114, but you should not immediately think about a car service. You can perform the procedure yourself without any special knowledge, but simply by following this article.
Video instructions for replacement:
Repairs are canceled
Breakage of plastic car body kits is a fairly common occurrence. Apart from cases of obvious collision, the bumper can be easily damaged by snow. In cold weather, plastic parts lose their plasticity. A slight push is enough for the bumper to crack.
Prices for plastic parts for cars of the Samara family nullify the economic feasibility of bumper repairs.
The cost of repairing plastic body kits with further painting will cost much more than a new body element. Moreover, the bumper can be purchased in the same color as the car.
Of course, doubts arise: will the new element exactly match the body color? There is no need to worry, because even new cars that come off the assembly line have only slight differences in the color of plastic elements and the body.
Design Features
How to remove and replace the front or rear bumper from VAZ 2113, 2114 and 2115 cars
The design and method of attaching body kits on Lada 13-15 series cars differs from other models of the “tenth” VAZ family. Design features are as follows:
- Additional metal brackets for fastening to the body are installed inside the plastic elements;
- the brackets are held on by threaded connections and screwed to the bumper with self-tapping screws;
- plastic latches appeared on the central part of the front bumper;
- the edges of the rear body kit are pulled to the body by nuts hidden behind the wheel arches;
- It is easier to remove the front and rear parts together with the amplifier, and then unscrew it if necessary.
Front bumper design
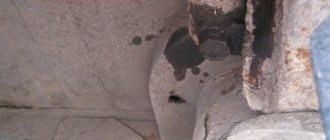
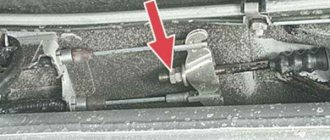
The listed features make it somewhat difficult to dismantle elements from the machine, since the threads located next to the wheels become covered with dirt and rust during operation. Over the years, corrosion also eats away at bare metal brackets that are not protected by any coating.
The rusted bracket needs to be replaced
This is interesting: How to tighten and adjust the handbrake on a Lada Kalina
Selecting a new part
When replacing, it is necessary that the new part exactly matches the dimensions of the original product. It often happens that the sides of the VAZ-2114 bumper, when replaced, do not reach their seat, and the joint with the front fender turns out to be ugly. This happens because manufacturers of non-original parts make the bumper slightly smaller than the factory one - the price to pay for a cheaper part. Another problem with aftermarket bumpers is that over time the paint and varnish will flake off the surface. This happens due to non-compliance with the dyeing technology.
The best option is to purchase an original part. Even in this case, the purchase will cost less than repairs.
Reasons for withdrawal
In fact, there can be many reasons for removing the front end of your car. Everyone has their own views on this issue.
But let’s still name the main reasons why car owners most often turn to car services or decide to dismantle and even replace the front bumper on their own.
- The replacement was caused by damage to the element as a result of a collision or accident. The integrity of the structure is compromised, and driving with a broken front end is not particularly pleasant.
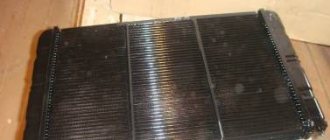
- Dismantling work with the subsequent return of elements to their place can be carried out due to engine repairs, when replacing the radiator and other components of the engine compartment.
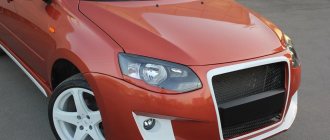
- External modification in the form of tuning the front of the car.
- Replacement of headlights, installation of new optics.
- Installation of decorative overlays, mesh.
Article on the topic: Checking the ignition module on a VAZ 2114: a multimeter and control to help
Dismantling works
If the bumper is broken, then you have two ways to solve this issue - replace it with a new one or try to restore the old one. This largely depends on the desire and degree of breakdown of the previous element.
How to choose
When choosing a new bumper for the front of your car, you should adhere to several of the most important, but fairly simple rules and recommendations.
We will be happy to share them with you.
| Selection criterion | Peculiarity |
| Plastic thickness | Try to choose elements made from the thickest layer of plastic. This has a positive effect on quality and protection |
| Color | If you buy a bumper that is already painted, carefully match it to the body color of your car. If it's unpainted, then you'll have to guess with paint |
| Compatibility | Many people purchase body parts from other VAZ models or from foreign cars. For the 2114, many people call the Sniper bumper, designed for the VAZ 2115 model, ideal. Moreover, choose a design with holes for fog lights |
| Manufacturer | There are many companies producing bumpers today. But experts agree that native elements are best suited for VAZ |
| Price | The cost of domestic native bumpers is significantly lower compared to imported analogues. Moreover, the quality may be even higher than that of foreign models. The average price for a VAZ front end is 2000-2500 rubles |
An unpainted bumper is usually 500 rubles cheaper, but there may be problems finding suitable paint. Therefore, we advise you to pay a little more. AvtoVAZ produces elements painted exactly to match the colors of the cars they produce. Problems may arise here with foreign analogues.
Do-it-yourself dismantling and installation
To replace the front bumper of a VAZ-2114 with your own hands, you can use a flat platform. Although the best option is to work on a lift or in a viewing hole.
Before starting work, you need to prepare a place for the new bumper. This is either a special table or a flat, clean floor surface. Before installation, the new part should not be removed from its packaging: the painted surface can be easily damaged. The car itself must be washed before starting work, including the wheel arches.
The dismantling procedure is as follows:
- On the side of the front wheels, you need to unscrew one screw at the top of the bumper.
- Remove the 6 screws securing the bottom of the bumper to the fender liners on each side. For further work, the locker can be removed completely. This will give freer access to the side brackets. You can also simply bend the fender liner to the side, but then further work will have to be done blindly.
- Using a “10” key, you need to unscrew the 4 nuts of the side brackets. Dirt getting into these places causes the nuts to stick tightly, and attempts to unscrew them lead to the stud breaking. To avoid these troubles, you need to thoroughly clean the fasteners of dirt and treat them with aerosol lubricant. Leave to sit for 10 minutes, then start turning away.
- Remove the license plate and plastic plate. Under them you will find 2 large screws for a Phillips screwdriver. They attach the bumper to the amplifier. You also need to unscrew 3 screws in the deflector area.
Work algorithm
Before performing the work, you should take into account that the process is quite labor-intensive and takes a lot of free time and effort. In addition, creative skills are required as making an attractive design is quite difficult. The algorithm for carrying out the work is as follows:
- First, a sketch is drawn that will allow you to get an attractive result.
- After this, the bumper is dismantled, the surface is cleaned of dust and dirt. Before starting work, you need to dry the surface.
- All elements of the vehicle that are nearby are protected with masking tape. This is due to the fact that the foam used is aggressive and has a negative effect on the paintwork.
- After this, the bumper is put in its place, since during operation it will be possible to adjust the result obtained.
- Plywood strips define the boundaries of the future product. They can be attached in a variety of ways, but must be rigid. It is ideal if their placement exactly repeats the contours of the future product.
- After the working space has been formed, it is filled with polyurethane foam. At the time of completing this stage, you should be guided by the sketch. Particular attention is paid to niches for air intakes and other elements.
- A relatively short amount of time is allowed for the applied material to dry. After this, excess material is removed using a knife. It is important to achieve the required symmetry and correct, even shape.
- After obtaining the required shape, the surface is coated with a special epoxy resin, after which it is covered with fiberglass. You should be careful about this, since such materials are quite expensive, and mistakes made will lead to an irregular shape. The best casino on the Internet Vulcan Platinum 777 mirror without registration and for real money.
- Sanding the surface is carried out after it has completely dried. All transitions must be smooth and even, since after applying the topcoat all defects will be noticeable almost immediately.
- A special putty is applied over the sanded surface. At this stage, an ideal flat and smooth surface is achieved; after the material has completely dried, it is sanded.
- A primer is applied over the putty layer. After it has completely dried, the surface is painted using a spray gun.
Carrying out such work can take quite a lot of free time. This requires certain equipment. When using construction foam, the task is greatly simplified, since after its application and complete drying, a homogeneous surface is obtained.
Amplifier
The fastenings of the front bumper of the VAZ-2114 are all unscrewed, but nevertheless it is impossible to remove the outer part. The reason lies in the plastic latches, which are located on the inside of the bumper in its upper part. Several clips are located under the headlight eyelashes. To separate them, you need to press the plastic from the inside with a pry bar or a long screwdriver. In the middle part there are also clamps under the radiator trim.
The amplifier may be damaged in a collision. It is the connecting link between the body and the front bumper of the VAZ-2114. It is also necessary to replace it if there is damage.
To remove the amplifier, unscrew 4 nuts to “13”. Be sure to use a long wrench. Using a short one will not allow you to reach the mount.
Under the amplifier there are 4 studs screwed into the side member of the car. They often have one or more wide shims. They are selected in such a way that the upper part of the bumper fits tightly to the eyelashes of the headlights. Therefore, when dismantling, you need to pay attention to how many washers were on each stud.
Removing and replacing the old bumper with a new one. How to remove the bumper on a VAZ 2114
In order to begin the removal process, you need to acquire a whole range of auxiliary tools.
Among them:
- Screwdrivers.
- Lift.
- Phillips screwdriver.
- Socket wrench 10 by 8. Alternatively, you can use an open-end wrench.
- Head with a 13 mm collar.
Additional Information. Replacing a VAZ 2114 bumper is a simple procedure. In order to complete it, it may take 60 minutes, but if a person does not understand anything about replacing body parts, then he will have to spend much more time. In any case, the car enthusiast will save on the services of specialists from service centers. It is recommended to carry out this procedure on your own, since not every master is responsible enough to replace body elements.
Bumper adjustment
When reinstalling the front bumper of a VAZ-2114, the first thing you need to pay attention to is the correct position of the amplifier. You may have to try the bumper on several times to figure out how to adjust it to the optimal position.
In addition to the adjusting washers, the amplifier can be adjusted in height by adjusting it in the mounting holes. This way you can press the bumper more tightly to the headlights and front fenders. This will eliminate the gap between them and give the car a cleaner look.
Adjustment using washers is more difficult. In order to raise the front part of the bumper, you need to place washers between the body and the amplifier on the lower studs. But there is a nuance here: if the thickness of the washer is excessive, then the side parts of the bumper will not fit well with the front fenders. There will be excessive clearance and the front end will be pushing too far into the headlights.
If the owner wants to tune the front bumper of a VAZ-2114 by adding a decorative mesh to the design, this will not affect the adjustment and subsequent installation. And if the tuning is due to a non-standard bumper, then, most likely, serious problems will arise both with fit and installation.
Installation of the front bumper of the VAZ-2114 occurs in the reverse order. The only difficulty is in the adjustment. To avoid displacement of the body kit relative to the body axis, immediately when installing the amplifier you need to pay attention to its alignment. Otherwise, the bumper may be shifted to the right or left, which will be noticeable against the background of the car's headlights.
How to remove the front bumper of a VAZ 2114 in order to install a new one
- At the first stage, you will need to open the protection, which is located on the front wheels. To do this you will have to remove 3 screws. The easiest way to do this is to use a screwdriver.
- Now you need to remove the protection to the side and open access to the inside.
Dismantling the protection
- A 10 mm wrench is required to unscrew the 2 fastening nuts inside.
- In exactly the same way, you need to dismantle it from the side where the second wheel is located.
- After this, you can remove the license plate. Some are afraid to perform this procedure due to the possibility of damaging the sign. In order to avoid any damage, you should unscrew several screws that are located under the number, and then remove 2 more screws located in the windows.
We remove the license plate
- Now it's time to remove the front. This requires a little effort. After that, all that remains is to install a new bumper. Installing a VAZ 2114 bumper will not cause difficulties if the car enthusiast managed to remove the old bumper.
This can be done if you perform the entire procedure described in reverse order, however, before installing a new front bumper, it is recommended to check the condition of the amplifier.
This component must be in good condition. If this is not the case, then the car owner will need to replace the amplifier before installing a new bumper.
In order to complete this procedure as quickly as possible, you need to immediately remove several mounting nuts after removing the bumper. This can be done using a 13 mm socket. All adjusting washers must remain on the studs, and all brackets that are located on the side must be unscrewed. They can be used when installing a new bumper.
Once this is done, you can begin adjusting the new amplifier to the desired height. Then you need to set the gaps between the headlights, the amplifier itself and the fender. This can be done using slots.
Removing the bumper of a VAZ 2114
After this, assembly of the entire structure should begin.
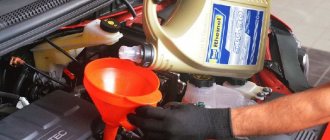
Motor modification
Tuning the VAZ-2114 engine can consist of both partial improvements and fundamental modifications. If we consider the first option, then it is the one that is most popular among car owners. There are relatively few opportunities to increase the power of the VAZ engine, since there is no turbocharging.
The most that can be achieved is the regulation of fuel supply and ignition timing (the gain in performance is no more than 8%). Chip tuning of the VAZ-2115 gives slightly better results. It is also practiced to change fuel and air filters and a number of other elements. Note that the goal of the work is both to increase power and reduce fuel consumption, and to achieve greater smoothness in engine operation.
Why are overlays needed?
Such parts are usually used as an elegant and beautiful addition to the overall look of the car. Such a tuning detail for 2114 will not be considered superfluous, as it will have a large number of advantages.
The first of them is, of course, appearance
The car will be transformed and will attract the attention of passersby. It will also take on a more dynamic appearance. Every motorist is quite capable of purchasing exactly the trim that, in his opinion, will correspond to the overall style of the car
And in addition to its decorative function, the front element is also additional protection from minor scratches and damage and improves the aerodynamic characteristics of the car
Every motorist is quite capable of purchasing exactly the trim that, in his opinion, will match the overall style of the car. And in addition to its decorative function, the front element also provides additional protection from minor scratches and damage and improves the aerodynamic characteristics of the car.
The main material for the manufacture of linings is the popular ABS plastic, which is also a very high-quality material. A more budget option are chrome inserts. They are rectangular cutouts that run parallel to the wheels and look very nice. In addition, their task is to create additional air flow, which will cool the rear brake discs. Usually such products are attached in special places and give a sporty and elegant look to the car. Options for the rear bumper element are also possible.