The VAZ 2107 is a legendary car, one might say. Firstly, this is the last representative of the VAZ classic, and secondly, it is a car in which both a carburetor and an injector were used to supply fuel. Today, the last cars of this brand that came off the assembly line still work properly. The only weak point of perhaps one of the most famous cars is not very good hardware. The VAZ 2107 injector tin is very susceptible to corrosion. Due to this very unpleasant feature, the gas tank can also develop an unexpected leak.
So that you are always prepared for such situations, in this article we will briefly go over the design features of the VAZ 2107 gas tank with an injector system. Let's talk about how to dismantle the fuel tank yourself and how to repair it both in an emergency and in a normal situation.
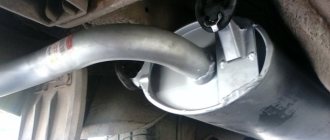
Gas tank on VAZ 2107
The procedure for removing the VAZ 2107 tank
First, you need to drain the fuel from the tank to reduce its weight and remove the gas tank trim in the trunk.
To do this, you need to unscrew the screws in the upper and lower parts of the casing, as well as from the cover on the spare tire (if there is one). Next, the removal of the fuel tank begins:
- Remove the sensor wires by first photographing or marking the connection points with a marker. The blue-brown wire is connected to the right terminal of the sensor, pink-brown - to the left.
- Loosen the fuel hose clamp and disconnect it from the fitting.
- Unscrew the bolt of the tank mounting clamp and lower the clamp that prevents removal.
- Loosen the ventilation hose clamp and disconnect the hose.
- Open the gas tank flap, unscrew the fuel filler cap and remove it.
- Using a screwdriver, remove the rubber apron that prevents removal of the tank.
- Unscrew the nuts securing the fuel level sensor and remove the ground wire located under one of the nuts.
- Remove the fuel level sensor.
After the operations have been completed, you can easily remove the VAZ 2107 gas tank by pulling it out of the niche in order to replace or repair it.
Installing the gas tank is done in reverse order.
Important: if the fuel tank of a VAZ 2107 is removed for repairs, it is necessary to wash it with clean gasoline or solvent, and then get rid of flammable vapors. To do this, the tank needs to be “steamed” - rinsed with a stream of hot water.
After this, you can carry out repair work without fear of explosion or ignition of gasoline vapors.
Canister valve
This element is installed on all car injectors, and the “Seven” was no exception. What is this element? The adsorber valve is a kind of can installed in the engine compartment near the air filter and filled with activated carbon. What is it for? The adsorber valve on the Semerka serves to condense and absorb gasoline vapors. When fuel vapor evaporates, it turns back into liquid and is sent back to the engine power system.
How to check this element? The main sign of a malfunction is the accumulation of gasoline vapors and a pungent odor in the cabin. The problem is also accompanied by dips at idle and loss of power during acceleration. If the tank hisses when opening, it means that the adsorber valve has become unusable. It is not necessary to change the entire jar - just one valve is enough. After replacement, the car works properly again, and strong odors no longer penetrate the interior.
How to remove water that has entered the Niva gas tank
Firstly, do not under any circumstances open the tank lid or leave it in this state in the sun. The water will not evaporate because the layer of gasoline completely covers it.
Add alcohol to the Niva gas tank
Actually, it's not as difficult as it sounds. As previously mentioned, water does not mix with gasoline, so removing it will not be difficult. This is where a school chemistry course comes to the rescue. Gasoline mixes well with alcohol. This is the easiest way. Therefore, it is enough to pour about half a liter of pure alcohol into the gas tank. It doesn't matter what kind of alcohol it is, but isopropyl is most often used.
Also interesting: Adjusting Niva valves
The most important thing is to have a high concentration. The resulting mixture will contain gasoline of approximately the same density. The water will be mixed, and the resulting liquid will not freeze in cold weather and will not interfere with engine operation. It will burn in the engine like ordinary fuel. The proportion of this impurity is small compared to the total amount of gasoline and therefore is not noticeable to the car. This method is effective if there is not much water in the tank.
For diesel engines, pour oil into the tank
Regarding diesel engines, it is better to use engine oil rather than alcohol, in the proportion of 200 grams per 50 liters of diesel fuel. Oil and water, when mixed, turn into an emulsion, which over time burns together with diesel fuel in the combustion chamber of the engine.
Pumping water through the fuel rail
The next method is based on the same fact: water does not mix with gasoline. Therefore, it can be pumped out by using the fuel rail. But it is better to entrust this matter to professionals, since it is not always safe and without consequences to interfere with the car’s structure. The procedure is quite complicated and not every service will undertake it.
Pumping water using a tube lowered into the Niva gas tank
The next method requires intervention in the structure of the car. It is necessary to remove the Niva fuel pump. We need a tube. We lower one end of it to the bottom of the gas tank, and the other into any container and wait for the water to drain.
It is important to remember that the container into which the water will be drained must be below the level of the fuel pump. After the procedure, we put the Niva fuel pump in place
Description of the salon
Having first appeared in 1982, the VAZ 2107 did not differ from its predecessors and competitors in any modern devices or design. However, even those little things that the manufacturer decided to introduce into the new Lada model played into the hands: the car became more convenient and attractive for drivers.
Interior trim
The interior trim was fully consistent with Soviet ideas about fashion. For example, higher quality plastic and wear-resistant fabrics were used. For the first time, the seats acquired an anatomical shape and received comfortable headrests. In general, the VAZ 2107 was the first in the manufacturer’s line to receive the title of a comfortable car for people.
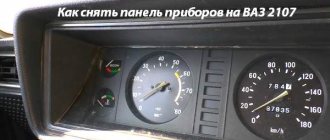
Dashboard
However, if the interior, at the very least, stood out from similar AvtoVAZ models, the instrument panel was always made in strict accordance with existing standards. We can say that the dashboard is featureless, although it houses the tachometer and additional services of instruments and sensors.
The gearbox on the VAZ 2107 is needed to transmit torque from the engine to the transmission.
By modern standards, the exterior of the VAZ 21074 is outdated.
Due to the fact that the entire line of the VAZ 2107 family (and the VAZ 21074 is no exception here) is rear-wheel drive, the engine is located in front, which made it possible to significantly expand the interior space: both in the ceiling and in the legs for the driver and front row passenger.
Compared to previous versions of the VAZ, the 21074 is more spacious inside
The interior trim is made of special plastic alloys that do not give glare and are easy to maintain. The floor of the car is covered with polypropylene mats. The body pillars and the inner parts of the doors are covered with medium-hard plastic and covered with caprovelor on top. The seats in most cars are upholstered in durable, wear-resistant fabric - velutine.
It must also be said that the VAZ 21074 uses a large number of “auxiliary” materials for interior decoration - various types of mastics, bitumen gaskets, felt pads and lines. All these materials come into contact with the upholstery in one way or another (doors, bottom, seats) and protect the interior from excessive noise from the outside.
- increased cabin sound insulation;
- minimizing vibration waves while driving;
- protection of metal from rust;
- increasing the thermal insulation of the cabin.
High-quality plastic and durable velutine fabric are used to equip the interior.
Dashboard
VAZ 21074 is considered a more comfortable version of the VAZ 2107. Comfort is achieved in various ways, including making it easier to drive. Thus, the instrument panel allows the driver to see current data on both the ride and the condition of his “iron horse” at any time.
On the VAZ 21074, the dashboard is made up of many elements, each of which shows the operation of a particular unit in the car. The panel is embedded in the dashboard of the car on the driver's side. All elements are located under plastic glass: on the one hand, they are clearly visible, on the other, the devices will be protected from possible mechanical shocks.
The instrument panel is protected from external influences by a plastic visor and durable glass
The instrument panel of the VAZ 21074 contains the following elements:
- A speedometer is a special mechanism that shows the current speed. The scale is numbered in divisions from 0 to 180, where each division is the speed in kilometers per hour.
- Tachometer - located to the left of the speedometer and is used so that the driver can see the crankshaft rotation speed per minute.
- ECON fuel consumption gauge.
- Engine temperature indicator - for the VAZ 21074, the engine operating temperature is set in the range of 91–95 degrees. If the pointer needle “crawls” into the red zone of the device, the power unit is working at the limit of its capabilities.
- Fuel quantity indicator in the gas tank.
- Accumulator charging. If the battery light comes on, it is necessary to provide additional charging to the battery (the battery is discharged).
Illuminated additional elements indicate errors, problems or the inclusion of an option
Penalty for draining fuel
Of course, fuel theft occurs not only in large enterprises and by drivers who are responsible for the car. Most often, the victims are ordinary car owners who leave their vehicles in the courtyard of their house. Every thief knows perfectly well how to drain gasoline with a hose quietly at night so that no one notices, and the absence of an alarm simplifies theft. Such criminals can be punished as follows:
- If the thief is caught, he faces a fine of 80,000 rubles. The fine will be paid by confiscating the person’s income for a period of six months.
- The court may award correctional labor for 360 hours.
- The offender can be imprisoned for four months, and in particularly difficult cases - for two years.
If the theft is committed by a group of people, and they illegally enter the premises where the car is parked, for example, a garage or a closed yard, then the punishment may be as follows:
- The fine automatically increases to 200,000 rubles.
- Compulsory labor for each thief will be 480 hours, and sometimes correctional labor can last for two years.
- Forced detention for a year and correctional labor for up to 5 years are applied.
Particular attention should be paid to theft of fuel from an oil pipeline on an especially large scale, in which case the punishment will be especially severe. The fine increases to 500,000 rubles, and the term of imprisonment will be at least six years
When wondering whether it is possible to drain gasoline from a car and go unpunished, first of all you need to understand that any theft will sooner or later be discovered, regardless of the size of the crime. Petty theft can result in imprisonment for 15 days, and larger theft can result in imprisonment for up to 10 years.
History[ | ]
People's House, 1900s, photo by Maxim Dmitriev The resolution on organizing an opera house in the city was adopted by the City Council in 1931. It was decided to rebuild the building of the People's House into a theater. The People's House was built in 1903 on the initiative of the Society for the Promotion of Primary Education in the Nizhny Novgorod Province with the assistance of M. Gorky. It was conceived as a “center of culture” in the provincial town (club, library, amateur theater).
The building was built according to the design of the architect P. P. Malinovsky with private donations, large of which were made by Countess S. V. Panina and F. I. Chaliapin, who gave a concert in favor of the construction at Gorky’s request.
The State Commission signed the act of acceptance for operation of the rebuilt building on May 31, 1935, and on July 1 the tour of the Musical Theater began. V.I. Nemirovich-Danchenko, then the Leningrad Choir Chapel and the Kyiv Musical Comedy.
By October 24, 1935, the theater prepared its first performance - A. Borodin’s opera “Prince Igor”. It has become a tradition to open the season with this piece.
Opera theatre. 2022
The second performance in the repertoire was “Eugene Onegin”. In the first season, a fairly large troupe (45 opera soloists, 50 orchestral musicians, 53 ballet dancers, 57 choir artists) staged (except for those mentioned above) the operas “Aida”, “Rigoletto”, “The Tsar’s Bride”, “The Barber of Seville”, "Pagliacci", ballets "Don Quixote", "Swan Lake" and ballet divertissement.
The theater confidently declared itself
Spectator interest and public attention confirmed the historical necessity of opening the State Opera and Ballet Theater in Nizhny Novgorod. This “was the largest event in the musical life of the city in the 30s”
On February 10, 1937, the theater was named after A.S. Pushkin. In 1994 he received the title of “academic”.
In 1986, the First All-Russian Pushkin Festival of Opera and Ballet “Boldino Autumn” took place. Since the second festival, which took place in 1988, “Boldino Autumn” has been held annually.
In September 2022, the large-scale reconstruction of the theater, which began in June, was completed. The façade, auditorium and interior have been restored
Installing a lock on the tank flap VAZ 2101-2107
You can install a lock like a mailbox, but these locks can be opened with almost any powerful screwdriver or wrench. Personally, when I lost my key and came to a car service for advice. The master broke the internal insert in 15 seconds and opened the hatch.
Some car owners install an electric lock and place a button directly in the passenger compartment to open the tank hatch. Let's imagine that an attacker wants to drain gasoline and sees that there are no locks, but the hatch does not open as usual. Most likely he will try to pry off the hatch with a screwdriver or crowbar. As a result, you will receive a scratched and bent rear wing element, the cost of which will cost much more than the cost of gasoline. Agree, this is not a very bright prospect.
There is a way to install an alarm sensor on the gas tank flap. In principle, it’s a pretty effective way to protect your gasoline from being drained. However, if thieves are constantly operating in your area, then in the end, the alarm going off every night can infuriate all the neighbors of your house and ruin your relationship with them. Personally, my choice in solving this issue fell on a metal glass, which I installed in the neck of the tank. After that, for more than a year, no one tried to drain the gasoline from my seven, although earlier in a week I could come to an empty tank up to 3-4 times in a row. In addition, I took several photographs of the already installed glass in the neck of the VAZ 2107 tank. Scheme of the design of the glass to protect against gasoline drainage. After watching a bunch of videos on YouTube on the Internet and reading quite a few articles, I realized that many craftsmen make this glass either from an old stabilizer bar or from a metal pipe of different diameters. Personally, I made my glass from 2 plumbing pipes. You can see the diagram in the figure. I will explain my choice of this design by the following factors. First I made a regular 150 mm glass from a pipe. When I first poured gasoline from the pistol, I encountered a problem that the fuel under high pressure did not have time to escape and the pistol was constantly firing. The use of a longer glass, as well as an increase in the diameter and number of holes, would improve the passage of fuel. However, in this case it is necessary to always not add a decent amount of fuel. In my case, I often go to the country and the distance between gas stations is quite long, especially in rural areas. It is for this reason that I radically changed the design of the glass and additionally welded a tube of a smaller diameter to the bottom, where I placed a pair of wires at the ends to make it impossible to insert hoses of any diameter. In this case, when filling, the fuel goes out with a bang and does not have time to fill the glass even with strong fuel pressure. The design of the glass does not allow it to damage its weak points at the place where the wire is welded using either a crowbar or another tool and, accordingly, to get to the desired fuel.
Didn't find the information you are looking for? on our forum.
Transmission
| Clutch | single-disk, dry, with hydraulic shutdown drive and central diaphragm spring |
| Transmission | mechanical, four- or five-speed, three-way, three-shaft, with synchronizers on all forward gears |
| Gear ratios: | |
| first | 3,67 |
| second | 2,10 |
| third | 1,36 |
| fourth | 1,0 |
| fifth | 0,82 |
| reverse | 3,53 |
| Cardan transmission | two-shaft, with intermediate support and elastic coupling |
| main gear | hypoid |
| Final drive ratio | gear ratio – 3.9 or 4.1 |
| Differential | conical, two-satellite |
Tips for repairing the VAZ 2107 gas tank
Even after steaming, gasoline vapors may remain in the tank, which are very explosive. Therefore, holes in the walls formed as a result of corrosion or physical damage are best repaired by soldering rather than welding. Large diameter holes can be sealed by making patches of thick copper foil.
If a hole in the gas tank occurs on the road, it can be temporarily repaired using laundry soap. It needs to be pressed into the leak and the problem will be eliminated for a time sufficient to get to the garage, drain the fuel and remove the gas tank.
Main malfunctions of the fuel injection system and their symptoms
Before moving on to malfunctions of the “Seven” fuel system, let’s consider what symptoms may accompany them. Signs of a system malfunction include:
- difficult starting of a cold power unit;
- Unstable engine operation at idle speed;
- “floating” engine speed;
- loss of engine power;
- increased fuel consumption.
Naturally, similar symptoms can occur with other engine malfunctions, especially those related to the ignition system. In addition, each of them can simultaneously indicate several types of breakdowns. Therefore, when conducting diagnostics, an integrated approach is important here.
Difficulty starting when cold
Problems with starting a cold unit can occur when:
- fuel pump malfunction;
- reducing the throughput of the secondary filter;
- clogged injectors;
- failure of the lambda probe.
Unstable motor operation without load
Irregular engine operation at idle may indicate:
- malfunction of the XX regulator;
- fuel pump failure;
- clogged injectors.
"Floating" speed
Slow movement of the tachometer needle, first in one direction, then in the other, may be a sign of:
- malfunction of the idle speed sensor;
- failure of the air flow sensor or throttle position sensor;
- malfunctions in the fuel pressure regulator.
Power Loss
The power unit of the injection “seven” becomes significantly weaker, especially under load, with:
- malfunctions in the operation of the injectors (when fuel is not injected into the manifold, but flows, as a result of which the mixture becomes too rich, and the engine “chokes” when the gas pedal is sharply pressed);
- failure of the throttle position sensor;
- interruptions in the operation of the fuel pump.
All of the above malfunctions are accompanied by an increase in fuel consumption.
Chevrolet Niva tank design
The gas tank is a welded structure made of sheet steel. This provides it with sufficient strength and safety. Steel is well welded and soldered. This makes it possible to eliminate minor damage to the walls. However, when condensation forms, the internal surface becomes corroded, creating the risk of rust entering the fuel system. Initially, the Niva Chevrolet was equipped with gas tanks manufactured by General Motors. Their factory part number is GM 212301101011000.
Advice: on the spare parts market, tanks made at AvtoVAZ are more often found. Their quality is not inferior to the original ones, and the price starts from 8,000 rubles.
Gasoline level sensor
#1 Brigadier
- Our people
- 848 messages
- 3 thanks
- City of Odessa, Ukraine
- Car: VAZ 210700-20
- Top
- Answer
- Quote
- Insert nickname or quote
#2 ruazizov
- City VAZ 2107, Moscow,
- Top
- Answer
- Quote
- Insert nickname or quote
#3 Eugen[kgn]
- Protection against spam bots: 123
- The city is growing forward!
- Auto: sharp, like diarrhea))
- Top
- Answer
- Quote
- Insert nickname or quote
#4 Brigadier
Added
(07/24/2010, 12:46) ——————————————— Everyone was hoping to get an answer to their question. But people are interested in different photos, humor, music. It must be hot to sit under the car in the garage.
Today I came across my own problem. And it was like a mine planted at the factory. A plastic ring was inserted into the hole under the flange of the fuel pump bracket, behind some shit. So this ring, apparently due to its quality, could not withstand three years of use and the temperatures of this summer, became deformed and slid down the bracket, clamping the float rocker in the lower position. During the first disassembly, I found it at the bottom of the tank, took it out and put it in place, but today it didn’t have time to fall and I saw what happened. Question for the designers - why the f.. is it needed there? The rubber gasket under the flange is in place. I'll post photos on Monday.
Keep in mind - the exploiters of the "squares" - that it is not necessary that something breaks in the car.
- Top
- Answer
- Quote
- Insert nickname or quote
#5 Vitaliy2008
- Protection against spam bots: 730
- City of Gatchina Len. region
- Car: BMW 730 i burned out after a crooked repair, sold VAZ 21043 sold, BMW X3 E83 2005 I'm driving now
American forum question = answer Jewish forum question = question Russian forum question = you listen for two days what a moron you are and then maybe they will answer Ancient Chinese wisdom says: “NI SY!”, which means: “Be serene, like a lotus flower at the foot of the temple of truth »
- Top
- Answer
- Quote
- Insert nickname or quote
#6 Brigadier
- City of Odessa, Ukraine
- Car: VAZ 210700-20
- Top
- Answer
- Quote
- Insert nickname or quote
#7 lost_c-s
- City of Don region, Makeevka (Russia, Moscow, Tsaritsino), Ukraine
- Car: lancer IX STW 1.6AT and 2101 combat girlfriend (21074 1.6i Bucket)
Dismantling the gas tank
- So, first we remove the plastic casing under which the gas tank is hidden. It is secured with screws that can be unscrewed with a Phillips screwdriver.
- Now disconnect the power wires from the fuel sensor. You can simply pull them up and remove them from the contacts.
- Next, unscrew the fastening of the fuel hose and pull it out of place using pliers.
- Then unscrew the bolt of the clamping plate securing the VAZ 2107 gas tank with the injector system.
- Now you can unscrew the filler cap and carefully remove the gas tank.
Next, all that remains is to seal the gap in the gas tank. There are many repair methods, from cold welding to sealing the tank with tar. Let's take the simplest and least expensive path.
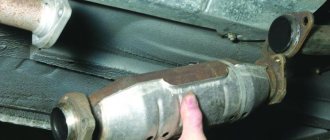
About the fuel pump on the VAZ2107 injector
If the car engine does not start, then various factors can be the reasons for such consequences. One of these factors may be a gas pump, the main purpose of which is to pump gasoline into the engine from the gas tank. The VAZ 2107 has an injector and a fuel pump that is much more reliable than on carburetor cars. Despite this, even on fuel-injected cars the fuel pump can fail.
Changing the fuel pump diaphragm
Replacing the diaphragm is not difficult, since this part cannot be repaired. The sequence of actions is as follows:
- We clean the outside of the device with white spirit or gasoline;
- We remove the hoses, both inlet and outlet. To prevent fuel leakage, plugs can be inserted into the hoses (for example, M8 bolts)
- Now you can use a Phillips screwdriver to unscrew the 6 screws securing the upper case and the cover to the lower one and separate them:
- Now you need to press the diaphragm plate, turn the rod, and pull it out of the balancer fork. After this, remove the spring:
- Now, using a size 8 wrench, unscrew the nut on the rod and remove the diaphragm plate along with the gasket. The diaphragm is included in the repair kit for the fuel pump; we replace it, carefully align all the holes in the diaphragms, and then tighten the nut on the rod.
- Assembling the device is done in the reverse order.
As a last resort, you can replace the entire device.
To do this, you only need to thoroughly coat the spacer between the fuel pump housing and the cylinder block with high-temperature sealant to maintain a tight seal.
These simple “tricks” will help you save time and quickly diagnose faults in the VAZ 2107 power system
4. Use a special hose to pump gasoline out of the gas tank. 5. Using a screwdriver, remove the rubber apron from the neck of the gas tank and disconnect the safety valve hose from it. 6. Take out the pistons and bend the right edge of the trunk mat 7. Using a Phillips screwdriver, unscrew the four self-tapping screws securing the gas tank lining and remove the gas tank lining 8. Using a 10 mm socket wrench, unscrew the bolt of the gas tank fastening clamp. 9. Using a 17 mm wrench, unscrew the fittings of the drain and supply pipes, holding the hose ends with a wrench of the same size. 10. Use a Phillips screwdriver to loosen the clamp and disconnect the bypass valve hose from the rear gas tank pipe. 11. Similarly, disconnect the hose from the front gas tank pipe. 12. Disconnect the wiring block from the fuel pump. 13. Remove the gas tank from the trunk niche of the VAZ 2107. 14. Remove the lower rubber gasket.
After installing a Solex carburetor last year, a problem arose with the return fuel line, which simply does not exist on the “classic”. Like any decent person, I went through all the “three stages of the classic return”, so to speak, tried all the options: 1. I plugged the return with a bolt and drove without it. 2. I stuck a tee in front of the fuel pump, tightened the clamps and drove for six months. 3. I carried out a return flow to the tank and I think this is the most correct option. Many will say that on a “classic” there is no need for a return line and they will be right in their own way, but I still decided to do it in order to take advantage of all the advantages of the Solex carburetor, and it only took a couple of hours, it took me two days, two hours each, Since I was looking more for the fuel line and buying more spare parts, I found the line in only one store. I started by securing the fuel line in a standard way parallel to the already existing brake and fuel lines, there is enough space there, it doesn’t touch anything anywhere, everything is fine. I ran a piece of tube from the return line of a VAZ 2108 into the trunk, bent everything while lying in the trunk, of course it’s inconvenient, but it fit well, the standard plastic covers everything, it’s not even noticeable that I was climbing in there) I connected the ends with hoses, tightened the clamps and went to make a fitting for the fuel intake.
I drilled a hole in the fuel intake opposite the fuel supply fitting, then drilled an M8 bolt of suitable length through, inserted it into the hole, cut out a rubber gasket, put it on top and tightened it tightly with a nut, I didn’t take any photos, the bolt turned out to be anodized, in general it was difficult to drill and I burned all my hands while it cooled down, it would have been better to wait a little, but oh well, I put everything in its place, yelling and swearing), and only then took a photo:
All that remains is to connect under the hood and disassemble the old system. I took the opportunity to change the fuel filter, although the old one was not old ;) I didn’t skimp on it.
While I was dismantling the old system, I watched cartoons, because the garage is poorly ventilated and it’s dark outside)) I’ll say a few words about the tee. I saw several options for tees on sale and in the end I bought the one I didn’t like) that’s the kind of person I am. The fact is that the cross-section of the return fitting, in my understanding, should be smaller than the cross-section of the supply line, let’s say an 8x6x8 tee will be more correct than 6x6x6, I bought a tee with the same fittings, everything seemed to work and okay.
I connected everything, pumped the fuel pump, it was pouring from the return line, it didn’t leak anywhere, there didn’t seem to be any smell, let’s go for a ride) I warmed up the engine to operating temperature, the fan turned on - the fuel pump was cold, so was the line, the speed was even, which means the work was not done in vain)
Note! To replace the gas tank with a new one, you will need to stock up on: A basic set of wrenches and a screwdriver!
Summary:
When should you change your gas tank? As mentioned earlier, the tank is removed when it is deformed and when rust appears on it, due to which over time a hole will form in the tank through which gasoline will escape.
Note! When rust forms in the inside of the gas tank, rust particles begin to mix with the fuel and after that all this gets into the car’s engine, which has a very detrimental effect on the mirror part of the cylinder walls by scratching them and therefore the inside of the rusty gas tank needs to be changed as soon as possible!
By the way, using this article, you can also remove and then install the same gas tank in its place. Why is this necessary, you ask? There are times when the gas tank needs to be removed for preventative flushing, or to eliminate a leak on your own, without replacing the tank itself. In addition, there are various situations when the tank must be removed to gain access to body parts and for their repair.
Leak detection methods
If you notice that gasoline is consumed very quickly, there may be several reasons: from difficult road conditions (mud roads, traffic jams) to a leaking gas tank. A faulty fuel tank can be determined by several signs:
- there is less gasoline even if you don’t use it;
- there was a smell of fuel in the cabin;
- at the place where the VAZ-2107 stood for some time, rainbow spots appeared on the ground or asphalt.
If you notice at least one of the signs, you need to check the fuel container for leaks.
Product delivery options
Note! Below are the shipping methods available specifically for this product. Payment options may vary depending on the shipping method. Detailed information can be found on the “Delivery and Payment” page.
Parcel by Russian Post
Available payment methods:
- Cash on delivery (payment upon receipt)
- Using cards Sberbank, VTB, Post Bank, Tinkoff
- Yandex money
- QIWI
- ROBOKASSA
Shipping throughout Russia. Delivery time is from 5 to 12 days.
Parcel by Russian Post 1st class
Available payment methods:
- Cash on delivery (payment upon receipt)
- Using cards Sberbank, VTB, Post Bank, Tinkoff
- Yandex money
- QIWI
- ROBOKASSA
Shipping throughout Russia. Delivery time is from 2 to 5 days. More expensive than regular delivery by Russian Post, approximately 50%. Parcel weight up to 2.5 kg
Express Parcel EMS
Available payment methods:
- Cash on delivery (payment upon receipt)
- Using cards Sberbank, VTB, Post Bank, Tinkoff
- Yandex money
- QIWI
- ROBOKASSA
Shipping throughout Russia. Delivery time is from 3 to 7 days. More expensive than regular delivery by Russian Post, approximately 100%.
Transport companies
Available payment methods:
- Using cards Sberbank, VTB, Post Bank, Tinkoff
- Yandex money
- QIWI
- ROBOKASSA
Delivery is possible to any locality where there is a representative office of the transport company. Delivery time is from 2 to 10 days. Sending large parcels is approximately 50% more profitable than by Russian Post.
Pickup from our warehouse
Available payment methods:
- Cash upon receipt
- Credit, installments
- Using cards Sberbank, VTB, Post Bank, Tinkoff
- Yandex money
- QIWI
- ROBOKASSA
Pickup times must coincide with store opening hours.
Engine
| Engine capacity | 1569 cm3 |
| Power | 75 hp |
| At rpm | 5400 |
| Torque | 116/3000 n*m |
| Gas distribution mechanism | OHC |
| Number of cylinders | 4 |
| Number of valves per cylinder | 2 |
| Cylinder diameter | 79 mm |
| Piston stroke | 80 mm |
| Compression ratio | 8.5 |