01/26/2022 12,788 VAZ Priora
Author: Ivan Baranov
Often, when overhauling an engine, it is necessary to remove, disassemble and reassemble the cylinder head. The article discusses how to remove the head on a Lada Priora 16 valves. Also included is a video with a detailed video report on the assembly and disassembly of the cylinder head.
[Hide]
What is a cylinder head?
The cylinder head is one of the main components of the engine. It consists of a cover that serves to protect internal parts from external environmental influences. The cylinder head is made by spot casting from cast iron or aluminum alloy. To remove residual stress that occurs during the casting stage, the product is artificially aged using mechanical processing.
The lower part of the cylinder head is more expanded, thus it more reliably protects the insides of the block. The inside of the head is perfectly smooth. The unit consists of a large number of elements.
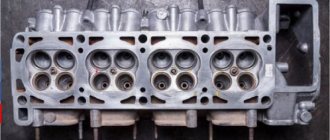
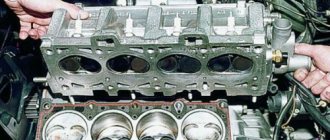
Structure of the Lada Priora cylinder head
In the upper part of the cylinder head there is space for camshaft bearing housings, valve springs, bushings and support washers, as well as for the gas distribution mechanism. Since the head consists of a large number of parts, the process of assembling and disassembling the cylinder head is very labor-intensive. Together, the parts of the unit convert the energy from fuel combustion into mechanical energy, which allows the vehicle to move.
Recommendations regarding cylinder head assembly
Before you begin assembling all components, you should remove any contamination that could remain due to burnt consumables. There should be no oil stains or other stains on the threads. New gaskets are installed in such a position that their outer part is directed towards the bushings.
Before installing the cylinder head in a permanent place, you should carefully check the correspondence of all marks relative to the shafts. All bolts must be tightened firmly and securely; for this, a tool of suitable size and shape must be used.
When is it time to change?
When operating the car, you should constantly ensure that the cylinder head is sealed against the block itself so that there are no leaks of working fluids. Like all car components, the cylinder head requires regular maintenance. Parts that are under constant load require more attention. These include components of the gas distribution mechanism: valve seals, valves, camshaft seals, gasket. The service life of its components and assemblies depends on the quality of car maintenance.
Cylinder head repair
Replacement of consumables should be carried out according to the recommendations specified in the Lada Priora service manual. Oil seals and gaskets should be replaced as they wear out or if they are externally damaged. There are a number of operations that require dismantling the cylinder head: modification and grinding of seats, replacement of valves, crimping of valve seats and bushings, and others.
The cylinder head on a Lada Priora 16 cylinders must be replaced if chips, cracks, and signs of corrosion are detected during its visual inspection. During repairs, the following work can be performed:
- change gaskets;
- camshafts are being replaced;
- change hydraulic compensators if they are faulty;
- change bent valves if the timing belt breaks.
Replacement process for a 16 valve car
The procedure for replacing the cylinder head gasket on a VAZ 2112 with engines that have 8 and 16 valves is similar. To carry it out you need to prepare:
- a set of spanners and wrenches;
- torque wrench;
- new consumables;
- container for draining coolant;
- clean rags.
For the convenience of the procedure, it is better to use an overpass or inspection hole.
Engine VAZ 2112 16 valves
Stages
- First of all, you should de-energize the car by removing the negative terminal from the battery.
- Then you need to drain the antifreeze into the prepared container.
- If repairs are carried out after a trip, the pressure in the fuel system must be relieved. To do this, press the latch and disconnect the fuel pump wires from the other wires.
- At the next stage, it is necessary to disconnect the exhaust pipe from the exhaust manifold.
- Next, the thermostat is removed.
- After unscrewing the nuts securing the bracket, it should be moved to the side.
- Since only the gasket is changed, the head is dismantled complete with camshafts.
- Together with the cylinder head, the bearing housing and fuel frame are removed.
- Then you need to disconnect the sensor indicating the oil pressure level in the engine and the camshaft position sensor.
- Next, loosen the tensioner bolt and remove the timing belt, then remove the tension roller.
- The toothed pulley must be fixed so that it does not rotate. Then you should unscrew the mounting bolt and remove it with the washer.
- Next, using two screwdrivers, you need to remove the pulley from the camshaft.
- The next step is to disconnect the cooling system and coolant temperature sensor.
- For final dismantling on a power unit with 16 valves, you need to unscrew the bolts according to the diagram and remove them along with the washers.
- The old gasket is removed along with the cylinder head.
We dismantle the cylinder head along with the gasket - Before installing a new consumable, the surface at the connection point should be cleaned of remnants of the old gasket and dirt.
- Threaded holes must be clear of coolant and engine oil.
- The new consumable is installed along the guide bushings. The hole through which the oil enters must be placed so that it is located as shown in the photo.
Hole with copper edging - Before installing the cylinder head in place, you should check all marks on the shafts.
- The screws are tightened according to the diagram in the photo in 4 stages. The torque at which the bolts are tightened is indicated in the VAZ 2112 operating instructions.
Scheme for tightening the mounting bolts - Assembly is carried out in reverse order.
- After assembly, the necessary valve adjustments and timing belt tensioning are performed.
Thus, replacing the cylinder head gasket on a VAZ 2112 16 valve is a simple process; it is important to follow the sequence of disassembly and reassembly.
Replacing a gasket on a 16-valve engine is quite difficult. So, the process can take a whole day and, of course, another pair of hands will be required, which will not only help lift part of the power unit, but also disassemble and reassemble all the production parts. Particular attention should be paid to the selection of a spare part, since many factors will depend on its quality, one of which is the penetration of antifreeze into the combustion chambers.
How to disassemble?
Removal, disassembly and assembly of the cylinder head for repair and modification consists of the following steps:
- First of all, it is necessary to cool the engine and relieve pressure in the fuel system.
- To de-energize the car, you need to disconnect the negative terminal from the battery.
- Before removing the unit, the coolant must be drained.
- Next, we dismantle the cylinder head and install it so as not to damage the valves for further repairs and modifications.
- After unscrewing the fastening nuts, we dismantle the power unit support.
- Next, we sequentially remove the fuel pipe bracket, phase sensors, coolant temperature sensors, emergency oil pressure warning light, and temperature indicator.
- Then you should remove the thermostat with the gasket installed under it.
- To avoid damage, remove the spark plugs.
- Next, remove the camshaft bearing housing.
- At the next stage, the camshafts and oil seals placed on their front ends are removed.
Removed camshafts
- The hydraulic pushers should be removed from the cylinder head holes.
- Now carbon deposits are removed from the combustion chambers.
- Next you need to inspect the unit. If cracks, scratches, chips, or traces of burnout in the combustion chambers are found on it, then it must be replaced.
- Burrs and nicks should be removed from the surface of the unit.
- Next, using feeler gauges and a ruler, you should check the evenness of the surfaces under the intake manifold and catalytic converter.
- Now you need to check the tightness of the cylinder head.
- Then we check the surfaces on which the camshaft journals rest, as well as the bearing housing. If there are any defects, it should be replaced.
- Then we wash the oil channels and check the tightness.
- The next step is removing the valves. If scratches, deformation of the rod or plate, or signs of burnout are found on the valves, they need to be replaced.
- Next, remove the valve stem seals and, if necessary, replace them.
- It is necessary to check the condition of the saddles. If necessary, they are modified.
- Significant valve defects can be eliminated by reworking and grinding. After which the valves are ground in.
- Next, you need to check the condition of the valve springs and their elasticity. Replace if necessary.
- After checking all components and modifying the valves, you need to insert them into the cylinder head at the previously marked places, lubricating the rods with engine oil.
- Then the valve stem seals, camshafts and bearing housing are installed.
- Next, install the cylinder head in place.
- When installing the head, be sure to replace the gasket. The fastening bolts should be tightened according to the torque specified in the manual for the Lada Priora car.
Checking the suitability of valves
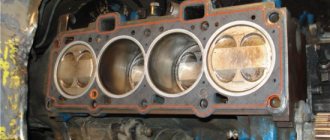
Let's move on to the cylinder block
We remove the pallet. Rotating the crankshaft as it is convenient for us, unscrew two bolts on each connecting rod cap. We use a TORX E10 head for this.
We take out the pistons along with the connecting rods. To do this, use the wooden handle of a hammer to press the connecting rod from below and lightly tap it to knock it up. We remove the old liners and buy new ones of the same size according to the markings on them. Here is another stone in AvtoVAZ’s garden, the owner has never climbed into the car from the interior or into the engine, but three pistons were of group “B” and one was “C”. It turns out that at the factory they re-sharpened one cylinder a little and simply put an enlarged piston there, no words. There are no options, we take group “C”, don’t sharpen the engine because of this. We will not touch the main liners either.
We buy a new piston group that does not bend the valves, connecting rods and connecting rod bearings.
Eliminating longitudinal play of the crankshaft
It was noticed on this motor. To eliminate it, replace the thrust half-rings. Standard and repair sizes are available. We take the first repair size, if they are too tight we sand them down a little. We unscrew the middle main bearing and gently push it with a screwdriver and move the half rings. The mark on it is in the form of three serifs, shown below.
When the half ring comes out a little, turn the crankshaft, it will push it out. There are two types of half rings: white at the front and yellow at the rear; the grooves on them should point towards the crankshaft cheeks.
We install them as we removed the new half rings; if they go in with great effort, you can grind them a little on a small abrasive stone, but not from the side of the grooves. Checking the play.
We tighten the main bearing with a torque of 8 kgf*m.
Assembling the piston
There is an arrow stamped on the top of the piston; it should be directed towards the front of the engine. And there are marks on the connecting rod that should look the same way.
Don't get confused!
We insert one retaining ring into the groove on the piston. We insert the connecting rod into the piston and, having lubricated the connecting rod and the piston pin with oil, insert it into place. Insert the second retaining ring. Although this operation seems simple, it will take some pains. We inspect the assembled structure; all retaining rings must be clearly in their grooves, otherwise a ring that has jumped out while the engine is running can cause a lot of trouble.
After assembly, you need to break off the connecting rod bearing cap, since the connecting rod is made in one piece. It's like that on our cars. First, unscrew the bolts. We insert the connecting rod into the cleats at the level of the mark shown in the figure with the black arrow and lightly clamp it, then break it off with a slight movement of the hand. The first time is very scary. We put the cover in place and tighten the bolts so as not to mix it up in the future.
Checking the thermal gap in the piston rings
We lay out each set of rings for each cylinder.
In the future we will not change their places.
In turn, we insert each ring into its own cylinder and push it a little with the piston approximately to the middle.
We measure the gap with feeler gauges.
Nominal clearance: 0.25 - 0.45 mm.
The maximum clearance for all is 1 mm. But this already smacks of waste.
Installing new rings
First, install the oil scraper ring expansion spring, then the ring itself. The oil scraper ring lock should face the opposite direction of the spring lock. Then we install the lower compression ring and finally the upper compression ring.
The inscription “TOP” must be stamped on the rings; it must face up.
The rings in the piston grooves must rotate easily.
Video “Cylinder head repair and configuration”
This video talks about repairing the cylinder head of a Lada Priora.
Cars of the VAZ-2112 family were produced with one of two 16-valve engines - 21124 and 21120. The displacement of these engines is different, and only one part called the “cylinder head” is used - it is designated by the numbers 2112-1003011. There are rumors that the cylinder head from the 21120 engine does not fit the 24th engine, but a reverse replacement is possible. However, there is only one article in the spare parts catalog, and it is suitable for two motors at once. Next we consider what actions to repair the VAZ-2112 cylinder head you can perform yourself. We will only talk about 16-valve engines.
An example of dismantling is shown in the video. Let's see.
Frequency and reasons for replacement
According to official regulations, the cylinder head gasket of a VAZ 2112 engine can last 200 thousand kilometers. Usually, after traveling such a mileage, the service life of the seal is exhausted.
For what reasons may it be necessary to replace it:
- Natural wear and tear. Any part or machine assembly has a certain service life. Natural wear and tear cannot be avoided.
- Damage to the cylinder head, deformation or deflection. This may cause the gasket to break and hot coolant to get onto its surface.
- Boiling of the power unit. Regular driving of a car with an overheated engine will cause damage to the sealing element.
Signs of replacement
By what “symptoms” can you understand that it’s time to change the BC head gasket:
- Leakage of motor fluid or coolant at the junction of the head connection with the block itself. If you see oil stains at the point of contact between the cylinder head and the cylinder head, diagnose the condition of the power unit.
- White smoke comes out of the exhaust pipe of the car, almost steam, uncharacteristic of exhaust gases. This indicates that coolant has entered the engine cylinders.
- The presence of foam in the area of the neck of the expansion tank in the engine compartment of the car. The substance foams as a result of exhaust gases entering the cooling system through a broken seal.
- The presence of greasy oily spots in the antifreeze, which indicates a poor connection and lack of tightness.
- A white coating has appeared on the engine fluid level dipstick. This indicates that refrigerant has entered the lubricant. This is usually the result of a damaged gasket.
Dismantling the cylinder head
First of all, to get to the cylinder head, you need to remove the cylinder head cover. For different 16-valve engines, this operation is different, and the cover part numbers also look different: 2112-1003260 (-10) and 21124-1003260.
Engine cover VAZ-21124 (1.6 l)
You will also need to remove the timing belt - there are no differences between different engines.
Let's look at how the exhaust manifold can be detached from the cylinder head. On engine 21120:
- Remove the exhaust pipe of the muffler: unscrew two nuts 1 (key “13”), remove the clamping bar, unscrew six nuts 2 (key “14”) and dismantle, not forgetting to turn off the oxygen sensor. The photo shows three of the six nuts.
Elements of the exhaust pipe
Everything important is under the screen
Now we will talk about engine 21124:
- Disable both oxygen sensors. We unscrew the three nuts securing the protective screen (with a 10mm wrench) and disassemble the bracket by unscrewing the four nuts with a 13mm wrench.
How to disassemble the mounting bracket
Operation with additional muffler
Here we believed that the VUT hose was disconnected from the intake module. Finally, the spark plugs are unscrewed on any of the engines (a “16” tubular wrench).
The tightening torques for the mounting screws are given in another text. In general, on VAZ-2112 hatchbacks, cylinder head repairs begin by replacing the “extended” screws with new ones. The length should be 95mm or less.
The order of unscrewing (left) and tightening the mounting screws
Installation and dismantling procedure
The part called the cylinder head is attached to the cylinder block with 10 screws. They are unscrewed with a 10mm socket wrench. The procedure for dismantling the cylinder head is shown in the first photo.
Reversal sequence (1-10)
The standard screw length is 93 mm. If the screw has been pulled out to at least 95 mm, it is replaced with a new one (AvtoVAZ requirement).
During installation, a different scheme is used (photo 2). Each screw is lubricated with machine oil, otherwise the efforts will be reduced to nothing.
The order of tightening the head is indicated in this photo
Selecting a cylinder head gasket
Before you start choosing a head gasket based on the catalog number, you need to consider what types of gasket materials there are. Let's look at the main types of cylinder head gaskets:
- Asbestos. The main advantage: minimal shrinkage and excellent recoverability.
- Metal. These are some of the most reliable and high-quality consumables.
- Non-asbestos. Used as repair kits. Main advantages: elasticity, heat resistance, elasticity.
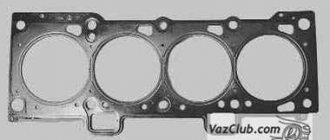
Metal cylinder head gasket
So, now you can consider the original gasket, as well as the substitutes that are used. Basically, all manufacturers label gaskets according to the original.
2112-1003020 is the original and analogue catalog number of the cylinder head gasket for the VAZ-2112. Also, the manufacturer Ajusa (10144200) produces a range of gaskets for the 2112 model.
Tightening torque for cylinder head cover bolts
For VAZ-2112, the cylinder head tightening torque is standardized:
- First pass – the force is 20 N*m;
- Each screw is turned 90 degrees to the right;
- Wait 20 minutes, then turn the screws another 90 degrees.
At first the effort is very small. But at “step 3” it will be difficult to cope with the work. Use the lever.
Reasons for failure
There are not many reasons why the cylinder head gasket failed, but every car owner must know them. So, let's look at the main ones:
- Wear. Each element of the car has its own service life, and therefore wear of the part is simply inevitable.
- Deflection or deformation of the cylinder head can lead to gasket breakdown or hot antifreeze getting onto its surface.
- Boiling your car can cause the gasket to fail.
Why are guide bushings needed?
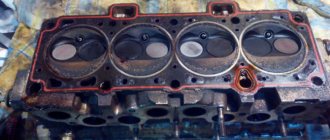
Before installing the cylinder head, perform the following steps: clean the threaded holes, as well as all holes for the bushings (photo 1). Each bushing is installed in place, and only then a gasket is placed on top.
Everything is ready to install the cylinder head
Metal parts adjacent to the gasket must be degreased. We looked at the cylinder head tightening diagram, but the cylinder head itself must be installed correctly:
- We place the cylinder head on the cylinder block;
- By moving the part in different directions, we ensure that the bushings fit into the recesses.
After “step 2” the screws can be tightened.
Sealant
No sealing compounds are used when installing the gasket! Solidol, CIATIM and other lubricants are not even needed. The main thing is that the metal must be degreased. And the cylinder head gasket must be new.
Cleaning valve channels
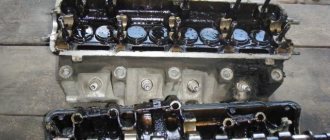
To remove any valve, you will need to remove the camshaft. All screws on the bearing housing must be unscrewed evenly and tightened with a force of 10 N*m. The hydraulic compensator can be removed with a magnet, and then the valve is desiccated by compressing the spring with a puller (see photo).
How to remove the valve
There may be carbon deposits in the valve channels. It is cleared:
Grinding is carried out as follows: a rubber pipe is placed on the valve, a paste with diamond chips is applied (one drop), then the valve is pressed into the channel and scrolled. It will also be possible to change the valve stem seals (2112-1007026). You can’t do this without a special puller.
Cap puller
On any car, including the VAZ-2112, cylinder head repair comes down to cleaning and checking, as well as correcting geometry defects. In the latter case we are talking about milling. The presence of cracks and chips is a reason for replacement, not repair.
A small photo report
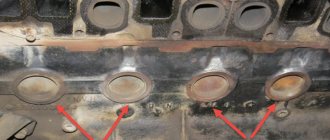
A burnt valve is immediately visible.
One valve burned out in cylinder 2
Carbon deposits were found in each valve channel.
Carbon layer in the cylinder head channels
Repair : cleaning all channels, replacing the valve with lapping. Direct repair of the VAZ 2112 cylinder head will require several operations that require some special equipment. Of course, this is not possible at home, and car enthusiasts simply replace worn parts. Next, we will consider the process of repairing the block head, as well as some of the nuances associated with this work.
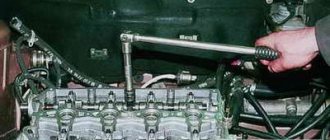
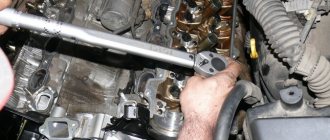
How to tighten the cylinder head bolts
Be sure to tighten according to the diagram given in the article. To tighten the bolts, you need to follow a few simple steps:
- Install a new head gasket and place it on the centering bushings.
- Install the head and tighten its mounting bolts.
- Start tightening with a torque of 20 N*m. If the scale is in “kgf/m”, then divide by 10.
- In the second run, you need to tighten all the bolts according to the diagram by 90 degrees.
- During the third pass they turn another 90 degrees.
Bolts with a length of 95 mm or more cannot be used. In general, the procedure is quite simple, but a torque wrench is required - without it, it will not be possible to maintain the correct tightening torque of the VAZ-2112 cylinder head (16 valves).
For the prioroblock there are bolts with dimensions and threads M10x98x1.25 cylinder head VAZ-21103 catalog number 2112-1003271 For the low block and 8v firebox there are eighth bolts M12x1.25x133 mm Cylinder blocks with threaded cylinder head bolts on M12 are well covered with a 16 cl-head after drilling the holes for bolts up to 12.5-13 mm. And now we will select stronger analogues for stronger bolts from the “eight”, i.e. with thread M12x1.25
Fiat 7653650 М12х1.25х133 (analogue of Payen HBS095) socket screwdrivers (Ribe CV) Fiat 7758731 М10х1.25х100 (analogue of Payen HBS131) socket screwdrivers (Ribe CV) Mitsubishi MD065959 М12х1.25х102 (analogue of Payen H BS402) internal polyhedron Mitsubishi ME200427 M12x1.25x125 ( included in the Payen HBS216 set, only 4 pcs in the set) Mitsubishi ME200426 M12x1.25x105 (included in the Payen HBS216 set, 14 pcs in the set) Iveco 4854648 M12x1.25x119 (analogous to Payen HBS011) Toyota hex collar 9091002112 M12x1.25x1 27 (analogue of Payen HBS209) external polyhedron
Payen cylinder head bolt kits for M12*1.25 threads. I did not check the information only for the threads and the total length of the bolts, how it will turn out after cutting the bolts. I did not record sets of bolts shorter than 98 mm. Each kit contains from 4 to 18 bolts, check. HBS227, HBS257 (Fiat) M12x1.25x218 socket screwdrivers (Ribe CV)
Conclusion
Thus, a major overhaul of the cylinder head of the 16-valve VAZ 2112 engine is being carried out. This process at a car service center will take 1-2 days, but in his garage a car enthusiast can spend much more time, since the lack of tools will affect him. Thus, it is recommended to carry out cylinder head repairs at car repair shops, where everything will be done much faster and with better quality. Of course, this will hit your pocket, since high-quality and major repairs of this part will cost on average about 7,000-10,000 rubles. along with spare parts.
Features of repairing the cylinder head of the Lada Granta
The engine of the Lada Granta car has differences with the Kalina engine. The block head, in comparison with the Kalinovskaya one, has been increased in height by 1.2 mm. This is due to a change in the combustion chamber. Lightweight pistons installed. The timing belt has been modified and operates in a temperature range from minus 40 to plus 40 degrees. The declared belt mileage is up to 200 thousand kilometers.
The main feature of Granta cylinder head repair is the use of metal-ceramic seats. By car Kalina, 2114, etc. Cast iron saddles are used, which can be processed manually using a set of domestic cutters.
Machining cermet seats requires wear-resistant cutting tools. In order to successfully process them, the head is installed on the NEWENContour-BB machine, designed specifically for the rapid processing of seats and guide valves with digital control or manually with a Neway tool.
Video showing cylinder head repair (1.5 l engine)
If, when starting the 16-valve Priora engine, you hear knocking noises in the engine compartment, which will disappear as the power plant warms up, then you should check the hydraulic compensators (HC). When every start of a cold engine is accompanied by a knocking sound, this is a clear sign of a worn hydraulic compensator. We will tell you how to replace expansion joints yourself. We will also look at a component such as the cylinder head check valve, which can also cause defects in the operation of compensators.
Hydraulic compensators are sensitive to the quality of lubricant. If mechanical impurities are present in the oil, the part may fail ahead of schedule. Faulty hydraulic compensators cannot be repaired. After installing new compensators, you may be upset by the knocking of the remaining main valves - this is normal, but not for a long time.
What should you pay attention to?
Pay attention to the condition of the screws. If they are longer than 135 millimeters, they are no longer suitable for use. Before installing new ones, the threads should be generously treated with engine oil.
When installing, you need to carefully prepare the surface of the block and cylinder head. It is cleaned of old sealant and all roughness is removed. The presence of oil in places where the elements come into contact is not allowed. There should only be red sealant here. Therefore, we thoroughly degrease the surface with alcohol or gasoline. Use clean lint rags.
Determining the faulty hydraulic compensator
Hydraulic compensators, which are also called hydraulic pushers, adjust the engine valve clearances on the Priora 16 valve. Below is a diagram of how the main body is dismantled and replaced, but first you should find out how to identify a defective part among the rest.
Checking compensators is carried out as follows:
- In turn, press on each main body with a screwdriver. Check that the camshaft cam is facing the pusher with its back;
- If the compensator is working properly, you will need to apply considerable force to press it;
There is another method - place the cams with the protrusions facing up. Now you need to check if there are gaps between the cams and the main body. When recessing the tested part of the Priora 16, it is necessary to compare the speed of its movement with the rest of the pushers. If you find a gap or the main body drops too quickly, then you should remove the pusher and inspect it for contamination.
Let's get inside the car
Tuning VAZ 21124 includes changes to the internal world of the car. Replacing the pump and timing belt for VAZ 2110, 2111, 2112, Lada Priora, Lada Granta, Lada Kalina. (16 valves) is the pump leaking? How to change the pump on a 16 valve engine? Additional devices are installed in the VAZ interior and the old ones are improved; sports seats, a steering wheel and airbags are installed. For a chic look, the VAZ 21124 lacks door trim, new armrests, interior handles and wooden pockets.
In the world of car tuning design, there is a wide range of PVC fabrics for ceiling upholstery, many options for door cards and leatherettes, which differ in color and design.
beautiful in the new VAZ 21124 , especially in yellow, red or blue. Replacing the timing belt on an 8-valve Lada Granta engine directly with your own hands is almost no different from that performed on the 16-valve version of the domestic Lada Granta. Don't forget about podiums for speakers and columns; they come in different diameters, colors and models.
If desired, corner covers, door inserts, sun visors, decorative floor coverings can be installed in the interior; it all depends only on your imagination.
Tuning VAZ 21124 photo
Tuning the VAZ 21124 changes most of the car’s system, so this car can rightfully be classified as a high-speed car. It’s so nice when on the road, your car easily bypasses other cars, moves easily and does not make noise when accelerating quickly. Installation of a turbine on a VAZ 21124 . high-quality braking system, steering, improved suspension for maneuverability and easy handling - all this is called car chip tuning.
Checking the cylinder head check valve
When disassembling the pusher, you will come across a cylinder head check valve, which contains a ball with a spring. Inspect the cylinder head check valve; if these elements are damaged, then only replacing the pusher will help. The cylinder head check valve along with its components can be replaced entirely, but these parts cannot be found in every car store. They are not in demand, as it rarely fails.
When you inspect the check valve, check whether it is dry or not. If the hydraulic compensator is working properly, then the check valve should be in oil. You can pour lubricant into it and see why the oil leaves.
Meet the model
With the new engine, the unit was given the name VAZ 21124, this car intensively fights against the ecology of the external environment. In addition to everything, when the car starts, the traction at the bottom has become noticeable, and the engine now runs calmer, without large jumps. We often hear questions from owners of 16-valve engines: “What needs to be done to prevent the valves from bending in the piston?” In Veil 21124, this task will not exist for you, in the bottom of the piston there are holes and sports shafts that keep the rise of the piston under control, and don’t let the knocking and noise of the VAZ 21124 engine frighten you, this is its normal environment.
Upgrading a car is currently the most important goal for every modern and self-respecting driver. Tuning VAZ 21124 contains configurations of both the internal and external features of the car. Replacing the cylinder head gasket of a VAZ 2114 8 8 Kalina valves with your own hands). Styling the exterior of a car includes installing a body kit on the bumper fenders, sills, hoods and doors, this gives your car a special, sporty look, and also improves its aero performance. To create a sports car VAZ 21124 . It is impossible to do without replacing body elements with plastic material. Plastic parts reduce the weight of the car, making it easy to drive on the road. The final feature of a sports car is the installation of alloy wheels and sports tires.
Replacing expansion joints
Experts recommend letting the Priora with 16 valves sit for two days and not start it. This is done to ensure that all the HA lubricant flows into the crankcase.
After checking how many pushers in the system are malfunctioning, you can go to a car store and purchase new parts for the Priora 16 and some consumables: oil seals, camshaft plugs, anaerobic sealant.
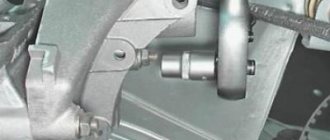
- Work begins with removing the air filter, wiring, which will prevent you from removing the coil and intake manifold. Also remove the throttle body. The most difficult thing will be to dismantle the collector - its mount is located under the generator. To get to it, you need to unscrew the generator fasteners and remove its belt. Using a suitable tool, move the Lada Priora generator to the side;
After such repair of expansion joints, the knock may remain. If a lot of time has passed and the defect does not go away, then it is worth checking the cylinder head itself. Perhaps the hydraulic compensators are knocking due to the lack of the required amount of lubricant. Check the oil channels in the cylinder head. If they are clogged, you will have to clean them.
Engine operation after replacing the main engine:
Tuning yellow iron
The VAZ 21124 includes “yellow iron” tuning, in which stabilizers (for agility), reinforcements and braces (for road stability) are installed. However, be careful with counterfeits of these parts; at worst, they will damage the car, and at best, you will be throwing away a lot of money.
Feel like a real circuit racing driver with the VAZ 21124 hatchback . All you need is to install additional parts: a nameplate (symbols) on the handle of the car, neon lighting under the bottom of the car, an air intake on the hood and roof. The installation of front and rear bumpers with an aerodynamic body kit will add power to the car.