How to remove the cylinder head on a VAZ 2109. Replacing the cylinder head gasket with your own hands
It is necessary to remove the cylinder head (cylinder head) when replacing the gasket, block, as well as when repairing the piston group mechanism and its valves or when repairing the head itself. In addition, when tuning the engine or completely disassembling it, you also need to dismantle the cylinder head.
Before starting work, it is necessary that the car is installed on an overpass or inspection hole.
REPAIRING THE CYLINDER HEAD FOR A VAZ 2109 WITH YOUR OWN HANDS
According to many years of experience of various car enthusiasts, replacing the cylinder head of a VAZ 2109 is most often associated with problems arising from the gasket. But there may be others that can cause the engine to overheat or even seize.
Any driver can repair and modify the cylinder head on a VAZ 2109, but special tools and a little knowledge of the operating principle of this unit are required. Recently, tuning of this unit has become more and more popular, thanks to which the power of the car increases. You can do tuning yourself if you have experience in such work. Working with valves and cylinders requires special knowledge and skills.
Adjusting the bolt torque
In order to do everything correctly and avoid mistakes, you must strictly adhere to certain rules and follow the order of execution.
Tightening should only be done with a special torque wrench, which allows you to control the tightening torque.
Torque wrench
First, using a torque wrench, set the holder to the zero position. This means that the device data is equal to the moment of the original position. Then, you need to look at the indicator of the device when starting the fastener. Rotating the holder, we monitor the indicators. If the moment has not changed, this means that the fastener can be stretched and this is normal, as it should be. If the torque increases rapidly, bolt movement must be achieved. This indicates low stretch of the holder. This means stabilization is needed.
While the vehicle is running, the bolts that secure the cylinder head are constantly experiencing various impacts. They constantly heat and cool, which over time leads to the destruction of the structure of the fasteners.
For all power units there are specific rules that must be followed during operation:
- Strictly follow the data specified in the practical manual for the VAZ 2109.
- Adjustment is carried out only with a torque wrench. The use of another device will not allow this work to be performed correctly.
- Use only good bolts.
Replacement bolt kit - When starting to work, be sure to check the condition of the holders.
- Strictly adhere to the tightening torque values recommended by the manufacturer.
The most important data regarding adjustments is in the annotation for each specific car. As a result, you must carefully study and adhere to what is written in it. During operation of the vehicle, you must strictly comply with all manufacturer's requirements and systematically diagnose the car. Correct and smooth operation of the VAZ 2109 power unit prevents the need to adjust the cylinder head holders.
Since the cylinder head of the VAZ 2109 is a complex unit, it is necessary to carry out repair work only with absolute confidence in your actions. Strictly observing the order of work. If a deviation in the operation of the motor is detected, immediately carry out diagnostics. This will avoid more expensive repair work.
Required Tools
- torque wrench;
- caliper or ruler.
Tightening diagram
The cylinder head tightening pattern is the same as on traditional models and you need to start from the center. It takes place in four steps.
The diagram according to which the VAZ 2109 should be pulled
- tightening torque 2.0 kgf/m
- tightening torque 7.5 - 8.5 kgf/m
- turn it 90 degrees.
- turn it again by 90 degrees.
To make it clearer, let’s describe this process in more detail:
- Using a torque wrench, tighten the bolts in the sequence shown in the figure to 2.0 kg/cm.
- Then we go around the second circle and reach 8 kgf*m.
- Next, twist it 90 degrees.
- We go around the second circle, twisting another 90 degrees.
Proper lift
Attention! On 16-cl power units, bolts can be reused, but if their length is no more than 95 millimeters.
Otherwise it changes. The length is measured along with the washer. Do not try to replace the torque wrench with another device, otherwise the consequences may be unpredictable.
What is a cylinder head
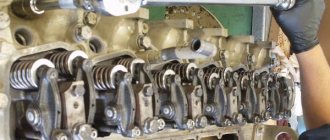
Cylinder head for VAZ 2109 in disassembled condition
The VAZ 2109 cylinder head is a special unit whose main purpose is to close the cylinders. It is attached directly to the block itself using special bolts. The cylinder head is important because it is a direct participant in numerous processes during engine operation. The cylinder heads of power units of cars produced today are distinguished by a rather complex structure and are assembled from a significant number of parts.
Also check out
- When disassembling the valve mechanism, it is necessary to place a wooden block under the valve plate.
Assemble and install the cylinder head in the reverse order.
Recommendations :
- Valve stems with engine oil. The same applies to guide bushings.
- Before installation, remove dirt, oil, and remnants of the old gasket from the surface of the cylinder block.
- The cylinder head gasket should be replaced using two special centering bushings.
- Install the mounting screws; the diagram below shows 4 steps on how to tighten them.
- The first tightening torque of the screws is 20 N.m (2 kgf.m);
- The second - with a moment of 69.4–85.7 N.m (7.1–8.7 kgf.m);
- The third - with an extension of 90°;
- The fourth is to turn the screws 90°.
When is it time to change?
- There may be a need to replace or repair the cylinder head if you begin to notice that fuel consumption has increased or the power of the power plant has decreased.
- Incorrect assembly and installation of valves and cylinders can also lead to malfunctions in the cylinder head system.
- If you constantly fill your car with low-quality gasoline, then do not be surprised that over time this system will begin to malfunction and will need to be repaired.
- A crack that appears in a block cannot be eliminated in any other way than by completely replacing this element.
- A symptom indicating problems in the cylinder head may be white smoke coming from the exhaust pipe, this is caused by antifreeze getting into the engine cylinders.
White smoke from the exhaust pipe
- If oil stains appear on the surface of the coolant in the tank, this also indicates that repair of the unit is necessary. This is due to the fact that oil, in one way or another, began to get to places where it should not be.
- Not often, but sometimes exhaust gases begin to break through the gasket. There is no other choice but to dismantle the head and replace the gasket.
- Removing the head may be necessary in the case of VAZ 2109 tuning, modifications, problems with plugs, tightening bolts or boring cylinders.
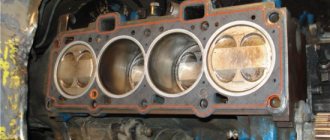
Signs of a broken gasket on a VAZ 2109
There are no regulations for replacing the gasket, since a good and well-made part can serve for quite a long time until the head is dismantled. But it is necessary to monitor its condition, and the difficulty is that damage to the gasket rarely manifests itself externally. Oil drips and antifreeze drips may not always indicate gasket damage. But there are a number of unconditional signs that the gasket needs urgent replacement.
- Suspension in the engine crankcase. This is determined by checking the oil level. Instead of clear or even dark oil, a watery, dark brown suspension appears on the control dipstick. The coolant can be forced into the lubrication system, where it mixes with the oil, but the mixture may not be homogeneous and looks like a suspension. The first sign of antifreeze leakage into the crankcase is an increasing oil level.
- Oily spots in the coolant expansion tank. The same story - oil got into the antifreeze, but it cannot dissolve there, so it looks like stains on the surface. This is also a signal that the gasket is broken.
- A drop in compression in a particular cylinder or in two adjacent ones. Most often this happens when the gasket is simply of poor quality and burns out in the place where the cylinder is sealed. It can burn out anywhere, along the perimeter of the combustion chamber - both outside the block and into the channels. External burnout can be heard immediately by sound. Therefore, such a nuisance must be eliminated immediately.
Stages of work
As we have already said, the replacement process is not complicated, but if you decide to take on it for the first time, then it is better to invite someone with experience in this matter to help. You may also need help if you decide to improve the performance of the VAZ 2109 engine by tuning it using channel boring. Replacing the plugs also requires additional assistance. In this case, removing old plugs and correctly installing new ones requires certain skills.
Tools
- hexagon;
- torque wrench;
Torque wrench
- knob;
- screwdriver.
Coolant drain
Now is the time to drain the coolant. To do this, you will need a container of approximately 10 liters, a wrench of 13. First of all, drain the liquid from the radiator of the cooling system. Place a container under the drain hole, then unscrew the plug, but do not forget that without unscrewing the plug on the expansion tank, the liquid will not drain. In order to replace the cylinder head gasket on a VAZ 2109, there is no need to completely empty the cooling system.
Then a container is installed under the drain hole, which is located on the internal combustion engine block. The plug is unscrewed using a 13 key. After you drain the antifreeze from the system, you need to remove the rubber pipes. The top one, which connects to the radiator, then the stove pipe, and the last one is the one that connects the thermostat. If necessary, you can unscrew the aluminum insert on the engine block.
Process
Before proceeding with the removal and repair of the VAZ 2109 cylinder head, it is necessary to carry out some preparatory work in accordance with the order.
Removal
- First of all, remove the air purifier housing.
- Disconnect the hoses and wires from the carburetor or injector.
- Next, you need to disconnect the pants from the manifold.
- We remove the distributor.
- Unscrew the valve cover.
- Remove the carburetor and manifolds.
- To unscrew the head bolts on a VAZ 2109, you will most likely need a wrench and a hexagon, because the bolts are tightened with decent force.
Pipe as a lever
- Remove the head mounting bolts and washers.
We take out the bolts
- We remove the VAZ 2109 cylinder head from the power plant unit.
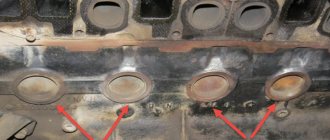
- We remove the gasket.
Gasket that has expired and needs to be replaced
- Also, if necessary, we carry out repairs or modifications to engine block components.
Tuning
Qualified adjustment, modification and tuning of the VAZ 2109 head will help to fully reveal the capabilities of your power unit. You've probably heard a lot about this, read or even watched videos on the Internet. Typically, when tuning, the channels are bored and smoothed, thereby reducing the turbulence that reduces power. The valves are changed to larger ones and ground into the seats. Tuning may also involve replacing standard valve guides with bronze ones.
Valve lapping
Lapping control is carried out as follows:
- the assembled head lies on its side;
- liquid is poured into the collector holes (ordinary water can be used).
If the liquid does not flow through the valves, this means that the work was done efficiently and the valves were ground in correctly. After all faults have been eliminated, you can begin installing the head.
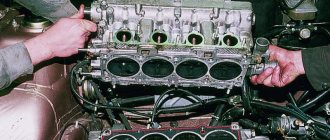
Installation
- Begin assembly by installing a new gasket. Attention! The holes in the gasket must coincide with the guides, which are located at the corners of the block.
New gasket
- You need to install the head carefully, do not move the gasket from its place at this moment.
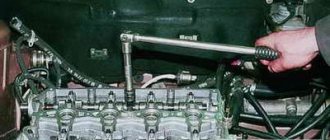
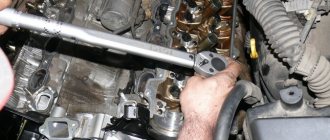
- We insert the bolts into their places and begin tightening with a torque wrench.
Tightening with a torque wrench
- Next, we install the dismantled equipment, injector or carburetor, in reverse order. Fresh coolant is added. Wires and hoses are connected.
Attention! This operation requires some knowledge and skills. Therefore, before performing it, you should know that the bolts need to be tightened according to a certain pattern and with a certain force. It would be useful to read additional material on this topic and watch video instructions.
Replacement
To change the gasket, you will need to dismantle the assembly, get rid of the worn cylinder head gasket and reassemble the structure in the reverse order, following the recommendations regarding the tightening torques of the cylinder head bolts. We will tell you about all this in more detail.
- Disconnect the wiring from the coolant temperature sensor and emergency oil pressure sensor.
- Remove the thermostat, just remember to drain the coolant first.
- Remove the air filter housing. There is no need to remove the carburetor, because it will not interfere with replacing the gasket.
- Disconnect the exhaust pipe from the exhaust manifold.
- Remove the camshaft drive gear after first setting the piston of the first cylinder to the TDC position. Now you can remove the protective casing of the camshaft drive belt, loosen the gear fixing bolts, securing the gear from turning.
- Remove the camshaft drive belt. Then you can completely unscrew the mounting bolts and remove the gear.
- Press the latch to disconnect the wiring block from the ignition distributor.
- Similarly, turn off the central high voltage.
- Loosen the clamps to remove the fuel supply hose from the fuel pump.
- Disconnect the throttle and air damper drive rods from the carburetor.
- Disconnect the power supply from the solenoid valve.
- Remove the vacuum booster hose from the intake pipe fitting.
- Disconnect the tube from the vacuum ignition corrector.
- Loosen the tension on the clamps to remove the interior heating hoses from the pipes.
- Remove the cylinder head. Using a socket with an extension, the mounting bolts are unscrewed.
- Rock the head a little jerkily, then remove the element.
- Remove the old gasket, clean it of any remaining rubber seal and other contaminants. Wipe dry thoroughly, after which you can reassemble.
- Before assembly, check whether the length of the cylinder head bolts is within the normal range. Ideally, their length is 135.5 millimeters. If the bolts have lengthened during use, then all bolts will have to be replaced.
Replacement procedure
How do you install the cylinder head and tighten the bolts?
What unexpected problems may occur during execution:
- Without a doubt, it is necessary to adhere to the cylinder head tightening torques.
- In this case, you cannot use other tools. Due to the fact that it is possible to determine the degree of tension only with a torque wrench.
- To perform tensioning, it is allowed to use serviceable screws. According to the requirements that are installed on the VAZ 2109 vehicle on the power unit.
- Subsequently, you need to know for sure that the holders are in working order.
- If a repair or complete replacement of the cylinder head has already been carried out before, in this case it is not advisable to use the bolts twice to perform tension. At the same time, go to the nearest spare parts store and buy a new spare part.
- On 16 cl internal combustion engines, secondary use of cylinder head screws is permitted, only in one case, if the length is no more than 9.5 centimeters. The screws are measured with a washer; if it turns out that the bolt is more than 9.5 centimeters, then it certainly needs to be changed.
- If the car is equipped with an aluminum head, then the cylinder head is mounted on TTU bolts. They will not have to be tightened as they are screwed into the thread.
- When purchasing cylinder head gaskets, first of all pay attention to the specifications of the manufacturer. Today they indicate a certain tightening ratio for each specific gasket. It is worth remembering that the specified moment of force should not differ from those used during repair work.
| Valve pusher with installed shim. |
| The position of the cams of the first cylinder when installing the camshaft on the cylinder head supports. |
Warnings
Before installing the camshaft, place wooden pads under the head of the VAZ 2108, VAZ 2109, VAZ 21099 block to avoid damage to the valves.
The intake manifold and exhaust manifold gaskets are supplied as replacement parts and are made of different thicknesses, so when installing new gaskets, make sure they are the same thickness.
Do not over-tighten the spark plugs as this may cause cracks in the spark plug insulator. The tightening torque of the spark plugs is 31-39 N m (3.1-3.9 kgf m).
1.
Install the support washer (plate) of the VAZ 2108 valve springs.
2.
Using a mandrel, press the oil deflector cap onto the valve guide (the mandrel is not shown in the photo).
3.
Lubricate the valve stem with engine oil and insert it into the guide sleeve of the corresponding cylinder (along the marks made during disassembly).
4.
Place a suitable stop under the valve.
5.
Turn over the head of the block of VAZ 2108, VAZ 2109, VAZ 21099 and insert the inner and outer valve springs.
6.
Install the VAZ 2109 valve spring plate onto the springs.
7.
Install a valve spring compressor.
8.
For ease of installation, glue the cracker to a thin screwdriver with grease. Compress the valve springs with a tool to release the cotter grooves on the valve stem. Insert the cracker into the grooves.
9.
Insert the second cracker in the same way and, gradually loosening the pressure on the handle of the device, unclench the valve springs so that the crackers fit into the hole of the valve spring plate. Remove the device. Install the remaining valves in the same way.
10.
Tap the ends of each valve stem with a hammer through a metal rod to force the crackers into place.
11.
Insert the shims into the pushers according to the marks made during disassembly. The washers are inserted into the pusher with the side where the washer thickness value is engraved.
12.
Lubricate with engine oil and install the pushers into the corresponding cylinders (according to the marks made during disassembly).
13.
Lubricate the camshaft supports in the head of the VAZ 21099 block and the adjusting washers of the pushers with engine oil (see note).
Before installing the camshaft, lubricate all bearings with engine oil.
14.
Place the camshaft on supports so that both cams of the first cylinder are directed upwards. In this case, the fuel pump drive cam should be on the side of the ignition distributor mounting studs.
15.
Lubricate the journals and cams of the camshaft VAZ 2108, VAZ 2109, VAZ 21099 with engine oil.
16.
Apply a thin layer of sealant to the surface of the head mating with the bearing housings in the area of the outer camshaft supports
17.
Lubricate the camshaft supports in the bearing housings with engine oil.
18.
Install the bearing housings onto the head of the satellite fret block and tighten the nuts securing them in the indicated order to a torque of 18.7-23.0 Nm (1.87-2.30 kgfm).
19.
Lubricate the oil seal seat in the Lada Samara block head and on the camshaft with engine oil.
20.
The camshaft oil seal is installed using a special mandrel. If there is no mandrel, slide the oil seal onto the camshaft up to the seat on the shaft. Then, using a sharpened stick made of soft wood, carefully tuck the working edge of the oil seal onto the shaft journal.
21.
Carefully push the oil seal in until it stops.
22.
Install the tension roller onto the stud and screw the fastening nut without tightening it.
25.
Install the inlet pipe onto the studs.
26.
Install the exhaust manifold onto the studs.
27.
Tighten the nine nuts securing the intake pipe and exhaust manifold to a torque of 21-26 Nm (2.1-2.6 kgfm).
28.
Install the warm air intake pipe and the eye on the studs.
29.
Tighten the nut securing the pipe and eye.
30.
Tighten the two remaining nuts securing the pipe.
31.
Close the oil pressure warning lamp sensor.
32.
Install the carburetor heat insulation shield onto the studs and tighten the two nuts securing it.
33.
Tighten the nut securing the shield to the fitting.
34.
Tighten the spark plugs.
36.
Install the carburetor on the studs and tighten the four nuts securing it to a torque of 13-16 Nm (1.3-1.6 kgfm).
37.
Tighten the screw securing the carburetor heating fitting.
The longevity of the cylinder head is determined by many factors - from proper use and timely maintenance to tightening the bolts of the device in accordance with a certain pattern. Therefore, it is important to know the tightening torque of the VAZ 2109 cylinder head and the sequence of task completion.
When is it necessary to puff?
How is the tightening torque of VAZ 2109 bolts adjusted?
Video “Visual aid for tightening cylinder head screws on a VAZ 2109”
Comments and Reviews
Puff
Reassembling the unit if you strictly follow the instructions for dismantling work will not pose any particular problems.
An incredibly important aspect of replacing the cylinder head gasket and all other activities associated with removing the head is the correct adjustment and tightening of the bolts.
Tightening the bolts is done strictly with a torque wrench, which will allow you to control the tension torque.
- Place the holder in the zero position. This will indicate that now the key data is equal to the moment of the original position;
- Look at the torque tool readings as you begin to tighten the bolts;
- Rotate the holder, monitor the indicators;
- If the torque does not change, the fastener may be stretchable, which is normal. This is exactly what should happen;
- If the torque increases rapidly, bolt movement should be achieved. That is, the stretch of the holder is small, it needs to be stabilized.
Golden rules of tightening
To properly reassemble the cylinder head, you need to adhere to the golden rules:
- Strictly follow the tightening torque data corresponding to the VAZ 2109;
- Make adjustments only using a torque wrench. Other tools do not allow you to get the desired result;
- To install the cylinder head, use only serviceable bolts that meet the requirements of your engine installed on the VAZ 2109;
- Before work, make sure that the holders are in good condition.
Tightening diagram
In addition to observing the required tightening torques for the cylinder head mounting bolts, one more rule must be observed here.
Returning the bolts to their places is carried out strictly according to the diagram below.
Tightening is performed in four circles, following the sequence of work with the mounting bolts indicated in the diagram.
| Tightening circle | Your actions |
| First round | All bolts are tightened using a torque wrench according to the diagram with an applied torque of up to 2.0 kg/cm m |
| Second round | Tightening in the second circle is carried out even according to the diagram, but the torque is applied up to 8 kg/cm m |
| Third circle | Each bolt on the third installation circle must be tightened 90 degrees. |
| Fourth circle | The fourth and final round of tightening the cylinder head bolts requires re-tightening the fasteners an additional 90 degrees. |
Make sure your bolts meet the specifications before following the instructions and diagram. Otherwise, even the most correct, strictly observed tightening will not give any result.
The cylinder head gasket on the VAZ 2109 is a fairly reliable element, but it tends to lose its performance qualities. To replace it, you have to perform far from the simplest operations, but in no case can you ignore the violation of the integrity of the gasket. Otherwise, the consequences will result in expensive repairs, and sometimes even a complete replacement of the engine.
The cylinder head (cylinder head) is usually removed to replace the gasket or block, or to repair the valve mechanism of the piston group or the head itself. The need to remove the cylinder head may also arise in the case of engine tuning or complete disassembly of the engine.
This work is carried out on an inspection pit or overpass.
Why do we need and what are head gaskets made of?
The cylinder head gasket must be replaced when the head is removed. The gasket, although expensive, is a consumable item and cannot be restored or reused. The gasket has to withstand enormous loads. Both thermal and mechanical. The temperature in the combustion chamber can reach 1200°C, and in the VAZ 2106 it is no less than 1000°C, so the requirements for the material from which the gasket is made are very high.
The heat-resistant gasket is made of asbestos-containing material, which does not collapse or change its structure when exposed to high temperatures. Asbestos was banned for use in automotive technology, so it is now being replaced with new materials, but more often than not, the asbestos content is simply not indicated on the packaging of the gaskets. Ceramic gaskets are expensive, so they are used only on expensive cars, to which the nine has nothing to do.
In addition to the thermal load, the gasket must withstand the severe pressure that forms in the combustion chamber, as well as ensure sealing of the oil channels and cooling system channels. To do this, the head gasket must have a certain elasticity and strength. Tensile strength is given to it by reinforcing materials, which most often are thin steel wire.
How to correctly stretch the cylinder head of a VAZ 2109
All subsequent work of pulling the fasteners and the completed correction and installation of the cylinder head is done with a torque wrench.
On a note! Every car owner and simply a connoisseur of domestic cars must have a special device for diagnosing a personal vehicle.
You can also do the following using a special scanner:
- Set up the car's on-board computer
- Analyze sensors
- Reset
- Perform reading
A torque wrench is a specially designed tool. It is used to tighten the cylinder head bolts on the internal combustion engine.
In addition to a special key, you need to take a ruler and a compass.
How to remove the cylinder head
First you need to unscrew the two nuts that secure the cover. They are at the very top. After this, you can unscrew all the engine head bolts. There are 10 of them in total, a hex key is required. That's all, after removing all the bolts you can remove the block head. Please note that on VAZ 2109, 2108, 21099 cars, replacing the cylinder head gasket is carried out according to the same procedure. However, even on dozens with an eight-valve engine, similar procedures are performed.
Please note that whenever the cylinder head is dismantled, the gasket must be changed. Look at the old one, what kind of damage, ruptures, burnouts it has. If you have already removed the cylinder head, then take the time to pay attention to the condition of the valves, seats, guides, caps and other elements of the gas distribution system. If you repair this mechanism in a timely manner, the engine will be very grateful to you.
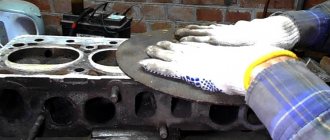
How to lap valves
To do this, you will need a drill - either manual or electric, as long as it has a reverse function. You also need an old valve, from which you need to make a small adapter. It will need to be clamped into a drill. In addition, you need to get a small piece of durable rubber hoses. You will also need to purchase lapping paste. Please note that there are two types - for coarse and fine grinding. It is also worth considering that you need to place the valve on the seat to which it was ground. Otherwise, the work will be completely disrupted. There will be no tightness between the valve disc and the seat. This work will also need to be carried out if the cylinder head is being replaced. The cylinder heads of the VAZ engine must be ground into new valves.
A prerequisite is the presence of a drill with reverse. It is necessary to turn the valve in different directions evenly so that the surfaces are as smooth as possible. It is worth noting that a coarse-grained paste is used first, and after it removes all small irregularities from the surfaces, it is necessary to wipe it off and apply a fine-grained one. The latter will allow you to clean the valve plate and seat to a shine. Please note that the lapping paste is an abrasive material, so it is unacceptable to get into the cylinder and other rubbing engine components. Carry out valve grinding work away from the engine to prevent paste from getting into the cylinders. Also, be sure to clean it after the process is complete.