Recently I received a letter in the mail with a proposal to write an article about a certain modification of the Lada Kalina, thanks to which the trunk door can be opened using a button on the key fob of the standard key.
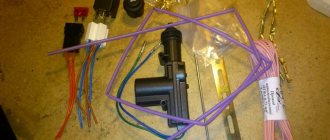
“I would like to write my own article about a kit for an electric trunk lock; I made this kit myself, designed it myself, manufactured it myself. the price of such a set is 300 rubles. it includes an actuator (electric drive), a latch, and a retainer.
The beauty of this set is that you don’t need to drill or modify anything, it fits into its original place and connects to its original sockets, the unlocking and locking algorithm is not disrupted, the trunk opening button is activated on the remote control.
When you press the trunk or door release, the trunk itself does not open, only the lock is unlocked, you only need to go up and press the lock itself.
I think the article will be very interesting and useful to society. Sincerely, Pavel Kulikov."
Within a few days I received a response from the author with a ready-made article on installing this device, which included installation photos and a link to a site where you can purchase it, although this set is only for older versions of locks up to 2010, now the author is working on creating one for new versions locks
To replace the trunk lock of Kalina, you need to arm yourself with some materials. You can carry out the work yourself, doing everything according to a certain algorithm. Below you will find detailed information about the replacement.
Install the activator
To get into the luggage compartment on Kalina, you need to turn the key and also press the button.
It's not convenient to do this. In such a situation, it makes sense to install an activator. It's not difficult to do. This can really be done with your own hands.
The activator is attached using a self-tapping screw and a wire holder. Check the device first. To do this, connect the device to the standard car connector and test it.
The main problem with the activator's operation is that the back door may not be picked up in time. When the current stops flowing to the activator, the trunk closes with the first latch, but the compartment may not be completely closed. To get into the trunk, you will have to pick up the key again.
Connection options
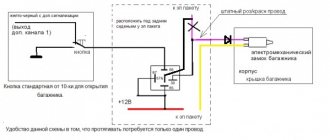
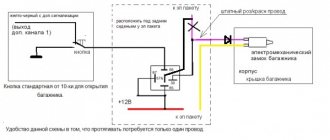
Making a lock that opens the trunk with a button is not difficult. A special circuit is assembled, and wires are also pulled. One of the programmable alarm channels is used to operate the lock.
There are 2 connection options.
- First
. The button connects to +12V and also bypasses the relay. The advantage of the method is its simplicity and the absence of additional components. But there is a drawback. You'll have to pull the wires; - Second
. More labor-intensive method. You need diodes and ground. A lot of wires are used. That's a plus.
Experts, as well as experienced motorists, prefer the second option. It's easier to implement.
It is better to use copper PV3 wires with a square cross-section.
In Lada Kalina, it is better to run the wiring on the left side and along the sills. Switching is done using crimping and electrical tape.
To control the activator, use a standard pink-red wire. It is connected to the relay, wrapped and hidden under the BUS mounting frame.
All procedures are carried out with the negative terminal of the battery removed.
Such simple steps allow you to install an electric drive on Kalina to open the luggage compartment. An actuator is also needed. It can be purchased assembled. This is better than collecting from scrap materials.
Let's get started!
- The task is to put the spring on the rod of the “lift” or trunk shock absorber, depending on who you say. To do this, you need to unscrew the hinge-mount. This is best done using a vice.
- We clamp the rod in a vice using fabric or other gasket that will prevent damage to the rod.
- Carefully unscrew the hinge and put on our springs. It is recommended to cut two turns to achieve the desired effect. Although everything needs to be looked at locally, it all depends on the length and stiffness of the spring.
- You can install washers or rubber gaskets under the springs, thereby eliminating contact between the spring and the elevator.
- After this, the spring is either fixed, for example, with electrical tape, or remains “free floating”.
- Some experimenters use a valve spring from a VAZ, adding one washer at the top and bottom; it is advisable to use rubber ones.
Next, this entire structure is returned to its place and checked. Be prepared for the lid to close with some force that was not there before. This is because of the springs that provide resistance. The disadvantage of the design is that over time the springs “sit down” and cease to perform their function; here, in principle, there are options. You can either find a stiffer hardened one, or stretch this spring from time to time, making it stiffer. You can also find suitable springs and change them from time to time.
Installation of the activator: preparatory work
What is the trunk volume of the Lada Kalina station wagon in liters?
Lada Kalina 2 station wagon trunk Since there is space for the trunk lock activator in Kalina, it makes sense to use it. Absolutely any activator will do. Of course, for those who are interested in the quality and long service life of the entire device, it is better not to stop at extremely cheap options. Experienced car owners still advise choosing domestic Kalina electric lock drives, regardless of body type. They are somewhat more expensive than similar products made in China or Taiwan, but still more reliable. Main parameters of the activator:
- 12 volts;
- two-pin;
- lock-unlock functions.
In order for the system to open doors by pressing a button to work fully, one activator will not be enough. You will also need such a thing as a rotary washer. According to many car owners, the easiest way is to grind it yourself. You will need a steel plate and a machine. There are quite enough drawings with dimensions that will show what kind of rotary washer for the Kalina activator should be on various auto forums.
It is possible that after the washer is manufactured, it will have to be modified when installing the activator. The activator installation technique itself will require some tricks. For example, the first step is to remove the trunk trim. It is secured with pistons, which immediately became unusable for most car owners. Conclusion: pre-purchase of “hedgehogs” for subsequent installation of the trunk trim in place is mandatory.
Another nuance lies in the types of locks on the Lada Kalina. Firstly, locks on cars produced before 2010 and after differ in their design. Accordingly, the types of activators will differ slightly. This issue is resolved upon purchase. Secondly, most of those who independently installed the lock activator for Kalina station wagon either modified the lock itself or replaced it with another one. It remains to figure out why this is needed and how it is done.
The bottom line is that the trunk lock is equipped with two “tongues”. After modifying the lock to open it with a button on the key, the existing problems were partially solved, but a new one arose. If, when opening the trunk with the key button, someone did not support the trunk lid in time, it would lower, as a result the trunk would close again. And only on one “tongue”. And this meant that the key fob certainly became useless. Now it was possible to open the trunk again only with the key. This is where two options for solving the problem appeared.
Luggage compartment lock
You can, if desired, modify the trunk lock of the Kalina hatchback in exactly the same way as was considered in the case of the Kalina station wagon. One of the main nuances, oddly enough, is not in the electrics or body design features, but in the fastening of the trunk trim. The point is that the Kalina hatchback is supported not only by pistons, but also by plastic corners.
That is why, when removing the trunk trim of a Kalina hatchback, you must pull the trim from the top: while the “hedgehogs” are easy to replace, the stationary plastic holders are only easy to break. And more about plastic. The bottom line is that the Kalina hatchback has a plastic trim on the trunk lid.
Constant efforts to open the fifth door, combined with a small number of stiffeners, gradually lead to the appearance of cracks in the plastic. Then everything follows domino rules. Perhaps the plastic will soon “fly”, and then you will have to think about repairs.
There are also aesthetes among Kalina hatchback owners who simply do not like the look of the trunk lid opening button. In general, all of the above reasons often lead hatchback owners to the same decision: an opening button on the fifth door is not needed.
Door lock adjustment
Dimensions of the trunk of the Lada Kalina station wagon
A car lock is used to prevent the door from opening spontaneously and is a protective element of the security system. The standard Lada Kalina lock consists of two parts: mechanical and electronic. It often becomes the reason why the door handle is difficult to open; Kalina sometimes has such a defect already from production. As in the case of adjusting door gaps, there are two options for correcting the deficiency:
- Take your car to a service station and trust the professional technicians. Recommended for beginners and inexperienced car owners.
- Fix the problem yourself using available tools. Suitable for car enthusiasts with extensive driving experience and basic training.
Adjusting the lock at home is done using a Phillips screwdriver. Before starting manipulations, it is recommended to mark the original position of all elements for possible return to their original state.
To move the lock module, loosen the three screws that secure it. The bracket is now not fixed and can move in the plane. Once it is in the correct position, the screws are tightened into place. The structure is treated with lubricant and undergoes mandatory testing by opening and closing doors.
If the lock is the reason that Kalina’s door does not open well, and the adjustment did not help, resort to more stringent means:
The locking bracket is pulled out 3 - 5 mm and secured in this position. The method allows you to use this additional distance for a smoother door movement
It is important to find the optimal size for the structure to bulge from the body. If the door is extended excessively, it will make sounds on uneven sections of the road and allow dust and moisture into the interior. Reducing the area of the locking hook. This is usually achieved by filing the mechanism and restoring the locking system to its original state.
The size of the cut area affects the ease of opening the doorway. If too much volume is removed, the door may open and close on its own. During processing, it is advisable to round off the sharp tip of the lock tooth.
This is usually achieved by filing the mechanism and restoring the locking system to its original state. The size of the cut area affects the ease of opening the doorway. If too much volume is removed, the door may open and close on its own. During processing, it is advisable to round off the sharp tip of the lock tooth.
A lock malfunction leads to the following difficulties:
- door jamming when opening or closing;
- the appearance of metal knocking when driving onto an uneven section of the road;
- deformation of the larva, while the key cannot be inserted into the hole;
- failure of the door module locking mechanism.
If loud rattling sounds occur, rubber tubes of the appropriate diameter help. They are placed on the levers after dismantling the entire system. Sometimes bending the impact area of the outer handle helps. In some cases, the car door lock must only be completely replaced, since adjustment is impossible.
How to dismantle the lock to replace the cylinder?
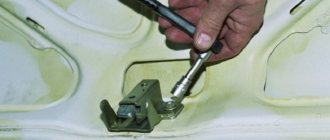
You can gain access to the lock mechanism by removing the plastic upholstery inside the luggage compartment. This protective component is fixed by means of two bolts, which are located in the places where the special handle is installed. They are also called latch caps. They are pryed off with an ordinary screwdriver.
Structurally, the trunk lock in the Lada Kalina is made of two parts, regardless of the body type, hatchback, station wagon or sedan. They are presented in the form of a cylinder and the unlocking mechanism itself. If it is necessary to replace the trunk lock, then the dismantling of these components is carried out in a separate order.
When you only need to replace the larva, this can be done in a few simple steps. Here you will need a screwdriver and a socket.
- By unscrewing the bolts, we release the necessary part of the body.
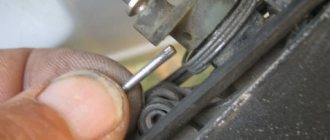
- Next, remove the retainer using a screwdriver. It is attached directly to the body of the larva itself.
- It is recommended to remove it very carefully, while holding the spring.
- Installation of a new element is carried out strictly according to the reverse manipulation algorithm.
If there is a need to replace the lock itself, the operation becomes a little more complicated due to the need for additional actions.
- First, the door lock is unscrewed using a screwdriver. This is not difficult since the element is held in place with only two screws.
- Now we pull the trunk lock outward, and it freely comes out of the landing niche.
As you can see, removing the trunk lock is not difficult.
Advantages and options for upgrading car locks
Volume and features of the trunk of the Lada Kalina: station wagon, sedan and hatchback
The technique is simple, the only thing needed is to make a rotating plate and a rod for it yourself. The wiring should be routed to the electric lock and connected to a special control unit. When disarming the car, the electric trunk lock will be activated after the fifth door opening button is unlocked.
The entire installation task is based on connecting the electric lock to two wires. You can purchase the part at any auto store. The trunk end must be additionally hidden to prevent water from getting into it. Otherwise, it will periodically short out during rain.
An important attribute is the trunk hinges. Wires are often broken in this place, so their condition must be carefully monitored.
An important step in the installation process is wiring; you can use those wires that are standardly suitable for the fifth door of the car.
Power is taken from the cigarette lighter. An important point is the installation of a protective fuse. The wire is laid along the threshold; it will take approximately 3.5 meters. Then the installation takes place.
Any option for modifying your own car has its pros and cons. It was already discussed at the beginning why exactly it is worth modifying the trunk lock of the Kalina hatchback and station wagon. Now about the possible options. Installing the trunk lock activator alone solves one problem - the issue of using the key.
True, you no longer have to remove the key from the ignition. That is why the issue of installing a trunk release button for Kalina hatchback and station wagon remains relevant. This modification option has its drawback: you will have to run the electrical wire through almost the entire car. Most car owners are willing to put up with such inconveniences, since they are one-time use.
DETAILS: Replacing lamps on a Mazda 3 Photo instructions on how to change the front lamps on a Mazda 3
The Kalina hatchback trunk lock drive and the issue of modification are a matter exclusively for the car owner. It is possible that it is impossible to independently modify the trunk lock of the Kalina hatchback, and there is nowhere to turn. In some regions, purchasing a lock for a Lada Priora car can be difficult. According to many motorists, this disadvantage can somehow be put up with.
For particularly skillful car owners, options for controlling door opening/closing mechanisms, including the fifth door, are available. For example, the simplest option is one in which all the doors of the car are unlocked simultaneously.
Let's sum it up
Replacing the trunk lock is quite labor-intensive and will require a lot of time to implement. If the owner of LADA Kalina encounters difficulties, we advise you to contact specialists when performing the installation procedure.
A reliable way to repair the Kalina trunk lock
Hatchback and Station Wagon.
The trunk door lock of the Lada Kalina Hatchback and Station Wagon is a rather capricious unit that can seriously spoil the blood of its owners.
As soon as you put a large load in the trunk that puts pressure on the lid, for example a couple of bags of potatoes, and drive a dozen kilometers on a bumpy road, it stops opening.
If, after pressing the button, the mechanism does not return back, then you will have to open it from the interior by pressing the latch with a screwdriver. The plate on the lock body has disengaged and the thrust stroke has sharply decreased, which does not allow the force to be transferred to the latch.
The design of the drive is puzzling. Even if the developers were faced with the task of minimizing the cost and high manufacturability of the assembly, this is not an excuse.
Any component of the car must work out its service life without failures. The plastic insert in the pressure unit is fixed by bending the latch on the lock body.
The lug is a few millimeters in size and easily breaks after several disassemblies necessary to clean the rotating mechanism.
The new case is sold only assembled; you most likely will not be able to buy the sleeve separately. Moreover, such a solution to the problem will not ensure durability. There are descriptions online of repairing a unit using a self-tapping screw screwed into a hole drilled in the eye.
That's exactly what I did, after having to open it from the inside with a screwdriver a couple of times. As it turned out, this method is too short-lived. The ear broke very quickly.
Recommendations
Comments 20
I also want to do this for myself, maybe one of these days I’ll do it
great post. A question from a teapot, so to speak. I don't know much about electrics. But still not enough to pull out the right one from the pile of wires. The question is exactly this. I have a viburnum with an alarm. Moreover, when the electrician installed it, he said that the trunk would be opened with the alarm key fob and with the standard key fob, and said to buy an additional regular four-pin relay. I installed the activator - but it’s not convenient to open it from the key fob - I want to embed a button into the interior. Maybe someone can tell me where and where to get what.
Here you can do everything elementary. The button is placed in the gap of the positive wire. It takes a long time to draw a picture, I’ll try to explain it with my fingers. Take a two-contact button that works to close. Connect one contact to 12V, the other to the plus of the activator. It is advisable to place a diode in the gap in the power wire that goes from the signaling to the activator. Everything will work.
Well, thank you. Almost understandable. I can most likely figure this out.
Here you can do everything elementary. The button is placed in the gap of the positive wire. It takes a long time to draw a picture, I’ll try to explain it with my fingers. Take a two-contact button that works to close. Connect one contact to 12V, the other to the plus of the activator. It is advisable to place a diode in the gap in the power wire that goes from the signaling to the activator. Everything will work.
Hello! Please tell me if it's not difficult. I installed the activator, now the trunk can be opened with the factory key fob. When the car is started, the key fob won't open it. But it opens if you press the unlock button on all doors. Everything would be fine, but I close the doors with a button in the cabin when I drive or stand in remote places. Then I open it in the city, and naturally, the trunk opens with them, I have to get out and slam it. How to prevent the trunk from opening with this button. And also, I want to make a separate button to open the trunk from inside, where should I connect it?
Read more: Gazelle coolant pump
Hello. Read the article carefully, it describes exactly your problem with the door opener button. You'll have to solder the circuit.
Thank you, I have already done the standard wiring. I set the activator to unlock, not to open. Now you only need to press the button on the trunk. In the blog there is
Here’s a question: I did it approximately according to the same scheme), but even after cutting down the second tooth I can’t open the door, I have to press the button on the doors, and maybe I need to change the stops or what?
I don’t quite understand, the button in the doors opens the tailgate, but not the remote control?
thank you, I figured it out) just not a big electrical glitch))
it turned out great) I also spent a long time doing everything, all I have to do is put the button on, but it doesn’t open with my key and for some reason the doors open along with the trunk, I don’t know why
Thank you! I don't quite understand about the doors. When you press the 3rd trunk release button, do the doors open?
Yes, such garbage, because of this I won’t use the remote control, I’ll have to make a button in the door, that’s enough
Hmmm...interesting garbage...I haven’t come across anything like this yet. It’s a pity that you don’t live in Donetsk, it would be possible to figure out what and how
Electric drive: easy installation
The manipulation algorithm is very simple. Here you will need to make the rotary plate together with the rod yourself. The wiring is laid directly to the lock and connected to a special control unit. When the car is “disarmed”, the electric drive of the luggage lock is activated following the unlocking of the button responsible for opening the rear door of the Lada Kalina.
The whole essence of the action comes down to connecting the electric lock to two cable lines. You can buy the product at a specialized retail outlet. The end of the luggage compartment will need to be hidden in order to prevent the risk of moisture getting into it. If this is neglected, then with the penetration of water a short circuit will be observed in the designated area.
Read also: Organization of pre-trip and post-trip medical examinations
Much attention should be paid to the area near the door hinges, because broken wires are a common occurrence here. To prevent this, it is recommended to regularly monitor this section of the highway.
Before starting the procedure for installing the electric drive in a Lada Kalina car, you will need to remove the plastic trim. Here you need to be careful not to damage the specified protective element.
The choice of a lock for LADA Kalina should mean that there is no subsequent need for modifications before installation. This means drilling additional holes.
An important point in the installation procedure is the laying of electrical lines. For these purposes, you will need about 3.5 m of appropriate cable. You can use standard wiring suitable for the rear door. The power supply can be a cigarette lighter socket
It is also important to install the fuse correctly
We do all switching in LADA Kalina in accordance with the diagram.
How the back door on a Lada Kalina should work correctly
When operating domestically produced cars, you have to deal with both acquired and factory defects. The rear door of the Lada Kalina is more often than other body elements exposed to physical impact during driving, includes a number of technically complex devices, and has a high percentage of defects during assembly line assembly. The main components of the normal operating process of the door:
- Correct geometry of fit of the lateral and vertical sides to the body, drain, sills of the car, equal gaps between them.
- Clear operation of the locking mechanism, installed door closer, and central locking lock.
- No extraneous sounds when moving the machine, including over rough terrain or dirt roads.
Careful car care increases its service life. Sometimes, if problems arise, it is enough to change the seal, tighten the fasteners, and lubricate the components and body parts.
Lada Kalina rear door repair
Removing the rear door trim
| 1. Unscrew the lock button by hand | 2. Having turned the inner handle so that the screw securing it to the lever is accessible, use a Phillips screwdriver to unscrew the screw and remove the handle. For the current full text about illegal actions in Ukraine, see here |
| 3. Using a screwdriver with a thin blade, pry up two decorative plugs and remove them from the holes in the armrest handle. | 4. Using a Phillips screwdriver, unscrew the two screws securing the armrest handle |
| 5. Remove the handle | 6. Use a screwdriver to press out the power window handle socket. |
| 7. Pull out the latch and remove it. | 8. Remove the handle and socket from the shaft. |
| 9. Using a screwdriver, placing soft material under it, press the lower edge of the upholstery away from the inner door panel, overcoming the resistance of the pistons. It’s better to start from the bottom, gradually moving the screwdriver around the entire perimeter of the upholstery. | 10. Remove the rear door trim |
| 11. Location of ten pistons on the inside of the upholstery | Install the rear door trim in the reverse order. |
Replacing rear door glass
Remove the rear door trim. We lower the glass so that we can unscrew the screw securing the decorative glass trim.
| 1. Use a flat-head screwdriver to pry up the edge of the inner glass seal. | 2. Lift the seal up, applying the necessary force, and remove the inner glass seal from the inner door panel. |
| 3. Bend over the edge of the seal and use a Phillips screwdriver to remove the self-tapping screw securing the decorative glass trim. | 4. Using a slotted screwdriver, press out the upper corner of the decorative trim and remove it. |
| 5. Remove the lower part of the seal from the door. Raise the glass. | 6. Using a 8mm socket, unscrew the bolt securing the glass guide at the end of the door |
| 7. Take out the guide. Roll down the window | 8. From the outside of the door, use a slotted screwdriver to pry up the decorative retainer of the glass seal. To avoid damaging the paint, place a soft material under the screwdriver, for example, a piece of fabric folded several times. |
| 9. Pull out the retainer from the outer seal and remove it. | 10. Remove the outer glass seal by pulling it off the front decorative clamp and lifting it up. |
| 11. Using a 8mm head, unscrew the two bolts securing the glass holder to the window lifter slider. | 12. Remove the glass from the door. Install the rear door glass in the reverse order. |
DIY lock repair step by step
I had to implement it in my own way, so that I could forget about the problem forever.
To work, you will need a minimum of tools - a set of 8, 10 wrenches, a drill, a screwdriver, a vice and a file.
The materials you need are a piece of metal perforated profile or DIN - 35 rails, approximately 350 mm long, a pair of M5-M6 screws, with nuts and spring washers, several “hedgehog” fastening inserts, well known to all owners of VAZ cars.
First of all, remove the plastic cover. To do this, you need to unscrew the 2 screws securing the pocket handle and remove the cover plate by slightly prying it up with a powerful screwdriver from below. The force should be applied in the downward direction (open upward) to avoid breaking the guides.
How to adjust the rear doors on Lada Kalina
The popular Kalina car from the Lada manufacturer has incorporated advanced technological solutions into its design. There were a number of inaccuracies in assembly and body defects.
Car doors do not open well
The most common manufacturer defect is that the rear and front doors on Kalina are difficult to open. The flaw occurs in used cars and those that have just come off the assembly line. The reason is incorrect or insufficient adjustment of the door handle or the door itself. In used cars, the doors become loose over time. Uneven gaps form at the joints with the housing components.
The problem can be solved with the help of a service center or fixed by yourself. The second option is more acceptable for experienced drivers, experienced auto mechanics and those who like to experiment with their car.
First of all, it is important to find out the reason why the back door on a Viburnum does not open well. An external inspection of the defect is carried out, comparison with the original position of the part.
Based on the results of the check, you can adjust the elements yourself.
In a similar way, malfunctions of the front and rear doors are eliminated, including the trunk door, if the car has a hatchback or station wagon body, but in this case there are nuances.
Door adjustment process
To eliminate defects in the operation of door elements, it is necessary to find out the cause of its occurrence. In some cases, treating moving parts of the mechanism with lubricants helps. The seals between the trim and the body are subject to wear and tear, and they also require replacement periodically. If manipulation of the replaced elements is not enough, technical intervention is required. Regulation is necessary for the following factors:
- the gap in the extreme part of the structure causes the door on the Kalina car to not close tightly;
- The problem is caused by a faulty door lock.
Violation of the geometry of the structure in the doorway is the most common cause of the defect. Gaps can appear in any part of the joint with the body. Most often this happens from above and below. The adjustment in these cases is similar, but has minor differences.
Adjusting the bottom of the door
First of all, it is necessary to establish access to the inside of the lock from the outside. To do this, the glass is completely lowered. The door closes with light blows on the bottom of the casing. During the process, the size of the gap in the lower part of the structure is controlled
When the correct result is achieved, the door is carefully opened and slammed shut. If necessary, repeat the procedure
It is worth monitoring the force of impact and correcting the geometry of the doorway.
This method is used at manufacturing plants at the final stage of car production. The only difference from regulation at home is the availability of technological devices and tools.
Adjusting a door with a large gap at the top
Failure to correctly position the door is not always due to a manufacturing defect. The appearance of an enlarged gap in the upper part of the doorway is often associated with natural processes. Poor quality roads, driving on rough terrain, and heavy weight of the structure lead to the door sagging relative to its original position.
Restoring the position of the element relative to the body is carried out by a similar physical impact in a state of incomplete closure. The glass goes down completely. The door closes with one click. In this state, the size of the gap is regulated by moving the door toward or away from you, depending on the force applied.
With heavy trunk doors of Lada Kalina hatchbacks and station wagons, the procedure is more complex and technological. The design is designed in such a way that when slammed, the lock tongue snaps into a metal bracket. The specific fastening of the lock with bolts creates additional instability. The bolts should be found and tightened with a screwdriver. The lock is coated with silicone grease. Checking for opening and closing will indicate further actions. If the defect has not been eliminated, rubber stops are used to strengthen the drive traction of the luggage lock. However, you should not overuse force to install them, as this may have the opposite effect.
Installing an activator for locking/unlocking the trunk lock on a Lada Kalina hatchback
I have long wanted to open the trunk with a button, everyone knows that in Kalina it is very difficult to do this, for example, I got into the car, started the engine and need to throw something into the trunk, to do this you need to turn off the engine, get out, insert the key, open the trunk, in general it is very inconvenient! And after washing in winter, the lock may freeze so much that you will have to drive until spring)
The question, as always, began with studying the topic, there are 2 types of lock buttons, the old and the new (since 2010) model.
I can say I was lucky, the old-style lock button and the trunk operation algorithm I need looks like this (if yours is different, then the new-style button)
What is most interesting in any Kalina is almost everything to unlock the trunk with a button, everyone saw a third button on the key fob just for opening the trunk (the button needs to be pressed and held for 3 seconds), wires are laid in the trunk for the activator and the standard place for its installation is in trunk, you need to add a little!
General view under the trunk trim:
Connector for connecting the activator:
In general, you will need to buy an activator, absolutely any one, I took this one:
I modified the ends of the wires a little so that they fit into the standard connector:
You will need to make the following part, it is called a rotary washer:
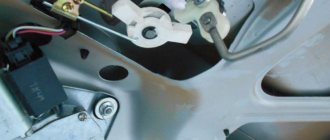
Then you can remove the trunk trim (attached to the pistons), take out the retaining ring and the plastic pusher (see photo 1) and try on the parts, they should look like this:
In these 2 photos below the principle of operation, the activator pushes the rotary washer:
You will also need a regular washer with an internal diameter = the internal diameter of the plastic pusher. The thickness of the washer must be very small so that the entire system can be assembled, here is a photo:
After that, we put everything back together, first insert the plastic pusher, then the rotary washer, then the nut. We fix everything with a locking ring (if it doesn’t fit, then you need to make the washer even thinner)
We insert the activator into a place specially prepared for this:
We connect the wires (I wrapped them with electrical tape just in case so that they would stick better)
Installing and adjusting rods:
Video of how it all works:
Now I’ll tell you how everything works in words!
Firstly, the door does not open on its own, you still need to press the open button, but the key is no longer needed! (If you wish, you can use the key if the battery is suddenly disconnected). Here are some examples of work:
— On the remote control, press the door open button once, only the driver’s door will unlock. Press the button again - the passenger doors and trunk will unlock! When we close the car, all the doors and trunk are blocked (it’s no longer possible to leave the trunk open, but this has happened)
— If you press and hold the trunk open button on the remote control for 3 seconds. then only the trunk door will unlock!
— You can also use the door open/close button from the interior. You can open/close the trunk together with the doors!
In general, now everything has become the way I would like it to work initially! But why hasn’t AvtoVAZ done this at the factory yet?!
Issue price: 150 rubles
Article from here: https://www.drive2.ru/cars/lada/kalina_hatchback/kalina_hatchback/dia2/
The placement has been agreed upon with the author Timofey Golubev.
next article:
Rain sensor DDA-25 Lada Kalina hatchback
After I installed good frameless wipers and fan windshield washer nozzles, all that remained was to do
Rating 4.50
Installation of the locking device drive
Removing the fifth door opening button is the easiest thing. It is more difficult to seal the remaining hole. This can be done using a special putty. One of the tricks is to process the hole cavity so that the surface becomes as rough as possible. This will create optimal adhesion to the putty. Next comes sanding, priming and painting. The work can be done independently without special training and practical skills. After that, you don't have to worry about aesthetics.
Of course, all dismantling work can be carried out only after the installation of the electric drive is completed, as well as the installation of the trunk opening button in the cabin. The trunk lock drive and how to install it are all relatively clear. Both the location and the connector of the wires in Kalina are determined in advance for this.
But where to install the button will have to be decided by the owner himself. The two most popular places are the dashboard in front of the gear shift and the driver's door. The first method is convenient because the button can be reached from almost anywhere in the cabin. The button on the driver's door is primarily a convenience for him.
Once the location for installing the button has been selected, it is time to install the electrical wiring. About 4 m of wire will be required. The connection point is located under the rear seat. The connection is made to connector 13, it is signed, so searching will not cause any difficulties. The work can easily be done independently. Thus, it became clear how to make a trunk lock drive.
