Home / Articles / FLS repair: malfunctions and ways to eliminate them
The situation when the fuel level sensor does not work correctly is familiar to many motorists. Of course, it does not lead to global consequences, but it still causes a number of inconveniences in the operation of the vehicle. The most common today are float sensors, also called potentiometric. Their working element is a float made of metal or plastic and placed in the fuel tank. In the process of changing the amount of fuel, it changes position, which entails a change in resistance. Based on this, the fuel level is calculated and the corresponding data is displayed on the instrument panel.
Float sensors are available in two varieties:
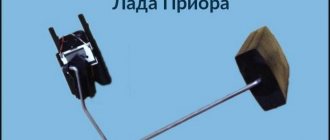
- FLS lever type. In it, the float is connected to the sliding contact using a metal lever. Changing the position of the float moves the sliding contact, which changes the resistance. The lower the resistance level, the higher the current level, the higher the indicator arrow rises. If this pattern is violated, we can conclude that the fuel level sensor is faulty. Such a device is considered universal in use, it is equipped with domestic cars (for example, VAZ) and in foreign and new Russian cars it is attached to the body of the pump section;
- Spring type FLS. The main element is a tube; a float is placed in it, which moves along a guide. Resistance wires are installed parallel to the guide. This sensor is mainly installed on large vehicles; it can be found in BMW models.
Replacement allowance
If you notice that the regulator no longer works, you will need to replace it.
This procedure can be done at home. Before you begin the process, prepare:
- new regulator;
- Screwdriver Set;
- a set of keys.
Stages
So, the replacement procedure is performed as follows:
Since the controller is part of the fuel pump structure, it will not be possible to dismantle it without touching the module as a whole. To gain access to this structure, it is necessary to dismantle the lower part of the rear seat, and then remove the luggage compartment upholstery. Using a 7mm wrench, you need to unscrew the screws on the right and left sides, in particular, we are talking about the gas tank cap latches. These screws also secure the upholstery to the sides. Having done this, you will see 8 more screws that secure the edge of the cover; they also need to be unscrewed. The next step is to remove the entire fuel tank cap, this can be done by moving it forward a little. After these steps, you will see the upper part of the pump, you need to dismantle the wire block that is connected to the device, for this you may need a 17mm wrench. You will also need to unscrew the nut of the fuel supply line from the fitting
In this case, there is no need to rush, it is better to wait a little, but do everything carefully and correctly. Before completely unscrewing the cap, make one small turn - this will allow you to get rid of the pressure that has built up in the system. Next, along the diameter of the cover you can see 8 more small nuts, you need to unscrew them, for this you use a wrench, but it will be more convenient to do this with a ratchet. When dismantling the fuel pump, it should be lifted up, then turned slightly clockwise, and then tilted. Such actions will prevent damage to the device's float. After dismantling the module, we begin to disassemble it
Using a slotted screwdriver, you need to move the locking ring located directly on the module. After this, you can remove the cover itself from the structure. You need to remove the wire from the pressure sensor terminal, after which the fasteners are pressed directly from the cover and the blocks with wiring from the fuel pump are disconnected. The controller latches are detached, after which the device itself slides along the grooves of the case. The regulator is dismantled and replaced with a new one.
Such actions will prevent damage to the device's float. After dismantling the module, we begin to disassemble it. Using a slotted screwdriver, you need to move the locking ring located directly on the module. After this, you can remove the cover itself from the structure. You need to remove the wire from the pressure sensor terminal, after which the fasteners are pressed directly from the cover and the blocks with wiring from the fuel pump are disconnected. The controller latches are detached, after which the device itself slides along the grooves of the case. The regulator is dismantled and replaced with a new one.
Sorry, there are no surveys available at this time.
How to fix the problem?
If the fuel sensor is not working correctly, repair work will be required. For each car model, the process of dismantling this device may differ significantly and may also require special tools. However, the general steps are similar and are as follows:
- the negative terminal is disconnected from the battery;
- access to the device is provided by removing the trunk trim;
- unscrew the mounting bolts that fix the position of the sensor, and remove the plate;
- the product is dismantled, the metal elements are cleaned (if it will be used again).
It is necessary to remove the FLS only after disconnecting all wires and foreign elements. The product should be removed easily, without visible effort. On older cars, the device may become stuck: in this case, it will need to be lubricated with a special liquid (for example, WD).
Types of fuel level sensors
Before considering the question of how to check the fuel level sensor, it is worth studying what types of such devices there are. Modern sensors are characterized by a certain number of advantages, among which are:
- reliability, accessibility and simplicity of design;
- high levels of measurement accuracy;
- low cost.
Among the disadvantages is the presence of built-in elements that are susceptible to frequent breakdowns due to oxidation.
The fuel system of modern cars uses devices of two main categories - lever and tubular. The main similar element of such devices is the float. For their manufacture, thin sheet metal, foam and hollow plastic are used. The remaining details of these devices are somewhat different, so each type must be considered separately.
Lever type
Such devices consist of a potentiometer, a float and a lever. The float is connected to the sensor contact via a small lever made of high-quality metal. By their design, sensors of this type are a sector divided into strips of metal of a special resistive type.
Such sensors can be mounted separately or in the unit itself responsible for fuel supply. Thanks to this versatility, the sensors can be used on almost all types and categories of fuel tanks.
Tubular type
In this sensor, the float moves inside the hollow part of the tube. There are also special wires that create a certain resistance. At the ends there are slip rings for the included float. Among the main features of such a device are:
- High level of resistance to vehicle vibrations.
- The main element is completely enclosed, which protects contact with the fuel being used.
- The float here is connected to the lever via a magnet.
The magnet moves along a sector where metal plates of different lengths are installed. The generated magnetic field creates a special electronic signal that determines the current level of the fuel mixture in the fuel tank at the time of measurement.
Why does the car fuel level indicator not work or lie?
Fuel level sensors often fail not only when the float is damaged. The reason for the needle stopping at zero can also be:
- electrical circuit break due to oxidation of contacts or faulty wiring;
- failure of the fuel indicator;
- Potentiometer failure.
Pointer jumps are associated with contamination, wear of the rheostat and moving contact. Abrasion of the surfaces of these elements, the formation of oxides and plaque leads to disruption of contact between them. The minimum fuel quantity indicator may not work due to a burnt-out light bulb or broken electrical wiring.
If the fuel gauge does not work, the problem may lie not only in the sensor, but also in the gauge itself. For example, sometimes the movable winding of the indicator jams, because of this the arrow cannot move normally. Often the fuel level sensor may not work after driving off-road or in snowy areas. Breakdowns are caused by aggressive chemicals entering the electrical circuit, which damage contacts and wiring.
Other causes of malfunctions include:
- blown fuses;
- a factory defect in the float, as a result of which fuel gets inside it;
- formation of deposits on the float movement guide in a tubular type FLS.
Sometimes you may notice that the fuel gauge needle does not work as usual, but is always at the top mark. The most common causes of this malfunction:
- lack of connection between the float and the moving contact;
- short circuit of the wire that is connected to the indicator, resulting in a decrease in the level of resistance in the electrical circuit.
If the measuring unit and the indicator itself are in good working order, but the arrow still shows incorrect data, it is worth removing the fuel level sensor and adjusting the device. The float rod is bent in the desired direction, after which the readings are checked. To ensure maximum accuracy, the procedure is repeated several times.
Typical faults
The second part of the lever is, in fact, an additional contact. If you place it in a certain position, the circuit regulating the process of replenishing with spare fuel will be closed. In the domestic “ten”, the volume of reserve fuel is about 4-6.5 liters.
Typical breakdowns
Definition of marking
There are several typical malfunctions that even a beginner can cope with.
- The fuel level indicator suddenly changes its values. Most likely, the contact track has worn out due to the slider. If the wear is not severe, it is enough to simply bend the fasteners of the slider so that it is slightly above the problem area. But when wear is severe, the contact track changes completely.
- The indicator arrow is at a level that is not true. For example, it shows an empty tank even though you just filled up. This will require some adjustment. Disconnect the sensor from the gasoline tank and adjust the indicator. It is enough to move the arrow from the value at which it is stuck to zero. Most often, this measure helps.
- The arrow barely moves and cannot reach the desired position. In such a situation, the tongue bends slightly, which allows you to increase the range of the pointer arrow. It is possible that the contacts on the pointers have broken or come loose. To do this, look under the dashboard and check the condition of the wiring.
- It is possible that the fasteners securing the wires have become loose. They need to be tightened up. If the instrument panel is in good condition, examine the entire wiring path. A short circuit often occurs, causing the measuring device to stop working.
https://youtube.com/watch?v=uo_Qwbp4QKY
If all the measures taken have not yielded any result, the sensor continues to show complete inoperability, you will have to replace it.
FLS fuse
Sudden sensor failure suggests a blown fuse. But the on-board network of a modern car does not provide a separate fuse to protect the fuel supply circuit of the FLS. Everywhere, the indicator and meter circuit is part of a whole group of sensors and actuators, protected by a common fuse for the instrument panel. Therefore, in the event of a short circuit in the sensor circuit, the fuse-link of the instrument panel burns out.
How to replace the fuel level sensor and how to check it on a VAZ 2110-VAZ 2112?
Note! When replacing an old sensor with a new one, try to buy the same type that was installed, the thing is that the sensors all look similar to each other, but they are different, and if you buy with the wrong marking, then there is a chance that it will work for you it won’t, or it won’t be as it should be!
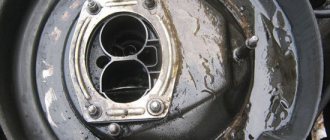
Removal: 1) Essentially, this sensor is changing and is not so difficult, but the first thing you need to do is remove the fuel pump from the car, you can read more about how to do this in the article entitled: “Replacing the fuel pump with "VAZ".
2) When you have removed the fuel pump, proceed to disassembling it and removing the sensor. To do this, use a screwdriver (Thin screwdriver) to move the retaining ring (Indicated by the red arrow) from the upper groove to the lower one, which is indicated by the blue arrow, thereby giving yourself the opportunity lift the cover of the fuel pump, and after it is lifted, disconnect the wiring from the fuel pressure regulator terminal as shown in photo 2.
Note! This locking ring is located on only one guide; there are essentially two guides in total, but on one of them there is a spring and a locking ring, so when the locking ring is moved to the very bottom, lift the cover to the highest level!
3) Now you will need to deal with the wires, namely, disconnect all of them so that they do not interfere with the removal of the sensor, we proceed to disconnect the first block of wires, to do this, simply squeeze out the latch that secures it (It is indicated by the arrow) and then disconnect the block and make sure that she hung.
4) Then move on to the second block of wires, it is attached a little differently, but disconnecting it will also not be difficult, to do this, use a screwdriver to press the latch (It is indicated by an arrow) and then disconnect the block as shown in the small picture.
5) And finally, you will need to slide the sensor along the grooves (It moves in them) and by releasing the two clamps that secure it (see photo 1), completely remove the sensor from the fuel pump as shown in photo 2.
Installation: The new sensor is installed in the same way as it was removed, only in the reverse order of removal it will all need to be done.
Checking the fuel level sensor for serviceability:
1. Using an ohmmeter, checking the sensor will not be difficult, but this can also be done without a special device, first let’s talk about how to check using the device, first you will need to connect the leads from the ohmmeter to the sensor as shown in the figure below, and when the leads are connected, you will have to move the float of this sensor, in the lowest position of the float the device should show a result of 285–385 Ohms (This indicates that the tank is empty), at the middle positions of the float, that is, when the tank is half full, the device should give a value of 100–135 Ohms and, accordingly, at the very top it should show 7–25 Ohms; if there are other values, then the sensor is faulty.
Note! If you want to clearly see how to move the float and what value the device will produce, then watch the video below, which shows everything clearly!
2. What should those who don’t have a device do, you ask? Let's explain! Without a device, you can also check the sensor, in this case, without removing the sensor (You will just need to remove the fuel pump as much as possible), turn on the ignition on the car and then move the sensor float to different positions, respectively, if the float is at the very top, then the arrow of the fuel level indicator will also have to show that the tank is full, after it has shown this, lower the float and make sure that the indicator arrow has fallen to the very bottom, if at some values the arrow shows the wrong value, then in this case bend the rod and check everything again, by doing so you will adjust the sensor and it will work normally for you.
Additional video clip: You can see more details about how to change the sensor in the video below, in it the disassembly of the fuel pump is shown and the replacement of the sensor is explained in detail.
Causes
Now you need to find out why this sensor on your car does not display the current fuel level correctly and what is causing this.
There are several potential reasons. Therefore, each of them needs to be considered in detail.
- Violation of the tightness of the installed float. It is found on sensors where the float is made in the form of a ball made of fragile plastic. With mechanical shocks, as well as under the influence of extreme cold, the material is destroyed. If the seal is broken, the float simply remains on the surface of the liquid or sinks. As a result, the controller shows that there is no fuel. For repairs, it is necessary to replace the float separately, or the entire sensor. Much less often, the float part is disconnected from the lever and begins to move independently inside the container.
- Lever damage. Due to its deformation, the float loses mobility or transmits information incorrectly. The cause of the problem is long driving. Moreover, on uneven and bad roads. Or in violation of the rules for dismantling the fuel unit from the tank. You can try to restore the lever. But more often repairs are carried out by replacing it.
- Deformation of the controller body. Because of this, the installed resistive elements give incorrect readings, or the lever is damaged and does not record data correctly. The reason is the filling of low-quality flammable liquid, or mechanical stress.
- Breakage of resistive elements. A common reason why the FLS stops working correctly. It occurs due to natural causes. That is, resistors wear out from a long service life. The contact between the elements disappears, and the arrow ends up at zero, or simply twitches.
- There is no contact on the electrical circuit section. This happens on those contacts that can simply oxidize over time due to exposure to moisture or the fuel itself. Wires are damaged, the integrity of the insulation is compromised, breaks occur, etc. Sometimes the reason lies in the electrical connectors.
- FLS wire shorted to ground. This occurs precisely with the signal wire, which begins to short to ground. As a result, the FLS indicators become incorrect, and the resistance tends to zero. No matter how much fuel is filled, the sensor will show a fictitious full tank.
- Burnt fuse. The car has a sensor that is responsible for the FLS. The specific fuse number should be found in the owner's manual for your specific vehicle.
- Failure of the fastening on the housing inside the fuel tank itself. As a result, the sensor fell into the tank or was distorted. Usually accompanied by the spread of fuel odors into the cabin.
- Break on the signal wire side. Found on tubular sensors. Then the arrow constantly indicates that the fluid tank for operating the internal combustion engine is empty.
- Plaque formation. Another characteristic feature of tubular type controllers. Plaque accumulates on the guide post. This interferes with the normal and free movement of the installed float. The deposit appears due to the filling of low quality fuel. The arrow stops in one static position.
- Damage to the magnetic sensor, wires. Relevant for contactless fuel level monitoring devices. Some FLS models of this type have control and control boards. Problems happen to them too. Then the sensor completely fails, and the correct fuel level is not displayed.
Practice shows that most often problems are observed from the resistive elements, as well as the float. They wear out over time and can no longer display and transmit data correctly.
Don't immediately blame the sensor. There is a possibility that the arrow of the device is broken, or there are faults on the side of the wires connecting the elements.
Varieties
It is impossible to carry out repairs without knowing which FLS we are talking about in a particular case.
The following types of special monitoring sensors are now installed on cars to monitor fuel levels:
- Lever. This is a float type of device. The oldest and structurally simplest controllers. The design includes a potentiometer, lever and float. The advantage is that the scheme is simple and reliable. Plus it's inexpensive. The downside is a significant error. If the road is uneven, due to the movement of fuel in the tank, the arrow on the vehicle dashboard begins to move in different directions.
- Tubular. Many cars use a tubular type sensor to display the current fuel level. Also a popular float variety. The structure includes a float, a hollow tube, a guide post, a signal wire and a contact group. The accuracy of displaying the fuel level is quite high, since the float is always located in limited space. That is, inside the tube.
- Electronic. Increasingly, the rating, which contains monitoring devices for displaying the real current fuel level, includes electronic types of sensor. This is the newest variety mounted on modern cars. It provides for the use of its own control unit. They are also called contactless sensors. This is due to the principle of their operation. The operating lever is located directly on the surface of the fuel. The reading device is connected to it due to the operation of a magnetic field. The error of such devices does not exceed 1%.
Each type of sensor has the potential to fail completely. The only question is whether the motorist will be able to solve the problem on his own, or whether he will have to turn to specialized specialists.
Causes of malfunction
The reasons why the fuel level sensor does not work or it shows incorrectly are the following faults:
- The float has lost its seal. This situation is relevant when a ball made of fragile plastic is used as a float, which can crack as a result of mechanical stress or as a result of operating the car in severe frosts. In this case, the float will be inside the liquid or, more often, it will simply sink and fall to the bottom. The result will be a constant reading from the device that there is no fuel in the tank. Repair measures include replacing the float or the entire assembly. Another rare option is that the float can simply detach from the lever on which it is attached and “go off on its own.”
- Deformation of the lever that holds the float. As a result, the float may lose mobility or reflect incorrect information. Often this situation occurs when the fuel module is inaccurately removed from the tank, but sometimes even as a result of long-term operation of the car on roads with uneven surfaces, that is, with constant vibrations while driving. You can try to return the lever to its original shape, but most often the corresponding lever is simply replaced with a new one.
- Damage to the sensor housing. As a result, the readings of the resistive elements may change or the lever that takes the corresponding readings may be damaged. In this case, the reason why the sensor does not show the fuel level correctly is the use of low-quality gasoline or mechanical shock loads on the part.
- Failure of resistive elements. This is a fairly common reason why the fuel level sensor does not work. Elements on the rheostat fail for natural reasons, that is, as a result of abrasion during long-term use. It is possible that the wear is partial, for example, in the middle. In this case, the instrument needle will twitch. It is also possible that there is no contact between the sliding element and the resistive track due to damage or wear of the resistive coating or loosening of the slider foot pressure. With such a malfunction, the arrow will lie at zero.
- Lack of electrical contact in a certain section of the circuit. As a rule, on contacts that are oxidized either by moisture or fuel. The wires, their insulation, or breakage may be damaged. There are also sometimes problems with electrical connectors.
- The signal wire has a short to ground. In this case, the value of its resistance will be distorted and tend to zero. With such a malfunction, the level sensor incorrectly displays the level, transmitting information that the tank is completely filled.
- The fuse responsible for the operation of the fuel level sensor has blown. The fuse number must be found in the electrical diagram of the specific vehicle.
- Failure to secure the sensor on the fuel tank body. For example, with a skew. As a rule, in such a situation, the smell of fuel spreads outwards, in particular, the smell of gasoline will be heard in the cabin.
- There are cases when the resistive board on which the slider moves simply falls off the fastening solder.
- Tubular fuel level sensors may have a broken signal wire. In this case, the arrow will constantly show an empty tank.
- Also, tubular sensors are characterized by a coating that can form on the guide post. This will naturally make it difficult (and even impossible) for the float to move. Plaque is usually formed as a result of using low-quality fuel (with a large amount of paraffin, gasoline instead of gasoline). In this case, the instrument needle will freeze in one position, and not necessarily in one of the extreme ones.
- For non-contact sensors, the magnetic sensor and/or its wiring may be damaged. Some of them have a special control and control board installed. The problem may be with her too. In this case, the sensor usually fails completely, that is, it does not indicate the fuel level at all.
Most often, problems arise with floats or resistive elements, which wear out over time and stop transmitting correct data. But note that when the fuel level is not displayed, it is not always the sensor that is to blame. Often the arrow does not work, and here the device on the panel, which, in fact, is a potentiometer, is to blame. Therefore, if the fuel sensor does not indicate the fuel correctly, then you need to remove it and check it with a multimeter and make a visual inspection.
Why the fuel level sensor does not work
Despite the simplicity of the design, fuel level sensors often fail, which leads to incorrect readings or may not work at all.
Possible FLS malfunctions can be divided into electrical and mechanical.
As for electrical circuit malfunctions, everything is simple: problems often arise due to oxidation of contacts, blown fuse, or damaged wiring.
But there are more mechanical faults:
- wear of potentiometer sectors;
- lever bend;
- failure of the float seal.
With such malfunctions, the fuel level indicator may not work or work intermittently - the arrow twitches, constantly points to an “empty” tank, etc.
Location
To begin repairs, you need to become familiar with the wiring diagram of automobile fuel level sensors, as well as their location and types.
The first question is simple but important. This is where the required fuel level sensor in the car should be located. Everything is simple here. It is located directly inside the fuel tank. The only difference is in the design of the controller itself.
Also, sometimes the sensor is built into the design of the fuel module, that is, it is a single integral device. It consists of the following components:
- current level display sensor;
- check valve;
- filter;
- sediment for pumping fuel.
Or it can be installed separately. Somewhere on the side or in the middle of the tank. This scheme can be used on diesel and gasoline engines.