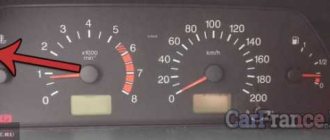
The VAZ-2115 fuel level sensor is a device that allows the driver to have no doubt about the amount of gasoline in the tank. Thanks to it, the driver always knows how many liters are currently present in the car and can calculate his route to the nearest gas station.
To ensure accurate readings, the fuel level sensor is located in the gas tank. Thanks to a float that constantly moves depending on the amount of fuel. The readings are displayed on the dashboard, and the driver always knows the amount of gasoline in the gas tank. When there is less than 6 liters of gasoline left, the float moves to an additional contact group, which allows you to light a light on the dashboard to notify you of the need to refuel soon.
Why doesn't the fuel level sensor work? Common causes and repair methods
Probably many people have had to face the question: why doesn’t the fuel level sensor work?
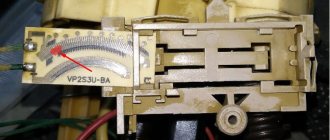
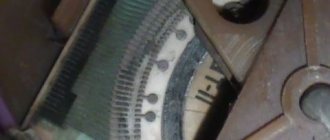
And the following situation also happens: after starting the engine, the sensor shows that the tank is empty, and while driving, the value on the sensor reaches the desired level. The following option is also possible: the needle is stuck at zero, but in fact there is still half a tank or the values on the dashboard are constantly changing. It can be very difficult without a sensor working properly, especially on long trips. You need to constantly keep in mind the moment of the last refueling and its volume, and keep a canister of fuel in the trunk just in case. Due to the mass of inconveniences caused by one sensor, we will look into the problem in this article. Why does the fuel level sensor not work? What is the reason for the breakdown? In this article we will try to describe possible options for sensor failure, as well as the reasons for the failure in readings. The most commonly encountered sensor can be considered potentiometric. This prevalence is due to its simplicity, low cost and clarity of the obtained values. However, it also wears out very quickly, and oxidation of the tracks is possible. Due to the high prevalence of this type of sensor, we will consider possible failure problems using its example. Sensor readings fluctuate. The reason for inconsistent sensor values is wear of the contact tracks on the board. The tracks wear out due to the constant impact of the fuel sensor slider. One option to solve this problem with minimal losses is to bend the slider so that it is higher than the worn-out area on the board. However, if a significant area has been wiped, then tucking the problem will not solve the problem. In this case, you need to replace the sensor with a new one. Before replacing the sensor, you need to study the instructions and read there information about its resistance. This is very important, since for one brand of car there may be sensors with different resistances, and if you install an indicator with an incompatible resistance, it will be very difficult to navigate the readings. The best option is to remove the old device and take it to the store.
The fuel level sensor is “lying” The fuel level indicator can either underestimate or overestimate the practical values of the amount of fuel. With such symptoms, adjusting the sensor may help. There are two types of adjustment for this type of malfunction.
- First: move the float pin to two extreme positions, while the arrow on the indicator should also fall into the two extreme positions 0 (empty) and 1 (full). If in the extreme position of the pin the arrow does not set to “0” or “1”, then it is necessary to bend the pin so that it remains movable and adjust with the bent axis;
- Second method: disassemble the instrument panel and get to the fuel level sensor itself, remove the arrow from it and reconnect the wires to the sensor. Start the car and let it sit for about 10 minutes. Then set the pointer axis to the extreme position “1” and connect the pointer.
If the sensor is stuck at “0”, you need to disassemble the dashboard and again get to the fuel indicator, find the contact wires going to it. There will be nuts that need to be unscrewed, cleaned with sandpaper (to prevent oxidation) and put back, tightened tightly
It is also necessary to inspect and clean all the masses on the body (special attention to the mass under the handbrake). With this problem, it may also be possible that the float is jammed in the tank.
Well, as the most common option, the fuel level sensor fails. How to find out: the problem is in the sensor itself or in the indicator? Take a multimeter and measure the resistance on the sensor (checking the indicator):
- if the tank is full, then the approximate resistance value will be about 7 ohms or less;
- if about half the tank, then the resistance ranges from 108 to 128 Ohms;
- if the tank is empty, the value on the multimeter will register approximately 315 to 345 ohms.
Sensor check:
- disconnect the wires going to the sensor;
- connect the resistance (R=330 Ohm) and add a resistor (R=10 Ohm) to the series circuit;
- start the car;
- We begin to change the resistance on the resistor with the slider: from 0 to 10 Ohms;
- the arrow on the sensor should float from “empty” to “full”.
*it’s also easy to check the ignition coil with a multimeter. So, depending on the failed part (sensor or indicator), we replace it with a new one. Thus, the article discusses the topic: why the fuel level sensor does not work. When such a part fails, there are many possible causes, from the simplest to the very complex.
Design and operating principle
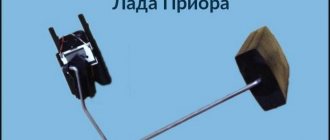
The sensitive element of the sensor is a rheostat (variable resistor). The sensor output consists of two control wires; ground is connected separately. The level sensor is based on a lever. A small plastic float is installed on one end of it, but the other end is connected to the rheostat, or more precisely, to its slider connected to ground.
The rheostat has two outputs, one of which (the lower one) is not connected to anything, and the upper one produces an analog signal that goes to the fuel level indicator. The control system measures voltage. The indicator is a voltmeter, its full scale is equal to the supply voltage. In simple terms, the indicator measures the voltage, and the level sensor changes its value depending on the amount of fuel in the tank.
The slider is also responsible for turning on the warning lamp. When there are five liters of gasoline left in the tank, the light on the indicator lights up. This is achieved by the fact that the second contact coming from the sensor body is connected to a control lamp. The positive terminal is connected to this lamp, and the negative one goes to the sensor.
How to replace the fuel level sensor on a VAZ 2113-VAZ 2115?
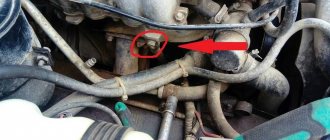
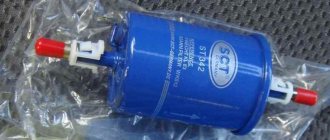
Removal: 1) To remove it, first the fuel pump will need to be pulled out of the gas tank, we already wrote about how to do this a little higher (The link was to an article on removing this pump), after the pump is removed, you can proceed to disassembling it and removing the fuel level sensor from the car (Depending on what engine is in your car, the fuel pump and the sensor itself may differ), but if your car is equipped with a 1.5 injection engine from cars of the VAZ 2110 family, then the sensor is mounted on them with screws ( Indicated by green arrows, the blue sensor itself is shown in the small photo below) by unscrewing which, the sensor can be removed from the car, but if your car is equipped with the original 21114 1.6 engine, which was designed specifically for the Samara 2 family (the exact same engine, by the way, is also for the Kalina is installed), then it has a new type of fuel pump with a built-in fuel pressure regulator (But you don’t need this), you can distinguish such a fuel pump very easily by its appearance, namely, it will be enough to just glance at the sensor and if you have one it is attached not by screws, but by side clamps (indicated by red arrows), which means you have a 1.6 engine and a new type of fuel pump installed, the sensor on it is much easier to remove, you just need to release these same side clamps and then slide them up along the grooves this sensor, remove it from the pump and, if necessary, replace it with a new one.
Note! After removing the sensor, by sliding it to the top, disconnect all the wire blocks that come from it and which are inserted into the connectors, they are easily disconnected, to disconnect the first one, it will be enough to bend the lock (indicated by number 3) and then disconnect the block from the terminal, in order to disconnect the second one, it will be enough to insert a screwdriver into the groove indicated by number 2 in the small photo, which would press the latch 1 (see again the small photo) and thereby remove the block, thereby both of them are disconnected and you have completely removed the sensor from the car's fuel pump!
Setting up the fuel level sensor VAZ 2107 injector
2) The information above concerns injectors, but VAZ 2115 cars were also equipped with carburetor engines from cars of the Samara family, so the principle of removing this sensor on such cars is slightly different but very similar, it consists in the following, at the beginning the rear airbag is removed in the same way seats, after that, again, the soundproofing material (if any) is removed to the side and the sensor hatch will be in front of your eyes, it is turned out with a screwdriver and then removed from the car, then the wire block, which is indicated by the red arrow, is disconnected from the sensor, the hoses that six nuts are attached to it and turned out in a circle, and then the sensor is removed from the gas tank (For more details on how to do this, read the same article on replacing the gas pump, everything is similar there, it’s just that on injection engines the pump itself is located in this place, and on the carburetor sensor, by the way, at the end of the article there is a video on replacing this sensor on carburetor cars).
Installation: The new sensor is installed in its place in the reverse order of removal, but when the old one is removed, do not rush to run for a new one and buy it at a car store, because you can revive the old one, as we said earlier, if the sensor gives incorrect readings, then by bending the float rod you can do this align everything, but you need to bend it in the following way: turn on the ignition and move the float and rod to the lowest position, if the sensor shows that there is still gasoline in the tank although the float is at the very bottom, then you bend it down until the fuel indicator arrow shows that the gas tank has run out of gasoline, as soon as it shows, perform the same operation by raising the rod all the way up and if the arrow shows that the tank is full, then you have adjusted it correctly and you can drive it.
Additional video clip: You can see in more detail how the sensor is replaced on fuel-injected cars by watching the video below:
Replacing the fuel pump grid and fuel level sensor (FLS) on VAZ 2110, 2111, 2112, 2113, 2114, 2115
Note! As for carburetor engines, the sensor can be removed in almost the same way, it’s completely different and you can also check it with an ohmmeter. For more details on how to remove it and adjust the rod by bending, see the video below:
How to replace a VAZ tank sensor. Do it yourself!
source
How to prevent the problem
It is almost impossible to prevent sensor damage, since mechanical wear of the sectors or float is an absolutely natural phenomenon. Therefore, if the indicator needle begins to behave strangely, and the check reveals problems with the sensor, it is better to replace it as an assembly, fortunately its price is not very high.
The same statement is true if the indicator itself breaks down. Service work to prevent damage to this device is not provided - only replacement if a malfunction is detected. Problems with electrical wiring, including a break in the wire leading from the fuel level sensor to the indicator, can also be solved by replacing the wire.
How to understand whether the temperature sensor is working or not
It happens that one component of the temperature recording system malfunctions, and the driver immediately blames the sensor; in fact, it may be quite serviceable. Therefore, do not rush to throw away the old sample, first check it for serviceability:
- Place the seized coolant in the container where the drained coolant is located.
- Carefully and gradually heat the antifreeze, note that the container must be resistant to high temperatures, otherwise it will simply melt.
- Armed with a thermometer and a multimeter set to ohmmeter mode, monitor the readings on these 2 devices simultaneously.
For convenience, we have presented what readings a working VAZ-2115 antifreeze temperature sensor should give in tabular form.
| Temperature on the thermometer, degrees | Resistance, Ohm |
| 20 | 3520 |
| 40 | 1459 |
| 60 | 667 |
| 80 | 332 |
| 100 | 177 |
If the readings you took from the sensor differ from the data in this table, it means that the device really needs to be replaced; it is not working correctly. Some car enthusiasts are trying in every way to repair the device, but experts are skeptical about such experiments, stating that the sensor that records the heating temperature of the antifreeze cannot be repaired, but only completely replaced with a new product.
Replacing the fuel sensor
If the device fails and shows unreliable data, then you need to purchase a new sensor, as well as prepare a voltmeter, a set of screwdrivers and spanners.
VAZ 2114 shows fuel level incorrectly
The car owner needs to adhere to safety rules, because the VAZ 2114 fuel level sensor functions in the fuel supply system.
First you need to disconnect the battery. To carry out repair work, simply disconnect the negative terminal
Please note that to ensure comfortable work, the gas tank should contain no more than 45% of fuel
Repair work is carried out in the following sequence:
the device is installed in a module for pumping a flammable mixture. Therefore, the motorist’s task is to remove the entire module; you will need to remove the lower cushion and remove the trunk trim; Next you need to unscrew the screws that secure the gas tank cap. With their help, the upholstery is held in place. To unscrew the screws, you must use a 7 key; at the next stage you need to unscrew 8 more screws holding the edge of the cover; removing the gas tank cap; disconnecting electrical connectors from the fuel pump
To do this you will need a 17 key; disconnecting the hose from the fuel pump; All work must be done carefully. Make one turn before completely unscrewing the fitting nut holding the fuel hose.
This will release pressure from the system; On the cover you need to find and unscrew 8 nuts. To do this you need to use a spanner wrench. Some motorists prefer a ratchet; dismantling the pump. The fuel device must be lifted slightly, then rotated clockwise and tilted. Such actions must be performed in order not to damage the float.
Thus, the module is removed. Then you need to do the following:
- Move the locking ring slightly using a screwdriver;
- dismantling the fuel module cover;
- disconnecting the wiring connected directly to the pressure regulator;
- disconnecting the blocks with all wires;
- disconnecting the fuel level sensor clamps;
- dismantling the sensor. To do this, the device must be moved along the grooves of the module body.
At this stage, the work on dismantling the FLS has been completed. Now the owner of model 14 can only install a new device and assemble the structure in reverse order. But there is no need to rush to complete the work.
DIY crankshaft position sensor replacement
It is possible that the problem is due to completely different reasons. Therefore, the sensor needs to be checked; this can be done as follows:
- It is necessary to connect a voltmeter directly to the contacts of the meter in question, switching it to resistance measurement mode. Measurements must be taken in cases where the float occupies the middle and extreme positions;
- in the upper position – 7-25 Ohms. In this case, the tank is completely filled with fuel;
- middle position. The device should record values in the range from 100 to 135 Ohms;
- if the tank is almost empty, then on the meter scale the indicators should vary between 285 - 385 Ohms.
If the specified parameters do not comply, the device can be repaired. But experienced motorists recommend purchasing and installing a new sensor. Experience shows that repairs are more expensive. In addition, it is almost impossible to repair the device on your own. Repairs usually cost more money than buying a new appliance. Repair work requires the use of special equipment and professional skills.
Buying a new FLS will cost a motorist less than 10 US dollars. Therefore, it is recommended to find a reliable online store and purchase a quality device.
The new controller is installed in the fuel module. Then all work is done in reverse order. Typically, car owners have additional difficulties with assembling structures. Therefore, in order not to make a mistake, the sequence of actions can be recorded on video. If this option is not available, then it will not be difficult to find a video on the Internet that demonstrates in detail and clearly all the work involved in dismantling and installing the fuel module. It is enough to do all the work yourself once. After this, replacing the sensor will take the motorist a minimum of time.
After assembling the structure, you must ensure that the arrow of the module is directed towards the trunk. If this is not done, the device will not work correctly.
Video “Instructions for cleaning the fuel pump mesh and replacing the FLS”
Find out how to clean the pump mesh and change the FLS with your own hands from the video below (the author of the video is In Sandro’s garage).
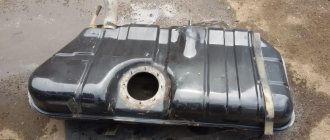
Welcome! Fuel level sensor - thanks to it you can always find out how much fuel is left in the tank, on all cars this sensor is located in the gas tank, and it consists of a float, a float rod and a so-called potentiometer (A potentiometer is an electronic part of the sensor, which, depending on depending on how much the float is raised, it changes its resistance), over time the electrical contacts of the potentiometer oxidize, which is why the sensor begins to lie very much or stops working altogether, or in some cases when the tank is deformed (And the tank on front-wheel drive cars is located very low ) the rod at the fuel level sensor is also deformed, due to which the fuel level indicator will begin to lie and incorrectly show the car’s gasoline, and finally, about the float, let’s say that over time it will develop holes due to poor-quality gasoline and a gap will form through it, it can also be formed if the float is touched with something sharp or if it is deformed during installation, due to this gap that can form in the float, the float will simply sink and it will no longer adhere to the surface of the gasoline and therefore, the readings given by the gasoline indicator will be constantly at zero (no gasoline).
Note! To replace this sensor, you will need: A screwdriver, a set of keys and, just in case, stock up on pliers, because they can also come in handy!
Summary:
Where is the fuel level sensor located? In old cars (we're talking about classics), the sensor was located directly in the gas tank, but on new injectors, the sensor is also located in the gas tank, but only in this case, it is combined with such a part as the gas pump, so to replace this sensor, first the gas pump you will need to pull it out and only then start replacing it (For information on how to remove this pump, read the article: “Replacing the fuel pump on a car”), in the photo below, by the way, this pump has already been removed and this sensor, which is located on it, is indicated by an arrow.
When do you need to change the fuel level sensor? At the beginning of the article, we already described all the problems that may occur with it, but we did not describe how it can be checked for serviceability (You need to check for serviceability only if the fuel level indicator does not show gasoline at all, but if it shows but with an error, then most likely the rod on your sensor is either bent, or it itself has become unusable and gives much less resistance, which is very unlikely), in the beginning you will, of course, need to remove the fuel pump (read how to remove it below), after removing it, connect block of wires to the pump, if you previously disconnected it, as soon as this is done, turn on the ignition and move the float up and down, while the arrow of the fuel level indicator should also move if you connect another ohmmeter to all this and check what resistance is given by the sensor, then the test will be even more successful, it is connected to the wire terminals in the place where the wire block needs to be inserted, after connecting the device, move the float all the way up and the readings it should give is 7–25 Ohms, then move the float approximately to the middle, the readings that the device should give are 100–135 Ohms, and finally, lower the float to the very bottom, in this case the device should give readings of 285–385 Ohms, if everything is so, then the sensor is working and does not require replacement , for more details on how to check it, see the video below:
Doesn't show fuel level AT ALL
When the arrow points to “0” with a full tank, then attention should be paid to all contacts and connections:
- First of all, this concerns the bolts located on the back side of the instrument panel, since they are the ones who create contact by fixing on the indicators.
- It is possible that the fuel level needle has lost its position and needs to be adjusted.
- The instrument panel itself may also be faulty. Since its mechanical parts are very susceptible to wear.
- We test all the “negative” wires, especially the one located near the handbrake. Because often it is he who is promoted.
- The float or the FLS itself is jammed.
Please note that if you have an on-board computer (not older models - approx.), it is possible to control the fuel level electronically. It is enough just to enter the readings, after each refueling of the car and the faulty FLS arrow will no longer bother you
Troubleshooting
There are times when the sensor indicates that the tank is always empty or completely full. Moreover, the readings do not change, even if the fuel level is changed.
Main reasons:
- The sensor is faulty and needs to be replaced.
- There is a poor contact connection with the body.
- A faulty voltage regulator is supplying incorrect power to the sensor.
- The fuel gauge is faulty.
- There are problems associated with the wiring of the sensor circuit, most often a break.
Before drawing conclusions about a malfunction of the voltage regulator, it is necessary to measure the output voltage at the contacts of the device. To do this, you will need to remove the dashboard and connect a voltmeter to the contact terminals.
To test devices, the sequence does not matter. Most often, they begin to look for the problem in devices that are located in the most accessible place.
Replacing the fuel pump VAZ 2115
The frequency of replacing the fuel pump on Samara 2 (VAZ 2113,14,15) cars is not regulated. Change it only if necessary.
It is quite easy to understand that the fuel pump is faulty. If the car does not start, or starts and immediately stalls, in this case, the first thing you can do is listen and understand whether the pump is pumping or not. Usually the sound of a running fuel pump is heard in a car.
If there is no sound, then you must first check the fuse and relay, and then only climb into the tank. It's another matter when the pump is still running, but pumping little fuel. In this case, you will not be able to check the pump yourself without special tools.
When the car begins to pick up speed poorly, drops in speed when you sharply press the gas pedal, or simply has unstable engine operation, you need to check the pressure in the fuel rail. If the pressure is less than 2 bar, the pump must be replaced.
The normal pressure of this fuel pump is 2.5 - 3.5 bar.
Removing or replacing the fuel sensor on Lada Kalina
Dismantling the fuel module and removing the FLS from it on the Lada Kalina:
- By squeezing the spring clamps of the fuel line tips, we disconnect the gasoline supply and return pipes from the module, and then move them to the side.
- Applying light blows with a hammer to the bit attached to the module’s pressure ring, we turn the latter counterclockwise.
- Using a screwdriver, pry the pressure ring out of the hatch.
- We remove the module by carefully removing the FLS float from the hole in the gas tank, being careful not to bend the sensor lever. To do this, the module is tilted slightly.
- We bend the clamps of the two tubular guides from the pump side, and then slide the module cover.
- We disconnect the wires going to the pump from the output contacts of the gasoline pressure regulator, which is installed in the module cover (remove their tips).
- Having released the connector lock installed on the module cover, disconnect the block with wires.
- Using a slotted screwdriver on the connector of the fuel pump protruding from the module body, release the retainer securing the wire block.
- Carefully disconnect the block with wires from the pump.
- At the FLS located on the side of the module body, we release 2 clamps for its fastening.
- We move the FLS along the grooves of its seat on the module and remove it.
The dismantled Lada Kalina FLS is immediately replaced or inspected and repaired in case of repairable defects. We install a repaired or new FLS and assemble the module in the reverse order. Carefully insert the lever with the float into the hole in the gas tank, put the fuel module in place and orient it so that the arrow marked on the module cover points backward (along the direction of the car), and the fixing protrusion of the cover fits into the groove of the flange of the tank hole.
We install the pressure ring, and then turn it clockwise all the way. After making sure that the module is securely fastened, we connect the connector with wires and fuel pipes. We connect the battery ground. Turn on the ignition for 5 seconds to check the tightness of the fuel line connection. Reinstall the hatch cover, and then the lower part of the rear seat.
Dear customers, in order to avoid errors when sending a fuel level sensor to VAZ cars, in the “Comment” line indicate your car model, year of manufacture, engine size.
The Lada Kalina electric fuel pump assembled with a BOSCH engine is an electric fuel pump module with a fuel level indicator sensor assembly. Designed to supply fuel from the gas tank to the engine injectors, as well as determine the fuel level and signal its minimum level in the gas tank with an electronic engine control system (ECM)
The VAZ 1118 electric fuel pump assembly is of a submersible type, installed in the gas tank located under the bottom of the car body, in the area of the rear seat behind the service hatch, by opening which you can find it.
Dismantling and assembling FLS in VAZ Kalina
Replacing the fuel sensor on Kalina is done in the following order:
- the tips of the fuel pipes are removed and secured with spring clips;
- using a bit and a hammer, unscrew the pressure ring, moving it in the direction opposite to the clockwise rotation;
- pry it off with a screwdriver and remove it from the hatch;
- is taken out carefully, tilting the structure slightly so as not to damage the sensor lever. Near the pump, the guide clamps are retracted and the module cover is moved to the side;
Defective fuel level sensor
The removed device is inspected and, if necessary, repaired and adjusted. If restoration cannot be achieved, the FLS is replaced with a new one. Assembly is done in reverse order. A carefully assembled block is inserted into the gas tank so as not to bend the lever with the float part. It is installed in such a way that the arrow shown on the cover is directed in the opposite direction of the vehicle’s movement, and the fixing part fits into a special groove on the opening of the fuel tank. The pressure ring is installed, having previously been treated with petrol-resistant sealant, then scrolled clockwise. When the module is securely fastened, the pipelines and connector with electrical wiring are connected. To check the tightness of the system, start the car and perform a visual inspection. If there are no leaks, and the correct readings of the presence of gasoline in the tank are recorded on the instrument panel, it means that the replacement of the fuel level sensor was carried out successfully. We screw the hatch cover and install the seat in its regular place. Despite the simplicity of the procedure for disassembling and installing a device for measuring the amount of gasoline in a gas tank, this work requires care and adherence to basic safety rules. Careless, careless handling of them can lead to a fire, since gasoline ignites quickly.
In appearance, the VAZ family cars to some extent correspond to European automotive trends. But domestic cars have many technical shortcomings that do not allow them to compete with global brands.
An example is the performance of the fuel level sensor. Many car owners have had to deal with a situation where the device showed unreliable data. Sometimes the needle points to zero, although there is still a lot of gasoline in the tank. In some cases, the opposite situation is observed. This usually applies to older cars, but there are exceptions. Such signs indicate that the device is failing and needs to be replaced. The work can be done with your own hands, without the involvement of specialists.
Checking the fuel level sensor with a multimeter
After a visual inspection, a check with a multimeter may also be necessary. In other words, to understand why the fuel sensor is not working, the specified sensor is also checked in ohmmeter mode.
The fact is that the resistor can change resistance over time, which leads to incorrect sensor readings. Resistance should be checked with the tank empty, 50% full and full. If it is determined that the resistance is not normal, it is better to immediately install a new sensor.
We also add that if, after installing a new FLS, the sensor does not accurately determine the fuel level in the tank, this is often due to the fact that the resistance deviates from the nominal one. In fact, we can say that the wrong sensor is installed.
As a rule, when choosing, it is important to consider that although fuel level sensors are visually similar, they usually have different resistance values. In fact, this is precisely what leads to errors. For this reason, you need to purchase just such a sensor that has the required resistance
For this reason, you need to purchase a sensor that has the required resistance.
Fuel level sensor float and other problems
In cases where the fuel level indicator does not work, in some cases it is directly related to the float. Floats can be of two types:
- hollow float made of plastic or thin metal;
- the so-called “foam” float, which is made of a porous base;
In the first case, the float may gradually wear out and become damaged; the fuel level indicator needle gradually fails to reach the maximum when filling a full tank.
Fuel can get inside the hollow float, causing the level sensor to show incorrect data. To fix the problem and carry out repairs, it is necessary to replace the float of the fuel level sensor in the tank.
You also need to understand that if the fuel sensor is lying, you should not exclude the possibility of mechanical damage to the gas tank itself. If the tank is damaged, then the float may simply jam.
As a rule, in this case the pointer works accurately, but the range is very limited. The fuel level arrow may also be “stuck” in only one position. In fact, the problem is not the most harmless and often requires a complete replacement of the gas tank to solve it.
By the way, often when buying a used car, you can hear from the seller that the fuel pump screen was recently cleaned or the fuel pump was replaced, after which the fuel level sensor, etc., stopped working.
At the same time, the seller claims that there is simply no time to fix such a minor breakdown. In fact, if the fuel level sensor in a car does not work, this can be caused either by a failure of the sensor itself or the float, or by deformation of the gas tank. Naturally, changing the tank is quite expensive.
We also note that if the FLS does not indicate the fuel level correctly, the bending of the lever may also be the cause. In this case, the pointer arrow is not able to reach the extreme marks.
The lever can be corrected, but it is important to understand that the problem itself occurs as a result of one or another mechanical effect on the tank. Also, after editing, the float may still jam. Again, in such a situation it may be that the tank itself needs to be repaired or replaced
Again, in such a situation, it may be that the tank itself needs to be repaired or replaced.
The list of possible problems with the FLS is completed by the fuel level indicator. To understand why the fuel sensor does not work, you need to consider that the problem may be not only in the sensor, but also in the indicator.
In this case, the incorrect fuel level is displayed due to the fact that the movable winding of the indicator is jammed. In turn, this leads to the fact that it is not possible to move freely, and the data on the indicator itself will be inaccurate.
Common problems
The fuel volume control system in the gas tank is susceptible to the following malfunctions:
- the pointer indicator lies at zero regardless of the amount of fuel remaining in the tank;
- the device does not display the fuel level correctly - it is lying up or down;
- the needle “jumps” or changes readings in a short period of time;
- The yellow minimum fuel indicator indicator does not light up.
Reference. In some domestic car models, the fuel sensor is lying from the factory. An example is the Chevrolet Niva SUV of the first releases, where the device greatly underestimates the actual level of gasoline. The driver, guided by the sign, pulled into a gas station, only to discover that the tank was full to the top.
There are several reasons why the needle drops to zero:
- Sticking or jamming of the lever.
- The float lost its seal and sank to the bottom.
- An electrical circuit is broken due to oxidized contacts or a wiring problem.
- Failure of the indicator itself or the lever sensor - potentiometer.
Typically, incorrect readings and “jumps” of the needle are a consequence of contamination of the rheostat and slider. On a car with high mileage, these parts can wear out - the thin layer on the plates wears away, causing contact to disappear between them and the runner.
The fuel level sensor in the tank sends conflicting signals that are reflected on the dashboard.
One of the reasons for the minimum level indicator not working is a burnt-out light bulb on the instrument panel. Less common are problems with the end contact located inside the tank, or a break in the electrical wiring. In the newest systems, the lamp even lights up at the command of the controller when the resistance of the lever potentiometer reaches a certain value.
Fuel level sensor - device (FLS)
In this article, our attention will be focused on cars where the FLS is used to indicate the fuel level, convert this level into volume and transmit the resulting value digitally or analogue
This device consists of a metal rod mounted into the fuel tank through a standard hole or a specially made hole of suitable diameter. The sensor is connected to the vehicle's monitoring system, where the required data is transmitted.
They are often high-precision universal devices, which allows them to be used not only in transport, but also in other equipment, and even in stationary facilities - factories, warehouses. This unit is closely interconnected with the fuel level indicator located on the instrument panel.
Today, there are a number of FLS variations - universal, ultrasonic, float, digital, electronic, but their common goal is the same - to correctly determine the fuel tank consumption, so that every driver has the opportunity to control their fuel costs. In addition, the device makes it possible to monitor the amount of drainage (the most useful option for taxi services, business managers and other organizations in which employees are able to drain government fuel) and fuel refills (in what volume, when and where they were carried out).
To be able to monitor the fuel level in more detail, it is necessary to install an appropriate device on the car with minimal error and increased sensitivity, which will provide the most accurate readings.
connecting the fuel level sensor
There are two methods for connecting the FLS to the vehicle’s on-board network, the design of which includes a ground switch:
- Connecting the FLS to the on-board network after the main switch. The sensor, in this case, will be de-energized immediately after the vehicle's mass is turned off. In this case, it will be impossible to find out the drain time when parked - the sensor will be turned off. This connection method is recommended for cheap sensors where there is no galvanic isolation.
- Connecting the sensor to the battery directly. This connection method is ideal from a practical and functional point of view. In addition, connecting the FLS directly to the battery is safe, since the sensor current consumption is only 10-48 mA. It is recommended to connect Pro Sensor sensors directly to the battery, since they are distinguished by the presence of a built-in galvanic isolation of up to 3000 V. In addition, the polymer body of this sensor is an insulator, as a result of which all electrical circuits are reliably protected from electrical breakdown. To connect other sensors directly to the battery, you will have to install additional galvanic isolation.
What it consists of and how it works
The fuel level sensor serves to calculate the amount of fuel in the tank and provide the corresponding information to the driver through the instrument panel. Sensor components:
- Resistor;
- Float and lever;
- Open-on sliding contact (turns on and off the warning lamp on the instrument panel).
Its operation is carried out due to the movement of the float when the amount of fuel changes. The resistance of a variable resistor changes, causing the resistance in the circuit to change as well. Due to this, the resistances are displayed on the panel. As practice shows, the BM 150 sensor is installed on the VAZ 2114.
Replacement allowance
If you notice that the regulator no longer works, you will need to replace it. This procedure can be done at home.
Before you begin the process, prepare:
- new regulator;
- Screwdriver Set;
- a set of keys.
Stages
So, the replacement procedure is performed as follows:
Since the controller is part of the fuel pump structure, it will not be possible to dismantle it without touching the module as a whole. To gain access to this structure, it is necessary to dismantle the lower part of the rear seat, and then remove the luggage compartment upholstery. Using a 7mm wrench, you need to unscrew the screws on the right and left sides, in particular, we are talking about the gas tank cap latches. These screws also secure the upholstery to the sides. Having done this, you will see 8 more screws that secure the edge of the cover; they also need to be unscrewed. The next step is to remove the entire fuel tank cap, this can be done by moving it forward a little. After these steps, you will see the upper part of the pump, you need to dismantle the wire block that is connected to the device, for this you may need a 17mm wrench. You will also need to unscrew the nut of the fuel supply line from the fitting
In this case, there is no need to rush, it is better to wait a little, but do everything carefully and correctly. Before completely unscrewing the cap, make one small turn - this will allow you to get rid of the pressure that has built up in the system. Next, along the diameter of the cover you can see 8 more small nuts, you need to unscrew them, for this you use a wrench, but it will be more convenient to do this with a ratchet. When dismantling the fuel pump, it should be lifted up, then turned slightly clockwise, and then tilted
Such actions will prevent damage to the device's float. After dismantling the module, we begin to disassemble it. Using a slotted screwdriver, you need to move the locking ring located directly on the module. After this, you can remove the cover itself from the structure. You need to remove the wire from the pressure sensor terminal, after which the fasteners are pressed directly from the cover and the blocks with wiring from the fuel pump are disconnected. The controller latches are detached, after which the device itself slides along the grooves of the case. The regulator is dismantled and replaced with a new one.