Author: Evgeny Zhivoglyadov. Publication date: February 20, 2022. Category: Automotive equipment.
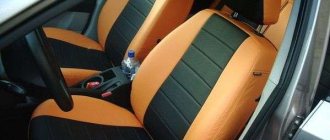
When the vehicle is used intensively, standard seat upholstery not only gets dirty (and it is quite difficult to clean them), but also wears out. Subsequent repairs (the so-called reupholstery of the interior) are expensive, and it’s quite difficult to do it yourself. You can avoid such troubles very simply: just “dress” the chairs in covers. Today, such accessories can either be purchased (they are presented in a large assortment, both universal and designed for a specific car model); or order (they are sewn in specialized studios); or make it yourself, saving a significant amount of money. At the same time, you can be sure of the exclusivity of the manufactured products.
Making car covers with your own hands is one of the most critical stages of the manufacturing process. Not only the ease of using homemade covers in the future (install, remove, wash and install again), but also the aesthetic appearance of the car interior depends on how accurately the blanks are made.
Sequencing
So, if you decide to make car seat covers yourself, then you need to decide on the procedure.
The first thing you should start with is to determine (by experiment) what thickness and density of the material can be sewn using the sewing machine you have. The choice of material for making covers will largely depend on this. Attempts to sew through too dense material can lead to its breakage and unjustifiably expensive repairs.
Then you need to make all the necessary patterns. The number of individual elements will depend on the configuration of the chair and armrests.
And only after that we decide on the amount of material needed.
Selecting material for car covers
To make your own seat covers, you can use a variety of synthetic or natural materials:
- velours;
- tapestry;
- cotton;
- neoprene;
- plush;
- leather (natural or artificial);
- various synthetic fabrics and so on.
Each of the materials has both its advantages and disadvantages. For example, the undoubted advantages of natural materials include: their environmental friendliness and “breathable” properties. Although they are less durable than synthetic materials. And leather, although it has numerous advantages (both in durability and aesthetic characteristics), is quite difficult to process. In addition, the price for such material is very high.
A combination of different materials is quite acceptable: for example, velor can be used for the main elements, and synthetic leather can be used for the armrests.
Both the comfort of the driver and passengers, as well as the convenience of subsequent operation, largely depend on the correct choice of fabric. Everyone makes the final decision, taking into account their financial capabilities and individual preferences. The main thing is that the selected material provides sufficient protection for the standard upholstery, so as not to carry out subsequent repairs.
Advantages of natural fur over artificial fur
Despite its cheapness, faux fur cannot compete with natural fur.
Firstly, this is due to the sometimes unsatisfactory quality of synthetics, and secondly, with the better thermal insulation properties of natural material.
Real wool retains heat excellently and keeps the body warmer.
In addition, natural fur is very soft and pleasant to the touch, unlike artificial fur.
The fibers of the synthetic material are very hard, so if you run your hand against the wool, they will bend strongly and will not immediately return to their original position.
Because of this, microdamages form on the surface of the threads - microscopic cracks and bends, invisible to the naked eye.
This is fraught with destruction of the fibers and “balding” of the cape.
Real fur has no such drawback: thanks to its natural softness, the pile quickly returns to its previous state.
Hair is not a thread, it is monolithic and does not consist of intertwined fibers.
This is why fur car seat covers made from natural wool last longer than those made from synthetics.
Real fur differs from artificial fur in structure, since its hairline is literally implanted into the base - the skin.
In turn, the synthetic fibers are glued or sewn to the base, so that with some effort they can be easily pulled out.
Natural furs withstand moisture better, dry faster, and can withstand very high and very low temperatures without problems.
With regular temperature fluctuations, artificial materials wear out very quickly, but in the wild, animal fur is not subjected to such tests.
Making a pattern using special tape and paper
The seats of modern cars have a rather complex shape. This is explained by the fact that manufacturers try to give them the most ergonomic shape.
In order for homemade covers to not look like a “potato sack”, it is necessary to most accurately repeat the geometric shape of the vehicle seats in the pattern. It's difficult, but possible.
To create a pattern for car seat covers with your own hands, we will need:
- double-sided paper adhesive tape (very similar to regular masking tape);
- scissors;
- soft paper (it is better to use special paper for patterns, which is sold in rolls in specialized stores);
- marker.
Let's start with the driver's seat. Work execution algorithm:
- We lay out a sheet of paper on the seat, smooth it with our hands and adjust it (in size) to the main part of the driver’s seat.
- We secure this part with pieces of paper adhesive tape so that it does not reach the seams of the standard sheathing by 1-2 mm.
- We perform the same procedures with the remaining parts of the seat (side and front end).
- After all the elements of the lower part of the seat are covered with blanks, we apply the necessary marks with a marker (so that later we do not get confused in the resulting patterns).
- Carefully remove the workpieces.
- We perform the same operations with the back of the driver's seat.
- We apply the resulting blanks to a sheet of thick paper or thin cardboard, outline them with a marker and cut out patterns for marking individual parts on fabric, velor or leather.
On a note! Many modern cars have a folding armrest on the rear passenger seat. When making patterns, you need to remember this and provide an appropriate hole for it.
Next, lay out all the patterns on the material. We apply the markings, retreating from the edge of the pattern by 1-1.5 cm (seam allowance). We cut out all the elements and sew car covers.
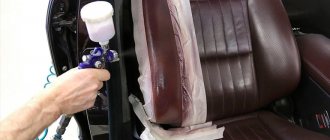
Making a case yourself
Sewing with your own hands is not something impossible or difficult. This can be done without any special tailoring skills. The process itself is divided into several stages:
- Selecting the style, type and material of the cover;
- Taking all measurements;
- Creating a pattern;
- Direct tailoring.
Advice on choosing a material has already been given, so it is proposed to move on to consider other points.
All necessary parameters of seats for manufacturing should be accurately measured.
Taking measurements for a future car cover
In all cases of tailoring, you need to take measurements first. They include the height and width of the backrests, as well as the length and width of the bottom pillow. You can use oilcloth that is slightly larger than the seat
She needs to tighten all the details and transfer the outlines, paying attention to the seams. Next, the parts are cut out and transferred to regular fabric that will be used for sewing
You can make a pattern using oilcloth
Nuances of patterns for car seats
The sewing process has a number of nuances and consists of the following steps:
- Take a blank made of oilcloth or polyethylene and transfer it to the working fabric using chalk or a marker. You need to be mindful of seam allowances;
- Arrange the parts so as to save as much fabric as possible, including allowances;
- Before cutting, cut the fabric into several large pieces to make work easier;
- Cut the pattern with scissors or a knife;
- Iron or steam the fabric if it is wrinkled after the cutting process.
Rear seat cushion cover
It is worth understanding that the size and shape of the covers will vary greatly depending on the size of the seats and the make of the car. Despite this, it is worth focusing on the given drawings and diagrams.
Covers for Kia Rio
Assembly instructions
After cutting out all the parts and other components, you can start sewing them together. Especially for this purpose, seam allowances were left, which will be used for stitching. First, the pieces and parts are joined together using special pins or needles, and then fastened with a hand-made basting stitch. This is done so that if any mistake is made, it is easy to rip the seam and redo the work and make adjustments.
Sewing car covers with your own hands is not difficult
If there are no shortcomings and everything is done correctly, then you can start working with the machine. With its help, you need to securely and accurately stitch all the details. So that the cover is securely attached to the chair. To do this, you need to remember to sew all the fixing elements in place. They can be used as elastic bands, garters, belts, hooks, and Velcro. Using strips of leather or nylon as a lining under them will help make the seams stronger and more durable.
Sewing car covers is a fun activity
Don't forget about the slots for seat belts or armrests, if any. Products must not interfere with the deployment of airbags in emergency situations.
Covers for the rear sofas of the car
Polyethylene patterns
Instead of pattern paper, you can use regular greenhouse film. For this you will need:
- medium density polyethylene;
- scissors;
- marker;
- pins.
Work order:
- we cut out a blank from polyethylene that is slightly larger in size than the seat element;
- lay it out on the seat;
- carefully attach it with pins;
- using a marker, apply markings (along the stitching lines of the standard seat trim);
- remove the pins and remove the polyethylene;
- cut out the blanks according to the applied markings using scissors;
- We do the same with all elements of the chair (sidewalls, protrusions, bends);
- carefully secure all the workpieces with pins to the corresponding elements of the seat;
- using a marker we apply all the necessary notes and inscriptions;
- lay out the polyethylene elements on hard cardboard and trace them with a marker;
- Using the applied markings, we cut them out with scissors and get patterns for car covers with our own hands.
We make patterns for the rear seats and armrests in the same way.
Advantages and disadvantages
Let's take a quick look at the strengths and weaknesses that characterize fur car capes.
I’ll say right away that we are talking about natural products, not synthetic ones. There is a gulf and a significant difference between them. The advantages include:
- maintaining appearance for many years;
- creating a more luxurious and rich look for the interior;
- therapeutic effect;
- light back massage;
- property to improve blood circulation;
- allows you to travel for a long time and comfortably by car;
- The cape is suitable for hot and cold weather;
- in summer the driver sweats less;
- warms up the body in winter;
- products protect seats from wear;
- retain their shape for a long time;
- easy to attach to chairs;
- do not slip off and do not cause the driver to slide in the seat.
As you can see, the list of advantages is more than impressive. Moreover, it is difficult to argue with each of the advantages.
But for the sake of objectivity, let’s look at some of the existing shortcomings. They really exist, but they are more relevant for low-quality capes and poorly made products.
The presence of the disadvantages listed below once again indicates the importance of choosing the right quality fur car cape:
- with low quality, the product quickly loses its shape and appearance;
- synthetic furs are electrified;
- this is a dust collector that requires mandatory care;
- When cleaning, chemical agents should be used;
- cleaning the cape with your own hands is not so easy;
- additional costs for dry cleaning services;
- fur absorbs foreign odors well;
- natural pile is destroyed by moths and other insects.
With proper care and purchasing an initially high-quality natural cape, there will be objectively more advantages than disadvantages.
Cover-cape
The dirtiest and most worn parts of car seats are the base (where you sit) and the inside of the backrest. It’s quite easy to protect them by making cape covers yourself. Moreover, you can periodically replace them without a significant blow to your budget, since they have a relatively low cost.
To make them you will need:
- any natural fabric, such as a large terry towel;
- scissors;
- threads;
- needle;
- pins;
- sewing machine;
- marker or chalk.
It is not necessary to make patterns for such cases. Everything is very simple:
- remove the headrest;
- carefully lay out the fabric on the seat and back with an overlap of 10-15 cm;
- we make holes in the material (for subsequent installation of head restraints);
- install the headrests in place (to fix the upper part of the fabric);
- Once again we level (with tension) along the entire seat;
- we fold the excess fabric inward and secure it with pins or baste with a needle and thread;
- we outline places for attaching laces or elastic bands (to secure the covers on the chair);
- remove the fabric and sew capes on a machine according to the basting;
- We attach the cover-cape to the seat using sewn ropes or elastic bands.
On a note! Knitted covers on car seats look very original. If we knit them from durable natural yarn of various colors, we get products that meet the requirements both for durability and exclusivity, health safety and ease of use. In addition, knitting a cover, for example, for an armrest, is much easier than sewing it.
Types of interior lining
The entire space inside the car serves a person and is called the interior. Manufacturers are paying attention to this segment. The class representation of the car in the sales market depends on the decoration and interior lining of the car.
The total cost depends on the material. The assortment is varied: leather, vinyl, carbon fiber, carpet and upholstery fabrics, suede, flock. There are pros and cons.
Automotive leather
Wealth, luxury of the interior. The comfort of the car is captivating; the desire to sink into leather seats comes from the first minute of acquaintance with the car. However, this is the most expensive type of trim; not everyone can afford it; it is installed in high-end cars.
Artificial leather (Alcantara)
Alternative finishing. Retains many functional aspects: non-slippery, brings a pleasant feeling to the touch, looks neat from the outside. Easy to use: easy to clean with detergents, practical. It is popular because the price is significantly lower than that of leather.
Textile
Budget material (upholstery fabric) is its strong point: availability. Strength variety at a low price. Synthetics have a number of disadvantages: they have a short service life and get dirty easily. Requires chemicals for constant cleaning.
Carpet
Durable fabric, can last a long time. Density improves the acoustics in the car. Young people like it. Average cost.
Vinyl
Moisture-resistant, durable, synthetically produced resin. Made in a variety of colors. Affordable price. Vinyl is indispensable if there are children and pets in the car. The disadvantages are cracking with prolonged use, as well as excessive softening at elevated air temperatures, and a feeling of stickiness appears.
An original way to decorate the interior. Fine fibers are “sprayed” onto the seats, forming a layer of material. When touched, it resembles a velvety surface. It has a number of advantages: warmth, sound insulation, fire safety, stylish colors, does not wear out, easy to care for.
Imitation “under the skin”
Elegant finish. Popular colors: black, brown, beige. If you do not take into account the service life, then there are no disadvantages.
Car trunk covers
If you often have to transport building materials, tools, sports equipment (skis or skates) or pets (with sharp claws) in the trunk of a car, then the standard upholstery (this is usually carpet) quickly becomes unusable. Subsequent repairs cost a pretty penny. To protect the bottom, side walls and backs of the rear seats (in hatchbacks, station wagons and SUVs) from dirt and scratches, you need to install a protective cover in the trunk. Such a functional device can now be purchased at any car accessories store. But the most rational and economical way is to make it yourself. Moreover, this is much easier to do than seat covers. The main requirement for this element is practicality (durability, ease of installation/removal and cleaning).
The work order is as follows:
- using a tape measure, carefully take measurements of the luggage compartment;
- We make a sketch based on the measurements taken;
- we purchase the required amount of durable, moisture-resistant and easy-to-clean material (for example, tarpaulin, durable “raincoat” or thick dermantine);
- in accordance with the sketch, we apply markings to the material and cut out blanks;
- sew individual elements together;
- we install the cover in the car and mark places for fastening devices (hooks or ropes (in accordance with the technological holes available in the trunk);
- We fix the fasteners on the finished product.
On a note! This device will reliably protect the paintwork of the open parts of the trunk from scratches (the repair of which is very inconvenient).
Summer protective car covers in just an hour - a master class for beginners
How to take measurements?
In order for the cover to fit perfectly evenly and tightly on the seat, you need to make a pattern. The easiest way: take an old T-shirt cape, open it along the seams, attach it to a piece of fabric and trace the contours.
You can use a large thick plastic bag as a pattern. Wrap the car seat in cellophane, secure the polyethylene with construction tape and outline the seat. Remove the tape carefully so as not to tear the cellophane.
Then take a measuring tape and take measurements from the driver or passenger seat. Measure the width, length and depth of the seat, backrest, and headrest. Transfer the measurements recorded on paper to polyethylene.
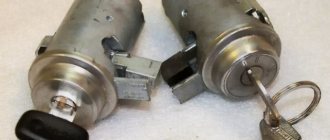
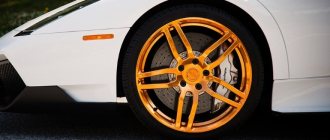
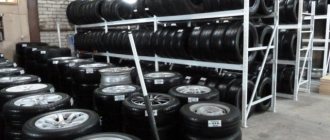
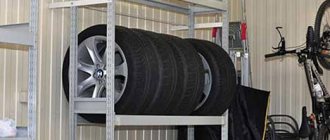
Wheel covers
Car owners have to change tires twice a year (winter to summer and vice versa). For ease of storage and transportation, special wheel covers are provided. You can either buy such products (fortunately, there are both universal devices and ones for a specific size on sale), or you can sew covers for car wheels with your own hands.
How to sew:
- measure the diameter of the wheel;
- to the resulting value add 1-1.5 cm (per seam) plus 1.5-2 cm (so that the wheel can be inserted into the case without effort);
- draw a circle on the material;
- cut out a round blank;
- measure the circumference and width of the wheel;
- we cut out the following blank from the material, namely, a strip with the following dimensions: width - 2-2.5 more than the width of the wheel; length equal to the circumference of the wheel plus 5 cm;
- then the round blank and the strip are sewn together;
- we bend the free edge of the strip and stitch it so that a “tunnel” is formed into which the cord will subsequently be threaded;
- Place the wheel inside the product and tighten the cord.
For ease of transportation, you can sew a handle made of durable synthetic tape of a suitable width on the outside of the case.
Sewing process
After you have prepared a pattern for car covers with your own hands, you need to start connecting the parts. When stitching, you can additionally strengthen the seam with a strong insert made of leather or nylon tape. This will ensure durability and practicality of the covers.
The main fabric should not be too soft. This may give the item a baggy appearance. To give it shape, the side inserts can be made from a more rigid material, providing a more durable frame for the entire structure, as well as diluting the design with a new texture.
Ribbons, elastic bands or hooks must be added to finished products for good fixation. With their help, the covers do not slide off the chairs.
When forming a pattern and sewing it together, it is necessary to comply with the design features of the back sofa. It may have an armrest in the middle. You need to make sure that new covers do not reduce the convenience of the car and allow you to enjoy all the advantages of the design.
The rear passenger seat is often divided into two parts for reclining and access to the trunk. This way you can transport long loads. New covers must take this feature of cars into account. When cutting and sewing, you need to cover the chair on all sides with new covers.