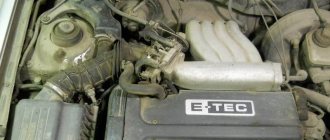
Timing belt for Daewoo Nexia and its features
The timing belt is a simple and at the same time important element of the car, designed to synchronize the camshaft and crankshaft.
The main task is to set the timing belt in motion and prevent valves and pistons from colliding with each other. The timing belt on the Nexia is covered with a protective casing and is located on the outside of the vehicle’s internal combustion engine. Depending on the type of power unit, the belt goes around a different number of pulleys.
By the way, we can highlight the features of timing belts with different engines:
- Nexia engine 8 valves is simple and reliable, but not powerful enough. If the timing belt breaks, there is a risk of bending the valves, but with such an engine it often happens that the valves do not bend;
- Nexia engine 16 valves - a more traction engine with good acceleration. If the timing belt breaks, the risk of bending the valve increases noticeably.
In any case, both on 8-valve and 16-valve internal combustion engines, the condition of the timing belt must be monitored and changed strictly according to the regulations or even earlier if necessary.
Item resource
The manufacturer promises that the belt will have to be changed no earlier than after 60,000 km. But this regulation may be violated if the car is operated incorrectly. Under excessive loads, extreme driving style of the car owner and bad roads, the service life of the belt drive can be significantly reduced. All this suggests that it is necessary to check the condition of the belt from time to time and replace it if the need arises.
The following symptoms will indicate an urgent need to replace the belt drive:
- The engine now needs more time to develop speed. The engine “does not pull” if the car is moving uphill. Engine vibrations became noticeable.
- Too much black smoke began to come out of the muffler. Sometimes the smoke may be too blue, uncharacteristic of normal exhaust.
- The power unit began to make a lot of noise during operation.
- The engine does not start the first time.
If these signs are detected, it is imperative to carry out a visual inspection of the belt. If, when examining the belt, cracks or chips were found on its surface, then this is a clear sign that it needs to be replaced. Oil leaks will also indicate the need for replacement. This means that the seals are also worn out and are leaking oil. And it greatly corrodes the structure of the belt, and after a while it can break. If the structure of the belt begins to delaminate, then individual threads will begin to appear on its end parts. This can also cause slippage or breakage.
Failure to replace the belt in a timely manner may cause it to break. If this happens, the crankshaft will continue to operate but the camshaft will stop. The valves will begin to hit the pistons, which will cause deformation of the latter. In short, real chaos will begin in the engine, the consequences of which can be disastrous. Therefore, it is so important to constantly monitor the condition of the strap. Sometimes the belt can break for other reasons, for example, due to the pump jamming.
Step-by-step instruction
Unscrew the intake pipe.
And an air filter with pipes.
We remove everything that bothers us. We also drain the antifreeze and remove the upper pipe.
Before removing the alternator belt, loosen the three bolts holding the power steering pulley. If you don’t do this right away, then later you will remember not only mom, but also dad, trying to stop the pulley and break the bolts.
We loosen the tension bolt of the generator and, moving the generator towards the engine, remove the strap.
We jack up the car, remove the right wheel and the plastic mudguard, if there is one. We see the crankshaft pulley and the air conditioner tension roller.
Loosen the roller nut and unscrew the tension bolt as much as possible, then remove the air conditioner belt. The nut is in the top photo.
We unscrew three bolts for 12 of the power steering pulley and four for 10 of the upper protective cover of the timing belt.
And we shoot last.
We jack up the engine through a plank by the pallet, but not by the air conditioning compressor.
We unscrew the two nuts securing the engine mount to the spar and the two bolts to the engine mount. It won't be easy with them, but the cardan will save us. Remove the engine mount.
Set the top dead center
Using the crankshaft pulley bolt, be sure to rotate the crankshaft clockwise until the marks on the camshafts match.
Unscrew the crankshaft pulley. If there is no special stopper, we put a partner behind the wheel, turn on the fifth speed and force him to press the brake, while at the same time, with a slight movement of the hand, we unscrew the crankshaft pulley bolt. After the pulley is removed, we see that the crankshaft marks match.
We unscrew the two 10mm bolts and, not forgetting the latch on the left, remove the lower protective cover of the timing belt.
We unscrew the two bolts securing the power steering pump and move it slightly to the side. There is no need to remove the bolts.
Use a hexagon to loosen the three bolts holding the pump. In the photo two are invisible, but there are two holes in the protective metal protection, approximately where the arrows are. In the following photos they will be visible when the iron protection is removed. Hitting them with a hexagon is very inconvenient, but you will have to suffer.
Using a special wrench 41, turn the pump until the timing belt loosens and remove it, insert it between the power steering pump and the engine.
We turn out the bolts of the camshaft pulleys, as well as the idler roller. The video in the photo has already been filmed.
We remove the pulleys and remember that on the intake camshaft the pulley is marked with the letter “I” and the exhaust valves with the letter “E”
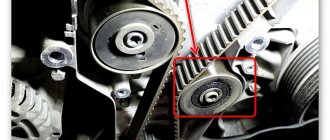
We unscrew the three bolts of the tension roller and remove it.
We unscrew two bolts at the top and two at the bottom, one of the bolts is located on the right side of the air conditioning compressor, it is very inconvenient to photograph and remove the metal protection. You'll have to rack your brains a little to get it out.
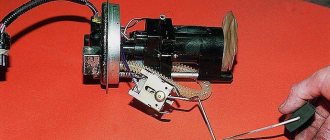
Replacing the pump
We unscrew the three bolts of the water pump, those that are hidden under the protection. We remove the pump. We place a basin under the engine, since some of the antifreeze remains in the block and when dismantling the pump it will pour onto the ground.
We clean the seat and wipe it dry. Lubricate the pump's o-ring with a thin layer of sealant and put it in place. We turn it as counterclockwise as possible. We do not tighten the bolts too much since it still needs to tension the timing belt. We install iron protection, idler and tension rollers, and then camshaft pulleys. We check that all marks match.
Signs that the mechanism needs to be replaced
How to determine that a 16-valve Nexia needs a timing belt replacement? This can be indicated not only by mileage, but also by the following signs:
- Characteristic noise and vibration at idle. It feels like the engine is running rough.
- It became difficult to start the engine. It takes longer than usual to start.
- Vibration is felt in the body when driving, especially downhill at high speeds.
- The car began to consume more fuel.
This is interesting: Self-replacement of low beam lamps in Hyundai Accent headlights
All this suggests that it is time to replace the belt. If you changed it recently, it may have simply jumped a few teeth and therefore the valve timing has shifted. It is also worth monitoring the visual condition of the belt. The presence of cracks, tears and traces of threads on it is unacceptable.
Such a belt can break at any moment. And if on eight-valve engines you can only get by with fear, then in the case of a 16-valve head you will have to fork out for serious repairs.
Replacement timing
The operating instructions for this car recommend replacing worn out timing drive parts with a mileage of no more than 60 thousand km. However, in some cases this mileage may be slightly different. Its mileage depends on the operating conditions of the car, driving style, and the quality of spare parts used. Experts recommend checking the condition of the timing mechanism drive parts every time a technical condition is carried out. The presence of technical fluids in the working area of the timing drive is especially harmful. The most optimal mileage before replacement is 50 thousand km.
What are the consequences of untimely replacement?
If the timing of changing the timing belt in the Daewoo Nexia 16 valves is violated, this can lead to serious consequences for the vehicle. If the wear is critical, the strap will break. As a result, the camshaft will stop, but the crankshaft will continue to work. As it moves, the piston will begin to knock on the valves, which can cause them to bend. The car owner will have to carry out major engine repairs or change the engine. Moreover, the consequences will be more unpleasant for an 8-valve unit. The valves themselves will have to be replaced.
To prevent such problems, it is necessary to constantly monitor the condition of the strap. Product breakage is usually due to natural wear and tear. During long-term use, the belt loses its elasticity, its structure delaminates, and cracks appear on it. The strap may break if the pump or tension roller jams. Sometimes it breaks due to the camshaft not working properly.
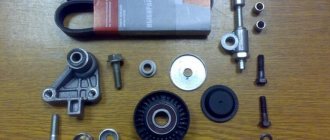
What you need for work
In addition to the standard set of tools (screwdrivers, jack, cylinder head, sockets, wrenches), you need to purchase a special wrench for 41. It costs about five hundred rubles. It would also be a good idea to have a universal pulley holder.
If you plan to replace the timing belt on a 16-valve Nexia (1.6), in addition to the belt itself, you will need a bypass and tension pulley. These elements must be changed. If necessary, the pump should also be replaced. Its resource, of course, is more than 60 thousand km, but if there are characteristic signs (antifreeze leakage, noise when the impeller rotates, and so on), it should also be replaced.
Which belt to buy
Not only the efficiency of the engine, but also its service life depends on the correct choice of engine components. This fully applies to the choice of timing belt for the Daewoo Nexia engine. The Nexia 16 cl timing belt kit includes not only a toothed belt, it also includes idler rollers and oil seals. In some cases, the pump in the engine cooling system is changed at the same time. After a long run, the pulleys on the camshafts and crankshaft wear out and are also replaced.
Experts recommend using kits from the following manufacturers:
- Bosch.
- Dongil.
- Gates.
Timing belt Bosh 1 987 949 194 Engine code-15SMS
When giving preference to one or another manufacturer, you should pay attention to the quality of the product offered. In automobile markets you can buy a fake that is very similar to a branded product. You should also be wary of the cost of the product. A quality product cannot have a low price. Having received some savings on spare parts, you can spend a significant amount on engine repairs.
Necessary tool
We definitely change the pump because the belt is tensioned by it and as soon as we touch it the o-ring will definitely leak. To replace it, we will need a special key for 41. Its price is a little more than a thousand rubles, but if the procedure is one-time, it can be made from metal 1 mm thick and bent as in the photo. One time is enough.
As well as a universal pulley holder, the tool is not required, but it is more convenient with it.
First of all, we buy everything you need: pump, belt, tension and idler pulley.
In Nexia, the engine under the hood occupies almost all the space and this promises us some difficulties. It is very inconvenient to unscrew the front engine mount, but putting it back in place is even more fun. I always remember several times the mother of the Uzbeks who installed this engine like that.
Replacing the belt yourself
Replacing a timing belt is a rather responsible procedure, which, however, can be carried out by any even slightly trained car enthusiast. Of course, you can entrust this matter to professionals, they will do everything efficiently, but where will you then gain the necessary experience...
This is interesting: How is the cabin filter replaced on an Audi A5 and how much will it cost?
So, if you decide that you will change the belt yourself, then first prepare everything you need. First, you will need a standard set of keys:
- socket and ring wrenches;
- screwdrivers with different types of tips;
- roller wrench;
- hex wrench;
- mount;
- jack.
Of course, in addition to this, you will have to prepare a new set of consumables, which, in addition to the belt itself, should include a set of rollers and oil seals. Don't skimp on the belt. Buy only high-quality consumables. Experts recommend the following brands of belts:
- Bosch;
- Dongil;
- Cates.
And if you save on buying a belt, then get ready for the fact that you will have to change it again very soon, since cheap products fail faster. And now directly about the procedure for replacing the belt.
- To make access to the belt easier, you need to remove the air pipe. We also remove the filter housing.
- Now we need to remove the power steering pulley. To do this, loosen 12 screws. After this, the product is dismantled. In this case, the power unit should be moved slightly to the side.
- Unscrew the necessary bolts and remove the timing case.
- Now we move on to the lower part of the motor system. We remove the right wheel, after first raising the car with a jack. To make the work safe, a brick support should be placed under the car.
- Remove the plastic covering the power unit. If there is an air conditioner, then its strap will also have to be removed.
- Now remove the crankshaft pulley. For this we will need an assistant. He should fully apply the brake at speed 4. At the same time, the crankshaft is fixed, and the screw securing the pulley is turned out using a wrench.
- We set the piston of the first cylinder to dead center mode. After this, you can begin to remove the belt. The mark located on the casing should be opposite the cutout on the crankshaft. If the arrow is directed slightly to the clockwise side, then this is normal.
- After this, you can remove the lower part of the casing covering the timing mechanism.
9. Unscrew the power steering pump lock. To do this, use a 12. 10 key. Now you will have to unscrew 2 more screws in order to remove the tension roller. 11. Now remove the timing belt.
The belt has been removed. Now we prepare a new consumable and install it.
1. We will carry out the installation process in reverse. Do not forget to ensure that there is no play on the cooling system pump. There should be no refrigerant leakage from the cooling system. Bearings should not make noise. If noise is present, the bearings should be replaced with new ones. 2. Now we check the correct location of the marks on the camshafts and the power unit. If everything is fine, we begin to tighten the new belt. It should be tightened by turning the pump. A special device is used for this. If it is missing, you should navigate by the marks, although this is much more difficult. To do this, take a 17mm wrench and loosen the camshaft mounting screw. There is no need to turn it out completely. After installing the belt, return the pulley to its place. 3. Now scroll the crankshaft to the right 2 times. We make sure that all marks match. The mark on the tension roller should align with the protrusion on the platform. 4. Turn on first speed, press the brake, thereby preventing the crankshaft from turning. 5. If necessary, the cooling system is replenished with liquid. 6. The belt is tensioned using a tension roller. Remember that the golden mean is important here - the belt should not be overtightened, and sagging is also not allowed.
Removing the old belt
So, let's get to work. Replacing the timing belt on a 16-valve Daewoo Nexia begins with unscrewing the clamp of the air filter pipe. You will also need to remove the filter housing itself.
This is interesting: Replacing lamps in Kia Sportage 3: photos, instructions
Next, using a twelve key, you need to loosen the screws that secure the power steering pump pulley, if one is included in the car. Then unscrew the top bolt securing the generator. It is also necessary to loosen the tension roller of the alternator belt. The next step is to remove the power steering pump pulley. To do this, you will have to tilt the engine off the mountings as far as possible to the side. Then, using a ten key, unscrew three more bolts and dismantle the upper part of the plastic timing belt casing. Next you need access to the bottom of the engine. Since the motor is mounted transversely, you can reach the pulley through the front right wheel. The latter must be removed by first placing the car on a jack and stops (if there are none, you can tighten the handbrake). Then unscrew the bolts that secure the plastic engine protection. If your car has air conditioning, loosen the tension roller clamp. You will also have to remove the compressor drive belt.
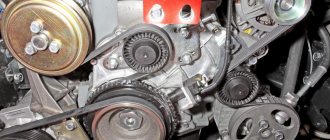
Alignment marks
Correct valve timing is ensured by the correct position of the timing marks. They are located on the camshaft pulleys, crankshaft, and cylinder block.
Rotate the crankshaft until the marks coincide
The camshaft pulley marks should be located exactly opposite, in the center in a horizontal position, on the side where the pulleys almost touch.
Camshaft marks
The crankshaft pulley mark should be located against the mark on the block.
Crankshaft marks
After installing new spare parts, the crankshaft is turned two turns, after which the position of the installation marks is checked again, which must match.
Tension
The power unit of this model provides tension on the timing belt by turning the pump in the engine cooling system. Using a special wrench, turn the pump to ensure the required tension of the drive belt. If the pump is not replaced, tension is carried out using a roller. It is turned until the marks on the roller body coincide.
Step-by-step instruction
We remove the air intake pipes, the air filter housing and everything connected to them. This is the picture we get.
Unscrew the bolts securing the protective timing cover and remove it. We also loosen the bolts securing the power steering pulley. So that he doesn’t swear later trying to stop him.
Loosen the generator mounting bolt, move it towards the engine and remove the generator belt.
Remove the right wheel and the plastic mudguard from below. Drain the antifreeze.
Now we see the crankshaft pulley.
Set the top dead center
Use the crankshaft bolt to rotate the entire gas distribution mechanism until the mark on the camshaft pulley and the housing coincide.
Remove the power steering pulley. The photo has already been taken. But the crankshaft mark is visible and it coincides with the pointer. Unscrew the two hydraulic booster mounting bolts. Do not drain the power steering fluid!
We remove the crankshaft pulley and see that the marks on it match. Unscrew the crankshaft bolt with the help of a partner. We engage fifth gear, press the brake and unscrew it with a slight movement of the hand.
Unscrew the bolts of the lower protective cover and remove it.
Replacing the pump
Loosen the three pump mounting bolts; they are hexagonal. They are not visible in this photo; after removing the protective casing, I will mark them. Using a special wrench, turn the pump until the timing belt loosens and remove it. Remove the camshaft pulley. The bolts for fastening the protective casing were hidden under it. And two more below. We unscrew them.
We move the casing and see just three bolts securing the pump.
Replacing the thermostat
And on top is the hero of the occasion, the thermostat in its own housing. We remove it and change it.
We remove the water pump and lubricate its gasket with a thin layer of sealant to prevent it from leaking later. There is no point in changing it, it is still new.
Thermostat, special key and water pump.
We put the water pump in place. There is a tension indicator on the tension roller; after tensioning the belt, the arrow should be opposite the groove.
Let's sum it up
Taking into account the above information, it becomes clear that replacing the timing belt of the Daewoo Nexia, or rather the timing belt, is a mandatory and responsible procedure. At the same time, it is important to change the belt not only according to the regulations, but also to take into account certain factors that can shorten its service life.
One way or another, if necessary, work on replacing the timing belt on a Daewoo Nexia can be done with your own hands in a regular garage. Of course, certain skills will be required (it is important to be able to correctly set timing marks, drain and refill antifreeze if necessary, replace the pump, etc.).
We also recommend reading the article about which is better, a timing chain or a timing belt. From this article you will learn what advantages and disadvantages the specified types of timing mechanism drive have, as well as what subtleties and nuances need to be taken into account when selecting a car and internal combustion engine with one or another type of timing mechanism drive. However, having the necessary set of tools on hand, replacing the belt and other elements can be completed independently, which will significantly save money. Finally, we note once again that when replacing the timing belt on a Nexia or any other car, you also need to pay attention to: the condition of the tension roller, pump, seals on the crankshaft and camshaft.
If it has been determined that any element needs to be replaced or replacement will be required soon, in parallel with replacing the timing belt, additional work should be carried out to replace worn or failed elements.
Ignoring this rule for complex replacement may cause the old roller to jam, as a result of which the new belt will still be torn off with all the ensuing consequences.