Brake pad - what is it and what functions does it perform?
The brake pad is an element of the brake system, which is part of any car, as well as the main working “organ”. It is the pad that is responsible for creating acceleration, which slows down the movement of the vehicle due to contact with the surface of the wheel and disc. Thus, the pressing force is “transformed” into braking torque.
Brake systems of the shoe type operate by converting energy. The kinetic energy of the car’s movement is “converted” into heat due to the intense friction of the pad against the disc, wheelset or drum. When you press the corresponding pedal, air pressure, brake fluid, and cable tension are generated in the brake drive. The latter is transmitted to actuators such as cylinders and cam. They are responsible for ensuring that the pad interacts as strongly as possible with the surface of the disc or drum.
The harder it is pressed, the more effective the braking will be. During such interaction, the friction pair, that is, the pad and the disc, become very hot and “absorb” the kinetic energy of the moving vehicle. As a result, it stops.
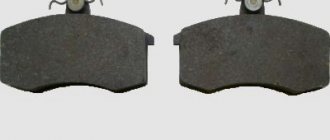
The brake pad design cannot be called complicated. It is a plate made of metal. It plays the role of a base on which a friction lining is installed. This design “repeats” the shape of the surface with which it interacts (disc, drum), and therefore has the shape of a semicircle or straight.
The pad is fixed to the block using special rivets and glue. On some models of modern cars, the pad is equipped with wear sensors. Modern pads include a specialized friction coating that is designed to protect and maintain structural integrity in extreme conditions (the temperature of the pads during operation of the braking system often reaches 1000 degrees).
Thanks to the presence of a friction coating, the pads are able to withstand operation at extreme temperatures for a long service life. The car owner must remember that if there is a desire to avoid premature wear, it is necessary to protect the brake pads from contact with water, engine oil, aggressive fluids such as antifreeze or brake fluid, as well as excessive overheating.
When braking efficiency drops, a squealing sound occurs when you press the pedal, the lining is completely worn out and the vehicle is slowed down only by the metal base - this is a sure sign of pad wear. Replacement required.
Brake caliper piston - device, purpose
If the brake system breaks down, the car owner immediately checks the brake caliper piston and adjacent components. This is justified because this device affects the safety of vehicle operation and ultimately the preservation of people’s health and lives. But what else do we know about calipers and their operation?
Brake caliper piston and other system elements
If we consider the brake caliper design as a whole, we should remember that this is a unit that, with the help of pistons, ensures uniform pressing of the pads.
The very design of disc brakes requires them to operate in critical temperature conditions.
Between the pad and the disc, as a result of friction, the surfaces of the parts are heated to a temperature of 500-600 degrees Celsius.
Considering the design of a disc brake with a floating caliper, one should note its characteristic features.
Its movement relative to the disk during braking occurs in such a way that it can quite easily provoke various malfunctions in the form of critical accumulations of dirt, corrosion, and jamming.
In such situations, the pads wear out quickly and fuel consumption increases. A more reliable design is considered to be a fixed version of the caliper, where there is no movement of it relative to the disc.
Front and rear brake calipers
The design and design of the front brake caliper is an open unit, allowing it to be effectively cooled while driving.
It consists of a disc mounted on the wheel hub and the caliper itself. The sockets house cylinders that are installed in a certain position using special clamps.
Inside the cylinders there are pistons sealed with rubber rings.
In order to protect the internal cavity from dust and dirt, a brake caliper guide boot is installed. The outer cylinder contains a special valve that removes excess air.
The rear brake caliper has a more complex design due to the presence of an additional handbrake mechanism. Thus, the braking system of the rear wheels can operate from two drives - conventional hydraulic and mechanical, which provides additional operation of the parking brake.
The integrity of the brake caliper protection is the key to safety.
A preventative repair that your brakes may need to prevent serious problems is replacing the brake caliper boot, which protects the exposed parts from the penetration of moisture, dust and dirt particles, and other chemically active substances. If this small part is not maintained in good condition, then any dirt that gets inside will ruin your complex structure.
However, before removing the boot, you must disconnect the rear brake caliper piston. To remove it from the body, it must be unscrewed from the rod, which is an integral part of the handbrake. The front part of the brakes will be a little simpler.
Many car enthusiasts repair brake calipers with their own hands. However, in modern cars, the design of this system is a rather complex mechanism, the repair of which most often requires the help of qualified specialists.
Replacing the boot - we try to do it ourselves
In what order should I get to the boot and replace it? Remove the cap from the caliper that protects the guide head (also called the “finger”). We take a suitable hexagon, turn it out and take it out. Now we have access to the boot itself, we remove it too.
If there is dirt underneath, it needs to be washed thoroughly, preferably not only from the visible part of the caliper surface. If possible, press in the piston; usually a special tool is used for this.
This will prevent damage to the system inside, where sand will scratch the inner surface of the caliper and the outer piston.
When you have washed everything well, you can return the piston to its usual place and check its progress. If it now moves smoothly and there is no sand grinding inside, then you have achieved your goal, you can install the boot and assemble the system.
But once you are under the car and look into the caliper, you can remove it and check it completely for defects.
Recommendations for timing of brake pad replacement
Car enthusiasts should not forget that the safety of the car, driver, and passengers in the cabin largely depends on the condition of the brake pads. Every vehicle owner should know when a replacement is required. However, the service life of such consumables directly depends on the material used in their manufacture, the individual driving style of the car owner, as well as operating conditions.
To maintain the braking system in working condition, you need to carefully monitor its performance. Experienced auto mechanics who work in specialized auto repair shops know exactly when it is necessary to change pads of one type or another. The remaining resource can be approximately determined by paying attention to the mileage of a particular car. Moreover, you can obtain information about the timing of replacement if you read the documentation included with the car.
The type of brake also affects the rate of wear. On average, brake pads are recommended to be replaced after traveling from 50 to 80 thousand km. You can extend the service life of such consumables by adjusting your individual driving style (sharp acceleration and deceleration while driving increases the rate of destruction of the linings several times).
The absent-mindedness of the car enthusiast can bring the day of replacing the pads closer. The fact is that inexperienced drivers (most often those who “got behind the wheel” recently) forget to release the car’s parking brake and start driving with the handbrake on. Such a “misconduct” has a very negative impact on the condition of the consumable material, as well as the performance of the braking system as a whole.
To increase the service life of the pads and prevent unnecessary costs associated with frequent replacement of this consumable, it is not recommended to perform long braking, which involves holding the brake pedal down for a long time. Experienced drivers in such a situation prefer to slow down their car by frequently and briefly pressing the brake pedal. Such measures will not only help prevent rapid wear of the pads, but will also prevent the car from skidding (the danger of such a phenomenon occurs when driving on a too steep slope or slippery surface), which will significantly increase the safety of the car, as it will prevent skidding.
Causes of knocking noises
Since you can independently determine the knocking noise from the caliper when testing the suspension on uneven surfaces, you can also safely repair your car’s brakes with your own hands.
There is nothing scary or difficult about this. This happens on a variety of machines, including:
- Toyota Corolla;
- Gazelle;
- Lada Largus;
- Ford Focus;
- VAZ 2110;
- Mercedes Sprinter;
- Renault Logan;
- VAZ 2114;
- Lada Vesta;
- Chevrolet Aveo (every 30 thousand km);
- Hyundai Solaris, etc.
The reason usually lies in one of 3 reasons.
This includes poor fixation of the element, wear on the guides, as well as wear on the brake pads. In the latter case, the pads themselves will actually knock, although the symptoms manifest themselves identically. In any case, you will have to go there and take appropriate measures.
Now we will consider each reason separately.
The pads are worn out
The first thing that should be checked when such symptoms occur is the pads.
There are two simple diagnostic methods that you can do yourself.
- While driving. If you feel that the car brakes worse with the same pressure on the pedal, plus there is a creaking noise when braking, the pads are probably seriously worn out. This also includes such a symptom as beating in the pedal;
- Visual method. You will have to get to the pads by removing the wheel and examine their condition visually. Worn linings indicate a problem. Even if they are not completely erased, it is better to treat the node immediately.
On every car, the pads must be replaced after a certain period. Usually this is 10-15 thousand kilometers.
If the pad is worn out, the driver will observe a sound reminiscent of a knocking sound from the caliper. Under no circumstances should the pads be allowed to wear excessively, otherwise this could result in damage to the brake disc. Also, such pads can squeeze out and cause jamming of the car brake cylinder.
Having dealt with the wear of the pads in the calipers, we move on.
The culprits are the guides
There is a rather important component in the brake system, called caliper guides. When they wear out, it is necessary to take measures to replace the components.
In fact, there may be 2 problems here.
- The guides themselves are worn out. If these elements are worn out, then there is no need to repair or restore anything. You just need to purchase new guides and install them in place of the old ones. Based on the video instructions, this will be quite easy to do;
- The sockets are worn out. The guides have sockets that also wear out over time. Special repair rubber bands will help you here. These rubber bands are put on the pin, thereby the guides stop causing knocking.
What you shouldn’t do is use the so-called collective farm method. It consists of drilling additional holes in the brake system cylinder block, as well as in the caliper itself, after which the elements are tightened. For this, a spacer spring is used.
Sometimes lubricant helps to get rid of extraneous noise for a long period. For some, the sound appears again after 200-500 kilometers, for others it lasts several thousand kilometers.
Caliper mount
The rarest malfunction is considered to be a loose caliper mount. But since this also happens, this problem definitely needs to be addressed.
How to determine wear?
Checking brake pad wear is an integral part of periodic maintenance. To understand how much this consumable has worn out during operation, you need to perform several operations in the following algorithm:
- Check for brake dust mixed with metal shavings on the wheel rims.
- Determine how effectively the braking system functions. Severe levels of wear can be indicated by the vehicle decelerating too quickly or ineffectively, as well as by the presence of a wobble when the pedal is pressed.
- Place the car on a viewing hole or jack. This will help facilitate the process of checking the functionality of the front brakes.
- Unscrew the front wheels using a telescopic spanner. If you are checking the pads on the left side, then you need to turn the steering wheel to the left (the same with the right side).
- Determine the thickness of the brake pad linings. This can be done by using the inspection hole, which is located in the movable caliper bracket. When carrying out this procedure, it is necessary to remember that if the thickness of the friction lining is less than 1.5 mm, then replacement is required.
- Place a jack under the rear wheels, then dismantle them and remove the brake drum.
- Measure the thickness of the friction linings using a caliper or an ordinary ruler. In addition to the small thickness of the linings, replacement is required if they are poorly connected to the base or oil traces were found during the inspection.
To carry out the check correctly, you need to prepare the necessary tools, namely a jack, a telescopic wrench, a caliper, the functions of which can be performed by a regular ruler. This procedure does not require any special knowledge or extensive experience. To determine the need for replacement, a car enthusiast must have only basic skills and a general understanding of the work algorithm.
However, inexperienced car owners who have never had to check pad wear are not recommended to carry out such a check “alone”. The fact is that if the wear level of consumables is determined incorrectly, this may lead to a decrease in the effectiveness of the brakes or failure of the entire system at the most inopportune moment. The best solution in such a situation is to carry out diagnostics in a specialized car service center. Specialists will be able to quickly check and, if necessary, replace consumables.
Cleaning and inspection.
Before assembly, all parts must be thoroughly cleaned and tested for suitability.
2.1 Wheel hub.
2.1.1 Cleaning the wheel hub.
The easiest way to thoroughly clean the hub of rust and dirt is to use a specially designed brush. Warning: There is a risk of injury due to splashes of rust and dirt! Wear safety glasses when performing this operation!
Note. Do not use cutting or grinding tools for cleaning. This always results in damage to the hub surface. After cleaning, thoroughly rinse the hub with TRW Brake Cleaner and ensure that all dirt is removed and the surface is clean and shiny.
2.1.2 Checking the wheel hub.
Check the condition of the contact surface of the hub with the disc for damage (pitting). Don't forget to check the condition of the wheel bolts. Any damaged hub must be replaced.
2.1.3 Wheel hub measurement.
If before repair the car exhibited vibration when braking, it is recommended to measure the runout of the wheel hub before installing a new brake disc. The amount of hub runout must not exceed the limit value specified by the vehicle manufacturer.
2.2 Clamp.
2.2.1 Cleaning the clamp.
Cleaning the fork has a significant impact on the proper functioning of the braking system. All surfaces in contact with the brake pads must be free of dirt and rust. Keeping it clean protects against subsequent complaints related to brake locking or squealing. Warning: There is a risk of injury due to splashing rust or dirt! Wear safety glasses when performing this operation!
2.2.2 Cleaning the caliper guide pins.
Cleaning the caliper guide pins allows the caliper body to move freely, ensuring it functions correctly as the piston extends and retracts. A brake disc damaged by brake pads being in constant contact with the disc due to a faulty brake caliper. Visible darker areas indicate overheated areas. They cause noise and vibration when braking.
2.3 Brake disc.
2.3.1 Disk cleaning.
If necessary, clean the surface of the new brake disc (also from the inside) with TRW Brake Cleaner. During assembly, ensure that no dirt or grease gets onto the washed surfaces. Note: brake pads should not come into contact with petroleum products. This may negatively impact their performance.
2.4 Clamp
2.4.1 Checking the clamp.
When checking the caliper, check all of its mechanical and hydraulic parts. Damage to the piston seal causes brake fluid to leak and, as a result, destruction of the friction material of the pads. On the other hand, damage to the brake piston cap allows dirt and water to get inside, causing corrosion. A caliper with a damaged, corroded piston or cylinder must be replaced. Leaving the caliper with a locked piston may cause the system to overheat or cause vibration when braking. Note. When cleaning caliper components, do not use cleaners containing mineral oil. This may cause the seals to swell, block the piston or leak!
How to choose the right brake pads?
When purchasing brake pads for your car, you must pay attention to the type of material from which the friction linings are made. Today on the market you can find the following types of linings:
- Metal. They are often made from steel or cast iron. In addition to automobile braking systems, a similar type is used in railway transport due to the provision of highly effective braking. Such material does not warp, but sharply loses its properties at temperatures above 400 degrees.
- Non-metallic. Such linings are made on an asbestos base, and resin or rubber is used as connecting elements. This consumable provides a high coefficient of friction until the temperature rises above 220 degrees.
- Sintered. This variety is most often produced on a steel base, but other materials are “sintered” with it during the welding process. Their role is played by pre-made blanks, which consist of powder mixtures subjected to strong heating. The performance properties of such consumables include a high coefficient of friction, wear resistance, stability, and a good level of adhesion.
Each type of consumable has unique properties that must be taken into account when purchasing.
Brake pads must be selected taking into account factors that influence wear. These include:
- Brand of consumables. Each manufacturer's pads have their own characteristics, which must be carefully studied and taken into account when purchasing.
- Vehicle weight. The heavier the car, the more force the brake system will need to exert to slow down or bring the car to a complete stop.
- Driver experience and individual driving style. Even an inactive car enthusiast can quickly exhaust the life of the pads. This happens when the driver does not know how to “brake with the engine” if necessary, or while idling in a traffic jam, keeps his foot on the pedal all the time and brakes sharply, approaching close to the car in front.
If a car enthusiast is accustomed to “aggressive” driving, then it is worth giving preference to consumables with increased wear resistance when working under harsh operating conditions (when the temperature at the friction point rises to 1000 degrees). Such pads, as a rule, are made of expensive materials, which has a significant impact on the cost of the finished product. If there are not enough funds to purchase such pads, then all that remains is to adjust your driving style.
What affects the reliability of the braking system?
It should be noted that there are points that have a great impact on the reliability and service life of brake pads.
These include the following points:
- How and what are the pads made of?
- Driver's driving style: aggressive, moderate.
- Quality of roads.
- Climate and time of year.
- Lifetime.
As mentioned earlier, the car’s braking system requires the most responsible care. You shouldn't skimp on it. Choose only high-quality spare parts from trusted manufacturers.
Moreover, if the pads you choose do not fit the dimensions of your car, do not under any circumstances attempt to modify them.
Understand that any impact in the future can disrupt the progress of their work and lead to irreversible consequences, the least of which will be the rapid failure of the pads themselves.
It is necessary to check the condition of the brake mechanism every 10 thousand km. Factors indicating the need to replace parts are:
- If the thickness of the residual friction layer is 2 mm or less.
- If there is damage on the pads that was not obtained naturally.
- If the mechanism has chips, cracks, grooves and irregularities.
Preparing the car for replacing brake pads
Before replacing the pads, it is necessary to prepare two types of lubricants, namely for processing the studs and the hub pad, for lubricating the guide pins and brackets that serve as pad retainers. If it is necessary to process the studs and the hub pad, then most often a graphite type of lubricant is used. However, it is possible to use a high temperature type made on a copper base. The fact is that a copper dab can more effectively protect metal surfaces from wear, oxidation, and “sticking” under extreme temperatures (from -40 to +1100 degrees).
The second type of lubricant required for the guide pins and retaining brackets should be a general purpose lubricant (preferably). Such a lubricant can effectively perform its functions, moreover, it costs much less. Before you start lifting the car with a jack, you need to select as level a horizontal surface as possible, put the car in neutral gear, sharply press the brake pedal, and then immediately release it. The last action will allow you to “deepen” the brake piston, which will make further actions easier.
It is necessary to place special stops under the wheels to prevent accidental movement of the vehicle during maintenance. To make it easier to “recess” the piston, you need to open the hood and unscrew the cap of the reservoir that contains the brake fluid. To gain access to the pads, the wheel must be removed. You need to fix the guide pin using a 17mm wrench, then unscrew the lower and upper fixing bolts.
Some car enthusiasts, when replacing pads in a personal garage, prefer to completely unscrew only the lower fixing bolt, and simply loosen the upper one, so that in the future they can lift the caliper up and not completely dismantle it. Using this method of maintenance, you can significantly speed up the process, but it is impossible to check the stroke of the guide pin in such a situation.
In specialized car services, where the quality of service delivery is always put first, rather than the speed of completion of maintenance, the caliper is always completely dismantled. This approach allows for more efficient inspection and replacement, and, moreover, saves the car owner from “unpleasant surprises” on the road. To prevent the caliper from interfering with maintenance, specialists often hang it using a metal wire on the suspension spring.
How to change front and rear brake pads
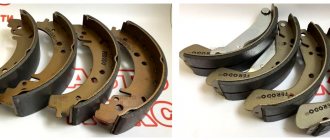
Replacing the front and replacing the rear brake pads are different, because the front has disc brakes and the rear has drum brakes.
General replacement procedure (disc and drum):
- Open the hood and unscrew the brake fluid reservoir cap.
- Jack up either front side and remove the wheel.
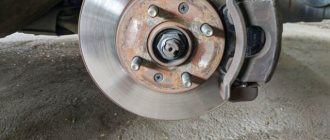
- Clean the brake disc from dirt.
This is what brake disc pads look like on a Skoda Octavia car
- Unscrew the bolts of the guide caliper and brake drum to gain access to the pads.
- Use a screwdriver to remove the pads.
- We install new pads in pairs.
- Then you need to bleed the entire brake system.
This was the general procedure for replacing brake system parts. Now let's look at how to properly change brake pads on the front and rear wheels.
What tools are needed to replace brake pads yourself?
Before you begin to “prepare” the car for the replacement procedure, you need to collect the necessary tools and other things. These include:
- Manual. If a car owner replaces the pads himself, then he needs to make sure that such a manual is available. If the “book” purchased with the car is not compiled in detail, then you need to purchase a higher quality edition with detailed step-by-step instructions. Such a guide will be useful to car enthusiasts who have little experience, as it will help to accurately determine the installation location of the jack, supports for holding the vehicle suspended, and obtain other information for the replacement procedure.
- Jack. As a rule, it comes with a new car. The jacks provided by the manufacturer are ideal for replacing a wheel, but “original” jacks are not always suitable for dismantling the pads. The fact is that they often cannot lift more than half the weight of the entire car, since the manufacturer believes that such a load capacity is quite enough to replace a wheel. But to replace the pads you need a device that can lift up to ¾ of the car’s weight. If we are talking about a passenger car, then the right decision is to purchase a jack designed for 3 tons. This will ensure safety and lift heavier machines if necessary.
- Lifting support. It is required to keep the car stable in the air after it has been lifted using a jack. Each such “stand” has individual load-carrying characteristics, so you need to purchase them based on the total weight of your personal vehicle. The best solution is to buy products with a reserve carrying capacity.
- Caliper adjustment tool. It makes it possible to independently calibrate the caliper if necessary. It can be done in other ways, but often all of them are less effective, especially if the car enthusiast lacks experience.
- New pads and brake discs (if necessary). An experienced car enthusiast will always prepare consumables in advance to replace worn ones before dismantling the wheel and removing old pads.
- Brake lube. It must be prepared, as it is needed for applying new pads and calipers to the surfaces during reassembly.
- Set of socket and wheel wrenches.
Rust removal sequence
To keep your brake calipers in tip-top shape, you need to clean the sliding pins regularly. Remove old oil, debris and rust, then add heat-resistant lubricant to the pin and put it back in. The entire process may take about an hour.
The following step-by-step instructions will make cleaning easy:
Remove the caliper. This is not possible if the car is at ground level, so you will first need to jack up the car
Once it is raised, loosen all the nuts on the four wheels without removing them completely. Remove the nuts on the front two wheels. Keep the nuts in a safe place. Carefully place the film on the surface and cover the cap. This process ensures that most of the vacuum is properly retained in the brake system. Loosen the line at the point where it meets the caliper. Unscrew it partially and bring the tray to collect the drops. Using a screwdriver, remove the spring clip. Loosen the bolts and remove them, then remove the caliper from the rotor. When it is completely free, you can pull out the pads. After removal, use the rubber vacuum cap and pan to collect the liquid
Place a piece of wood between the piston and the outer flange. Do-it-yourself cleaning of calipers from rust is carried out using brake fluid to remove contaminants and grease. Use a cleaning brush and brake fluid. Spray some of the brake cleaner onto the brush and begin processing. Do not spray cleaner directly onto the calipers. The more carefully this step is performed, the better the cleaning effect will be. When finished, remove the front locking clip and close the drain valve using masking tape. Once it is closed, secure the brake hose fittings as well. Take some stiff cardboard and cut out a piece in the shape of an inverted L. You need to protect all parts of the car with plastic film. If paint gets in, the normal functioning of the braking system will be disrupted. You may need to use duct tape to hold the plastic in place. Spray the paint onto the caliper using a slow and steady motion. Take special care to prevent paint from getting between the brake pad and rotor. Leave the paint to dry before removing the plastic and cardboard. Move to the next wheel and repeat the process. Make sure the paint is completely dry before attaching the wheels. Repeat the process until the caliper is completely clean. Observe safety precautions when performing work. Any dust or dirt in the air can get on wet paint. In addition, the smoke from spray paint is dangerous if the driver inhales it, so it is recommended to wear a dust mask when working. Replace the piston and reattach the brake line, then install the brake caliper into the wheel. Once all four calipers are serviced and the wheels are installed, check the brakes. If any problems are found, contact customer service.
Step-by-step instructions for replacing brake pads yourself
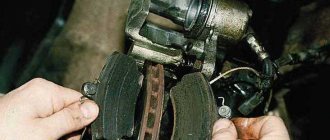
Inexperienced car enthusiasts often wonder: how to understand brake pads . They should know that the replacement process in disk and drum systems has its own characteristics that need to be studied in detail before starting the procedure. If we are talking about replacing worn brake pads in a disc system, then you need to adhere to the following algorithm:
- Jack up the car, remove the wheel, and then install a special support on the bottom.
- Unscrew the caliper guides. If the design contains fixing brackets, they must be removed using a screwdriver.
- Disconnect the pad wear sensor connector, if equipped.
- Remove the pads from the disc using a screwdriver. This action is performed to press the brake piston.
- Remove old consumables.
- Install new pads.
- Reassemble the brake system in the reverse order, that is, put the wheel “in place” and remove the jack.
- Bleed the brakes. This is necessary for the new pads to “break in”.
Carrying out the above steps in the described sequence will help you carry out the replacement procedure as efficiently as possible and achieve a positive result without resorting to the help of specialists.
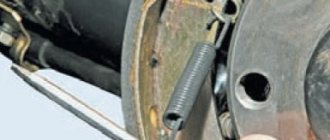
If the car is equipped with a drum brake system, the replacement procedure will have some differences. Actions are performed in the following algorithm:
- Jack up the car, install a support under the bottom and be sure to remove the car from the handbrake.
- Unscrew the bolts securing the brake drum, and then dismantle it.
- Release the handbrake cable. To do this, you will need to dismantle all the springs and remove the rear brake rods.
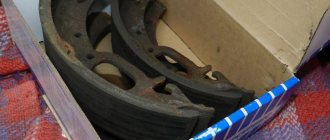
- Remove old pads.
- Install new brake pads, then reassemble the entire system in reverse order.
- Reinstall the removed wheel without removing the car from the jack.
- Check the operation of the rear brake mechanism. To do this, you need to put the car on the handbrake and try to spin the wheel.
- Pull the jack and supports out from under the car.
The described algorithms cannot be called complex - all actions can be performed in a personal garage by the car owner. However, a car enthusiast should have at least a general understanding of the design of the brake system (disc or drum). If you do not have the minimum experience and knowledge, then it is not recommended to “climb” to replace brake pads , “armed” with one instruction. An incorrectly assembled brake system may not work at the most inopportune moment.
Replacing the caliper repair kit
The most difficult and responsible operation when repairing calipers is replacing the caliper repair kit. During this operation, all seals and rubber parts of the caliper are changed.
To begin with, you must purchase a repair kit for the caliper of your car. To do this, in a car store you will have to tell the seller the make and model of your car, the year of its manufacture and other information that the seller asks.
To carry out repairs using a repair kit, you first need to dismantle the caliper. After that, transfer it to the workbench and completely disassemble it
A very important note - the place where the caliper is disassembled must be as clean as possible. Even the smallest grain of sand getting inside the caliper threatens its early failure
When disassembling the caliper, it is recommended to write down or photograph the places and methods of installing certain parts.
In most cases, you will need to replace the following rubber products:
- Brake cylinder seal;
- Brake piston boot;
- Guide boots;
- Guide seals;
- O-ring of the bleeder fitting.
If there is deep corrosion on the working surface of the brake piston (with the formation of cavities), then the piston must also be replaced.
Reassemble the caliper in the reverse order of disassembly. After this, the caliper must be installed on the car, the guides lubricated and the brakes bled. As you already know, you will need an assistant or a special device for this.
Running in brake pads after replacement
Often, after replacing the pads on their own, car enthusiasts forget to break in the new consumables and immediately begin to operate the brake system in “aggressive” mode. Such an attitude can most likely lead to premature failure of the brake system elements (and we’re not just talking about the pads). Such use provokes the appearance of a “whistle” when braking in 80% of cases.
To increase the service life of the brakes, it is necessary to break in, adhering to the following algorithm:
- Warm up the brake system. To do this, without starting to move, press the brake pedal several times (2–3 times). This will help create the right pressure.
- Start driving using intermittent braking for the first 300 km. In this case, you must avoid pressing the pedal hard or for long periods of time. Such “procedures” make it possible to prevent the pads from overheating immediately after installation. During break-in, you need to pay attention to strong noises and vibrations that occur when the brake system is activated. The presence of such phenomena may indicate improper assembly or installation of brake system components. If such “symptoms” occur, you will need to check it yourself as quickly as possible or contact a car service center where the consumables were replaced.
- Perform final run-in. After passing the first 300 km, 3 to 5 intensive braking sessions are required. Such braking must begin at a speed of 90 to 110 km/h. The initial force when pressing the pedal should be average, then it needs to be increased until it comes to a complete stop (you don’t have to do this: just slow down as much as possible). Between intensive braking, you need to allow the system to cool for 1 minute.
- After the initial break-in and a series of intense braking, drive for several kilometers and try not to use the brake at all. This is necessary to cool the brake system as much as possible.
Running in is carried out in order to prepare the material from which the pads are made to the high temperatures that occur at the friction point during braking. Carrying out the described “procedures” allows you to avoid temperature shock (it provokes rapid wear) and effectively grind in the working surfaces of the pads and brake discs.
To perform break-in, you need to have a certain experience, in the absence of which, entrusting the described procedure to a more experienced specialist is the best solution. This will help avoid damage to the brake system when performing “rough” break-in.
Brake caliper design
Car enthusiasts are not always good experts in the field of car maintenance and sometimes do not know all the intricacies of the technical standards that are required for the effective operation of cars. Calipers are cleaned annually or every 40,000 km of the vehicle. The frequency and types of work differ significantly from servicing a conventional brake.
The device consists of pads, brackets, pistons and sliding pins that press the pads against the rotors during braking. Over time, the pins consume all the lubricant, and the sliding process is disrupted, after which the following “problems” appear in the car:
- The brakes do not make contact with the rotor, causing the pads to wear unevenly.
- The pad constantly interacts with the rotor, which creates heat that destroys the brakes.
- The brakes become weak due to the fact that the linings do not lie on the entire working surface.
The device is an integral part of the braking system. When the brake pedal is depressed, fluid flows from the master cylinder to the calipers, putting pressure on the piston inside, thereby pushing the pads against the metal discs and stopping the car. The key role is to create friction with the rotors, thereby braking the wheel. There are two types of devices: floating and fixed. Floating - Moves in and out, creating friction with the rotors. Brake grease washes away on wet roads. Metal parts are susceptible to rust, so it is recommended to clean them to improve the performance of your car.
It is advisable to carry out cleaning annually. In expensive cars, brake discs are made of cast iron. Conventional brake systems are very sensitive to corrosion and must be thoroughly cleaned during mandatory equipment lubrication procedures. Rust residue in critical areas can cause brake problems.
Possible problems and their causes
As mentioned above, if the installation of new pads is carried out by an inexperienced car enthusiast, then problems may arise during future operation. These include:
- Overheating of brake discs. The main reason for this is the “wedging” of the caliper guides. In such a situation, the pad cannot fully interact with the working surface of the disc. Uneven pressure resulting from deformation of the pad leads to overheating. Its premature wear can also be a cause.
- Creaking and grinding of pads. The reason for the appearance of such sounds during operation of the brake system may be a violation of the integrity of the boot of the main piston, the use of low-quality consumables, the absence of cuts or bevels on the surface of the pad, excessive overheating of the disc or its wear. Extraneous noise can be eliminated in various ways, depending on the specific reasons.
- “Sinking” of the brake pedal. This phenomenon can be caused by damage to the cylinders, a lack of working fluid in the system, or poor-quality assembly. Most often, the pedal fails after replacing the pads due to the carelessness of the car enthusiast who installed them. Inexperienced intervention in the system will most likely cause air to enter or working fluid to leak out.
- Knock when braking. It can be caused by play in the caliper guides, wedging of the piston, bending of the brake disc, or loosening of the cable in the parking brake system. Another reason for the appearance of such extraneous noise can be the anti-lock braking system, if it is included in the design. To check this, you need to pull the fuse from it, which will “turn off” the ABS, but the brakes will continue to function.
- Vibration. It may be caused by deformation of the brake disc. It may be caused by excessive heat during operation. The fact is that during intense braking, the pads can be pressed too hard against the disc, creating enormous pressure and temperature. This can cause the disk to lose density and change its shape. It is worth noting that sudden cooling of the disk can also cause deformation in certain places.
Taking into account the above reasons, you can adjust your driving style in such a way that the service life of discs, pads and other elements of the brake system will increase several times. An inexperienced driver can protect the braking system from such problems to some extent by installing ABS.
Repair
Having figured out the main reasons why the car may not slow down, you can begin repairs. Specifically, in this article we will look at repairing car calipers with our own hands. If everything is clear with the first case, for repairs you just need to clean the calipers from dirt, and everything will be operational again, then in the second case you will have to work.
You can solve the problem with the second breakdown only after searching for information specifically for your car, because there is no universal way to fix this problem.
Unfortunately, these are not the only problems that may cause your car to fail to slow down. Another reason why the wheel may not brake or, on the contrary, may not release, is considered to be a faulty cuff. The cuff is installed as a spring, which returns the brake piston to its place. Over time, the cuff loses its elastic properties and ceases to return the piston, which presses the pads to the brake disc. In this case, the disc will begin to overheat, which will lead to dire consequences on the road. You can check that the cuff does not return the piston only after raising the car.
On a fully functional car, the wheel spins without difficulty, even if you rotate it by hand
Particular attention will need to be paid to ensure that the wheel rotates completely immediately after the brake pedal is released. Fortunately, this problem can and even needs to be fixed with your own hands.
The main advantage of fixing all problems yourself is budget savings and personal experience in car repairs. So, if something happens on your car that the cuff does not return the piston to its place, then you need to look for the reason. Most often it is hidden in the boot of the brake piston. The first thing you need to look at is the brake disc and pads. The brake disc should not show signs of overheating or signs of severe rubbing. If the disc is heavily worn, it will need to be replaced immediately with a new one. After inspecting the disc, you can begin to inspect the pads.
After the discs and pads have been inspected, we proceed to inspect the caliper piston. This can be done by just looking under the boot. There should be no marks, scratches, or even rust on the piston body; if any of these are present, then you need to disassemble the caliper. In stores that sell car parts, you can find a repair kit for car calipers. Most often, it only includes elastic bands and gaskets. In fact, a piston for a caliper is not so easy to find, so it is best to use an analogue from other cars, which will be similar in diameter and other parameters.
When replacement is required
To begin with, let me remind you that the block consists of two main components. This is the lining (aka friction) and the body itself. It is the friction element that performs the most important function, that is, it brakes the brake disc. Therefore, it gradually wears out naturally. Replacing the pad is only a matter of time. Previously, they only changed the linings themselves, but now they simply dismantle the entire block and put a new one in its place.
When exactly it will be necessary to replace disc brakes or change the drum, no one can say for sure. Wear and performance depend on a number of factors:
If we talk about the pads on the front wheels of a car, they can last approximately 10-15 thousand kilometers. This is a completely normal indicator for an average car in our conditions (road quality, weather, etc.).
And the pads installed on the rear wheels last longer, since the load on them is slightly less. This is if the main load in the car falls on the front brakes, and not the rear. They usually live 30-60 thousand kilometers, and sometimes more.
Installing rear disc brakes is a popular modification for a car because they are more efficient and reliable. Some cars are already equipped with disc brakes. Therefore, when buying a Ford Focus, Renault Logan, Hyundai Solaris, Volkswagen Polo or Passat, Kia or Audi cars, pay attention to how the brake system is designed on them and what it consists of.
There is one general rule for everyone. Brake pads should not be worn more than 1.5 millimeters from their original size. If wear exceeds one and a half millimeters, this will negatively affect the quality of braking, and you risk damaging other components of the system. Plus, the car will start making unpleasant sounds that will literally irritate you every time you press the brake pedal. There is no need to think about what to lubricate or where to turn the wrenches, as long as the creaking goes away. An unusual sound is a clear sign of wear. You will lubricate new components of the brake system during the replacement process.
Now there are so-called smart pads. Their peculiarity is that they have a wear indicator. When the time for replacement comes, that is, the block is ground down to the maximum permissible value, a characteristic squeak appears. From it, the driver easily understands that it is time to change this device, otherwise trouble will not be avoided.
Characteristic signs of wear
Yes, you can periodically send your car to a car service center, of which there are a huge number in the cities of St. Petersburg, Moscow and many others. But before going to the service station, you should understand why such measures and diagnostics were needed in the first place.
Some evaluate the current state of the elements with their own hands. Moreover, self-diagnosis looks quite simple:
- the front wheels are removed one by one and the condition of the pads is checked;
- if the thickness is below the acceptable level, it’s time to change;
- on the rear wheels, the drum is additionally removed to measure the thickness of the pad;
- the disk is cleaned of dust and dirt;
- measurements are taken using a caliper;
- The thickness of the brake disc must be at least 10.8 mm;
- If the pad is worn out only on the left or right, it still needs to be replaced in pairs.
Choosing new pads
You understand perfectly well why you should replace your pads after showing signs of wear.
Do not forget to simultaneously check the disks and the condition of the handbrake, even if your car has an electronic handbrake. A failure of the handbrake is also not a problem, so its components will also need to be replaced if they fail.
When the pedal fails, the brakes squeak, make noise, overheat and after several braking stop responding normally to the pedal, things are bad. Cars with ABS are extremely dependent on the condition of the entire braking system. Therefore, extraneous vibration, wear of friction linings and problems with discs can lead to loss of control, decreased pedal response and emergency situations.
It's one thing to choose brakes on a bike and change them. Working on a car is something completely different. Therefore, I would advise you to contact a trusted car service center. They are well aware of the procedure for replacing pads. The cost is not that high. How much a replacement costs depends on several components.
You can buy yourself a new set of pads yourself. I suggest you find out what pads are currently produced and how to choose them wisely.
Let's start with two main criteria.
- Operating temperatures. For a regular passenger car, this parameter is selected at approximately 300-350 degrees Celsius. If we are talking about fans of sporty and aggressive driving, as well as owners of powerful fast cars, then you will need more durable pads - about 800 degrees.
- Friction coefficient. Until the pads reach operating temperature, which is about 200 degrees Celsius, the coefficient remains low, which is why the pads will wear out quickly. Experts recommend focusing on an indicator of 0.3-0.5. The higher the coefficient number, the better the car can brake.
The next point is the material from which the block is made. There are several of them, and they have their own characteristics.
- Semi-metallic. More than 40% of the composition is high quality metal. Use iron, copper or graphite. Inorganic components are also added to ensure excellent heat transfer and long service life. But at sub-zero air temperatures they brake poorly and wear out faster.
- Organic. Consist of glass, resin, rubber, Kevlar and carbon. Soft, effective, silent. But they don’t like moisture and create a lot of dust when braking.
- Low metal. The composition resembles organic ones, but with the addition of steel or copper. They wear out quite quickly and are expensive.
- Ceramic. The most effective, but also the most expensive. They brake perfectly, are not afraid of temperature and moisture, and are made of metals and ceramic fibers.
If you notice the first signs of wear, do not delay with replacement. When the price for work at a service station confuses you, you can try changing the pads yourself. Photos and videos are kindly offered by YouTube users, as well as various sites where there are similar photo reports and video tutorials.
What kind of pads are on your car and how often do you change them? Write about it in the comments, ask questions. Subscribe, don’t forget to tell your friends about us and expect a lot of new, interesting and useful materials.
(No ratings yet)
Did you like the article?
Subscribe to updates and receive articles by email!
We guarantee: no spam, only new articles once a week!
Any car owner can change the front brake pads themselves in a garage or in the field. This step-by-step instruction will help you change brake pads correctly and without errors. Even those who first decided to swing the pads with their own hands will be surprised how simple and quick the procedure is.