In cars of domestic manufacturers, engine cooling occurs using a cooling system; in the VAZ-2114, this task is performed by antifreeze. Only with the right choice of antifreeze can you ensure efficient operation of the cooling system:
- Factory antifreeze fluid is worse; due to the smaller amount of additives, the thermal protection of the vehicle suffers significantly. Antifreeze was developed specifically to cool vehicle parts and components, so it is exceptionally useful.
- Factory fluid has one big drawback - it quickly spoils the pipes, which in turn leads to fluid leakage and radiator defects.
Having convinced himself of how important it is to use high-quality antifreeze, the driver of the VAZ-2114 begins to replace the old fluid with a new one. In this case, after a couple of weeks an antifreeze leak is detected, what’s the matter? The owner of the car did not take into account that along with the antifreeze, the pipes through which leaks occur must also be replaced.
Cooling system pipes VAZ 2114, 2115
The rubber pipes of the VAZ 2114 cooling system are examined in video and photos at the request of Boris Zverev...
Greetings, Lada VAZ car enthusiast on the RtiIVAZ website!
A YouTube channel subscriber came up with the idea to make a video about the rubber radiator pipes of the VAZ 2114 and the heater pipes of the VAZ 2114, just like his car. This video was filmed at the request of Boris Zverev, and the article was edited on the initiative of Albert Aukhadullin.
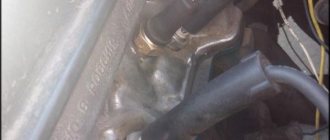
Let's start with the steam exhaust hose of the cooling system. This hose serves to remove steam from the radiator to the expansion tank. The length of this product is slightly more than one meter, the diameter of the internal hole is 8 mm.
This hose is installed on VAZ 2108, 2109, 21083, 2113, 2114 and VAZ 2115 models with injection and carburetor engines.
On models of the “ten” family, the same hose is installed as in the photo above, catalog number 2110-1303095.
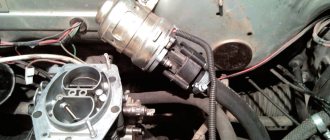
Next we will consider the hoses installed to heat the throttle assembly.
These are inlet and outlet hoses for coolant. The diameter of the hose when measured with a school ruler is about 10 mm, and the length is 48 cm.
A little theory
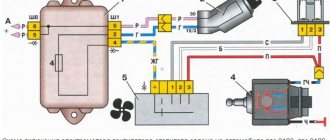
The heated liquid moves from the thermostat to the tap, and then it either enters the radiator “30” or exits directly into the outlet pipe. These are two different cases corresponding to the extreme positions of the engine (MAX/MIN). If you look at the drawing, everything will become clearer.
This is what the heater assembly looks like
Shown here: 6 – outlet hose; 8 – supply hose; 7 and 27 – clamps (4 pcs.); 26 – internal outlet hose (to the radiator); 28 – supply internal hose (from the radiator), 33 – clamp.
Radiator pipes VAZ 2114
Next comes the upper radiator inlet pipe, connecting the radiator to the engine block head.
This hose goes to injection engines. Its internal diameter is 32mm, see catalog number 21082-1303025.
The next one is the lower radiator outlet pipe, which connects the radiator to the engine cooling system thermostat.
Its catalog number is 21082 – 1303010, internal diameter is 32 mm.
“Angle” pipe for connecting the thermostat to the water pump (pump).
Catalog number – 2109-1303093-01. This pipe fits almost all front-wheel drive VAZ models.
The expansion tank pipe is popularly called the “filler pipe.”
It serves to connect the expansion tank to the thermostat. Through it, antifreeze enters the cooling system when the system is filled or topped up through the expansion barrel. See catalog number 21082-1303080 for its number.
Stove pipes VAZ 2114
The pipe that connects the heater to the block head is often called “big goose” in everyday life because of its resemblance to this bird.
The hose supplies coolant from the block head to the heater radiator. We look at the catalog number 2114 – 8101206.
These considered rubber hoses are reinforced, except for the throttle heating hoses and antifreeze steam exhaust hoses.
The goose curve hose is located under the hood of the car and serves to drain coolant from the heater radiator to the water pump.
Catalog number of the crooked goose 2114- 8101208, factory BRT.
The “short” pipe connects the thermostat to the engine block head.
Shorty catalog number 2108-1303082, BRT plant.
The “small” cabin pipe of the stove supplies coolant to the radiator of the stove, through the tap, from the “crooked goose”.
Its VAZ catalog number is 2114-8101200 from the BRT plant.
The cabin “large” outlet pipe is designed to drain coolant from the heater radiator through the “big goose” hose to the water pump.
Catalog number 2114-8101204 from the BRT plant.
Under the hood, the “big goose” supplies coolant to the heater radiator through a tap. And it takes the liquid to the pump from the radiator of the “goose curve” stove through the “large” cabin hose. For example, thanks to a set of rubber pipes, coolant circulates through the heater radiator.
The rubber pipe, the so-called injection “breather”, serves to connect the valve cover of the block head with the “snail” (2111) for supplying air to the engine.
The upper catalog number of the factory breather is 2111-1014058-10.
All connections presented in the video are located under the hood and in the interior of the VAZ 2114 car, related to the cooling system. In addition to the large breather pipes, small breather pipes and volutes, which serve for the passage of air.
The car also contains well-known gas supply hoses, brake hoses, a vacuum hose, as well as windshield washer fluid supply and others. They will also need to be viewed on video and described in the article.
All rubber hoses in a car need constant replacement, as they are exposed to aggressive liquids and gradually lose their properties. They lose their elasticity, become tanned, crack and sometimes break when used for a long time without replacement.
Therefore, it is recommended to periodically review their condition and replace them if any malfunction is detected.
This video ends the review; I hope that the video will be useful to someone both for information and when servicing their car.
Boris Zverev suggested in the comments the idea of equipping the Lada VAZ 2114 with a set of pipes, for which special thanks. I upload a video about the Renault Logan car on the YouTube channel, since it is my car. You, Boris, have subscribed and write comments about technology. Thanks again for this and respect.
Watch the video
Thank you for watching the video, subscribe to the channel, write comments and ask questions.
liputrik.ru
- home
- About me
- Map of site
- Alarm connection points European Audi Audi A4
- Audi A6
- Audi TT
Mercedes-Benz Opel Volkswagen Citroën
- Citroën Jumper
Peugeot Renault Volvo Saab Fiat
- Fiat Dukato
Fiat Doblo Scoda
- Skoda Fabia
Skoda Octavia Japanese
- Acura Acura CL
Acura Integra Acura TL Infiniti Honda
- Honda Accord
Honda Airwave Honda Aria Honda Civic Honda CRV Honda Element Honda Fit Aria Honda Insight Honda Mobilio Spike Honda Odyssey Honda Pilot Honda Rafaga Honda Saber Honda Stepwgn Honda Stream Honda Integra Lexsus Mitsubishi Mazda
- Mazda Axela
Mazda BT-50 Mazda CX-5 Mazda CX-7 Mazda Demio Mazda MPV Mazda 2 Mazda 3 Mazda 6 Nissan Subaru Suzuki Toyota Korean
- Daewoo Daewoo Matiz
Daewoo Gentra Daewoo Nexia Daewoo Winstorm Hyundai
- Hyundai Accent
Hyundai Avante Hyundai Elantra Hyundai Equus Hyundai Getz Hyundai Genesis Hyundai Grand Starex Hyundai Grandeur Hyundai i30 Hyundai i40 Hyundai ix35 Hyundai Porter Hyundai Santa Fe Hyundai Solaris Hyundai Sonata Hyundai Tucson Hyundai Veloster Kia
- Kia Bongo
Kia Ceed KIA Cerato Kia Morning Kia Optima Kia Picanto Kia Ria Kia Sorento Kia Sportage Kia Soul Kia Venga SsangYong Chinese
- Chery Chery Fora
Chery Indis Chery Very Great Wall
- Great Wall Wingle
Great Wall Hover Great Wall G-5 Safe Geely
- Geely MK
BYD American
- Ford Ford C-MAX
Ford Escape Ford Expedition Ford Excursion Ford Focus Chevrolet
- Chevrolet Malibu
Chevrolet Aveo Chevrolet Cavalier Chevrolet Cruse Chevrolet Epica Chevrolet Lacetti Chevrolet Lanos Chevrolet Rezzo Chevrolet Silverado Chevrolet Spark Chevrolet Tahoe Chevrolet Tracker Chevrolet Trailblazer Chevrolet Niva Chevrolet Orlando Russian
- VAZ Lada Granta
Lada Kalina Lada Priora GAZ
- GAZ 3110
Gazelle, Sable, Barguzin UAZ
- UAZ Patriot
- Note to “gazelists”
- Ford Transit glow plug replacement
- Replacing the heater radiator for a Chevrolet Lanos.
- Installing an alarm system on a Chevrolet Orlando
- Replacing a generator on a Ford Focus
USEFUL TIPS (1)
- Audi A6 Heater fan replacement
- Note to “gazelists”
- Chevrolet Lacetti problems with light.
- Removing the heater fan on a Volvo S60
- Renault Scenic II “Secret” fuse box
- Replacing a generator on a Ford Focus
- Replacing the heater fan motor on a Nissan x-trail
- How to replace the heater radiator on a VAZ-2115
- Search for leaks.
- Installation of the SEVERS-M heater
Instructions for replacing the cooling system pipes of the VAZ-2114
In cars of domestic manufacturers, engine cooling occurs using a cooling system; in the VAZ-2114, this task is performed by antifreeze. Only with the right choice of antifreeze can you ensure efficient operation of the cooling system:
- Factory antifreeze fluid is worse; due to the smaller amount of additives, the thermal protection of the vehicle suffers significantly. Antifreeze was developed specifically to cool vehicle parts and components, so it is exceptionally useful.
- Factory fluid has one big drawback - it quickly spoils the pipes, which in turn leads to fluid leakage and radiator defects.
Having convinced himself of how important it is to use high-quality antifreeze, the driver of the VAZ-2114 begins to replace the old fluid with a new one. In this case, after a couple of weeks an antifreeze leak is detected, what’s the matter? The owner of the car did not take into account that along with the antifreeze, the pipes through which leaks occur must also be replaced.
Experience shows that old hoses are absolutely unusable; antifreeze corrodes them very quickly. Therefore, it’s time to learn how to replace pipes, and finally close the question of the correct operation of the cooling system. Service station specialists will tell you how to implement your plans.
Diagnostics of brake hoses: basic methods for checking them
As they say: “The salvation of drowning people is the work of the drowning people themselves.” This principle is indisputable for the driver, and if he wants to increase the degree of safety while driving, he must monitor the technical condition of the car. Make it a rule - before leaving, inspect the visually marked units under the hood, pay attention to where the car is parked at night, maybe puddles have formed under the car, which means important brake fluid or oil is leaking. If any problems are identified, postpone leaving in your personal vehicle.
Brake hoses VAZ 2114
How to correctly replace pipes in a VAZ-2114
The first question that experts hear from car enthusiasts is which pipes should be purchased for the VAZ-2114? Products made from silicone are considered the most durable and at the same time ideally compatible with the cooling mechanism of the VAZ-2114. The diagram below shows the location of the pipes we are interested in:
- The short ones are mounted on the couplings of the thermostat and the pump pumping water.
- Next comes the conductive hose.
- The pipe located in the lower part is responsible for removing antifreeze from the radiator unit.
Why the OS does not work
If you don’t know which cooling radiator is best to choose for the VAZ 2114, look at the existing one. Buy an analogue from the manufacturer, or purchase a device with the closest characteristics.
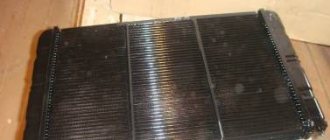
The fourteenth model is equipped with an aluminum radiator with two additional tanks. The radiator design includes:
- Radiator;
- Upper tank with pipes;
- Bottom tank with pipes.
Instructions for replacing the cooling system pipes of the VAZ-2114
Step-by-step replacement of cooling system pipes in a VAZ-2114 car looks like this:
- Remove the battery cable that comes out of the negative socket.
- Carefully drain the old coolant, but wait until the engine has cooled completely before doing so. Otherwise, there is a risk of getting burns from the coolant.
- Remove the following components: set aside the upholstery that provides sound insulation, the fan, the trim going to the windshield frame, the facing material.
- Now your goal is to get to the air collector; to do this, unscrew the brackets in the form of springs and the screws responsible for fixing them. A screwdriver is ideal for spring clips; for screws, you need a wrench.
- To loosen the clamps, remove the front housing, and then remove the old hoses from the fittings.
- All that remains is to install new silicone hoses in a specially designated place; it is preferable that the parts are manufactured abroad - they will last longer.
- Reinstall the other components by following the reverse order of this step-by-step instruction.
HEATER RADIATOR IS LEAKING
It was said above that one of the reasons for the appearance of antifreeze in the car interior may be leakage from the heater radiator.
Below you will learn how to replace a leaking heater radiator. First of all, of course, you need to drain the antifreeze. Then you get comfortable in the cabin and begin to disassemble the front panel: glove compartment, consoles, sides. Unscrew all the screws and screws. To avoid losing them, collect them on a magnet or in a small plastic cup. There is one hidden screw under the plug on the dashboard console, so be careful.
When you remove all the panels and access to the heater radiator opens, loosen the clamps on the pipes, release them, but do not forget to place a mug or other container under the hoses so as not to flood the interior with antifreeze residue. Now you have to remove the VAZ 2114 stove, or rather, the heating radiator.
Assembly is done exactly the opposite. Install the new radiator in place. Experienced drivers recommend lubricating the fittings with soap to make the rubber pipes easier to put on. It is recommended to install new clamps for them, purchasing them together with the radiator. Also install the panel, glove compartment and other parts in reverse order.
When mounting the panel, be sure to ensure that the center pillars are attached to the body. Install and secure the cables, check their adjustment, make sure that the valve and faucet are functioning properly
When pouring antifreeze, check that no air pockets form. To do this, remove one of the hoses leading to the throttle valve and release the air. Reattach the hose to its place.
Don't forget about the air lock when replacing antifreeze
If you did everything correctly, there will be no more antifreeze leaks, and the cabin will become warm and comfortable.
If owners of classics quite often complain about malfunctions of the interior heater, then the VAZ-2114 stove in this regard works quite stably, coping “well” with its immediate responsibilities. If the interior is in good condition, even in severe frost, the stove will be able to provide a comfortable temperature, and ice on the windshield will be removed within a few minutes.
Subtleties of filling new antifreeze
Before you start filling in new coolant, you need to drain the old one, and also thoroughly clean the entire cooling system of contaminants. To do this, it is better to use a special cleaning agent that can be purchased at a car enthusiast store. Make sure that all taps and plugs of the VAZ-2114 are open. You can determine whether the system has been flushed or not based on the color of the antifreeze flowing out.
The plugs and tap are closed only when the product becomes transparent. If the manufacturer describes in the instructions the specifics of using the cleaning mass, follow these rules for effective cleaning. As for the level of antifreeze filling, some drivers prefer to fill to the limit mark, others deliberately do not top up, and later, after a successful test, add more fluid.
After the antifreeze has been replaced, all that remains is to close the expander and start the car engine. The motor should idle until the furnace fan starts running.
Tools and materials
To replace the heater radiator in a VAZ-2114 you do not need expensive and complex tools or equipment. It is enough that almost every car enthusiast has a new spare part in his garage. To complete the job you will need:
- new heater radiator - aluminum or copper;
- a set of ring and open-end wrenches, you can use a set of sockets with a ratchet;
- curly screwdriver;
- set of hexagons;
- container for draining antifreeze;
- fresh coolant, no more than 4 liters.
Additionally, it is better to stock up on rags to wipe off antifreeze that has spilled into the cabin; in addition, you will need a stop for the torpedo - a wooden block of 50x50 mm, about 40 cm long, is perfect.
Reviews of silicone pipes for the VAZ-2114 cooling system
Drivers of the VAZ-2114, who replaced the usual factory rubber pipes with silicone ones, note the following advantages of the new components:
- Long service life, and all thanks to the increased wall thickness and dense reinforcement, consisting of several layers of material.
- Silicone hoses work successfully and efficiently, regardless of the temperature and weather conditions outside.
- When the silicone pipe is tightened, a force is felt, so overtightening and damaging the hose, like a rubber one, will not work in any case.
- The engine compartment can be painted any color you like.
Among the disadvantages of silicone pipes built into the cooling system of domestically produced VAZ-2114 cars, drivers note:
- high cost of parts, one set is approximately 1.5-2 times more expensive than rubber analogues;
- the manufacturer does not provide any warranty, so if you bought a defective product, it is impossible to replace it and you will again have to spend money on a new set of hoses.
In order not to pay extra, VAZ-2114 owners prefer to order silicone pipes in online stores, where they are found in 2 types:
- with reinforced thread;
- Along with silicone there is a rubber component.
Despite the possible negative nuances of silicone hoses, the owners of the VAZ-2114, who took the time to modernize their car and changed the pipes in the vehicle’s cooling system, note that the modification is worth the money - the engine is cooled like clockwork, no major comments are made.
As for the service life of new hoses, on average it is 2 years longer than that of rubber pipes, but only when it comes to reinforced silicone components.
The following video clearly shows how to change antifreeze and flush the cooling system of a VAZ-2114: https://www.youtube.com/watch?v=CGGDk3F1hNY.
The difference between a rubber hose and a silicone hose is explained in the video:
Numbers and analogues for pipes to radiator X22XE
#1 yuriua
. I looked through everything and still couldn’t find our original 34th diameter.
I bought some kind of Tazprom CRAP - a 35-diameter corner and not only did it start to swell in the spring, but it also began to LEAK through the cord thread.
I wanted to buy blue three-layer reinforced hoses, but the price of 17 USD for a 10 cm silicone pipe is daunting.
In general, does anyone have part numbers for analogue hoses of 34 diameters?
And where to buy them in Ukraine?
32 diameter is not suggested - I couldn’t tighten it. And I WILL NOT BUY soft Tazprom hoses ANYMORE. I have a large collar on the top tank.
Thanks for answers.
Look at the Gates catalog and look for ones that are suitable in shape and length.
Then look for who sells it there
That all original pipes are bought. Or will 32 work for everyone?
#5 sueng
GP 80 Plus (Product Type 3219) Robust hose for general industrial use, eg for conveying oil, hydraulic fluids, alcohols, aqueous solutions, acids, detergents and chemicals. Conducts static electricity for greater safety. • resistance to oil, abrasion, weather conditions and ozone; • minimum burst pressure of 110 kg/cm² (11 mPa) for sizes with an internal diameter up to 13 mm (1/2”) and 90 kg/cm² (9 mPa) for larger diameters; • Temperature range from -40°C to +95°C during continuous operation, temporarily up to +110°C.
DIAGRAM AND DEVICE OF THE COOLING SYSTEM
The cooling system of the VAZ 2114 is liquid, with forced circulation. Antifreeze or antifreeze is poured into the system as a coolant. In the most extreme case, you can fill it with water, but you can’t drive it for a long time - in winter you can defrost the engine, and during the rest of the season, when the engine is used for a long time on water, the cooling jacket in the block and cylinder head is corroded, and rust accumulates in the radiator.
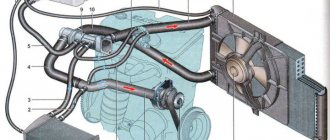
The VAZ 2114 engine cooling system (SOD) consists of the following elements:
- Radiator. It is the main cooling part in the system and performs the function of transferring heat to the liquid into the surrounding airspace;
- Water pump (pump). The pump creates forced movement of antifreeze in the system, thereby cooling the entire SOD, including the internal combustion engine (ICE). The pump rotates from the timing belt;
- Branch pipes (hoses). Antifreeze circulates through them;
- Thermostat. It regulates the passage of coolant through all pipes or only in a small circle and maintains the required operating temperature of the internal combustion engine;
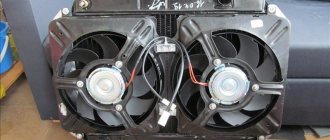
- Electric fan. The fan is located on the plane of the radiator and, due to the air flow created, cools its surface when turned on. The electric motor turns on only when the temperature set by the sensor is reached (103°C);
- Expansion tank. Liquid is poured into the tank, and when the fan is activated, antifreeze flows into it through the return hose, thereby releasing excess pressure into the SOD;
- Expansion tank plugs. There are valves in the plug that relieve excess air pressure created in the system when antifreeze circulates.
The upper pipe is inflated
I changed the cap, checked the thermostat, poured it into the tank, and sucked it out as it cooled. It seems that the air in the cooling system should be removed on its own. What could be the problem? The pipe is hot, the temperature remains in the middle of the scale.
- Coolant fan does not turn on, Toyota Rav 4 – 9 answers
- Engine temperature sensor below 90 degrees in Toyota Rav4 2 – 4 answers
- Why does the Toyota Rav 4 eject antifreeze from the radiator cap? – 3 answers
- The coolant arrow does not show the temperature correctly - 1 answer
When it’s hot, that is, on a warm engine (CAREFULLY with a large piece of rag, open the lid, gradually bleeding air from the system), then put it on and it will inflate already in a warm engine. Can you imagine what happens when a car moves along the highway, at revs?
On Japanese ones, the air came out once or twice, if everything is in order, the air in the system simply has no place to come from.
It inflates for everyone, some more, some less. The temperature rises, and accordingly the pressure in the system also increases. Have you tried warming up the car to the opening temperature of the thermostat, when the lower pipe becomes hot?
As it cools, the air does not escape, but rather enters the expander, because the valve in the lid is bidirectional. In one case, it is triggered when the pressure in the system increases (during overheating). In another case, the valve allows air into the system when the coolant cools, so that a vacuum is not created in the system and the hoses are not flattened.
Thus, on a cold engine, the system must have atmospheric pressure, no more, no less. And if you have an air lock somewhere in the system, then it can remain there for a long time if it is not helped.
COOLING SYSTEM PROBLEMS
As a rule, due to malfunctions in the cooling system, the engine overheats, and this leads to engine failure. Any of the elements may be faulty.
- It may leak. Possible leakage through aluminum tubes and plastic tanks. Often the plastic outlet for the return hose of the expansion tank breaks off.
- It may clog, and for this reason the engine will heat up.
Pipes. Because of them, antifreeze leaks due to the fact that the pipe:
- Ragged.
- Old and lost elasticity.
Thermostat. Depending on how incorrectly the valve in the thermostat operates, the internal combustion engine can:
- Overheat (in this case, the antifreeze “throws out” through the expansion tank).
- Do not reach operating temperature. As a result, the car drives poorly, and in cold weather it is cold inside the car.
Water pump (three main problems):
- Noise and play in bearings. It is not worth driving with such a defect for a long time; the pump may jam or fall apart.
- Liquid is leaking through the inspection hole. It also signals the imminent “death” of the part.
- Broken impeller. With such a defect, the engine overheats very quickly.
- A faulty fan also leads to overheating of the internal combustion engine.
The clamps may be faulty or poorly tightened. It happens that thin hoses become clogged with debris (“return”, throttle valve heating).
How the OS works
The electric fan is located on the electric motor shaft. Depending on the indicators of the sensor, it is turned on or off. One of the main elements of the OS is a thermostat valve with a storage tank , which senses changes in air temperature.
If the fluid temperature is around 87 degrees, the main valve turns on and sends fluid through the large circuit. At a temperature of 102 degrees, the valve stops at 8 mm.
REPAIR OR REPLACEMENT OF RADIATOR
Let us consider in detail the features of the work.
RINSE
Replacing the cooling radiator is required if the internal combustion engine heats up due to its clogging. But before changing it, you can try flushing the cooling system of the VAZ 2114 engine. Often flushing helps, and the engine stops heating up. We perform washing as follows:
- We park the car on a level surface;
- Unscrew the expansion tank cap;
- Drain the coolant from the radiator by unscrewing the bottom plug;
- We unscrew the water plug from the cylinder block (it is located between the internal combustion engine and the fan in the starter area) and drain the antifreeze from the block;
- We wrap the plugs and fill the system with plain clean water;
- Let the engine run and drain the water. If the water that comes out is dirty, repeat the flushing. We repeat the procedure several times until the draining water becomes clear;
- After flushing, fill in new coolant. It should be noted that the volume of the VAZ 2114 cooling system is 7.8 liters, and if all the antifreeze is not included in the system, most likely an air lock has formed in it. It is necessary to fill the container as much as possible to avoid overheating of the internal combustion engine.
It is often recommended to do the flushing on a cold engine to avoid being scalded by hot antifreeze. On the one hand, it seems to be true, but in cold weather all the dirt will settle on the walls of the SOD, and the washing efficiency will not be so great. And don’t wait every time for the water to cool down. You just need to drain the coolant carefully and work in thick, waterproof clothing and gloves. You also need to remember that the shelf life of antifreeze and antifreeze ranges from 2 to 5 years.
REPLACEMENT
Replacing the cooling radiator on a VAZ is very simple:
- Remove the expansion tank plug;
- Drain the antifreeze from the radiator and cylinder block. It is necessary to prepare a container for liquid in advance;
- We dismantle the air filter housing, it will interfere with removing the radiator;
- Disconnect the electric fan plug, unscrew the two bolts securing it and dismantle the unit;
- We loosen the clamps where it is more convenient and pull off the pipes;
- In the upper part of the radiator, remove the two bolts securing it to the body frame, tilt its body towards the engine and remove the part. Radiator removal is complete;
- We reassemble in the reverse order, then fill in antifreeze and start the engine.
REPAIR
If you wish, you can make minor repairs to the engine cooling yourself, but more often they repair it as a necessary measure:
- If you need to get to some destination;
- In the case when they did not expect a replacement and there is no money yet.
Plastic tanks can be sealed with epoxy resin or soldered; against leakage through the honeycombs, a special chemical composition is used, which is added to the antifreeze and clogs the leaking areas. But it is possible that such chemistry will complicate the passage of coolant throughout the system.
It’s easier not to be tricky with the radiator, but to replace it, especially since it is inexpensive, somewhere from 1,200 rubles.
Therefore, do-it-yourself repairs often become economically unjustified, and a lot of time is spent on useless “treatment.” True, there are more expensive copper radiators, but they are easier to repair - copper can be soldered.
Repairing the thermostat is hardly advisable; it is better to replace such a part immediately. Moreover, it costs about 350-500 rubles.
REPLACEMENT OF PIPE
Replacing the pipes of the VAZ 2114 cooling system is very simple - drain the coolant, loosen the clamp and replace it. In stores, pipes are often sold as a set, and it is also recommended to change them as a set.
Replacing pipes is easy (you can apply sealant to the joints)
Why does the stove blow cold air? Causes of malfunction
In the interior of the VAZ 2110 you can quite often see that the heater simply does not respond to the temperature regulator. The answer immediately suggests itself - one of the elements of the system has simply failed. We start looking for him.
Problems with the interior temperature sensor
First of all, we check the interior temperature sensor. It is located on the ceiling, near the interior lighting. If the temperature regulator is turned to the extreme right position, and the stove reacts to this, then the sensor needs to be changed. If everything is fine, we look further.
Problems with the heater damper
The heater damper may oxidize and jam. Many experienced owners of these cars install an aluminum damper, which better distributes air and retains heat in the cabin. But you can only get to it from under the hood.
If the stove on a VAZ 2110 blows cold air, but is itself heated to a temperature of 90 degrees, then the reason is hidden in the standard air ducts. Most likely, they are either damaged or have fallen off from the stove itself. And to get to them you will have to disassemble and remove the entire panel. If you still cannot restore them, you can simply replace them with corrugated hoses purchased from building materials and install them. And seal all joints tightly and thoroughly with polyurethane foam or modelin.
The heater radiator is clogged
If the stove on a VAZ 2110 blows cold air, then there is only one reason - the stove radiator is clogged. If the engine is cooled with water, then rust can form in the radiator, and at high temperatures, scale can also form. Small pipes in the radiator can become clogged if you (accidentally) mix antifreeze with antifreeze, this mixture will simply curdle. In addition, some short-sighted car enthusiasts add a special radiator sealant to the coolant, which also clogs the radiators from the inside. It's quite easy to check. You need to warm up the engine to a temperature of 90 degrees, turn on the heater and check the inlet and outlet pipes of the heater by touch. If the temperature on them is different, then the radiator is simply clogged and must be replaced. But the process of replacing it is quite labor-intensive.
The heater fan is broken
The stove fan may fail. Both he and his fuse are checked.
The gasket between the head and the engine block may be broken, allowing coolant to enter the cylinders. As a result, the coolant level may drop. If thick white smoke comes out of the pipe, then the gasket is definitely broken and requires immediate replacement.
If the cabin filter is clogged with dust, then there is no or almost no cold air intake to the fan of the VAZ 2110 stove. It must be immediately taken out, cleaned, and if that fails, then replaced with a new filter.
There may be a low level of antifreeze or antifreeze and there is simply not enough for the stove due to air locks in the cooling system. When the pump squeezes out and expels this plug from the system, you must add liquid.
Thermostat failure
The most common reason why the stove on a VAZ 2110 does not heat with hot air is the thermostat. It just starts to stick in the upper or lower position over time. If this happens, then you just need to replace it. But the same situation can happen to a new one. So what should we do then, change it again? There is a proven way to bring a stuck thermostat back to life.
To do this, you will need to park the car on a slight slope. In this case, the front wheels must be 25–35 cm higher than the rear wheels. The engine must be running. You need to open the hood and prepare a small wooden (precisely wooden, to avoid damaging the thermostat) stick, or the handle of a shovel. Now, once you get behind the wheel, you need to change the gas 2-3 times. Immediately go out and tap the thermostat with the butt of a stick. After this, touch all incoming and outgoing pipes near the thermostat. Such manipulations need to be carried out 3 – 5 times, after which the thermostat will work like new again.
Cracks in pipes and pipes
Another serious malfunction of the stove is coolant spilling out under your feet. There are usually two reasons. A leak in the radiator or a crack in the pipes. It is best to replace both elements, since repairs and sealing them will cost longer and more expensive.
VAZ 2114: cooling system and replacement of pipes
The VAZ-2114 car uses a hidden engine cooling circuit with an injector. It is highly complex and includes 28 elements. Traditionally, the assembly of the cooling system of this car is not of high quality. Therefore, throughout the entire period of operation, it requires constant monitoring, regular maintenance and repair. In this regard, many owners of this car are interested in the nuances associated with independent maintenance, repair and operation of the cooling system, among which the most common questions are:
- 1. How to properly replace the coolant mixture?
- 2. How to flush the cooling system?
- 3. How to remove air from the VAZ-2114 cooling system?
- 4. How to properly replace the cooling system pipes?
Copper stove radiator
Initially, copper has a heat transfer equal to 389.6 W/(m deg), takes a long time to heat up, and takes a long time to cool down.
The number of fins is significantly less than that of aluminum, the channels are small and quickly clog, poor fluidity at idle (by the way, this is why cool air blows at idle - the most common problem among owners of the domestic automobile industry). The copper radiator is repairable; in case of leakage, it can be soldered.
It is also worth noting that recently for the manufacture of copper radiators they use not pure copper; some paint it, which reduces heat transfer. Today there are very few high-quality copper radiators on the market, so it’s easy to run into the last slag.
Briefly about the car
The VAZ-2114 hatchback is a fairly popular car that can still be found both on domestic roads and on the roads of the entire post-Soviet space. It was produced by AvtoVAZ OJSC from 2003 to 2013 and was one of the variants of the restyled series of the Samara-2 (VAZ-21093) family of cars.
During mass production, various engines with the same type of cooling systems were installed on it, which operate on the principle of internal heat exchange using a special cooling mixture of the “Tosol” type.
Cooling system diagram
What is a stove fan
A fan is a functional element that drives air through the heater radiator and into the cabin. The fan, along with the radiator, pipes for refrigerant circulation, liquid regulator and air duct, is part of the heating unit. Its purpose is to drive cold air through a heated radiator, creating heat exchange.
We recommend: Secrets of the masters - all the ways to straighten a dent without painting
Node functions
The heater fan is a motor that supplies air. You can imagine its operation in more detail only during the operation of the entire heating system:
- As the car engine heats up, liquid enters it, cooling the walls of the cylinder block and taking away heat.
- Hot antifreeze enters the heater radiator, and the latter quickly heats up.
- A motor (fan) is turned on, supplying flows of cold air, thereby cooling the element.
- The interior of the car begins to warm up.
The heating diagram of the VAZ 2113–2115 clearly shows the purpose of the motor
Where is the VAZ 2113-2115 heater motor located?
On VAZ 2113-2115 vehicles, the heater motor is located in the engine compartment. It is covered with a protective casing secured with four screws. The fan itself is also supported by bolts and nuts and is connected to the body of the car.
Maintenance
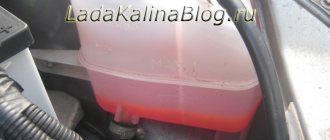
Regular maintenance of the cooling system comes down to checking the level of the coolant mixture in the expansion tank and monitoring its color. It is recommended to check before each trip or, in extreme cases, regularly every 500 - 600 km.
The level of the coolant mixture in the tank must constantly exceed the minimum level by 2...3 cm. Checking the level and adding fluid must be carried out only on a cold engine. The mixture intended for topping up must be of the same type as the liquid poured into the system. Mixing different types is not recommended.
IMPORTANT! In the event of an emergency, you can add clean water to the liquid, but the cooling ability of the mixture deteriorates, and the presence of water contributes to corrosion on metal parts. In addition, in winter, the diluted mixture can freeze and damage both the radiator and the engine. Therefore, the coolant mixture diluted with water must be drained as soon as possible and, after repairing and flushing the system, it must be filled with the recommended coolant.
Resistor fault
Despite the fairly simple design of the heater, some of its elements may fail over time. At the same time, the probability of failure of the heating system as a whole is quite small. The most common stove failures include:
- problems with the radiator;
- faucet leak;
- wear of pipes;
- resistor failure;
- switch malfunctions.
Let's look at each fault block in more detail.
As noted above, the resistor is designed to change the level of resistance of the current supplied from the generator to the heating system fan. In the VAZ-2114, using a switch, you can ensure the fan operates in three modes. In the extreme position, the fan is powered by a voltage equal to the nominal voltage of the vehicle's on-board network, providing maximum power output.
If the windings burn out, regardless of the switch position, the fan operates only at full power. The inability to switch fan operating modes is evidence of a resistor malfunction.
A faulty resistor may be indicated by the fan operating in one mode, when manipulations with the switch do not affect its blowing speed. To replace the resistor, you need to prepare a screwdriver with a Phillips head, fine-grain sandpaper and a multimeter. Algorithm of actions:
- disconnect the negative terminal of the battery;
- unscrew the screws that secure the right console cover;
- Use a screwdriver to unscrew the screws securing the right cover of the center console;
- you will have access to the resistor, from which you need to disconnect all the wiring and evaluate the contacts for burning. If the contact surface is oxidized, use sandpaper to clean it down to metal;
- It may well be that the resistor has lost its functionality precisely due to burning/oxidation of the contacts, so we assemble everything in the reverse order and check whether the fan will work in all normal modes;
- in case of a negative result, again remove the negative terminal, the panel cover and unscrew the screw that secures the resistor to the body;
- We remove the resistor and use a multimeter to measure the resistance at the resistor inputs and at the inputs of both windings. In the latter case, the indicator indicating the working condition of the additional elements is 0.2 Ohm. For the entire resistor, the standard resistance should be 0.8 ohms. If the multimeter readings do not match the specified values, replace the resistor with a new one, and then reassemble in the reverse order.
Flushing the system and replacing the coolant
Repairs related to replacing the coolant on a VAZ-2114 car are carried out if:
- The color of the mixture in the expansion tank has changed. This usually happens after 20 - 40 thousand kilometers;
- repairs were carried out that required a complete drainage of the mixture.
In general, coolant replacement is carried out in the following order:
- 1. Completely drain the cooling solution. To do this, you need to open all the plugs and taps, and also remove the radiator and expansion tank caps. Drain the mixture only after the engine has cooled down (In a hot engine, the temperature of the solution can be more than 100 degrees Celsius).
- 2. Rinse the cooling system with distilled or clean water. Begin the washing procedure after all the old mixture has drained. It is recommended to flush the engine block and radiator with warm water. Otherwise, it is recommended to fill in cold water, warm up the engine, and then drain the water. The color of the water determines how dirty the system is and repeats the flushing process until the flowing water becomes clean. Only after this they begin to replace the mixture.
- 3. Pour a new cooling solution into the system, having previously closed all plugs and taps. Pour liquid into the tank in a thin stream until the maximum mark is reached. Air pockets are not allowed. Then the expansion tank and radiator caps are closed. In order to prevent the rubber pipes from drying out, they must be lubricated with silicone grease.
- 4. Start the engine and let it idle until the heater radiator fan turns on. After this, you can turn off the engine and, after cooling, check the fluid level in the tank. If the fluid level has not changed, then everything is normal and the work is completed. If the liquid level in the tank has decreased, you need to make sure by visual inspection that there are no leaks. If they are not there, then add fluid, start the engine again and repeat the test.
Preparing for replacement
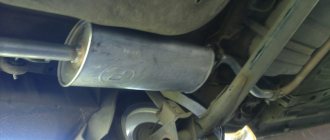
The negative terminal is disconnected from the battery. Then, using a 10mm wrench, unscrew the 16 screws holding the engine splash guard.
Removing the mudguard is not so easy
Next we will drain the antifreeze. Unfortunately, on a VAZ-2114 there is no other way to replace the faucet. And on the 11183 engine, to do this, remove the ignition module with the bracket (three 13mm key screws). The main thing is to open the cap on the expansion tank, disconnecting the sensor connector from it.
First, the antifreeze is drained from the engine, then from the radiator. Using the “13” key, unscrew the cap on the engine, replace the container... Then we do the same with the radiator cap (see photo).
Two drain plugs
Both plugs will need to be tightened.
The rules for choosing antifreeze were discussed earlier. By the way, when draining old antifreeze, do not leave the stove tap closed.
What to check
Before replacing the faucet, you need to make sure that:
- The network is de-energized;
- The car is secured with a handbrake;
- There is no liquid in the cooling system.
Two drain plugs
What to check
Replacing cooling system pipes
The cooling system of the VAZ-2114 car uses 4 rubber pipes:
- upper supply pipe - supplies cooled liquid from the radiator to the engine;
- lower outlet pipe - removes the heated liquid below from the engine to the radiator;
- two short pipes that connect the water pump and thermostat to the system.
If the pipes fail, they must be replaced. In this case, it is best to purchase silicone pipes.
To remove old and install new silicone (rubber) pipes, you need a set of wrenches, several screwdrivers and silicone lubricant.
Repairs associated with replacing pipes must be carried out in the following order:
- 1. Disconnect and remove the battery;
- 2. Drain all coolant mixture;
- 3. Remove the fan, soundproofing upholstery, trim and frame trim from the windshield;
- 4. Clear access to the air collector by removing its fastening elements;
- 5. Remove the front housing and release the clamps that hold the pipes;
- 6. Remove the pipes from the fittings and install new ones (silicone or rubber) in their place. Secure the new pipes with clamps. Before installation, it is recommended to lubricate the rubber pipes with silicone grease. It is also advisable to lubricate the clamp screws with silicone grease. Subsequently, this will allow you to easily unscrew them;
- 7. Install all the removed parts in their places, flush the system and fill it with new coolant mixture.
Replacing the stove tap
It often happens that a part such as a faucet breaks (it is worth noting that on the 2114 it is not very reliable). When replacing it, you should simultaneously replace the pipes, even if they are in good working order (the location of the pipes of the VAZ 2114 stove was described above).
All faucet replacements are performed in the following order:
- place the car in the pit and secure it;
- unscrew the screw plug and drain the coolant;
- using a screwdriver, loosen the clamps on the pipes located in the engine compartment, and then remove them;
- find the tap in the passenger compartment on the passenger side (located under the panel), loosen the clamps of the pipes suitable for it, and then remove them;
- Using a 10mm wrench, unscrew a pair of nuts screwed onto the studs and securing the valve body;
- from the interior side, pull out the tap and disconnect the control cable from it;
- install a new (similar) faucet in its original place;
- perform assembly in the same sequence, but in reverse order.
Before disconnecting the pipes (especially those located in the passenger compartment), you should place a cloth under them in case of coolant leakage.
Many car enthusiasts who carry out such a replacement are sometimes interested in how to properly connect the pipes to the VAZ 2114 stove? After all, by mistake or forgetfulness, you can connect them incorrectly, which will disrupt the normal circulation of coolant.
In order not to make a mistake, it is worth remembering that the connection diagram for the connection pipes of the VAZ 2114 stove is as follows: the pipes located in the engine compartment are connected: the first - from the tap (inlet) to the hole in the cylinder head, the second - from the tap (outlet) - to "saxophone". The connections in the cabin are connected: the first - from the tap to the thermostat, the second - from the tap to the pump inlet.
Replacing the heater motor
The following sequential steps must be performed:
- The electrical network is completely de-energized.
- The positive wire should be disconnected from the motor. It is located under the dashboard.
- It is necessary to unscrew two bolts located in the engine compartment. They serve to hold the stove casing.
- Then you need to disconnect the mass.
- Unscrew and remove two bolts that serve to secure the fan to the heater housing.
- The air duct grille is being dismantled. To do this, the element is rotated 90 degrees and removed from the casing.
- The device should be assembled using the reverse sequence. The power supply contacts must be securely fixed. Otherwise, the assembly will have to be disassembled a second time.
What will be needed for repairs?
Please note that replacing the VAZ 2114 stove can be done in 2 ways: with removing the dashboard and without dismantling the dashboard. Professionals prefer the first method
That is, master mechanics of any service station replace the radiator with a 2114, having first disassembled the top down to the screw. Only someone who has already assembled and disassembled the dashboard with their own hands can handle this work. There are a lot of subtleties and nuances.
Speaking for us, we will replace the VAZ 2114 stove radiator without removing the dashboard.
But again, only highly qualified craftsmen can qualitatively change the design of the machine. We won't interfere there, out of harm's way.
For this job we will need:
- Screwdriver Set
- A set of keys
- A pair of new clamps for the diameter of the radiator pipes
- New radiator. By the way, it’s better to take something imported, for example, Fenox RO0004C3 (it costs twice as much as the original)
- New antifreeze for the heating system
By the way, pay attention to the article about the advantages and disadvantages of various types of radiators. Now let's look at the question of how to replace a VAZ 2114 stove without removing the panel (only the radiator)
Now let's look at the question of how to replace a VAZ 2114 stove without removing the panel (only the radiator).