Painting a car is in itself a rather complex “event”, which, in addition to experience, also requires patience and attentiveness. Roughly speaking, an amateur cannot cope with this task, and sometimes even professionals with already “full” hands make mistakes. Actually, we will look at how to get rid of them in this article.
Causes
Now we will highlight the most common causes of these “troubles”, namely:
- the spray gun was poorly configured or not at all ready for work;
- the paint used was of too low quality;
- dust got on the paint;
- incorrect proportions during dilution;
- too fast drying and subsequent re-application of paint;
- incorrect operation of the spray gun.
Quite often, leaks occur precisely because of dust (it is very difficult to find a place where it is completely absent). Often, experienced craftsmen know how to fix this “problem” even before the car has time to dry out.
The second most common mistake in the appearance of smudges is the insufficient level of knowledge of the technician. In any case, absolutely all stains, regardless of their complexity, can be removed. However, to avoid having to do this, either initially do not take on painting yourself, being unsure of your abilities, or do not trust the first best “garage”. It’s better to pay more once, but be sure of the quality and receive a guarantee for the work performed.
Technology of applying layers of auto enamel
The actual application of enamel to the car body occurs in several layers. Their number depends both on the color of the paint, the quality of the preparatory work, and on the skill of the car painter. As a rule, metallic painting is carried out in two layers.
According to the technology of painting a car with metallic, the first layer is made wetter. A small number of stripes or spots are acceptable here. The main task of this stage is to hide the primer and bring the painted surface to a uniform state. When using this method, you should be careful not to apply too much paint and get smudges.
Before applying the next coat of paint, the solvent must be allowed to evaporate. According to the technology of painting a metallic car, depending on the temperature in the spray booth, drying takes on average from 10 to 30 minutes. More precise information is provided by each manufacturer. It is not recommended to speed up the paint drying process with air. If the metal particles dry too quickly, they may not have time to properly settle into the enamel layer, which will lead to stains.
If the primer remains visible under the first layer of enamel, the above stage must be repeated. Typically, a second application is sufficient to cover up the primer and old paint.
After the last layer of paint has dried, you should proceed to the final stage of painting - varnishing. According to metallic car painting technology, it is not recommended to overdry the paint before applying varnish. It is highly undesirable to leave a painted car without varnish overnight. Overdrying the enamel can negatively affect the adhesion of the varnish to the painted surface.
Preparatory work
Important! Stains must be eliminated before the finishing layer has been applied.
So, you will need the following materials:
- masking tape;
- water;
- polishing machine;
- sandpaper;
- wooden block;
- polishing paste;
- sharp blade.
Wrinkling
Wavy, wrinkled thickening on the surface is a serious cause for concern and means damage to all layers of paint. You may not immediately detect this defect, but still remember - it is very dangerous. Over time, chips and cracks will form in place of these irregularities, the primer will begin to deteriorate, and rust will appear.
Let's look at the reasons for the appearance of this defect and find out how to remove smudges after painting a car: 1. The most common cause of wrinkling is considered to be improper drying of the layers after their application. IMPORTANT! You must strictly adhere to the drying instructions that any paint and varnish material from a quality manufacturer should have. The design of the spray booth itself easily allows you to complete the entire process in compliance with technological standards. 2. The second reason is improperly prepared material for painting. IMPORTANT! Use only thinners that are compatible with this type of paint. Otherwise, the mixture may become heterogeneous - this will very clearly affect the appearance of your car. It is impossible to eliminate such a defect without completely removing the paint layer, since this defect is deep. If the “wrinkled” area is small in size, then you need to remove the paint from it (before the primer), clean and degrease the surface, and then apply a new coating. If a large area is affected, you will have to remove everything and repaint the car.
Eliminating smudges on hardened paint
In this case, unfortunately, you will have to put in more effort than in the previous one. If you find a smudge on hardened paint, do not panic; it can be removed without completely repainting a certain element.
Important! If the paint has not yet completely hardened, but is already close to it (that is, it will not spread on its own if tilted correctly), do nothing! Let it cool completely! Otherwise, you risk removing several layers of paintwork at once, and then you will probably have to repaint everything again.
Elimination of such “errors” should be done in the following order:
- First, mark the boundaries of the defect (so that during subsequent work you do not “do extra work”).
- Use a blade to cut off the leak. Let us remind you that you need to do this work as carefully as possible (try to feel like a jeweler at this moment). Start removing drops from the top, slowly moving down.
- The third stage is the skin (by the way, it can also be the second, but only if the defect is very small). So, install a P800 sandpaper on the grinding machine, using a special cream (sometimes it is replaced with plain water). The closer you come to “victory”, the end of the work, the more often you replace the skin with a softer one. The work should be completed with P200. Be especially careful, do not rush and remember that it is much better not to rub it in than vice versa.
- Polishing is carried out precisely at this stage. But at the same time, constantly move the grinder, never staying in one place.
Subtleties of the process
Elimination of smudges should be carried out on a dry coating. If the paint is not completely dry, this can lead to separation of the bead along with the paint layer. Cavities and enamel detachment may occur. Place masking tape around the defect. Use a blade to cut off the influx, starting from the top to the base. Then they move on to sanding. To do this, wrap a rubber block in sandpaper and moisten it with a soap solution. Then they change the skin to a less grainy one. Too large smudges can be cut off while they are still wet. After removing the buildup, apply a thin layer of putty and after 20 minutes sand it using the technology described above. It is much easier to remove small smudges. If it is a small part, it can be turned over in the opposite direction to the direction of the leak. If the smudge is barely noticeable, you can touch it up a little.
How to paint correctly
In order not to mess things up, you need to first learn how to paint correctly. Now we will share how acrylic painting works. So, it includes three stages:
- the first of them is applying the base;
- the second and no less important is applying the main one;
- and the final one is protection.
It is important to remember the correct proportions: add more liquid and smudges will form on the surface; make the “mixture” too thick and it will be difficult to spray. In addition, the room should not be too dusty! And the most optimal temperature for carrying out this kind of work should be no less than 19 and no higher than 21 degrees Celsius (otherwise it will take too long to dry, causing smudges to form).
Which brush should I use to apply acrylic varnish?
How is water-based acrylic varnish applied? The varnish is applied with a wide, soft, flat synthetic brush No. 16.
Interesting materials:
Who is a castrated boar or a hog? Who executed Anne Boleyn? Who is the owner of Aeroflot airline? Who is the owner of Gazprom Neft? Who is the boss of Marvel? Who is the owner of the Magnit chain of stores? Who pecked the liver? Who commanded the Soviet soldiers at the Dubosekovo crossing? Who Counters Storm Spirit in Midu? Who controls the availability of labor safety instructions in the organization’s divisions?
Bottom line
Well, you already know how to remove paint stains on a car. We also hope that now you theoretically understand how to properly paint a vehicle or certain parts of it so that there are no smudges on it.
In any case, it is always important to correctly assess the situation in which you find yourself. Sometimes it is much easier and cheaper to simply repaint it rather than waste your time, patience, nerves, and even money on work that will ultimately end sadly.
Don’t forget, smudges can occur not only due to lack of experience, but also “thanks to” the use of low-quality products (this includes paint and varnish, as well as a spray gun).
We wish you success!
Available means
After finishing painting, it is recommended to remove smudges on the car only after the first layer of paint has completely hardened.
If you rush and start the process earlier, you risk starting the process all over again. Before eliminating defects, prepare tools and other materials:
- Soap solution.
- A well-sharpened knife or blade.
- Scotch tape, preferably using masking tape.
- Sanding paper of different grits.
- Beam.
- Apparatus for polishing work.
- Napkins or piece of cloth.
Soap solution
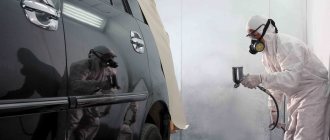
During the application of paint and varnish, agents are also used to protect the body. Gloves, goggles and a respirator are usually worn.
Deterioration of paintwork due to environmental influences
During the operation of the car, its coating is greatly affected by all kinds of insects that break on the hood and other parts of the body. Such impacts leave small spots, then, under the influence of high temperatures and humidity, the dead insect seems to “sink” deep into the car’s coating.
Because of this swelling, the paint begins to deteriorate at an accelerated pace. And although the damage is only a few millimeters in size, it can have a very negative impact on the paintwork. You should try to notice such defects immediately and eliminate them.
To do this, you need to thoroughly wash the vehicle using special shampoos. After it dries, all affected areas are treated with a special liquid to remove adhering insects (you can purchase it at a specialized auto store). Then the surface is thoroughly cleaned with a degreaser and treated with solid mastic.
Some defects can be caused by seemingly harmless bird droppings. The damaged area usually appears duller than the rest of the coating and the area is slightly corroded. It is in hot weather that bird droppings most seriously damage the paint and varnish that covers the car.
If it is not eliminated in time, it can cause chemical burns to the surface, cracks, and the paint layer in this place can be etched down to the putty layer. If the damage to the body is minor, it can be removed by polishing using special pastes and polishes.
On the body you can also see drops of a brown tint from drops of sap or resin dripping from the trees. They have a destructive effect on the paint layer in the warm season; in winter, the resins practically do not destroy the coating. Due to exposure to high temperatures, the resin begins to melt, its components react actively with the enamel that covers the body and this leads to swelling.
You can get rid of swollen areas in a paint drying box. There, using infrared radiation, the ambient temperature is achieved at 60C, then warm up the vehicle for about an hour. You can remove stuck particles of resin from the body using a clean cloth soaked in kerosene (gasoline).
The secretions of aphids can erode the body coating almost down to the putty. Such droplets no larger than 1 mm in size greatly damage the paint layer, so they need to be removed as quickly as possible. Any tarnished paint that remains after this can be removed by thoroughly polishing the car.
After cement gets on the surface of a car in the warm season, it begins to form alkaline compounds that corrode the paint layer. Therefore, you need to immediately wash off the dirt and remove dull spots after them by polishing. If the cement has already dried, you can soften it by applying a napkin soaked in vinegar to it. After this, the cement is carefully removed, the area must be thoroughly rinsed with ordinary running water and polished.
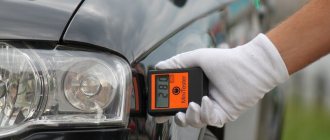
Industrial dust deposits leave defects on the body that differ in color from the rest of the coating (can have all shades from red to blue). If such islands are not removed in time, rust forms in those places, which can rapidly increase in size.
defect in paintwork
Dust that contains iron particles is very difficult to remove from the surface of the body, and if this is not done immediately, after a few days it will become completely impossible. Dust can be removed from the surface during the washing process, then finishing polishing can be done using a cleaning mastic.
Some flaws form even at the time of painting and can become noticeable immediately after drying.
Instructions for spray painting a car
The dyeing process is divided into a certain number of stages. At the first stage, preparatory work is carried out, which includes cleaning the body, degreasing work, and the use of anti-silicone.
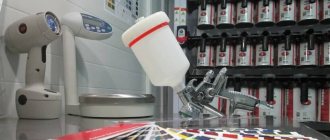
At the next stage, you need to decide on the shade. Having previously checked the body marking instructions, a specialized store will help you choose the required option.
To prevent an error, colorize the body. Specialized equipment and software will evaluate the level of color fading and other factors.
It is worth noting that you will have to spend a lot of money on the procedure. In addition, paint options such as “metallic” or “chameleon” cost much more, because these shades are the most popular.
If there is already rust on the body, then you need to get rid of it, in this case you will need sandpaper, which will turn the surface matte.
After degreasing, we begin the putty process. If the defects are more serious, then you should use putty with windshield washer.
Do not overdo it with a layer, because it may peel off. Layers are applied gradually until the surface is completely leveled.
To make the putty dry faster, there is a secret - you should add a large amount of hardener to the putty. But in this case, you should not overdo it, because you can turn the putty into a crumbling element.
The putty is considered ready when a homogeneous mixture is created. Apply it as quickly as possible, because it begins to harden instantly, already in the seventh minute. If the procedure is not carried out in a timely manner, lumps may form.
The most optimal technique for applying putty is to apply it across scratches and chips, and then level it lengthwise. Thus, it is easy to fill the voids that appear.
The temperature at which the mixture dries as quickly as possible is 25C. Next, sandpaper is used to level the surface. If the damage is deep, use coarse-grained paper; fine-grained paper for smaller scratches.
The next stage is primer. In the modern world, primer in cans is popular; it is easier to apply and saves time. But you can prepare the primer yourself by mixing everything according to the instructions. As a rule, the required proportion is indicated on the packaging.
The resulting mixture is stirred with a wooden stick and filtered through a filter. Many car enthusiasts use a regular stocking as a filter.
The resulting primer is poured into a spray gun, which will help apply it evenly. Remember that the solution can be used for 2 hours, then it begins to dry out.
The dried primer is treated with sandpaper, but a plane is more suitable to save time. Those areas where the old paint will be combined with the new must be prepared: matte them with Brite tape with abrasive paste or sand parts of the body with P1000 sandpaper.
The surface should be cleaned of chips and dust so that the paint lies evenly on the surface.
To avoid other defects, walk over the surface with an antistatic cloth and treat with a degreaser.
Next comes painting. The spray can is held perpendicular to the surface to be painted and strictly at a short distance. Moving upward, painting is done horizontally.
The distance at which the can is held is 30 cm, painting is carried out at room temperature. Thus, uniformity and absence of drips are achieved. When the first layer has been applied, it is worth letting it dry and applying the next one.
It is not necessary to apply all the paint; once you have achieved the desired color you can stop working. When the paint has dried, it must be varnished and polished.
In the process, you will experience how simple and fast it is to spray paint a car. Finally, a clear varnish can be applied to the coating. The application of this substance is carried out according to the same principle as paint.
The appearance of bubbles.
Immediately after painting or after some time, paint blisters appear on the surface. Such bubbles can be caused by various reasons:
- insufficiently cleaned surface;
- presence of moisture – insufficient drying or “wet” work with putties;
- insufficient removal of micro-foci of corrosion;
- the presence of microcracks and microholes in the metal.
You can tell whether the problem is caused by moisture or corrosion. During corrosion, such bubbles most often appear in single or small quantities, and in the presence of moisture – in large quantities. With corrosion, you will have to strip everything down to the metal and remove it; it is easier to deal with moisture - most likely, simply repainting will help.
What to do with old stains
There are long-term stains that appear from long-standing leaks and are not eliminated. No matter how much you make repairs, they will show through the paint again and again.
To remove these unsightly places, they should be thoroughly cleaned and washed. Then the problem areas need to be treated with any biocidal solution (a means for destroying fungus, mold, etc.). There is no need to rinse off the solution!
Be sure to wait until it is completely dry to ensure that re-cleaning is not necessary.
Next, a blocking primer is applied to the areas. It is waterproof and will reliably protect your walls and ceiling from stains and smudges. After drying, you can begin painting.
Removing pollen with an auto scrub
Auto scrub is an alternative to cleaning clay and is produced in different versions - a circle (for working with a polishing machine, as well as manually when using a special holder), a mitten, a towel, a sponge (for working manually). It can have different gradations (aggressiveness of impact). When using an autoscrub for machine processing (Autoscrub Foam Pad), it is recommended to use a dual-action (eccentric) polishing machine, since a rotary machine will be too aggressive on the paintwork.
Auto scrub is used with a lubricant or soap solution.
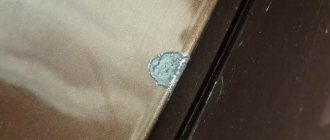
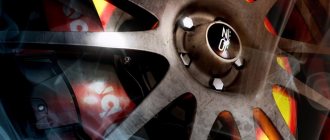
The close-up photo shows pollination along with traces of water droplets. This contamination occurred when the car was parked close to workers who were painting something. The most damaged part was the trunk lid. The surface was very rough, and the contamination was not washed off.
For cleaning, a medium grade Nanoskin Autoscrub wheel was used on an orbital polisher with a large amount of lubricant (diluted Nanoskin Glide). This is a foam circle combined with a very soft rubber surface. After removing dirt and wiping with microfiber, the surface was polished.
GAZ-22 is back in service
After disassembling the car into parts and troubleshooting, welding work was performed. The normal condition of the bottom, sills and boxes has been restored.
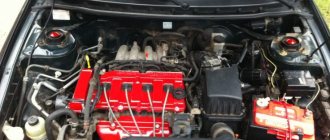
After removing the old coating from the bottom and body, as well as replacing the rear wings, the car was covered with primer. The new paint color, a dark gray shade, suited the austere model well. The interior and sofas of the car were completely redesigned.
The old engine was not suitable for long journeys. It was replaced with a powerful engine from a Volvo 940 with a volume of 2.3 liters. The lengthy assembly of the updated Volga has reached its logical conclusion.
Technology of painting wood without smudges, stains and unpainted paints
During renovation work, the question often arises: how to remove paint stains on wood? Coping with the resulting unevenness can be quite difficult, so the best solution would be to follow the painting technology. If you follow simple recommendations, you can paint wood beautifully and neatly. At the same time, no streaks or unevenness appear on the surface. The paintwork material lays down in a nice, uniform layer.
Don't know how to paint wood with acrylic paint without streaks? Then
will share a few simple secrets of success.
- Video on how to properly sand wood before painting
- Surface pre-treatment
- To perform sanding correctly, you must follow these recommendations:
- Does the surface need to be primed?
- Intermediate grinding
- Selecting a brush
- When should you use a spray gun?
Video on how to properly sand wood before painting
Surface pre-treatment
Before applying the paint and varnish, you need to carefully inspect the material, cut out the resin pockets, glue in wooden boats instead, and fill in the knots and chips knocked out with a milling cutter.
After the processing has been completed, you can proceed to the next preparatory stage - grinding. It is needed to improve the adhesion of the paint to the surface, to open the pores, so that the primer penetrates deep into the wood. During sanding, the surface layer of wood, up to 1 mm thick, is removed. This eliminates the polymerized resin, which prevents soil penetration.
» >
Photo 1. Pre-sanding of wood
To perform sanding correctly, you must follow these recommendations:
- The moisture content of the material should not exceed 14%. At higher humidity levels, achieving a uniform, smooth surface will be very difficult;
- If there are significant wood defects, it is better to use sanding wheels with a large grit (80). They eliminate all surface irregularities much better;
- Traces remaining after wheels with coarse grains must be removed with wheels with a smaller grain size (120-150).
To fully level the surface, it is worth using several grinding wheels, this is exactly how we work in production.
» >
Photo 2. Passage with a sander
Does the surface need to be primed?
Painting wood with acrylic paints has its own characteristics. The acrylic molecule is very large, so the paint and varnish material forms a beautiful, even coating on the surface. The main condition is that pre-treatment has been carried out correctly. A mandatory step in surface preparation is priming. A high-quality primer improves the adhesion (adhesion of paint to wood) of the paint and varnish material and significantly extends its service life.
The choice of primer should depend on the type of paintwork. For acrylic paint, you need to choose an alkyd-based primer. Its molecule is small, so it effectively fills pores and penetrates between the molecules of the paint itself, holding them like roots.
» >
Photo 3. Applying primer to the surface of wood.
Different primers are suitable for different types of work. Before painting building facades or performing other exterior work, it is recommended to use alkyd primers. They fill pores well and improve the protective properties of the paint and varnish material.