Published: 10/30/2020
- Defects in car paintwork
- Body polishing is a cosmetic operation for a car.
- Preparatory work
- Pricing factors for painting individual elements
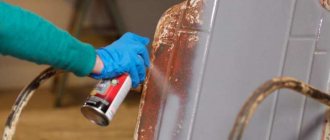
- How to remove varnish stains on a car after painting (step-by-step instructions with photos and videos)?
- Polishing a car after painting the body
- Removing pollen with an auto scrub
- Why did the paint lift?
- Features of operating an automatic transmission in winter
- Preparatory work and what is needed for this
- How to avoid them
- How to remove smudges after painting a car?
- Deterioration of paintwork due to environmental influences
- GAZ-22 is back in service
- Where do the drips come from?
- In conclusion
Defects in car paintwork
Painting and subsequent varnishing of a car may not always work out. This process requires maximum concentration from the person performing the work, adherence to technology and the use of decent quality materials. But even professional work is not without unpleasant surprises. Moreover, it is much easier to prevent various kinds of errors than to remove them later.
One of the common defects is smudges - drop-shaped formations that appear on the body.
Main causes:
- Unfavorable external conditions. Varnishing can take place in a cold structure or with cold materials. Therefore, it is necessary to warm up the room and the car itself.
- Features of materials. The use of varnish and thinner must be in the correct proportion. They must also be suitable for each other, so it is better to use paints and varnishes from the same manufacturer.
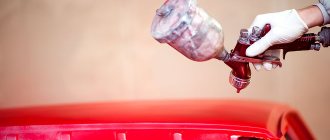
- Inaccurate spray adjustment. The enamel must be fed through a well-functioning small hole in the spray gun, maintaining an angle of 90 degrees. If you use a large nozzle, the varnish will flow rather than spray, and droplets will remain on the body.
- Insufficient degreasing of the car before applying enamel.
Incorrect positioning of the spray gun is the cause of smudges
Elimination of varnishing errors
There are several ways to remove smudges.
The first method is “washing out”. You will need putty, fine sandpaper (P2500 and P2000), water and a vacuum cleaner. The car surface to be treated is first thoroughly dried (an industrial hair dryer or spotlight can speed up the process). Then putty is applied to the stains - it will protect the varnish from damage.
The putty layer is watered and then carefully polished with sandpaper (P2500). By the way, if you wrap it around an even block and make short movements, the polishing will be done more accurately. After reaching the thickness of the putty layer, you should take a finer sandpaper (P2000) and treat the surface with it until the putty disappears. After this, polishing is completed with P2500 sandpaper. At the end of the work, you need to remove the dust with a vacuum cleaner and (if desired) re-coat the sanded fragment with a layer of varnish.
The second method is “washing out” with a marker. You will need a marker, fine sandpaper, water and a vacuum cleaner. This method is similar to the first, the only difference is that the marker replaces the putty. By drawing lines with a marker on the smudges, you can see how deep the polishing goes.
The third method is scraping. You will need masking tape, a construction knife, a rubber block, several types of sandpaper P600-P2500, soap, water. The area where the car is sagging is covered with masking tape. It is needed so as not to damage the clean surface. The smudges themselves should not be soft. Just in case, you can dry them.
Removal of smudges is done with a knife blade - they are carefully scraped off from top to bottom. Then, with a rubber block wrapped in coarse sandpaper and soaked in a soap solution, those places on the car where the varnish was scraped off are sanded. Gradually, the sandpaper needs to be changed to a finer one, ending at P2500.
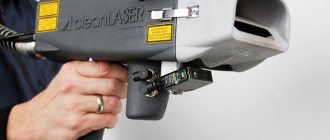
The fourth method is removal with a cutter. Its main purpose is to remove dust, but it also copes well with influx. The cutter should be held at an angle of no more than 40 degrees. After treatment, the leak area is carefully sanded.
Thus, even with simple improvised means you can remove defects in car varnishing. The main thing is attentiveness and accuracy.
How to pay TWICE LESS for GASOLINE
- Gasoline prices are rising every day, and the car's appetite is only increasing.
- You would be happy to cut costs, but is it possible to live without a car these days!?
General information about defects on the car body
A chip is a damage to the paint layer. It is necessary to address the problem as early as possible.
Reasons for appearance
The occurrence of defects is due to:
- mechanical impact;
- violation of dyeing technology.
The first category includes the following factors:
Falling hail or gravel falling into the car from under the wheels of other cars
The second most often occurs when the distance is not maintained in relation to the vehicle ahead. Scratching by bushes and branches when moving near green spaces. Damage resulting from careless parking or an accident. Impacts from an unsecured gate leaf when entering a garage or, conversely, when the door is opened carelessly. Scratching with a nail and other actions of vandals. Collision with beetles and other insects that have a hard chitinous covering. Washing with an excessively hard tool or dirty water. When applying paintwork, for example after body repair, the following mistakes are made:
When applying paintwork, for example after body repair, the following mistakes are made:
- Leaves unevenness on the painted surface.
- Dirt and grease stains are removed from it poorly.
- The putty is not applied correctly.
- Inappropriate enamel and other materials are used.
- In the process of preparing a 2-component composition, the recommended proportions of ingredients are violated. This is a mistake that beginners often make. If you lack experience, instead of mixing the components yourself, it is better to purchase the material ready-made.
- A faulty spray gun or compressor is used. This often happens in small workshops where amateur equipment is used. It’s better not to skimp and turn to car painters with professional tools.
The result is low adhesion strength between the paint and the substrate. The coating gradually crumbles due to temperature changes.
Main types
Depending on the depth, defects are divided into categories:
- Small ones. Only the top, varnish layer is damaged. In addition to scratches, these may be traces of polishing, a network of microcracks (“cobwebs”), abrasions or water marks.
- Average. Part of the enamel is chipped.
- Deep. All layers, including the soil, have lost their integrity.
Possible consequences
If you do not get rid of the damage immediately, the following happens:
- With small scratches, the defect grows and turns from local to extensive and deeper. As a result, the cost of repairs increases significantly. This occurs because the paintwork without a protective layer becomes vulnerable to atmospheric factors and mechanical stress.
- With deep chips, the metal of the body rusts. Unprotected steel can rot through and through, which will also lead to a significant increase in the cost of restoration work.
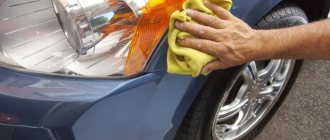
Body polishing is a cosmetic operation for a car.
First, let's look at the simplest case, when the scratches are very small and insignificant, damaging only the top layer of paint. As a rule, these damages can result from contact with pebbles or small branches.
In this case, you just need to properly polish the damaged area. Based on the tasks to be solved and the functions performed, there are two main types of cosmetic polishing of the machine:
- Abrasive polishing is the simplest method aimed not only at restoring the body, but also giving it its original beautiful appearance. The polish itself is of great importance, because preference should be given only to high-quality products. Otherwise, you can neutralize both the scratches themselves and the protective layer of paint. If you polish your car too much, you will have to perform more complex restoration work.
- Protective polishing - unlike cosmetic polishing, this category of work is aimed exclusively at restoring the paint layer of the car body. In addition to standard polishes and similar compounds, numerous mastics and special car waxes can be added here. The principle of operation of such compositions is that after application to the surface of the car, a film is formed that corrects damage, while perfectly masking it.
Polishing is carried out after applying polish to the body. Specialists usually use special equipment, for example, a grinding machine or similar equipment. But you can completely do without these devices by using fine-grained sandpaper or even a usually thick napkin if the scratch is very small and unnoticeable.
After applying the composition to the metal, you need to grind the surface using gentle circular movements. The paste must be constantly moistened, since a dry composition when rubbed into the top layer can cause additional damage. Once there is no trace left of the scratch, polishing can be completed. These actions must be performed only in warm, dry rooms where there is no exposure to external factors, including moisture, precipitation or dust.
Let's save the situation
Build-up should be removed only after the applied layer has completely dried. Otherwise, when removing them, the lower layers may be removed, resulting in the formation of deep pockmarks. Or the connection between them will be broken: then over time the paint will begin to peel off and crack.
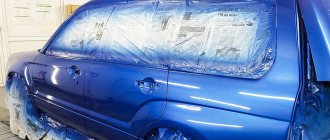
- Defects on the body that need to be eliminated are delimited from the body by gluing masking tape. These frames are needed so that during the work you do not begin to cover up high-quality painted areas;
- If the drip has formed a thick build-up, it must be cut off with a blade as close to the surface of the body as possible. You need to act extremely carefully so as not to cause scratches. Lumps that are not too protruding can be removed without this step;
- A rather coarse sandpaper (for example, P800) is wrapped around the block, the sandpaper is moistened with water and soap dissolved in it, and the cleaning begins. From time to time, the skin needs to be dipped into the bowl again or the treated area should be sprayed with a solution;
- Gradually, as the thickness of the drip decreases, the skin changes to increasingly fine-grained. Finish the sanding with P2000 sandpaper and finish it with a polishing machine;
- If the build-up is not too rough and the painter is not very confident, the solution can be supplemented with an aerosol sanding detector. Firstly, sanding will proceed more smoothly, and secondly, it will be easier to determine when it is time to finish: there should be no traces of aerosol left on the area being sanded.
How to remove varnish stains on a car after painting (step-by-step instructions with photos and videos)?
Good afternoon. From today's post you will learn how to remove varnish stains on a car after painting.
It's no secret that Russians' incomes are not as high as they would like and the vast majority of the population drive cars older than 10 years. Naturally, such a long period of time negatively affects the appearance of the car, and most car owners end up repainting their cars, and since painting a car is quite expensive, many do it themselves. In this case, with a high probability the following smudges are obtained:
And if there is a smudge on metallic (base enamel) it is impossible to remove! Either on acrylic paint or acrylic varnish, the smudge can be removed without major problems, you just need to be careful and patient.
So, in order to remove smudges on acrylic varnish, we will need:
- Sandpaper 240-360-400-500-600-800-1000-1500-2000
- Soft rubber block
- Water
- Polishing paste 1 and 2 numbers
You may need:
Blade for smudges - will speed up the work and allow you not to sand off the smudge itself
Universal putty. – allows you to sharpen smudges without fear of opening the varnish.
Step-by-step instructions if you don’t have a blade to cut off smudges:
Step 1 - sand off the leak itself. Sandpaper with numbers 240-360-400-500-600-800-1000-1500
We work with sandpaper with numbers after 800 with water, and rub the smudge crosswise on a soft rubber block.
Here's a short video for you:
Step 2 - after the smudge is leveled with the rest of the varnish/paint surface, be sure to wash the surface.
Step 3 – polish with paste numbers 1 and 2, making sure to wash the polishing area after each number.
Here's an example in the video:
Step 4 – wash the repair area and enjoy the result (scratches are a consequence of haste).
Notes.
If you have a smudge remover blade, which you can buy here, the process will speed up.
Cut off the smudge with a blade, matte the surface with a rubber block using sandpaper with numbers 400-500-600-800-1000-1500 and then wash and polish according to the instructions.
If there is a very thin layer of varnish at the site of the smudge, or if you have never sanded off smudges before, use putty.
The technique is as follows - apply the putty in an even layer to the area of the leak:
And sand it as in normal preparation for painting.
Your task is to sand the putty, finishing sanding at number 800-1000, in this case the drip will go away and the varnish next to it will not come off.
When the putty is sanded, knock down the marks from 1000-1500 sandpaper with water and polish the area of the leak.
That's all for me today. I hope that the article fully answered the question of how to remove varnish stains on a car after painting?
If you want to add to the article or have any questions, write comments.
Removing large stains
You can remove any stains, but only on an already dry coating. If they are removed from under-dried paint, this can lead to separation of the bead along with the layer of paint and varnish material. Cavities may appear in this place, which will eventually lead to peeling of the enamel.
First of all, you need to start removing large smudges left after painting by covering the surface around them with masking tape. Then, with a blade, you need to try to cut off the influx, starting from its top and gradually descending to the base.
Then, wrap a rubber block in sandpaper and moisten it with a soap solution, and begin to sand the cut area. Gradually you need to replace the sanding paper with a less grainy one, and apply sandpaper at the end of sanding. The pasted tape prevents the clean surface from being touched with sandpaper. This option is less acceptable, but more complex. You can remove large drips after painting without waiting for the paint to completely dry. After cutting off the bead, you need to immediately apply a thin layer of putty and after 10–15 minutes sand it using the described technology, having previously isolated this area with masking tape.
Polishing a car after painting the body
Polishing a car after painting
After polishing the car, to maintain the shine and good appearance after painting the car for a long time, you need to polish the car body. Polishing a car body is designed to give the car an excellent appearance, eliminate microcracks, scratches, remove the smallest unevenness in the coating and protect the coating from external factors. Since the smallest paint defects, invisible to the naked eye, allow aggressive liquids to penetrate under the coating and cause corrosion, polishing also protects the body from these processes. Polishing stages:
- partial removal of the coating, in which fine abrasive sandpaper is used;
- restorative polishing using abrasive paste;
- protective polishing after painting the car with a non-abrasive paste to give a special shine.
Types of polishes
- If the paint on the body is not badly damaged, then it is enough to use a polish without abrasive particles to restore it, but before that you need to treat it with a polish with a high content of abrasive elements.
- If there are a large number of microcracks on the body, it is better to use color-enriching polishes. Which cannot replace paint and eliminate scratches to metal, and they do not form a protective coating on the body, so they should be used in combination with protective types of polishes.
Classification of polishes by consistency:
- paste polishes. They are used for horizontal and vertical surfaces due to their thick consistency. At the same time, they give the coating a significant depth of color;
- Liquid polishes are safer to use because they do not cause increased wear of the coating even with prolonged use. But they are limited in scope and are used only on horizontal surfaces;
- Although aerosol polishes are convenient to use, due to the fact that a significant part of the can is occupied by solvent and propellant, the amount of polish itself in it is not very large.
Depending on the depth of damage to the body coating after painting a car, polishing is divided into restorative and protective.
Car polishes
Restorative polishing can be used to remove shallow scratches, the depth of which does not exceed the depth of the paintwork before the primer; tearing out abrasions and oxidized layers, which manifest themselves as clouding of the paintwork, in the form of spots or stripes. The process of applying restorative polishing consists of mechanically removing a surface layer with abrasive pastes about 5 microns thick. Whereas the thickness of the paint coating is about 100-150 microns, therefore about 10-20 polishings can be carried out on one painting without compromising its integrity. Protective polishing is designed to protect the paintwork after painting a car from negative environmental influences. It uses non-abrasive polishes based on wax or synthetic materials. Depending on the bases on which polishes are made, they are divided into wax, silicone and polymer. Wax and silicone protective polishes are easy to apply, but also easy to wash off after two or three visits to the sink. And they will need to be reapplied. Polymer polishes are more durable; they are applied once every 6 months, have good protective properties, but at the same time they are more expensive and their application is more labor-intensive. If you painted your car metallic or pearlescent, then you need to buy polishes specifically for these types of coatings.
Drips when painting a car: what to do?
Why drips occur and how to avoid them
Regardless of who paints the car - an experienced craftsman or a novice, no one is immune from paint drips; in the first case, of course, they occur less frequently. The main reason for the formation of drips is too much paint or varnish applied, and the ability to determine the amount needed is a matter of experience.
In order not to eliminate a problem, it is better to avoid it in the first place. The basic rule to prevent drips: you need to apply as much material as the surface to be painted can hold.
Let us note some techniques and facts that will allow you to avoid or minimize the risk of drips when painting a car:
1
It is important to paint in excellent lighting, since control rests entirely with the vision of the “painter”
2. Watch out for glare. When the paint layer becomes uniformly glossy, you need to stop application.
4. Intermediate drying should last at least 10 minutes. And if painting is done at cold air temperatures, the time needs to be increased. The colder it is, the longer it takes.
5. The instructions for using hot drying say that it can be started 15 minutes after dyeing. This is wrong! The viscosity of the paint will decrease due to heating, which means it will definitely flow. In summer, hot drying can begin an hour after painting, and in winter no earlier than the next day.
How to remove drips after painting a car
If it was still not possible to avoid this problem, it will have to be eliminated. Some impulsive people grab a cloth and solvent to remove all the paint, but you shouldn't do this. Firstly, so many fibers will remain from the fabric that further work will turn into hell. Secondly, you will go broke on the number of rags and solvent. There is a more effective method that takes just a few steps.
First, you should exhale and, as if nothing had happened, dry the freshly painted iron horse. Please note that in places where there are hated drips, the layer of paint is larger than on the rest of the surface, which means it will take longer to dry completely. Press the drip with your fingernail; if there is no dent left, the paint has dried and you can move on to the next step.
You will need the following tools:
- aerosol grinding detector,
- waterproof sandpaper with grain up to 1200,
- a block of wood or rubber.
Apply a detector to the area where streaks have formed and sand it with water. The sandpaper can be wrapped around the above block to provide ample working surface and save your hands from chafing. When there are no traces of the detector left at the drip site, you can proceed to the final step.
Polish the entire piece you painted with a non-abrasive polishing paste. It is better to do this with a polishing machine and a woolen wheel. It is not impossible to perform high-quality polishing manually, but it is very difficult. Usually they polish places with their hands that cannot be reached with a polishing machine. For hand polishing, use a small amount of paste and a clean cloth (or rag). The paste can be applied either to a circle or fabric, or to the surface itself.
By the way, a non-abrasive paste is perfect for polishing the entire car. It is based on wax, which enhances gloss and maintains shine.
At the end of all three stages, the car element will again become smooth and shiny, as before the start of the stain removal process.
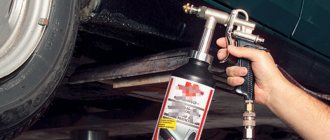
Removing pollen with an auto scrub
Auto scrub is an alternative to cleaning clay and is produced in different versions - a circle (for working with a polishing machine, as well as manually when using a special holder), a mitten, a towel, a sponge (for working manually). It can have different gradations (aggressiveness of impact). When using an autoscrub for machine processing (Autoscrub Foam Pad), it is recommended to use a dual-action (eccentric) polishing machine, since a rotary machine will be too aggressive on the paintwork.
Auto scrub is used with a lubricant or soap solution.
The close-up photo shows pollination along with traces of water droplets. This contamination occurred when the car was parked close to workers who were painting something. The most damaged part was the trunk lid. The surface was very rough, and the contamination was not washed off.
For cleaning, a medium grade Nanoskin Autoscrub wheel was used on an orbital polisher with a large amount of lubricant (diluted Nanoskin Glide). This is a foam circle combined with a very soft rubber surface. After removing dirt and wiping with microfiber, the surface was polished.
The main reasons for the appearance of defects:
Smudges are often called any defects after painting a car. Smudges can form, for example, due to a speck of dust or some small insect stuck to a freshly painted car. In order not to repaint a body part, or even the entire car, it is useful to know how to correct painting flaws.
However, defects (smudges, graininess, shagreen, etc.) can be removed if they do not occupy too large an area. Otherwise, you will still have to paint the car again.
Why did the paint lift?
- Cheaper paints tend to lift the old coating more often.
- Solvents of applied paint act on the old coating. This is a chemical reaction of the solvent that softens the underlying surface and lifts it. The reason may be that the base paint is applied too thickly. This can happen due to the old coating becoming saturated or getting under its edges or through rubbing marks from sanding. Never apply a thick (wet) first coat. Apply the first layers thin, semi-wet (closer to dry, but too dry layers are also bad, as they will impair the adhesion of subsequent layers). This will reduce the likelihood of paint lifting. The room must be warm enough so that the solvent has time to evaporate before it affects the surface.
- The first layer did not dry properly. In this case, the materials can be of high quality and compatible. Solvents in the paint base affect the applied coating. This leads to wrinkling. If you apply the base to a recently primed and prepared surface and paint lifts, it means that the primer has not dried well enough or is not fully activated. If the sanding paper "clogged" when you prepared the surface for painting, then this is a sign of uncured primer. If a one-component primer was applied, it does not harden, but only dries and solvents from the paint can saturate it.
- Applying layers that are too thick, preventing the bottom layer from evaporating the solvent and drying at the same rate as the top layer.
- The surface may be too hot to coat.
- Improper cleaning and surface preparation. If there are areas on the surface to be painted that are not prepared for painting (unsanded area). It must be remembered that before sanding the old coating must be thoroughly washed, since the protective coating layer or dirt may remain at risk and impair the adhesion of the new paint. Use matting paste, it has both matting and cleansing properties. You can also read the article “preparing the car for painting”.
- Insufficient drying time between coats. The solvent does not have time to evaporate from the first layer. It is important to dry the bottom layer thoroughly before applying the next coat.
- Too much time between layers. There is a period (window) in which you can apply a second coat or repaint a recently painted surface. If this period has passed, a paint “lifting” defect may occur. Typically, the paint should be applied in several thin layers, every 15–20 minutes and no later than 1–2 hours. If this period has passed, then you need to wait a day and prepare the surface again.
- Sometimes, the paint can wrinkle when applied to the bumper. This can happen if there are areas of bare plastic on the bumper. The anti-adhesive lubricant that is used at the factory during their production may remain on the bumper, which will “lift” the paint. Prepare the bumper for painting correctly (see the article preparing the bumper for painting).
- Incompatibility of coatings. Inappropriate base coat (for example, nitrocellulose paint or primer).
When the top layer is quickly dried, a film is formed that prevents the evaporation of the solvent from the bottom layer.
- Incorrect drying. Accelerating the drying of the top layer leads to the fact that the bottom layer remains wet and is sealed by the top one. Do not dry a freshly painted surface with dryers immediately after applying paint. Allow the surface to dry a little on its own, after which you can accelerate hardening.
- If the surface was degreased using a solvent, instead of a special degreaser, this may cause a paint “lifting” reaction. Even if a special product was used, make sure that the degreaser has completely evaporated before applying paint.
Other things to consider
Flaws are best shown in white. To protect yourself from possible failure, do not take a snow-white coating or add a little color to it.
To paint the walls, take the paint that you like best. For the ceiling, take the highest quality one. The ceiling is the most finicky of all planes, especially since you cannot cover the flaws on it with furniture or paintings.
The main components of an excellent result: a well-prepared base, a non-viscous coating and adherence to painting technology. But at the same time, know that the ideal does not exist, which means you shouldn’t squeeze all the juice out of yourself to achieve it.
Preparatory work and what is needed for this
It is worth keeping in mind that smudges must be eliminated before applying the finishing coat of paintwork. Before this event, prepare everything you need for work.
What is needed to eliminate smudges
To eliminate smudges on metal and plastic, you need to have the following:
- Masking tape;
- Sandpaper;
- Water;
- Sharp blade;
- A wooden block to wrap the skin;
- Polishing paste and machine;
Primer Defects: Removal Methods
If the manufacturers' recommendations are not followed, primer paints can also form smudges. If these deposits of primer are significant, then they must be removed, otherwise the unevenness will be noticeable even after applying the top paint coating. Smudges on the primer are eliminated using the same sandpaper of different grain sizes.
Moreover, it is even easier to remove defects with a primer than with paint. After all, minor roughness that may remain after sanding with sandpaper with a grit of P240 to P400 will subsequently be covered with paint. Therefore, you don’t have to waste time on very careful sanding with fine-grained sandpaper (mandatory for the top paint layer). If, after removing the primer drip with a blade, a small cavity forms, then you can not use putty, but simply apply an additional layer of the same primer.
How to avoid them
Smudges appear on surfaces where several layers are required. The risk increases if a larger area needs to be treated.
When painting furniture
Paint is often used to coat furniture. On the vertical walls of cabinets, the risk of streaks is especially high. The occurrence of smudges on furniture, measures to eliminate the problem:
| Problems | Elimination methods |
| Thick coat of paint | Apply several thin layers at 1 minute intervals. Hold the spray gun, aerosol can or gun at the optimal distance at an angle of 90 degrees. |
| Lack of clutch | Priming and sanding the surface. Use of high-quality compounds for priming. Complete drying of the primer layer. |
| Heavy smudges, liquid paint | You cannot add the entire volume of solvent to the mixture, so as not to make the composition liquid. It is recommended to add it gradually to achieve a suitable consistency. |
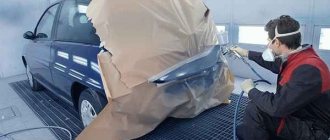
When painting a car
Repainting a car depends on the characteristics of the paint composition. It should provide strong adhesion and an even finish.
Possible problems when painting a car, solutions:
Cause of streaks and streaks Possible solution Paint is running due to lack of adhesion Before painting, preparation should be carried out. The surface is treated with a primer that will ensure adhesion. The condition for creating the preparatory layer is the use of a grinding machine or sandpaper. With their help, all visible flaws are removed. Presence of slow thinner, too much thinner The paint is thinned gradually, adding a few milliliters of thinner at a time, so as not to create a liquid mixture that cannot contribute to the formation of the coating. A poor quality thinner does not allow the composition to create the necessary structure. Violation of the rules on maintaining the optimal distance from which paint is applied. Excessive approach or separation creates insufficient or excessive pressure, provides an uneven layer or a layer of incorrect thickness. Thick layer Coatings 2 or 3 times thick create a layer that provokes streaks Spray gun settings are incorrect Factory settings are recommended Temperature discrepancy Cold car does not accept warm paint well
Cold paint does not adhere well to the surface, so it is important to bring both temperatures closer in key indicators.
Why do varnish drops appear on a painted car?
Often the problem is due to the fact that the spray gun operator does not have enough experience. Moving the gun too slowly along the plane of a metal part causes an excessively thick layer of paint. If such layering occurs on a vertical part, the drop rolls down and a leak forms. If there is a layer on the ceiling, a drop may fall down. There are several preconditions for such unpleasant effects on the car body:
- poor-quality paint - sometimes the car enamel rolls off on its own even when applying a thin layer;
- clogged spray gun - in this case, the varnish is not sprayed normally over the surface;
- unprepared chamber - this can be seen by condensation on the ceiling, dust in the air and high humidity;
- unprofessional painting - uneven application of layers of enamel on a metal part;
- too many layers of auto enamel, large weight of the paint layer and slipping of the applied material.
How to remove smudges after painting a car?
Before removing the stain, the paint or varnish must be completely hardened. So that both the leaks and the rest of the paintwork are of the same hardness. Stains take longer to harden than other fresh paint due to their thickness. A smudge that has not completely hardened and the paint or varnish adjacent to it can be sanded differently, which may make it difficult to remove it without leaving a trace. You can check the hardness by scratching the stain with your fingernail. It is better to remove stains after 24 hours of drying or later. This time is enough to harden and the paint remains slightly pliable for sanding.
To remove the bulk of the smudge, you can use replacement blades (for paint scrapers or scrapers for glass ceramics). Use a new blade each time. Hold the blade at a 90-degree angle and scrape along the stain in one direction. There is no need to try to cut off the smudge; scrape off each passage a little. If the leak has hardened well, this method works well. When using the blade, its edges should not touch the paint surface. It is better to seal the edges with masking tape so that only the middle of the blade remains sharp. After scraping off the bulk of the smudge, the remaining unevenness should be sanded using P2000 sanding paper with a hard stone and polished.
The smudge can be removed by sanding paper through a hard block with water, but there is a danger of rubbing off the paintwork adjacent to it. We will look at how to avoid this in the next paragraph. Large smudges can be started by sanding with P800 or even P600 abrasive and continue with P1000 - P2000. Sanding paper P600 can remove 80% of the smudge, and the remaining 20% can be removed with finer abrasives. The function of the hard block is to sand down the high spots of the smudge without touching the surrounding paint surface. Never use a sponge soft block to remove smudges as it will only hug the smudge as you sand. When sanding with water, periodically remove the water and check the result. Why not sand the smudge immediately with P2000 abrasive? If you remove the smudge only with P2000 sanding paper, it is safer, but it will take a lot of time. In addition, when it seems that the smudge has disappeared, after polishing you will be able to see a small unevenness where it was. This is due to the fact that the P2000 abrasive is too fine and does not cut off excess varnish well, but rather smoothes it out. Therefore, it is better to start removing stains with at least P1000 abrasive, continue with P1500, and finally remove scratches from previous abrasives with P2000 paper. It is better to soak the sanding paper in water with a small amount of dishwashing detergent.
Putty can also be used to remove smudges. It is better to use fine finishing putty. It is applied in a thin layer to the stain and the surrounding area. The function of the putty is to prevent rubbing of the paintwork located next to the smudge. The putty should be sanded using P600 sanding paper with a hard block. The smudge will be erased along with the putty. When all the putty and smudges are erased, you need to change the sanding paper to P1500, and then P2000, to remove large marks. Next, the matte paintwork needs to be polished.
When sanding, the smudge is removed along with the putty, and the surrounding varnish remains practically untouched.
Elimination methods
To combat this evil, sandpapers with small grain sizes were invented: 1500, 2000, 2500. Although they leave small scratches on the paintwork, they can then be easily removed with polish. First rough, then softer. Sanding is a monotonous and lengthy process. The temptation to take a larger skin will result in damage to the paintwork. You can carefully remove this tubercle with a special plane. But the risk of harm is also great.
There are several ways to remove shagreen after painting with your own hands. Shagreen in itself is not dangerous. She's just plain ugly. Thorough polishing cannot always remove it. You should lightly walk over the defective surface with fine sandpaper. If the defect is not significant, this will help. An overly expressive “image” is completely removed and the area is repainted.
There are ways to eliminate this defect. To do this, lightly sand the surface with very fine sandpaper and water. You need to add a drop of Fairy substance to the water. But it is better to remove the paint and repaint it again.
Deterioration of paintwork due to environmental influences
During the operation of the car, its coating is greatly affected by all kinds of insects that break on the hood and other parts of the body. Such impacts leave small spots, then, under the influence of high temperatures and humidity, the dead insect seems to “sink” deep into the car’s coating.
Because of this swelling, the paint begins to deteriorate at an accelerated pace. And although the damage is only a few millimeters in size, it can have a very negative impact on the paintwork. You should try to notice such defects immediately and eliminate them.
To do this, you need to thoroughly wash the vehicle using special shampoos. After it dries, all affected areas are treated with a special liquid to remove adhering insects (you can purchase it at a specialized auto store). Then the surface is thoroughly cleaned with a degreaser and treated with solid mastic.
Some defects can be caused by seemingly harmless bird droppings. The damaged area usually appears duller than the rest of the coating and the area is slightly corroded. It is in hot weather that bird droppings most seriously damage the paint and varnish that covers the car.
If it is not eliminated in time, it can cause chemical burns to the surface, cracks, and the paint layer in this place can be etched down to the putty layer. If the damage to the body is minor, it can be removed by polishing using special pastes and polishes.
On the body you can also see drops of a brown tint from drops of sap or resin dripping from the trees. They have a destructive effect on the paint layer in the warm season; in winter, the resins practically do not destroy the coating. Due to exposure to high temperatures, the resin begins to melt, its components react actively with the enamel that covers the body and this leads to swelling.
You can get rid of swollen areas in a paint drying box. There, using infrared radiation, the ambient temperature is achieved at 60C, then warm up the vehicle for about an hour. You can remove stuck particles of resin from the body using a clean cloth soaked in kerosene (gasoline).
The secretions of aphids can erode the body coating almost down to the putty. Such droplets no larger than 1 mm in size greatly damage the paint layer, so they need to be removed as quickly as possible. Any tarnished paint that remains after this can be removed by thoroughly polishing the car.
After cement gets on the surface of a car in the warm season, it begins to form alkaline compounds that corrode the paint layer. Therefore, you need to immediately wash off the dirt and remove dull spots after them by polishing. If the cement has already dried, you can soften it by applying a napkin soaked in vinegar to it. After this, the cement is carefully removed, the area must be thoroughly rinsed with ordinary running water and polished.
Industrial dust deposits leave defects on the body that differ in color from the rest of the coating (can have all shades from red to blue). If such islands are not removed in time, rust forms in those places, which can rapidly increase in size.
defect in paintwork
Dust that contains iron particles is very difficult to remove from the surface of the body, and if this is not done immediately, after a few days it will become completely impossible. Dust can be removed from the surface during the washing process, then finishing polishing can be done using a cleaning mastic.
Some flaws form even at the time of painting and can become noticeable immediately after drying.
How to remove paint from a car using traditional methods?
There are quite a few options for removing paint from a car using improvised means, the effectiveness of which has been tested by more than one driver in his own experience.
Method 1
Remove fresh, unfaded inscriptions as follows:
- Fill a bucket with warm water.
- Add vehicle washing shampoo or dishwashing detergent to it.
- Take a clean sponge.
- Dampen it with soapy water and wash the car.
- Apply solvent if necessary.
Take a nail polish remover that does not contain acetone. Dampen a soft cloth with it. Wipe off any unnecessary paint marks. Wash treated areas with water.
Take acetone. Use a brush or rag to apply it to the paint. Remove it quickly with a dry and clean cloth.
Take gasoline or kerosene. Dampen a rag with it. Wipe off dirt from the coating sequentially in each contaminated area.
GAZ-22 is back in service
After disassembling the car into parts and troubleshooting, welding work was performed. The normal condition of the bottom, sills and boxes has been restored.
After removing the old coating from the bottom and body, as well as replacing the rear wings, the car was covered with primer. The new paint color, a dark gray shade, suited the austere model well. The interior and sofas of the car were completely redesigned.
The old engine was not suitable for long journeys. It was replaced with a powerful engine from a Volvo 940 with a volume of 2.3 liters. The lengthy assembly of the updated Volga has reached its logical conclusion.
What influences the formation of smudges
Painting a car is not an easy process. It is difficult to achieve uniform distribution of material. Irregularities often appear on the surface. Among the main reasons for the formation of defects are:
- Use of low-grade materials.
- Fluidity of the paint and varnish material due to inaccurate adherence to the instructions set out in the instructions.
- Errors in the use of equipment.
- A base that is not prepared for paint.
- Ingress of debris and dust into areas treated with paint.
- Large distance between the surface and the tools, incorrectly chosen angle of application of the product.
- Insufficient interval for drying individual layers.
- Excessive application of material.
Lack of experience also leads to defects. A little practice on a different surface will make further actions easier.
Where do the drips come from?
The main reasons that the paint goes on unevenly is non-compliance with the painting rules. And this manifests itself in different ways.
- Failure to follow the instructions for the paint: the proportions of the pigment and solvent are incorrect, or the thinner used does not match the paint. As a result, the composition turned out to be too liquid, and it is not able to stay on the body;
- The spray gun is not adjusted before use;
- The muzzle of the apparatus was held at an angle, or at too great a distance from the surface, or over one area for too long;
- During the work, dust got into the paint;
- The temperature regime was violated when storing the compositions or in the room where painting was carried out;
- The required time interval was not maintained between individual layers, and the previous one did not dry completely before applying the next one;
- Well, and, of course, low-grade paint. Moreover, it does not have to be cheap: you can buy an expensive one, but an unsuccessful one, or a trusted manufacturer, but a fake.
Minor flaws:
Some defects can be corrected either immediately or without additional effort. So, if you are painting a separate element of the body and notice that the paint has flowed, you need to quickly turn it: the composition that has not yet dried will be evenly distributed over the surface.
If drips are detected after drying, but are very small (for example, they are not visually detected, but can be felt), another applied layer of paint can help out. Just this time, try to do everything as correctly as possible.
Reasons for the appearance of smudges and drops on the coating
Leakage occurs as a result of uneven thickness of the coating layer in certain areas. This is especially true for vertical surfaces. Excessive accumulation of wet paint and varnish causes runoff.
Painting a car is a painstaking and time-consuming process.
The reasons for the formation of flaws include:
Often the reason for the formation of smudges is the procedure carried out by a beginner without the proper experience and skills - in this case it is recommended to practice painting on a third-party surface.
Description of marriage
Varnish runs are when paint from the top area has moved down. It turned out that in one place the layer is too thin, and in another there is a clear excess, which is visible and “hurts the eye.” Not everyone clearly understands what shagreen is when painting. It is sometimes called automobile cellulite. Shagreen is a very common problem when priming or painting car parts with a toothbrush or airbrush. The paint falls on the body in small lumps instead of a smooth layer. This adds unacceptable roughness and spoils the appearance too much. Typical reasons are high spray pressure, too thick paint, quickly evaporating solvent. A little experience can also affect the appearance of this defect. Smudges and shagreen are related defects. They have a lot in common, a lot can be removed in one way. The main technology of work is based on the experience and handicraft developments of craftsmen. A serious automaker is not interested in this. It is more profitable for him when a person buys a new car.
Causes
Now we will highlight the most common causes of these “troubles”, namely:
- the spray gun was poorly configured or not at all ready for work;
- the paint used was of too low quality;
- dust got on the paint;
- incorrect proportions during dilution;
- too fast drying and subsequent re-application of paint;
- incorrect operation of the spray gun.
Quite often, leaks occur precisely because of dust (it is very difficult to find a place where it is completely absent). Often, experienced craftsmen know how to fix this “problem” even before the car has time to dry out.
The second most common mistake in the appearance of smudges is the insufficient level of knowledge of the technician. In any case, absolutely all stains, regardless of their complexity, can be removed. However, to avoid having to do this, either initially do not take on painting yourself, being unsure of your abilities, or do not trust the first best “garage”. It’s better to pay more once, but be sure of the quality and receive a guarantee for the work performed.
Sanding procedure
To complete the work you will need: an eccentric sander (ESM), sandpaper with different sizes of abrasive grain, graters, and soleplates. Sanding can be either “dry” or “wet”. With the “dry” leveling method, it is more advisable to use an electric grinder (in everyday life, due to the complex trajectory of the polishing wheel, called orbital grinding), rather than manual work. You should start with sanding wheels with a large abrasive grain size suitable for grinding, followed by a gradual transition to finer grains.
“Wet” grinding involves the use of water during the work process. This method will require waterproof sandpaper and supports to hold it in place. The last devices are needed so that there are no marks left on the surface from pressing with your fingers. And just as in the previous grinding method, you need to start with sandpaper with large crystalline particles and low grain size, gradually moving to blades with an increased grain number and a reduced size of abrasive elements.
Sanding allows you to remove streaks, shagreen and other visually detectable defects. A combination of “wet” and “dry” finishing methods provides the best effect. The main thing is to work extremely carefully and not allow the paintwork to rub off to the ground. After completing the grinding procedure, you should proceed to the next stage - abrasive polishing.