Hello, dear friends! Today we are interested in the connection diagram for the trunk opening button.
In practice, installing a button in the cabin that will automatically open the tailgate is not difficult. It's easier than many people think.
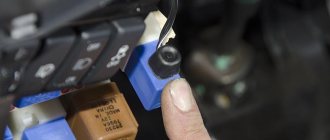
The very scheme of opening the trunk with a button is to modify the lock. An electric drive is added to it. He's an activator.
How it works
Many cars are not equipped with a trunk release button from the factory. The car owner has to do this with his own hands.
Even budget foreign cars, as well as domestic car models, can get this function. The cost of its implementation is small.
There are a number of modifications for the cargo compartment of passenger cars. Someone is soundproofing the trunk lid. Others completely insulate the trunk.
It will be convenient and correct to do automatic unlocking. In addition, the scheme for opening the trunk with a button is implemented without skill, as well as experience and special skills.
This is the meaning. A button is displayed in the interior. The driver presses it. The device operates on the principle of a push-pull mechanism. Springs will ensure the lid lifts. This way the driver won’t have to press a button on the trunk or fiddle with the key in the lock.
Another option is to display a button on the alarm remote control.
Trunk lock control
The servo drive for opening the trunk is a convenient thing, especially when your hands are busy. You've probably already encountered this in a hypermarket parking lot. Automakers make loading easier by adding radio control for opening from a standard radio key or even gesture control - for example, on the new Ford Kuga, you just need to move your foot under the rear bumper for the trunk to open.
But on old cars, and even on current budget foreign cars, you still have to turn the key or press a button on the lid. This problem has long been solved by the service functions of alarms: they implement either a built-in power relay or a customizable additional channel for an external relay. They are activated when the desired key or combination of keys on the key fob is pressed, after which they give a short-term impulse to a separately installed electromechanical drive, or duplicate pressing a button on the door. In modern cars, where the on-board electronics are integrated into a common digital network, the trunk can sometimes be opened using a command via the CAN bus; no additional devices or connections are required.
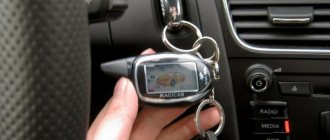
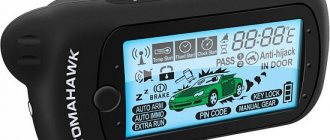
It is also possible to control the trunk lock on Starline A93. There is no strictly specialized channel for this, but it is preferable to use channel 1 for this, as the installation instructions indicate.
Control buttons on StarLine A93 key fobs
Flex channel 1 in trunk control mode is activated as follows:
- long press button 2 on the key fob;
- Immediately press button 1 briefly.
After this, the key fob will emit three melodic signals, and the car will give three light signals. If the car is disarmed, an impulse to open the trunk will be given without additional actions. If the car is armed, then when the trunk is opened, the doors will remain locked, the security status will not change, but the built-in shock sensor will be disabled. If any additional sensor is connected to the alarm (a special connector is provided for this), it will also turn off.
Video: Lada Granta, opening the trunk from the StarLine alarm remote control
What to do if the trunk does not open?
Be sure to make sure that when you press the desired key combination, the key fob emits a triple signal - this indicates that the alarm has received the command.
If your car has an additional servo drive for opening the trunk, then listen carefully: a click from the side of the trunk lid when the command is executed will indicate that power is supplied to the servo drive, but it is either broken (the internal rack or gear that drives it is damaged) or not The unlocking mechanism connected to the servo drive is working.
To operate, the servo drive is connected by a rigid rod to the lock mechanism so that when the drive is activated, it simulates manual opening of the lock. If the rod is bent or has fallen off (it is attached to the lock with a screw clamp), then the spent servo will not open the trunk. Eventually, the castle itself may freeze.
The absence of noise will indicate damage to the wiring, failure of the power servo control relay, or a blown fuse. In this case, you should contact an auto electrician or read the installation and operating instructions for Starline A93. It is also worth doing if an additional servo drive was not used to control the opening.
In cases where pressing the 2+1 button combination does not lead to the desired reaction on the key fob, check that the alarm settings are correct:
- Disarm the car.
- Without turning on the ignition, quickly press the Valet service button five times inside the car
- Five siren signals and one signal from the key fob should sound, and the message AF will appear on its screen - the alarm has entered the setup mode.
- Enter the AF menu (service and security functions) by first pressing button 3 for a long time, then (after a short beep) briefly again.
- Now use buttons 2 and 3 to scroll through the various alarm functions, which will be displayed as “10-4”, where 10 is the function number, 4 is its setting. Scroll to function 13 - it controls channel 1. To control the trunk, the correct value should be 13-1. If you see something different on the screen, set the function to the desired value by pressing button 1.
- After this, save the settings by turning on the ignition.
If you use the StarLine mobile application to control the alarm, then it is possible to configure trunk control from it (if this has not been done previously). Since only one channel can be activated in the application, set the correct one in the settings of the alarm itself: using the method described above, set function 20 to the value 20-1.
What do you need for work?
A similar connection diagram for the trunk button attracts many.
To realize your idea, you need to prepare materials and tools.
The set consists of:
- electric drive (activator) of the luggage compartment lock;
- universal 4-pin relay;
- fuse blocks;
- fuse;
- wires;
- female type terminals;
- trunk opening buttons;
- heat shrink tube;
- electrical tape;
- plastic clamps.
The block is placed for safety reasons. Mounted on the positive wire. The fuse can be taken as standard, 10 Ampere. Do not need anymore.
Determine the length of the wiring individually. But practice shows that 5-6 meters is enough with a margin.
Take the opening button from ten. It is considered the most reliable and also affordable. If you are tuning a domestic car, then it will definitely fit.
At any car market it will not be difficult to buy the entire set. It will cost 600-800 rubles. Maximum 1000 rubles.
What to do if the Starline A91 constantly shows an open trunk
Some owners of the Starline A91 alarm system are faced with a problem when the open trunk icon lights up even after it is closed. When the rear compartment is unlocked, the alarm disarms and additionally disables the shock sensor. Accordingly, opening the trunk is an event that deserves to be indicated. But closing the door when the car is not armed is not. Data updating occurs automatically, but it can also be done manually. To make the trunk opening indication disappear from the screen after closing the lid, you must press the “*” button.
Where to begin
Now to the question of how to connect the trunk release button.
You need to start by studying the instructions from the alarm. An option for those who are going to connect a button to the remote control of the car’s security system.
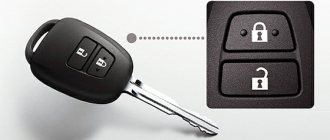
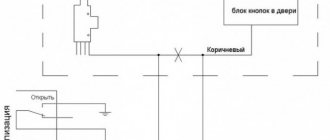
In the connection diagram you need to find the wire of the desired color that goes to opening the tailgate. This is usually a yellow-red wire.
If you have figured this out, then select a location for installation, and also begin the installation process itself.
Installation
I can’t say that installing an electric drive is something incredibly difficult. In fact, anyone who knows how to work with bench tools, a soldering iron, and also knows the difference between transistors and diodes can implement such a mechanism.
The installation process roughly looks like this:
- It is necessary to modify the purchased mechanism, remove the motor and rotate it so that it can function along the rack. Using a grinder removes all excess;
- Using a perforated metal blank, a fastening strip is made from it;
- The rack and drive motors are fixed to the bar. This design is mounted on body panels;
- One end of the window regulator mechanism, which was not used, is mounted on the trunk lid holder;
- Then everything is adjusted together and brought to the desired position;
- Think in advance about how you will lay out the wiring harness so that the wiring does not fray or become damaged;
- The connection diagram is selected based on the selected set. Ready-made kits have a special scheme, that is, you need to act strictly according to it;
- Connection to the power source is carried out with a separate cable, which is connected to the battery;
- A separate fuse is used for the power circuit;
- A button is mounted in the cabin in a place convenient for the driver.
In terms of ease of installation, it is much more convenient to work with ready-made factory kits. The manufacturer includes detailed instructions, following which you can do everything in just a couple of hours and enjoy the result.
Whether the financial and time costs are worth it, everyone decides for themselves. After all, before we somehow managed without an electric drive on the trunk. You can continue to live without him. And if you want, then no one forbids or prevents you from installing the kit.
Installing a radio in a car with your own hands: basic nuances, setup
Many people are interested in how to make the trunk open with a button. Now you'll find out.
Using the example of the timeless classic VAZ 2107, the process looks like this:
- Install a relay under the hood. The best option for placing a four-pin relay. You don't have to run the positive wire to the button. Plus, the space under the dashboard is more difficult to find. A good option is to attach it to the windshield washer reservoir. Make sure that connections and contacts are tight and insulated;
- Pull 2 more wires through the standard hole of all wires. One will go to the button, and the second to the activator;
- The wiring needs to be routed throughout the cabin. It is better to do this on the roof. And to the trunk. Or use areas where standard wiring runs under a layer of carpet;
- Carefully pull the wire through the luggage compartment to the lid. The wiring is connected to the main bundle. Fixed with electrical tape or a plastic clamp;
- Now the activator is attached to the trunk door lock. Do not forget that the electric drive works by pushing and retracting. To change the direction of movement, it is enough to change the polarity;
- To connect the activator, you need to do the following. Unscrew a couple of nuts and remove the lock. Use a drill to make a hole in the side. Place the rod there and connect it to the tongue of the locking mechanism;
- It will be correct to close the installed activator, as well as the lock using the casing. This will prevent dust and dirt from entering. Plus it will protect against mechanical damage;
- Now select the place where the button will be located in the cabin. If this is a seven from AvtoVAZ, then they usually choose a plastic trim to the left of the driver’s seat. This will allow the button to always be at hand. He quickly pressed the button, left the cabin, and the trunk was already open;
- The button is easy to install. A hole is made in the cover. A button is inserted there, and terminals are also put on. The minus is attached here, on the plastic lining fixing bolt.
We install an electric drive system like a pro
For VAZ 2110 and 2112
Before installing the system - in accordance with all the rules of proper installation - you should pay attention to the required set of electric drive components: it is better to look for a set that is not too universal, one that contains a mounting plate. This plate is needed to secure the electric lock. It is possible to make it yourself, but having a plate will significantly save valuable time, which will allow you to focus on work on connecting wires to ground, relays, etc. Their length should be at least 4 meters.
Electronic lock
So, how is the electric drive installed in VAZ 2110 and VAZ 2112 cars:
- first you should take care of the battery: its negative wire must be disconnected from the battery terminal;
- then you can begin installing the lock itself on the trunk lid;
- the lock must be freed from the casing by prying its latches with a screwdriver;
- Using a slotted screwdriver, the fastening screw of the body lock drive rod is loosened, and the fitting is unscrewed while holding it with a “seven” key, and then the drive rod is dismantled;
- According to the preliminary placement of the electric drive, it is important to note the future holes for its fixation - five millimeter holes are drilled strictly along the drawn contour;
- the loose fitting of the lock drive rod should also be drilled to a diameter of 3 mm;
- a U-shaped bracket is then made from improvised steel wire (the diameter of which is 4 mm);
- the bracket is threaded with nuts (they are installed on the threaded ends (M4 thread);
- the electric drive system control button is located on the dashboard to the left of the mounting block (here it is important to supply primary voltage to the panel - from terminal “2” of block “Ш1” of this block);
- The final step is to connect the negative wire to the battery terminal.
This video shows a more universal way to connect an electric drive (without including a relay in the final system):
For VAZ 2111
There are noticeable differences between the placement of the electric drive in the VAZ 2110, 2112 and in the VAZ 2111. In the middle of the process, installation follows a unique route, which is largely explained by the factory installation (installation at the production stage of the car) of the wiring harness:
- first, the rear casing is also dismantled (the pistons are removed by unscrewing a pair of screws);
- a pre-made steel fastening plate is attached with fittings and nuts (size M5 for fittings) to the door panel from the inside, the electric drive is also attached with a pair of screws to the fixed plate;
- the curved tip of the lock rod on the VAZ 2111 is then inserted into the eye of the electric drive and after that the end of the rod is necessarily bent around the lock lever with pliers;
- the drive is connected to a wiring harness that contains a block with two poles, from which white and black wires extend;
- the white one is connected to the green wire of the electric drive, the black one is connected to the blue one.