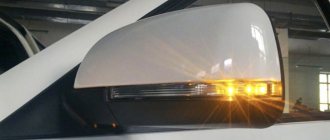
Good visibility is important for safe driving. While driving, the driver always has to “keep his finger on the pulse” so as not to get into an unpleasant situation (accident). The side mirrors on the Priora are initially made quite well - the viewing angle is enough to sit still when reversing or changing lanes. This is not a joke, it’s really like a Kruzak review. After the Priorovskie cars I get into other cars and I miss my familiar overview. Mirrors on Priora come with turn signals (repeaters); this is the Special Edition version of Lada (luxury) Priora cars. The price of these is naturally more expensive, but not by much 900 rubles. They can be installed on a regular Priora. Turn signals in mirrors are a newfangled theme and they look beautiful and are also practical.
The side mirrors of the Priora 1 car have been improved along with the restyling of the car. In the SE luxury version, which is essentially the most expensive and complete package of the car, these devices have changed, the car has become even more convenient “for the driver”. Some people buy such SE mirrors on a Priora 2 and install them even if they originally bought a car with a more economical package.
All that remains is to properly disassemble the mirror and make friends with the wires. Indeed, to install the modernized version you will have to put a lot of effort into finding reasons. You can do simple tuning, if you want to change the appearance to a more curly one - just put covers on the mirrors. It seems like a small change, but the car looks more solid with them.
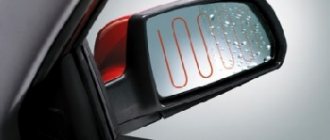
Who hasn’t felt the thrill of using a car after ten, or a classic, freezing the car in winter - heating seems to be a common thing, but this was not the case on the VAZ. The heated mirrors of the Priora car are implemented using spirals. Often turning on heating in wet weather, a mark forms on them. Despite this, after 6 years of use, they have not faded.
Life hack: side mirrors on Priora - removal and installation
Good visibility is important for safe driving.
While driving, the driver always has to “keep his finger on the pulse” so as not to get into an unpleasant situation (accident). The side mirrors on the Priora are initially made quite well - the viewing angle is enough to sit still when reversing or changing lanes. This is not a joke, it’s really like a Kruzak review. After the Priorovskie cars I get into other cars and I miss my familiar overview. Mirrors on Priora come with turn signals (repeaters); this is the Special Edition version of Lada (luxury) Priora cars. The price of these is naturally more expensive, but not by much 900 rubles. They can be installed on a regular Priora. Turn signals in mirrors are a newfangled theme and they look beautiful and are also practical. The side mirrors of the Priora 1 car have been improved along with the restyling of the car. In the SE luxury version, which is essentially the most expensive and complete package of the car, these devices have changed, the car has become even more convenient “for the driver”. Some people buy such SE mirrors on a Priora 2 and install them even if they originally bought a car with a more economical package.
All that remains is to properly disassemble the mirror and make friends with the wires. Indeed, to install the modernized version you will have to put a lot of effort into finding reasons. You can do simple tuning, if you want to change the appearance to a more curly one - just put covers on the mirrors. It seems like a small change, but the car looks more solid with them.
Who hasn’t felt the thrill of using a car after ten, or a classic, freezing the car in winter - heating seems to be a common thing, but this was not the case on the VAZ. The heated mirrors of the Priora car are implemented using spirals. Often turning on heating in wet weather, a mark forms on them. Despite this, after 6 years of use, they have not faded.
Types of windshields
The dimensions of the windshield, standard, and sensor-equipped windows are the same. Additional features and prices will vary. The most convenient way to select is by article number.
Standard
The most common glass without additional options. Installed on the factory rubber seal. The cost of the original glass model is approximately 2.5 thousand rubles; replacement will cost 2 thousand rubles if the work is done in a workshop.
Front windshield on Priora with rain sensor
The rain sensor automatically turns the windshield element and sometimes the washer system on and off. The essence of the operation of the unit is the refraction of an IR light beam. It passes through snow, mud, and water drops, coordinating the operation of a special photocell. The sensor can be rearranged after replacing the glass. The price of one product is from 5 to 9 thousand rubles, installation will cost 2 thousand rubles.
Heated
A product with a heating function can have different versions:
- heating of the entire working surface;
- warming up the working instrument area.
The principle of operation of the system is to heat thin filaments inside the glass. The unit operates automatically and switches off periodically, saving battery power and preventing overload of the on-board network. The ice crust thaws quickly in winter, providing good visibility and protection from fogging. Price – 6–10 thousand rubles, installation usually costs 2 thousand rubles.
Standard side mirrors - article number and price
For the Lada Priora car, standard parts with electric drive have catalog number 2170-8201017. Price – about 3,100 rubles per set.
Compared to the SE version, they have one design disadvantage. The surface area does not completely cover the mirror, which can also be “usefully” occupied. This shortcoming was corrected with the SE, where the mirror elements were actually made larger.
Heated mirrors on the Priora received a larger mirror element. Thanks to this, the driver does not have to lower them when reversing – even this difficult-to-reach area is visible. For the SE version, repeaters were added to the mirrors. Priora with electric drive, repeater and heating (catalog number 2170-8201021, price - about 3,800 rubles per set) was much more expensive than conventional versions.
Please note that kits are often sold unpainted or painted to match the body color. If necessary, paint the body of the mirror device before installation. Painting it yourself will turn out much better. Some stores offer painting only the upper parts of the body, but you can choose any painting method yourself. Speaking about the rear-view mirror of a Priora car, you can notice that it is ordinary, as simple as two rubles, attached to a holder that is secured under the trim.
How to glue a rear view mirror to a car windshield
The need to dismantle the rear view mirror does not arise often, mainly in the event of an accident, collision, or impact with oncoming traffic.
Many car owners complain about the lack of methodological information on removing the rear view mirror of a Lada Vesta.
To help drivers, we will consider the main points during dismantling:
- Open the hood.
- Remove the terminals from the battery.
- Open the driver and front passenger doors wide.
- Remove the top and bottom plastic covers.
- Press the metal lock and slide the mirror up from the mount.
Note to the driver!
In the “luxury” configuration of the Lada Vesta, the rear view mirror (hereinafter referred to as the rear view mirror) is installed with a rain and light sensor. You need to move the mirror mount up. In all other configurations, sensors are not installed; the mount must be moved down.
Take this information into account when replacing the CBV to avoid damaging the equipment. Many craftsmen do not know the intricacies of attaching the interior mirror, which damages two digital sensors.
Disassembly procedure
Once the structure has been removed, disassembly can begin. If it is required, of course. Perhaps you have found a new mirror whose price suits you completely. Then you can skip this point.
If it is necessary to disassemble an element, we start from whether it is internal or external.
The interior mirror is disassembled as follows:
- there is a place where the glass and the body are connected;
- spin is inserted;
- pressed with little force;
- a gap appears;
- use a mediator to pass along the entire length of the gap;
- the body is divided into 2 parts;
- the mirror is removed;
- everything else is located underneath it;
- We carry out the necessary work.
You may also need to disassemble your car side mirror.
It doesn't matter whether left or right
- Using a hairdryer, the area between the case and the glass is heated;
- Do not heat to high temperature. Use a household hair dryer on medium power;
- Use a flat-head screwdriver to separate the body into 2 parts;
- Sometimes it is necessary to bend the terminals;
- If you are afraid of damaging the mirror, wrap the instrument with electrical tape;
- On some cars you need to slightly press the mirror to the center and move it to the side;
- The glass is carefully removed;
- Remove the screw from the plastic frame, if there is one;
- Under the frame we see the entire mechanism;
- Use a screwdriver to remove the broken structure and replace it with a new one.
That's it, the work is almost completed. But since we disassembled everything and changed the necessary components, now we need to assemble the structure and install it back on the car.
Review of Manufacturer Prices
| Name / catalog article | Price in rubles |
| LadaVesta and Lada XRAY, Renault Megane 3 with light and rain sensors (8200000509) | From 2000 - 2200 |
| Reflector without light and rain sensors (7700838529) | From 1200 |
| *price indicated as of 04/05/2019. |
Conclusion
Replacing a mirror in a Lada Vesta car yourself is quite simple. The task completes within 10 minutes. Difficulty may arise when purchasing equipment. Check the modification of the car, the presence of pre-installed rain and light sensors. There are no significant differences between domestic and foreign components. The owner of the technical equipment chooses based on personal preferences.
Reassembly
I will say right away that the assembly is carried out simply in the reverse order of the previously carried out dismantling work. Therefore, I see no point in talking about this separately.
With mirrors on special mounting brackets, everything is also extremely simple. All that remains is to tighten the fasteners and fix the mirror on the ceiling or side of the car.
But what’s really more difficult is gluing a car mirror. To begin, choose the appropriate composition. Household superglue or double-sided adhesive tape will not work. Tested by many car owners. It's better to ask for the appropriate adhesive at an auto parts store. If found, for gluing you need:
- choose a warm and sunny day without high humidity;
- create a temperature in the garage of 25-27 degrees;
- remove all dirt and traces of old glue from the body;
- walk a little along the joint with sandpaper;
- sand the gluing area on the mirror;
- degrease all surfaces;
- Apply the required thin layer of glue to the holder;
- spray the purchased activator on the fastening area;
- attach the glass to the surface;
- press the mirror to the glass;
- keep as long as the glue manufacturer said;
- remove the remnants of the used activator and glue from your mirror and also the holder itself;
- put the entire structure in its rightful place;
- use as intended.
Basic faults
Additions to the conventional mirror element make driving even more comfortable. Just in case, the repeater makes it clear to inattentive traffic participants where the driver is going to go. Heating will promptly evaporate moisture - raindrops, and will not leave stains that distort the image. The following malfunctions may occur during operation of the machine:
- The fasteners have become loose. Each part is held in place by several fasteners at different points. They may become so loose that tightening them will be useless. Everything will depend on the severity of the damage. In some cases, replacing the fasteners will be sufficient.
- The heating does not work. Check the connection of the wire blocks. Perhaps it is enough to strengthen the wire connections so that they no longer come loose.
- The electric drive does not work. Adjusting the position of mirror devices while sitting in your seat is much more convenient than doing it manually. Check the wiring.
- Turn signal repeater. If the repeater does not work, it means the signal is not reaching it. The problem, again, is the wiring.
- Broken mirror element. It will be enough to replace it with a new part, but during the replacement you should be extremely careful. It is important to prevent splinters from getting under the cover.
Search
Choosing a mirror in Kalina
Kalina mirror often requires replacement. This is justified by the difficulties of the first years of driving and the desire to install a more beautiful part.
Replacing a side mirror is not a complicated process; it is important to be careful and follow a certain method
How to make a worthy choice?
Exterior mirrors are one of the most important and important parts of a car. Without them, it is impossible to look at the situation and move along a busy highway. Side view mirrors often require replacement, which is explained by their greatest “trauma” while driving. Before starting work, you need to choose a balanced version of the mirror part. This could be a similar or more sophisticated mirror in Kalina. If you're having trouble choosing, you'll need to familiarize yourself with the basic setup mechanisms.
There are the following types of mirrors:
Ease of use depends on the choice of mechanism. The articulated mirror element is the most common type. Almost all modern cars do not do this.
The lever control is based on a joystick or lever located inside the cab and is pulled to the side by a narrow cable.
Electronic mirror element. this is a modern mechanism. It is found in new cars equipped with many additional features. Its implementation. comfort and safety.
Main advantages of the electronic mechanism:
- increased appearance;
- anti-glare coating;
- heating;
- Built-in double turn signal.
How to remove
and disassemble the side mirror
by car Lada
Kalina
.
replacing the mirror element with an exterior rear view mirror from Kalina, Grants and Priors
Video review of the self-service mirror element on the external rear view mirror of such cars
Heated mirrors. These are modern developments that simplify the life of every motorist. Increased visibility allows you to better navigate city roads. This option reduces the likelihood of accidents and increases the chances of noticing a dangerous moment. Lastly, the clarity and appearance of this item is much better than the standard part.
The anti-reflective coating on the viburnum mirror allows you to reflect both the sun and bright light. The anti-glare effect ensures good visibility while driving.
Heated mirrors. this is a convenient option. Thanks to this, you don't have to remove snow and ice from the glass. This is a very nice and convenient addition. Finally, there is a built-in signal repeater. This Lada Kalina Mirror element allows everyone to know the traffic about future maneuvers. Which simplifies the trip and makes it safe.
When choosing the best mirror element for Lada Kalina, personal preferences should be taken into account. Of course, do not forget about convenience and safety.
How to disassemble a mirror (left and right) on a Priora car - removal and installation
Replacing a device that is installed on a car of the “Norma” or “Standard” trim levels with the SE version becomes a good way of tuning. In order to disassemble these devices, you will have to disassemble the interior trim. Carry out the work as follows:
- Remove the screws that secure the A-pillar trim.
- Pull part of the trim towards you.
- The part is held in place by three bolts. First, lower the glass, then slowly unscrew the bolts, taking the reflective element with your other hand.
- Do not jerk the device. First, disconnect the wires - there should be two terminals going through them. The first is for heating, the second is for position adjustment.
- Place the new part in place of the old one and secure it with bolts.
Connecting the mirrors of a Priora car should be done according to the following diagram:
- the green wire goes to the black-green one;
- red wire - to blue-red;
- connect the blue wire to the black-blue one;
- brown wire - to red-blue (second block);
- black to black wire (second block; This is the “minus” for repeaters and heating).
If you change this part in winter, when the outside air temperature drops below zero, you will have to be more careful with the mirror element. Once you remove it, you should warm it up using a hair dryer or heat gun. The surface may become chipped or “burst,” so that it remains useless. You will have to prepare for the replacement in advance by obtaining the necessary tools.
Why did it happen so?
Perhaps the automatic requests do not belong to you, but to another user accessing the network from the same IP address as you. You need to enter the characters into the form once, after which we will remember you and be able to distinguish you from other users exiting from this IP. In this case, the page with the captcha will not bother you for quite a long time.
You may have add-ons installed in your browser that can make automatic search requests. In this case, we recommend that you disable them.
It is also possible that your computer is infected with a virus program that is using it to collect information. Maybe you should check your system for viruses.
If you have any problems or would like our support team, please use the feedback form.
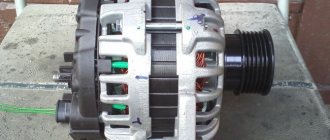
Upon arrival at the garage I saw the following picture:
When I bought it, the car had terrible mirrors, which had peeled off and turned yellow over 8 years of service. Also, the heating on the left mirror partially stopped working, and on the right mirror it stopped working completely.
I bought new heated mirror elements:
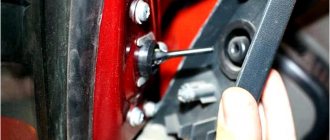
Changing the elements is very simple; to do this, you need to press the bottom part of the mirror all the way, which will cause a gap to appear on top. Through this gap you need to bend the latches with a flat screwdriver, they can be seen in photo No. 6, just bend 4 latches.
Priora Lada (2013+). Disassembling the outside rear view mirror
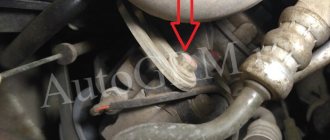
We disassemble the outside rear view mirror to replace the heated reflective element, gear motor unit or side turn signal. The work is shown on the left mirror; we disassemble the right mirror in the same way. At low ambient temperatures, in order not to split the reflective element, we recommend removing the mirror and gradually warming it up with a household hairdryer or warming it up indoors.
To replace the heated reflective element, turn the reflective element all the way down.
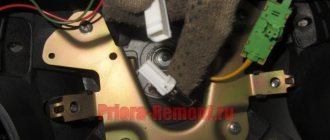
Pulling the reflective element towards you, press the upper latches of the element with your finger. . remove the element from the mirror body (arrows indicate the upper clamps of the element).
Disconnect the wire block from the pointer block. _
. and remove the turn signal.
The indicator is equipped with LEDs; if they fail, the turn indicator assembly must be replaced. Install the side turn signal in the reverse order.
Replacing mirror elements
To replace the mirror elements of the Priora side mirrors, you will need a flat-head and Phillips screwdriver. Use a Phillips screwdriver to unscrew the side mirror from the door. Next, press on the bottom side of the Priora mirror element, a gap will appear. Insert a straight screwdriver into the resulting gap and unclip the lock of the mirror element. Then, disconnect the block with wires from the heater of the mirror element of the Lada Priora. Finally, you can unscrew the side mirror adjustment mechanism. Another replacement option is to simply break the mirror element with a hammer. Installation is carried out in reverse order.
Owners of a Priora in an old body can install turn signal indicators on the mirrors. Of course, you'll have to tinker with the wiring. On mirrors with turn signals, in addition to the adjustment and heating pads, a third pad is mounted. Turn signal block. On the Internet you can find a wiring diagram for the kit for installing a turn signal in the Lada Priora mirrors.
After all the manipulations with replacing mirror elements and installing repeaters. Mirrors should be adjusted to minimize blind spots. There is a universal way to adjust the mirrors, taking into account the body structure of the Priora. All you need to do is ensure that all mirrors do not reflect the same objects. If a car is visible in the left mirror, then it should not be visible in the interior mirror. Thus, the car behind will move from one mirror to another until it overtakes.
Mirror elements of the Lada Priora are a fragile part of the car, without which driving becomes dangerous. Mirrors must be kept clean and tidy. Moreover, you can replace the mirror elements yourself, with just a couple of screwdrivers on hand.
Installation of side mirrors of the new SE model on Lada Priora
Currently, Lada Priora is equipped with electric drive and heated exterior mirrors. One of the popular modifications is the installation of side mirrors of the new SE model (with heating, electric drive and turn signal indicators). We'll tell you how to replace old-style mirrors with new ones with your own hands.
Required
: Electrically controlled external mirrors with turn indicator (article: 2170-8201050-75 and 2170-8201051-75, price about 3,500 rubles), turn signal caps SE.
Installation
Remove the standard side mirrors (pry off the mirror triangle with a screwdriver and remove the three mounting screws). Install the new mirror in the reverse order.
We stretch the turn signal wires to the mirrors:
- Remove the door trim.
- Remove the turn signal from the fender and disconnect the block. We install plugs instead.
- Pull the wires out of the fender and into the interior. To do this, unscrew the sill trims in the cabin, peel back the carpet and felt and pull the black wire in the engine panel. We determine which of the two +12 V wires using a multimeter or a test lamp. We insulate the second wire.
- Route the wire from the passenger compartment to the car door through the corrugation.
Connection
Old style mirrors (without direction indicators) have two connectors (3 and 2 wires):
The mirrors of the new SE model have 1 block of 6 wires:
We cut off the wires from the SE mirror block and solder it according to the diagram:
The process of installing and connecting mirrors of the new SE model is also shown in the video:
How to remove a heated mirror on a Priora
[QUOTE=Antropoff;1068220]well, here is a photo series with comments from the analyzer)))
We remove the mirror from the car, it looks like this:
For further tricks, we will have to remove the mirror element itself, for which we need to unclip 4 paired latches. We press on the inside of the mirror, pressing directly on the glass - it will turn under a little force. Then, from the outside of the mirror, use a thin, long screwdriver to climb inside the mirror, and using your fingers, pull out the latches. It takes quite a lot of effort, and you have to be careful, because... you can kill the insert, and the set costs 1200 (here, in Kurgan) i.e. there is something to worry about. And you can also kill the latches themselves.. which is what I did.. The mirror will be written off in a couple of months anyway and with a new insert it will live on the car of one of our employees.. i.e. I didn’t take special care of the insert.
The process of tensioning the timing belt “from start to finish”
We perform all operations on a cold engine. Let's say the belt is now being replaced and the nut on the roller is not tightened. Then just skip "step 1":
- We take a crocodile clip for the battery and fix the belt on the pulley. Then use a 17mm wrench to loosen the nut (see photo).
- We screw an M8 pin into the threaded hole next to the roller. We screw two nuts onto it. We put a plate on the roller and set the force with a dynamometer - exactly 4 kgf.
- The inner nut on the stud should touch the plate. Screw another nut on top, securing the plate in place.
- Taking the key “17”, tighten the nut on the roller. Recommended force – 33.2-41.1 N*m.
- All that remains is to remove everything unnecessary - the plate and the pin.
On a VAZ-2112 engine, the timing belt tension depends on the force applied to the adjusting key. The force should be 2.0 N*m. And our distance from the axis to the “ear” is 51 mm (see below). Multiply 0.051 by 39.2266 (4 kgf in Newtons) and you will get what you need.
Plate drawing
The plate shown in the drawing is made from steel 2 mm thick. The pattern must be made based on the characteristics of the bending equipment. When bending, the length decreases, which means that the dimensions of the pattern will be larger than 94x75 mm.
Threads for M4 screws are cut in the standard way. Each screw should protrude 7 mm beyond the plane.
Life hack: side mirrors on Priora - removal and installation
Good visibility is important for safe driving. While driving, the driver always has to “keep his finger on the pulse” so as not to get into an unpleasant situation (accident). The side mirrors on the Priora are initially made quite well - the viewing angle is enough to sit still when reversing or changing lanes. This is not a joke, it’s really like a Kruzak review. After the Priorovskie cars I get into other cars and I miss my familiar overview. Mirrors on Priora come with turn signals (repeaters); this is the Special Edition version of Lada (luxury) Priora cars. The price of these is naturally more expensive, but not by much 900 rubles. They can be installed on a regular Priora. Turn signals in mirrors are a newfangled theme and they look beautiful and are also practical.
The side mirrors of the Priora 1 car have been improved along with the restyling of the car. In the SE luxury version, which is essentially the most expensive and complete package of the car, these devices have changed, the car has become even more convenient “for the driver”. Some people buy such SE mirrors on a Priora 2 and install them even if they originally bought a car with a more economical package.
All that remains is to properly disassemble the mirror and make friends with the wires. Indeed, to install the modernized version you will have to put a lot of effort into finding reasons. You can do simple tuning, if you want to change the appearance to a more curly one - just put covers on the mirrors. It seems like a small change, but the car looks more solid with them.
Who hasn’t felt the thrill of using a car after ten, or a classic, freezing the car in winter - heating seems to be a common thing, but this was not the case on the VAZ. The heated mirrors of the Priora car are implemented using spirals. Often turning on heating in wet weather, a mark forms on them. Despite this, after 6 years of use, they have not faded.
Problem and solution
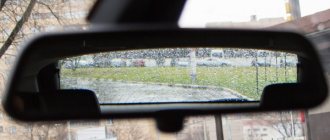
Winter is coming. And here, unfortunately, side rearview mirrors cannot always help the car owner. Winter is a particularly difficult time of year for motorists. We will not now list all possible technical problems, starting with starting the engine, but will touch only on purely mechanical problems:
Let's just remember how in the morning, leaving the entrance and looking around at the cars parked nearby, it is not always possible to immediately understand which one is yours. The reason for the conspiracy is quite banal - overnight snowfall. So, your first task arises to get a shovel or other improvised means and dig out your iron horse After this, we move on to cleaning the body of the VAZ, then the windows of your car. A problem arises, what to do with the rearview mirrors? Ice and snow did not ignore them
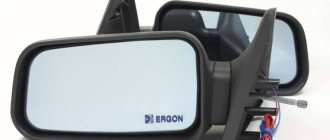
Standard side mirrors - article number and price
For the Lada Priora car, standard parts with electric drive have catalog number 2170-8201017. Price – about 3,100 rubles per set.
Compared to the SE version, they have one design disadvantage. The surface area does not completely cover the mirror, which can also be “usefully” occupied. This shortcoming was corrected with the SE, where the mirror elements were actually made larger.
Heated mirrors on the Priora received a larger mirror element. Thanks to this, the driver does not have to lower them when reversing – even this difficult-to-reach area is visible. For the SE version, repeaters were added to the mirrors. Priora with electric drive, repeater and heating (catalog number 2170-8201021, price - about 3,800 rubles per set) was much more expensive than conventional versions.
Please note that kits are often sold unpainted or painted to match the body color. If necessary, paint the body of the mirror device before installation. Painting it yourself will turn out much better. Some stores offer painting only the upper parts of the body, but you can choose any painting method yourself. Speaking about the rear-view mirror of a Priora car, you can notice that it is ordinary, as simple as two rubles, attached to a holder that is secured under the trim.
Video
How to disassemble the side mirror on a VAZ 2110, see the following video:
Disassembling side mirrors
You can remove the mirror element from the mirror body in various ways: 1. Unclip the mirror by pressing on its center from the inside, using a curved object or a screwdriver. If you pry the mirror element from the edge, you can break it.
2. You can also remove the mirror element by sharply hitting the mirror body on a soft surface.
To detach the mirror housing from the triangular mount, simply remove the spring, unscrew the adjusting rod and remove its pin.
Assembly and installation of the mirror is carried out in the reverse order.
In order to replace the internal rear view mirror on VAZ 2110-2112 cars, you only need a couple of minutes of time and two screwdrivers:
Discuss
Select it and press Ctrl + Enter
Every now and then there are miracle projects online that bring smiles to the public’s faces. Like, for example, the little UAZ-452.
This time, the tuning masters got to the point of the Soviet “all-terrain vehicle”. The “shorty loaf” caused both laughter and affection with its appearance. The authors of the project, apparently, decided to create a toy SUV, shortening the all-wheel drive off-road minibus by almost half.
Upon completion of the project, the car received a narrow wheelbase and began to resemble Smart cars. Painting in light green and pink colors emphasizes not only the place where the two halves of the UAZ-452 body are welded, but also a certain “toy-like” quality of the car itself.
Netizens left a lot of funny comments about what they saw.
Somehow, projects involving the remaking of the Soviet model GAZ-24 Volga have become frequent online. They have already managed to transform it into a muscle car, giving it unusual shapes. This time, users of the social network Vkontakte heatedly discussed the new concept. Now the Volga has received a futuristic image, which actually amazed the audience.
However, it is worth immediately noting that the car still exists only in the form of a render from one independent designer. But look what he offers.
The shape of the head optics and bumper, as well as the radiator grille, refer us to the original source. The rest of the designer's decision was dictated by modern trends.
The car appears before us in a two-door version, which makes it even more attractive. At the same time, some features from the Mustang are captured.
The author of the project did not specifically disfigure the usual style of the car, adding only laconic modifications. At the same time, it was decided to make the interior sporty.
Basic faults
Additions to the conventional mirror element make driving even more comfortable. Just in case, the repeater makes it clear to inattentive traffic participants where the driver is going to go. Heating will promptly evaporate moisture - raindrops, and will not leave stains that distort the image. The following malfunctions may occur during operation of the machine:
- The fasteners have become loose. Each part is held in place by several fasteners at different points. They may become so loose that tightening them will be useless. Everything will depend on the severity of the damage. In some cases, replacing the fasteners will be sufficient.
- The heating does not work. Check the connection of the wire blocks. Perhaps it is enough to strengthen the wire connections so that they no longer come loose.
- The electric drive does not work. Adjusting the position of mirror devices while sitting in your seat is much more convenient than doing it manually. Check the wiring.
- Turn signal repeater. If the repeater does not work, it means the signal is not reaching it. The problem, again, is the wiring.
- Broken mirror element. It will be enough to replace it with a new part, but during the replacement you should be extremely careful. It is important to prevent splinters from getting under the cover.
How to disassemble a mirror (left and right) on a Priora car - removal and installation
Replacing a device that is installed on a car of the “Norma” or “Standard” trim levels with the SE version becomes a good way of tuning. In order to disassemble these devices, you will have to disassemble the interior trim. Carry out the work as follows:
- Remove the screws that secure the A-pillar trim.
- Pull part of the trim towards you.
- The part is held in place by three bolts. First, lower the glass, then slowly unscrew the bolts, taking the reflective element with your other hand.
- Do not jerk the device. First, disconnect the wires - there should be two terminals going through them. The first is for heating, the second is for position adjustment.
- Place the new part in place of the old one and secure it with bolts.
Connecting the mirrors of a Priora car should be done according to the following diagram:
- the green wire goes to the black-green one;
- red wire - to blue-red;
- connect the blue wire to the black-blue one;
- brown wire - to red-blue (second block);
- black to black wire (second block; This is the “minus” for repeaters and heating).
If you change this part in winter, when the outside air temperature drops below zero, you will have to be more careful with the mirror element. Once you remove it, you should warm it up using a hair dryer or heat gun. The surface may become chipped or “burst,” so that it remains useless. You will have to prepare for the replacement in advance by obtaining the necessary tools.
Wiring diagram for mirrors on Grant Liftback
There are six pins in total, of which:
- No. 1 – horizontal adjustment;
- No. 2 – —/— vertically;
- No. 3 – weight of the control unit;
- No. 4 – heating;
- No. 5 – turn signal repeater;
- No. 6 – general “minus”.
Connection diagram by wiring color
- blue – left side;
- white – side lights;
- blue – right side;
- white – black – “plus”;
- black – “minus”;
- green – common on both sides of the mirrors;
- red – general.
Wiring diagram for Lada Granta Liftback mirrors on the control unit
- gray - black and blue - black - control unit on the driver's side;
- black - “minus”;
- white-black - “plus”;
- pin No. 7 - not used. Connect third-party contacts;
- white - dimensions;
- green, orange - control unit on the passenger side.
If you want to connect Grant Liftback mirrors to a VAZ, purchase a control unit from a Lada Kalina or a VAZ Niva. The standard unit is not intended for installation on other VAZ models. The pinout of the terminals occurs according to the following diagram:
- blue – left and right side;
- black – “minus”;
- yellow – common on both sides;
- red is a plus.