PTFs are installed on the Priora to improve the standard light when driving through dark sections of the road or in fog, they are simply necessary. Fog lights on the Priora are a privilege of luxury trim levels.
Lada Priora was produced in 2 bumper design options: restyling SE, pre-restyling, so the part number is different - more about it below. In all other, empty configurations of the Priora car, plugs are installed in place of the PTF, which over time you want to replace with fog lights. Usually this moment comes when the driver drives his car for the first time through dense fog - so that visibility is minimal, it’s scary to drive, but it’s necessary. In such cases, the emergency lights turn on, movement should be slow and careful - and if there were fog lights, the driver would feel more confident.
The price of fog lights for a Priora car starts from 800 rubles and goes up to 2000+. The amount is not large, but the useful function is obvious.
Connecting the PTF is done in 7-8 steps; if you wish, you can do it yourself in the garage - read about it in this article.
The turning point leads to the choice between lens PTFs in the Priora and LED PTFs. One way or another, when driving in conditions of insufficient visibility, the light will become much larger. The driver will do everything possible to fulfill his duty to ensure traffic safety. But the fulfillment of this duty will have to be supported.
PTF Priora is not eternal, like other lights
Not only do you need to install the fog lights on the Priora in their standard places for longevity and correct light, and adjust them correctly, you also need to periodically ensure that the contacts do not come off and that there is still light. The lenses in the PTF for the Priora must comply with GOST standards, otherwise it will be another high beam, or cloudy daytime running gear. Correct installation of fog lights on a Priora will protect the glass from fogging, and the driver will not have to worry about the quality of the car's lighting devices.
Adjustment (setting) of PTF according to GOST
It’s not enough to just install PTFs, they also need to be configured, otherwise they will just be spotlights freely shining at an incomprehensible point - without fulfilling their functions. As in the case of other light devices, adjusting PTF on 2170 begins with checking the tire pressure (it should be equal), placing the car on a flat surface opposite a smooth wall at a distance of 5 m from the extreme point of the bumper.
On the wall, mark the distance from the floor to the center of the headlight, then a point 5 cm below. The PTF base on the Priora must be placed so that when the PTF is turned on, the upper limit of the light passes through the lower point marked on the wall. Fog lights, as statistics show, are rarely installed even after purchase, but with the correct settings they will serve as a good assistant.
Basic Setup Aspects
After the fog lights are installed, their luminous flux will need to be properly adjusted so that the operation of the optics is most effective. Adjustment of fog lights should be carried out in conditions that are closest to real ones. Therefore, make sure that there is a spare tire in the trunk, the tank itself is fully filled, and the tire pressure should be the same. In addition, for greater realism, a load weighing about two hundred kilograms can be placed in the car interior.
When all these conditions are met, you can begin adjustment. First of all, the vehicle must be placed on the most level surface, this will allow you to get the most accurate result. If this condition is not met, the adjustment will be incorrect. The setting is done in front of a wall or garage door, this is a prerequisite.
To begin the adjustment, measure the distance from the ground to the middle of the lantern. After this, you should draw a straight line on the wall or garage door that corresponds to the distance measured earlier. Having done this, you will need to draw another stripe - it should be 5 centimeters lower, while the first line can be erased. The anti-fog optics should be adjusted so that the upper limit of illumination is located on the horizontal strip that you draw on the network.
Standard PTF Priora 1 and 2: article number, price
AvtoVAZ installs fog lights on Lada Priora from Bosch and Avtosvet (Kirzhach). The difference is that Bosch is 40% larger in installation depth than fog lights from Kirzhach. Lighting equipment from BOSCH was installed in luxury versions, and from Kirzhach - in standard ones. Two options for the kit are being considered. The first set is a PTF for Priora 1 (pre-restyling), the second is for Priora 2 (restyling). The difference is the shape of the headlights and installation points. PTFs are sold complete or separately.
For Priora 1:
- PTF set of Kirzhach “Avtosvet” 21700-3743010-52. Price – about 700-800 rubles. One headlight costs about 500 rubles.
- PTF kit Bosch 21700-3743010-54. Price – about 1600-1900 rubles. One headlight costs about 900 rubles.
For Priora 2:
- PTF set Kirzhach “Avtosvet” 21700-3743010-53. Price – about 800-900 rubles. One headlight costs about 500 rubles.
- PTF kit Bosch 21700-3743010-50. Price – about 1000-1200 rubles. One headlight costs about 600 rubles.
Additionally, you will have to purchase an installation kit or just a set of wires for installing fog lights for the Lada Priora-2170; it comes with a button and a relay. The kit costs about 600 rubles.
Prices for headlights and work
Installing headlights in the showroom (where you buy a car) will cost 2,000 - 3,000 rubles, plus the price of fog lights is 2,600 rubles, which is much more expensive than in a store. Installation of fog lights in a car service center averages from 1,500 to 2,000 rubles. You can buy headlights yourself. It is not necessary to pay money for installation, because fog lights can be installed on your own.
The price of a set of fog lights varies from 1200 to 1800 rubles. For headlights you need to purchase a connection kit - 400 rubles.
Fog lamp models
Kirzhach and Bosch are not a death sentence, and if the light of these models does not suit you, there is a good choice from other manufacturers:
- Automotive lighting (Ryazan);
- Beam (Ryazan);
- DAAZ;
- Orion-7 (diode);
Made in China (lensed or diode). The Chinese also sell frames for the restyled version, which are installed instead of a plug and leave a hole exactly for the old-style foglights - on the pre-restyled Priora. A non-diode or non-lensed analogue of fog lights costs much less, but you shouldn’t rush into purchasing - bright white light does not always come with a long service life.
Installing PTF in Priora 1 and 2: are there any differences?
The PTF connection on the Priora differs in the position of the headlights: in the pre-restyling version, the round headlights are located closer to the center of the front end, and in the Priora 2 - restyling: the trapezoidal PTFs are located closer to the edges of the front bumper.
Installing PTF in Priora 2 can be complicated by the fact that instead of a trapezoidal headlight, the headlight of a pre-restyling Priora car will be installed; you will have to stock up on screws and patience in order to secure the headlight well in the frame, and the plastic frame to the bumper. You can install fog lights in a couple of hours, the main thing is to understand the wiring connection order.
The procedure for installing the button inside the cabin, powering the circuit
In order to connect the PTF button, you need to perform the following steps:
- Remove the negative terminal of the battery;
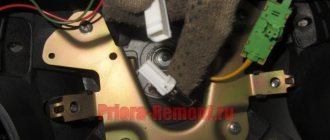
- Disassemble the steering column. It is secured with three plastic latches; they need to be turned 90 degrees. Find the safety block;
- The block holds a self-tapping screw, unscrew it;
- Disassemble the center console by unscrewing four screws: under the ashtray, under the radio and near the OPEN sign. In place of the plug, put the on/off button for the fog lights and connect the blue wire to the safety block, possibly through a relay;
- Using clamps, connect the remaining wires to the heated rear window button.
Description of the scheme
The relay must be connected according to this diagram. The relay has only 4 contacts, which are assigned numbers: 85, 86, 87 and 30.
- We connect contact number 86 to the negative of the battery;
- We connect contact number 30 to the “plus” of the battery;
- Contact number 87 is connected to the power wire (plus) of the PTF;
- We connect contact number 85 to the PTF ON/OFF button with a blue wire through a fuse;
We hope our article was useful to you.
Installation of fog lights on Priora, connection diagram
The schematic diagram for connecting fog lights is as follows:
To install PTF, in addition to a set of headlights and an installation kit for connecting fog lights, you will need:
- insulating tape;
- heat shrink;
- corrugation (to insulate the wires);
- flat screwdriver;
- Phillips screwdriver;
- key number 10;
- key number 13;
- pliers.
The algorithm for working on installing headlights is as follows:
- Open the hood, remove the negative terminal of the battery. Remove the frill and wipers, dismantle the fastenings using a 13mm wrench. The expansion tank and its mounting bracket must be removed using a 10mm wrench - without this it will simply be inconvenient to work, but putting them back is not difficult.
- Unscrew the screws securing the front bumper. There are 10 of them in total.
- The screws that secure the plugs can be easily unscrewed with a Phillips screwdriver. Fog lights are installed in standard places and securely fastened with self-tapping screws (so that the fastenings do not become loose when driving on uneven roads - because of such a trifle, you will have to return to the garage and remove the bumper).
- Proceed to wiring. It is recommended that all wires be corrugated to prevent chafing, and then secured so that the contacts do not come off.
- In the set of wires, select the longest wire (it is blue). It is “divided” into two “ends”: one is attached to the right headlight, the second to the left. The wire is then pulled into the engine compartment, closer to the master cylinder.
- Pull off the interior trim (a flathead screwdriver will help) and insert the wire into the interior.
- Connect the wire to the safety block.
After work, adjust the fog lights, otherwise all the work will be done in vain!
How to connect fog lights on Lada Priora?
When there is not much left in stock, you just have to disassemble everything and install the PTF, then put everything back together and enjoy the work done. Kidding :-).
- Let's start with the fact that we need to de-energize everything, to do this we remove the “-” terminal of the battery.
- Next, you need to remove the bumper; to do this, unscrew the screws that secure it one by one. The screws that need to be unscrewed are marked in the photo. After all the fasteners are unscrewed, carefully unclip the bumper from the latches and dismantle it completely.
- Next, take a screwdriver and remove the foglight plugs, which are attached with self-tapping screws.
We prepare our fog lights and proceed to an important stage called “installation of fog lights.” We carefully place the PTFs in their regular places and secure them with the screws that secured the plugs
Then we start laying the wiring. The wiring is routed from the inside of the bumper; it is advisable to use corrugated wire.
- The wires need to be pulled into the cabin in the GTZ area; to do this, we take out a special plug, under which the holes we need are hidden. For convenience, it is recommended to remove the frill along with the wipers, as well as the expansion tank with bracket.
- In the cabin, in order to extend and connect the fog lights, you should pull off the trim (sound insulation) and pull the wire into the cabin.
- When the wires are brought into the interior, you can start connecting. The diagram according to which it should be connected is usually included with the PTF kit, but just in case I decided to post the diagram.
Connecting the fog lights to the button requires the removal of the central panel.
When installing the PTF relay in the unit, it is important not to mix up the wires and follow the PTF connection diagram.
Installing fog lights on a Lada Priora is quite an extraordinary task and can be done by any car enthusiast. The only problem is the connection; as a rule, difficulties arise with it. However, if you follow the instructions and carefully study the connection diagram, then everything should work out. If difficulties arise during the connection, I recommend contacting an experienced electrician, he will easily help you for a minimal fee. Before final assembly, do not forget to check everything and make sure that the PTFs are working as they should.
That’s all for me, thank you for your attention and see you again at VAZ Repair! Bye!
PTFs are installed on the Priora to improve the standard light when driving through dark sections of the road or in fog, they are simply necessary. Fog lights on the Priora are a privilege of luxury trim levels. Lada Priora was produced in 2 bumper design options: restyling SE, pre-restyling, so the part number is different - more about it below. In all other, empty configurations of the Priora car, plugs are installed in place of the PTF, which over time you want to replace with fog lights. Usually this moment comes when the driver drives his car for the first time through dense fog - so that visibility is minimal, it’s scary to drive, but it’s necessary. In such cases, the emergency lights turn on, movement should be slow and careful - and if there were fog lights, the driver would feel more confident.
Connecting the PTF is done in 7-8 steps; if you wish, you can do it yourself in the garage - read about it in this article.
The turning point leads to the choice between lens PTFs in the Priora and LED PTFs. One way or another, when driving in conditions of insufficient visibility, the light will become much larger. The driver will do everything possible to fulfill his duty to ensure traffic safety. But the fulfillment of this duty will have to be supported.