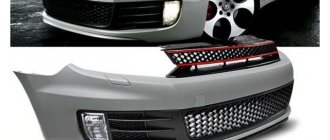
The cooling of the car starts from the grille at the front. A good part can cool the engine only with the flow of air. The radiator grille in Priora 1 and 2 (SE) has such functions. The price of the part is from 700 rubles. On long trips, they allow air to pass through perfectly and cool the radiator. There are several spare parts options for Priora. For example, the radiator grille called the saber looks great. Our Priora is like a Lego. This type of tuning is popular among car owners - change the headlights, or the grille with bumper. As if the Lada Priora will no longer be a Lada. The black radiator grille of the Priora car without a badge also looks great on the car. It is popular with those pelvis workers who constantly rip off badges as if it won’t be a pelvis after that. The part is the “first step” in the air purification system entering under the hood of the car.
The main purpose of the part is to prevent foliage from getting inside. The mesh structure with which the standard spare part is made can only stop relatively large lumps of dirt and leaves. If its structure contained too small a honeycomb, the volume of air entering under the hood in a given unit of time would decrease. This will negatively affect the temperature of the car.
Content
How to remove the radiator grille on a Lada Priora
Selecting and installing a new grid
Modifying the grille on a Lada using moldings
Recommendations
Replacing such an element as the Priora radiator grille often arises in the minds of owners of a Lada car of this model. This car's grille doesn't have the most attractive appearance. To improve the appearance of the car, car owners often resort to tuning. Designers of automobile corporations never cease to amaze us with new forms and models of vehicles. Small details play an important role in the overall appearance. The radiator grille is no exception.
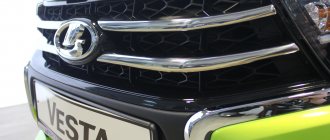
New radiator grille for Priora
There are always large holes on the bumper. They serve to keep the engine cool and the engine compartment to be freely blown and ventilated. A mesh is placed behind the radiator grille. It is designed to protect the insides of the car from various debris, insects, and small birds that can get under the hood while driving. The mesh performs a protective function. In tandem with the radiator grille, the mesh also plays a decorative role. This is why craftsmen love to experiment with this part of the body and make the car unique.
If you install a new grille on the Lada Priora, you can significantly change its appearance. Before you begin work on improving the design, you need to know how to remove the grille. Consultation with a specialist will not be superfluous. An experienced master will give advice, make recommendations and share the secrets of performing the work.
Replacing the Priora radiator grill is a simple process that you can do yourself. The process will depend on which grille you plan to replace the old one with. Before starting work, disconnect the wires from the battery and remove the engine splash guard.
There are two ways, with and without removing the bumper. To remove the grille on a Priora, you need to press on the washer that secures the bumper, and then remove the washers that hold the grille directly.
The Lada Priora se radiator grille is attached with nine screws, so there is no need to remove the bumper. Just open the hood and pull it out.
Replacing the radiator grille on a Priora
How to remove the radiator grille on a Lada Priora
So, to remove the radiator grille, you can use two methods:
- with removal of the front bumper;
- without removal.
If you decide to completely transform the appearance of your car, then the second method would be ideal. It may be needed if you decide to install new tuning elements or replace an existing bumper with a new one.
How to remove the radiator grille on a Priora? If dismantling the body kit is not required, we perform the following processes:
- We open it, and with the help of a support, we fix the hood of the car.
- Unscrew the three side screws securing the headlight mudguards.
- We also unscrew the fasteners securing the bumper and car body.
- Bend the upper part of the bumper away from the body. This must be done carefully.
- We remove the screws holding the radiator grille on the top and bottom sides. Due to insufficient space, we carry out the work using a short screwdriver.
- We pull the grill forward and carefully take it out.
- We install the grille in place in the same way, only in reverse order.
Removing the radiator grille on a Lada Priora car
Selecting and installing a new grid
A fairly common tuning method is to install a mesh instead of a radiator grille. This action can improve the protection of the space under the hood from various debris and insects. The appearance of the car is significantly improved. The radiator is cooled better. You can use a mesh made of different materials. The most popular are plastic and metal.
Installation steps:
- The radiator grille is dismantled.
- All unnecessary elements are cut off, leaving one outline.
- The holes formed during work are covered with putty or fiberglass.
- After the putty layer has dried, the surface is sanded.
- Cover with a layer of soil.
- We paint using a roller, brush or spray paint.
- We attach the finished mesh. For plastic, glue is used, for metal, screws are used. The metal mesh should be preheated to prevent breakage.
- We cover the entire surface of the part with a layer of paint.
- Apply a protective layer of varnish.
- We install it on the car.
Mesh for the Priora radiator grille
When choosing the size of the cells, take into account the fact that the open space is intended for cooling. You should not install a grid with too small cells. If you choose a medium-mesh mesh, both protection and cooling will be of high quality. In order for the radiator grille on the Priora to serve for many years, you should choose it from high-quality material, and not just guided by external factors. In the cold season, professionals advise using special covers for the Lada Priora radiator grille. This will save fuel and, accordingly, your finances.
Modifying the grille on a Lada using moldings
Quite an interesting way to transform the radiator grille with the help of moldings is preferred by many drivers. It allows you to radically change the appearance of your car. Tuning the Priora radiator grill will ensure the exclusivity of the part. The use of automotive moldings is the simplest and most cost-effective option for modifying a part.
Required tools and materials:
- moldings;
- scissors;
- masking tape;
- glue, preferably epoxy.
Using a hacksaw, cut off the badge from the hood of the car. We attach two moldings of the same length on the outer and inner sides of the mesh and secure them with tape or masking tape. We apply glue to the grille and attach metal strips to its inside. All that remains is to glue the moldings and remove the tape. Finally, use the bolts to install the grille in place.
Sequential steps for replacement
Body-matched grille
For the work you will need a screwdriver and an awl. Auto mechanics distinguish 2 methods for dismantling the grille.
- The bumper is removed.
- The bumper cannot be removed.
At the first stage, the ground wires are disconnected from the battery. Then the engine mudguard is removed. To do this, you will need to unscrew the 3 bolts from below that attach the bumper to the protective covers. The next step involves removing:
- screws securing the bumper to the front of the body;
- 2 screws for fixing the left and right headlight housings;
- 2 screws on the right and left side of the arches, they attach the bumper to the front fenders.
Removing the grille is completed by removing the bumper. If you remove the Priora SE grille using the second method, then you will need to press the locking washer located near the bumper. Then the washers securing the grille are removed. Otherwise, the hood is raised and secured with a stop. After this, the screws securing the combination lights to the front panel are removed. The lights themselves are removed, the electrical wiring is disconnected from them. Using a screwdriver, turn the locking washers 1/4 turn. The old grille is then tilted forward, pulled up and removed.
Replacing and tuning the grille on a Priora se are processes that require attention, since this unit provides maximum air flow to the radiator. The procedure will not take much time if you install a branded radiator grille. To secure it, you will need special parts. To do this, it is recommended to determine in advance the location on the bumper where this unit will be installed. In this case, a sealant is used.
Removing the front bumper upper grille
You will need: pliers, long and short straight screwdrivers.
- Remove the 6 screws of the upper bumper mounting;
- Bend the upper part of the bumper along with the grill towards you;
- Remove the fixing washers (on Priora SE, remove the screws) of the upper bumper grille by inserting your hand with a short screwdriver through the resulting hole;
- Remove the upper bumper grille by pulling it towards you.
It is worth noting that those with large hands may not be able to get their hand through or may break the upper part of the bumper. Mounting diagram for the upper and lower bumper grille:
Design features of the front bumper of Lada Priora Lux
The Priora front body kit is made of durable polypropylene, which allows you to reliably protect the car body in collisions with hard objects. The Lada Priora Lux 2015 body kit is an individual design consisting of a plastic base to which the lower bumper grille and cooler grille with additional decorative elements are attached.
The upper part of the body kit contains elements for fixing the hood of the car, presented in the form of holes for the hood lifting handle. The protection itself is attached to the car body through special mounting holes.
Bumper of the updated Lada Priora
An important functional part is the upper frame of the radiator, which allows the flow of air from the external environment to the internal mechanisms of the car, being part of the air cooling of the engine. In addition, the upper grille also serves to protect the car’s cooling system from mechanical damage caused by foreign objects. In addition, this part of the bumper is one of the main elements of the exterior design of a luxury car, as it is located in the place of greatest visibility.
Content
How to remove the radiator grille on a Lada Priora
Selecting and installing a new grid
Modifying the grille on a Lada using moldings
Recommendations
Replacing such an element as the Priora radiator grille often arises in the minds of owners of a Lada car of this model. This car's grille doesn't have the most attractive appearance. To improve the appearance of the car, car owners often resort to tuning. Designers of automobile corporations never cease to amaze us with new forms and models of vehicles. Small details play an important role in the overall appearance. The radiator grille is no exception.
New radiator grille for Priora
There are always large holes on the bumper. They serve to keep the engine cool and the engine compartment to be freely blown and ventilated. A mesh is placed behind the radiator grille. It is designed to protect the insides of the car from various debris, insects, and small birds that can get under the hood while driving. The mesh performs a protective function. In tandem with the radiator grille, the mesh also plays a decorative role. This is why craftsmen love to experiment with this part of the body and make the car unique.
If you install a new grille on the Lada Priora, you can significantly change its appearance. Before you begin work on improving the design, you need to know how to remove the grille. Consultation with a specialist will not be superfluous. An experienced master will give advice, make recommendations and share the secrets of performing the work.
Replacing the Priora radiator grill is a simple process that you can do yourself. The process will depend on which grille you plan to replace the old one with. Before starting work, disconnect the wires from the battery and remove the engine splash guard.
There are two ways, with and without removing the bumper. To remove the grille on a Priora, you need to press on the washer that secures the bumper, and then remove the washers that hold the grille directly.
The Lada Priora se radiator grille is attached with nine screws, so there is no need to remove the bumper. Just open the hood and pull it out.
Replacing the radiator grille on a Priora
How to remove the radiator grille on a Lada Priora
So, to remove the radiator grille, you can use two methods:
- with removal of the front bumper;
- without removal.
If you decide to completely transform the appearance of your car, then the second method would be ideal. It may be needed if you decide to install new tuning elements or replace an existing bumper with a new one.
How to remove the radiator grille on a Priora? If dismantling the body kit is not required, we perform the following processes:
- We open it, and with the help of a support, we fix the hood of the car.
- Unscrew the three side screws securing the headlight mudguards.
- We also unscrew the fasteners securing the bumper and car body.
- Bend the upper part of the bumper away from the body. This must be done carefully.
- We remove the screws holding the radiator grille on the top and bottom sides. Due to insufficient space, we carry out the work using a short screwdriver.
- We pull the grill forward and carefully take it out.
- We install the grille in place in the same way, only in reverse order.
Removing the radiator grille on a Lada Priora car
Selecting and installing a new grid
A fairly common tuning method is to install a mesh instead of a radiator grille. This action can improve the protection of the space under the hood from various debris and insects. The appearance of the car is significantly improved. The radiator is cooled better. You can use a mesh made of different materials. The most popular are plastic and metal.
Installation steps:
- The radiator grille is dismantled.
- All unnecessary elements are cut off, leaving one outline.
- The holes formed during work are covered with putty or fiberglass.
- After the putty layer has dried, the surface is sanded.
- Cover with a layer of soil.
- We paint using a roller, brush or spray paint.
- We attach the finished mesh. For plastic, glue is used, for metal, screws are used. The metal mesh should be preheated to prevent breakage.
- We cover the entire surface of the part with a layer of paint.
- Apply a protective layer of varnish.
- We install it on the car.
Why do you have to change bumpers?
The obvious answer to this question is after the car gets into an accident, when the body kits literally fall apart. It is impossible to repair and paint broken parts, so in this situation you have to buy new ones. Fortunately, the price of the products is quite affordable and it is possible to select elements by color or buy them unpainted.
Reference. An unpainted front bumper of a VAZ 2170 costs about 40 USD in the Russian Federation. e., painted - 50 USD. e. Prices for rear body kits are approximately the same, plus or minus 3 USD. e.
There are other reasons why Prior owners resort to removing or replacing these parts:
- During operation, the bumper received multiple cracks or the paint peeled off, and the owner does not have the time or desire to repair and paint the elements.
- If a car enthusiast still wants to repair and paint the body kit, then it will still have to be removed.
- As a result of the impact, the plastic latches of the bumper broke off or the fastening screws were torn out in such a way that the material cracked.
- When you need to gain access to other parts and parts of the car body. For example, install new headlight units.
- Cars sold as standard were at one time equipped with black budget bumpers. They have to be removed to paint or exchange for painted ones.
- If the owner of a VAZ 2170 decides to start tuning his car and install beautiful body kits that differ from the standard ones in shape.
Note. To replace the headlight unit in a Priora, it is not necessary to dismantle the entire bumper; just unscrew it from the sides and bend the edges. But for convenience, many motorists still remove the element completely.
Replacing the radiator grille on a Prior
Welcome! Radiator grille - for some it is just an appearance, but for others it is also the safety of the car’s cooling radiator; if the car does not have a radiator grille installed, then a pebble flying towards the car may simply fall into the cooling radiator, then this can cause deformation the radiator itself and as a result of which you will have to replace it with a new one, because if you do not change it, then you will have constant problems with cooling the engine, and the leaking coolant will contaminate the engine and thus you will still need to constantly add coolant to the tank , therefore, it is recommended to change a worn or deformed radiator immediately and not hesitate to replace it, but still today we are discussing not the radiator but its grille, not all people know how it can be replaced on a car, although it is attached only to small washers by removing them you can easily remove the grille, and you will learn how to do this today from this article on replacement.
Note! To replace the radiator grille with a new one, you will need to take some tools with you, namely you will need: Two types of screwdrivers, as well as a small set of basic socket heads, you can also try using socket wrenches and wrenches instead of heads, but this will be somewhat ineffective convenient, so if you don’t have sockets, then use wrenches, but if you still have a small set, we advise you to take it, because with the help of socket heads it will be much easier to unscrew all the bolts and nuts!
Is it difficult to change the grille on a Prior? We are asked this question quite often, mostly by young motorists who buy a new beautiful grille at a car shop and want to install it to replace the old one, so to change the grille it doesn’t actually require a lot of time, as we said a little earlier ourselves The grille on the bumper is attached with just three washers, which if removed, then the grille can be easily removed, so replacing the grille is not difficult and this operation will not take much of your time.
DIY radiator frame replacement
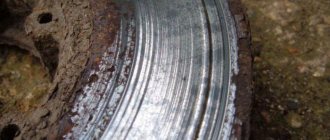
The photo shows the inside of the radiator frame. At the final stage of all work, you need to thoroughly treat the bottom of the TV with anti-gravel in several layers. When the TV rots, it can burst as a result of a sharp blow and the motor sags. We received a VAZ car for body repair, the car is more than 10 years old. In this case, it is necessary to change both parts.
2110. Replacing the radiator frame. 1 part
The photo shows the outer part of the radiator frame. The problem was the following: the radiator frame at the bottom was cracked, causing the engine to sag. The arrow under number 1 shows the lower beam. Otherwise, after installing the unpainted frame on the car, we will not have the opportunity to paint the engine compartment side. We drill out the spot weld and cut it off with a chisel.
Before this, the lower beam of the radiator frame was boiled and overcooked more than once. We attach the areas for attaching the daisies by welding, because factory welding does not inspire confidence. In this case, it is necessary to change both parts. Cars of the tenth family, Kalina, Priora, do not have this drawback; they have a slightly different design of the front body panel.
The arrow under number 1 shows the lower beam. When the TV rots, it can burst as a result of a sharp blow and the motor sags. Do-it-yourself car repair VAZ
Cars of the tenth family, Kalina, Priora, do not have this drawback; they have a slightly different design of the front body panel.
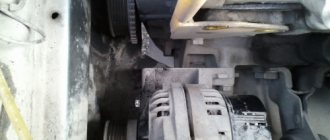
The outer part of the radiator frame is attached to the side members and to the inner part of the frame using spot welding. The arrow under number 2 shows the front engine mount mounting bracket. The car arrived to us in this condition.
When the TV rots, it can burst as a result of a sharp blow and the motor sags. The radiator frame on the nine consists of two parts - outer and inner. The arrow under number 2 shows the front engine mount mounting bracket.
We drill out the spot weld and cut it off with a chisel. The outer part of the radiator frame is attached to the side members and to the inner part of the frame using spot welding.
We prime and paint from the inside, that is, from the engine compartment. We try on the new frame on the car, weld it, and clean the weld spots with a grinder. The photo shows the outer part of the radiator frame. Next, you need to putty the welded areas, prepare for painting and paint the radiator frame from the outside. The arrow under number 2 shows the front engine mount mounting bracket. Cars of the tenth family, Kalina, Priora, do not have this drawback; they have a slightly different design of the front body panel.
We drill out the spot weld and cut it off with a chisel.
How to replace the radiator grille on a VAZ 2170-VAZ 2172?
Note! Before you get started, you will need to explain a few things, namely that the grille can be removed in only two ways, this is after completely removing the bumper from the car (it will be very easy to reach it after removing the bumper and therefore such a replacement will be faster, but due to the fact that you will remove the bumper, the time will increase and as a result you will work longer, but in this case it will be easier to get to the radiator grille), the second method is when you do not remove the entire bumper but only unscrew the top screws that secure it and after unscrewing these screws you will need to bend the top edge of the bumper and thereby crawl under the washers that secure the grille itself (This method is faster, but due to the fact that you will bend the top edge of the bumper, you can deform, so you will need to work more carefully here)!
Tips for choosing and installing a new radiator grille for Lada 2015
Before you begin replacing the radiator protective frame, you should study the recommendations and experiences of those who have encountered this issue:
- 1. When selecting a new radiator grille for Priora Lux, you need to pay attention not only to the external design, but also to the quality and practicality of this product. This will ensure a long service life and reliable protection of the radiator from external factors;
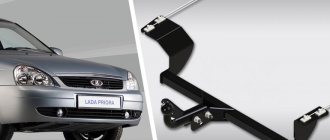
- 2. Grilles with saber-shaped horizontal stripes have the property of accurately directing the air flow to the heat exchanger, unlike conventional factory grilles Lada 2015;
- 3. Protective mesh in the bumper design allows you to reliably protect the car’s radiator from external factors that can damage parts of the engine cooling system.
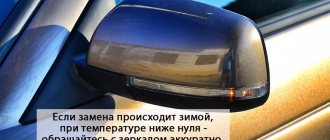
In winter, experts recommend using special covers on the radiator grille, which allow you to save fuel when warming up the car in the cold season.
Radiator grille Lada Priora
The Priora radiator grill affects several factors at once: the visual perception of the front of the car, the quality of radiator cooling and the protection of the engine compartment from various types of contaminants that enter from the outside while the car is moving.
Many owners, in order to somehow improve the performance characteristics of this element and give the Lada a more modern and sporty look, carry out various kinds of tuning of the Priora.
Tuning the radiator grille on the Lada Priora
Life hack: radiator grille of Priora 2 and 1 - how to change it, part numbers
The cooling of the car starts from the grille at the front.
A good part can cool the engine only with the flow of air. The radiator grille in Priora 1 and 2 (SE) has such functions. The price of the part is from 700 rubles. On long trips, they allow air to pass through perfectly and cool the radiator. There are several spare parts options for Priora. For example, the radiator grille called the saber looks great. Our Priora is like a Lego. This type of tuning is popular among car owners - change the headlights, or the grille with bumper. As if the Lada Priora will no longer be a Lada. The black radiator grille of the Priora car without a badge also looks great on the car. It is popular with those pelvis workers who constantly rip off badges as if it won’t be a pelvis after that. The part is the “first step” in the air purification system entering under the hood of the car. The main purpose of the part is to prevent foliage from getting inside. The mesh structure with which the standard spare part is made can only stop relatively large lumps of dirt and leaves. If its structure contained too small a honeycomb, the volume of air entering under the hood in a given unit of time would decrease. This will negatively affect the temperature of the car.
- Standard radiator grille for Priora - article number and price
- Radiator grille on Priora 2 - restyling
- Lower grille: article number, price
- Saber – article number, price
- Basic faults
- Replacement: how to remove the radiator grille on a Priora
- Replacing the lower grille
- Winter grille cover
How to remove the radiator grille on a Lada Priora
If you decide to tune the radiator grille on the Lada Priora, or you need a replacement, you will first need to remove it. There is nothing complicated here. Let's figure out how to dismantle the grille on a car without removing the front bumper on a Priora.
The process looks like this:
- unscrew the 6 screws that secure the front bumper on top;
- bend the bumper and radiator grille;
- put your hand into the gap formed and unscrew the upper fasteners;
- remove the grille by pulling it towards you.
A replacement or tuned product on a Lada Priora is installed in the reverse order.
Upper mountings of the radiator grille Lada Priora
Make part of the production
grille from Priora se is easy to make yourself. To do this you will need the following materials:
Where to remove the screws from the radiator grille
Firstly, the old block is dismantled. The puzzle cuts the middle of the piece. Holes are drilled at the mounting points for adjustment. Then you will need a thin and flexible material. plastic or cardboard. It goes around the inner contour of the future block. It is recommended to note how many centimeters the part will fit inside. Based on the obtained dimensions, cardboard or plastic is cut.
Lattice
The radiator is well cleaned with sandpaper and degreased. A solvent is used for this purpose. Apply to the area of contact with epoxy resin. Otherwise the connection will be weak. To get reliable contact and the desired thickness, you will need to repeat this process. As each layer dries, the product comes out of the cardboard or plastic. This will determine if the material fits snugly. The next step is to level the surface. Putty is used for this purpose.
When sanding, make sure there are no holes or scratches on the radiator grille. The main task. keep the product safe and secure. It is then coated with paint and primed. The setup is complete. The radiator grille is in place. To do this, you will need to bend it at several points.
Tuning "Lada Priora" using moldings
A very interesting radiator grille (Lada Priora) is obtained if you use a couple of moldings. This tuning allows you to radically change the appearance of the front of the car.
The work is quite simple - you do not need any special skills.
- remove the radiator grille;
- cut off the VAZ icon located in the middle;
- We mark 2 chrome moldings along the length and cut them to the required size with a hacksaw;
- Using epoxy resin, we glue the moldings to our base and wait for it to dry;
- use a file to smooth out any unevenness if necessary;
- We install the resulting product on the car - and the tuning is successfully completed.
In the photo you can see what the radiator grille (Lada Priora) will look like after you do this tuning.
How to make a radiator grille with your own hands
The radiator grille is manufactured independently in several stages.
Materials
First you need to purchase the following materials:
- thick cardboard;
- polyester resin (200 - 300 g) and hardener;
- glass mat with a density of 300 - 450 g/m². You need approximately 500 g;
- universal putty;
- masking tape;
- bars for grouting;
- sandpaper;
- degreaser;
- acrylic primer;
- solvent.
The tools you will need are a screwdriver, a spatula, scissors, bolts and keys.
Matrix manufacturing
The creation of a lattice begins with the manufacture of a matrix. The standard radiator grille acts as the frame. But it can be replaced with a car bumper with the addition of foam, cardboard, wood, etc.
Transparent tape is glued to the frame in the right places. Painting tape is applied to it. This way the base will be protected from the aggressive effects of polymerization of materials.
Formation of fiberglass
Polyester resin is used to form fiberglass. It is diluted with the hardener. Take 100 g of resin per 2 g of hardener. The proportion must be observed.
The prepared glass mat is applied in 2 - 3 layers. At temperatures from +18 to +25 °C the product will dry in 2 - 3 hours. After drying, the part is separated from the grid. It looks like a frame. Excess fiberglass is removed with a grinder. Then the part is returned to its place for modification of the matrix.
Refinishing is done using cardboard. It is glued on the back side. Fiberglass mat is applied from the front in one layer. After work, the brushes are soaked in solvent.
During the formation of fiberglass, rubber gloves are put on your hands.
Part processing
After drying, the fiberglass part is leveled. All excess material is removed from it. The gaps are made equal and even. It is recommended to try the processed product on a car grille. If necessary, another layer of fiberglass is applied. Next, the base is processed with sandpaper to create irregularities.
This is interesting: How to make a flame arrester for a car from a catalyst with your own hands? 3 advantages of the device
After the work has been completed, the part is ready for applying putty. The surface of the fiberglass is cleaned of dust and degreased. The putty is diluted with a hardener. Proportions are determined by eye. The prepared solution is evenly distributed over the product. The putty is applied in several layers.
Priming and painting
After processing the part and drying the putty, it’s time to prime. The solution can be applied in several layers. This will ensure further even distribution of paint. The coloring composition is applied to the part, which has dried well. Painting is carried out according to the standard scheme.
After drying, the grille is installed on the car. This will allow you to identify defects and errors that are invisible in the draft version. If the part looks good, the product is considered ready.
Grid installation
Quite common is tuning, which consists of installing a mesh instead of a radiator grille. This allows you not only to give the car a more modern appearance, but also to provide effective protection from dirt and high-quality radiator cooling.
For this purpose, you can use a plastic or metal mesh. The installation process looks like this:
- remove the radiator grille;
- Using a hacksaw, we cut off all unnecessary vertical and horizontal elements, leaving only the outer contour;
We apply a mesh to the back of the Lada Priora radiator grille
- we seal the resulting holes using putty (some use fiberglass for this purpose);
- When the putty dries, sand it until smooth. This is a rather labor-intensive process - you need to carefully monitor the shape and smoothness of the lines;
- prime;
- paint with a spray can or a regular brush;
- We attach the mesh with self-tapping screws (the base will need to be heated so that it does not burst), or with glue if it is made of plastic;
- apply paint to the entire product;
- varnish;
- we install it back on the car - at this point the work can be considered complete.
The level of protection for the engine compartment will depend on the size of the cells. You need to remember the right balance: with large cells the cooling will be better, but the level of protection will be lower. For small cells the opposite is true. When choosing a grid, try to maintain the “golden mean”.
The main reasons for changing the grill
Another design option
Adjusting and removing the grille is necessary to give the car an original look. Car owners should know how to replace a part if it cracks. It should be noted that this design has:
- Resistance to large temperature changes;
- Personality;
- Low price.
Priora tuning involves installing an “aggressive” radiator grille. This model will give the car a sporty look by increasing radiator cooling. Some Lada owners prefer to install factory models. You can use chrome strips and moldings. They stick easily to the ribs.
Of the necessary tools:
grille from Priora is easy to adjust with your own hands. To do this, you will need to cut the VAZ icon with a hacksaw. Then you need 2 moldings, which are pre-applied to the plane, marked and cut to size. This element is attached to the grille with tape. The forms must be pre-wrapped with adhesive tape. This will prevent damage to the main element.
READ How to Remove Hover H5 Door Trim
The next step is to dilute the epoxy glue in a container. They are covered with moldings and grilles. The strips are then applied, pressed and held in place for a while. After the glue has dried, the edges are trimmed. The file is used for this.
Installing the Prior 2 bumper on Prior 1
The car bumper is removed in case of replacement, repair or tuning. The procedure does not require special skills, so you can cope with this task alone. Let's take a closer look at how to remove the front bumper of a Priora with your own hands.
You will need: a 10mm wrench and a Phillips screwdriver. If you have fog lights, disconnect the negative battery cable.
The procedure for removing the bumper on a Priora:
- Open the hood and unscrew the 4 screws securing the bumper to the body and 2 screws on the left and right headlight housings;
- Unscrew the 6 screws from the bottom (3 on each side) securing the bumper to the protective covers, as well as several screws securing the engine protection;
- From the wheel side, unscrew 2 screws securing the bumper to the fender liners;
- We remove the Priora bumper by pushing it forward, freeing it from engagement with the body. Disconnect the wires from the PTF.
The whole process will not take more than 10 minutes. Installing the front bumper on the Priora is done in the reverse order.
Let us remind you that currently the approximate price of a front bumper on a Priora is 1,700 rubles. unpainted (the cost of a painted bumper is 500-1000 rubles higher), catalog number 2170-2803015. See also other Priora repair instructions.
Key words: Lada Priora bumper
On the Lada Priora, as on other cars, the bumper performs an important protective function - softening the impact of a collision, and since it is made of plastic, it is often damaged. This situation can happen both on city streets and on country highways. Therefore, you need to know how to remove the bumper on a Priora in such cases.
Tool
Dismantling a buffer in a garage does not require special knowledge or outside assistance. One person can successfully handle this job. In order to remove the front bumper on the Lada Priora, you need to prepare the following tools:
- a Phillips-head screwdriver;
- 10 mm ratchet wrench.
They will be needed to dismantle the fasteners holding the part to the car body. A screwdriver will be used to unscrew the screws, and a wrench will be used to unscrew the engine protection bolts. For ease of work, you will need to install the car on an inspection hole or overpass. If there are no such structures nearby, then you can raise the front of the car using a jack and securely secure it in this position.
Front bumper
This is an energy-absorbing device for a car that can withstand a collision with an obstacle at a speed of 4 km/h without major damage to the body. It is made of plastic and attached to amplifiers, which are installed on the car body and determine the nature of the deformation of the body. Today this detail plays more of a decorative function than a protective one. On Priora, the design is a continuation of the body parts.
The front bumper of the Lada Priora is additionally equipped with fog lights, a radiator grille and a boot. The lower part is made in the form of a spoiler, which reduces the air flow under the bottom of the car. There is a place in the center for attaching a license plate. When completely dismantling the structure, all attached parts are removed. The side wings are attached with self-tapping screws to the wheel arches.
Replacing the front bumper of a Lada Priora can be carried out not only after a collision, but also for tuning the car.
In addition, the device must be periodically dismantled to inspect the condition of the body parts located underneath it. Due to the ingress of moisture, snow and salt, the material begins to corrode. Such areas must be cleaned of rust and covered with special mastics. This will extend the life of the body.
Dismantling
Let's figure out how to remove the front bumper on a Priora with your own hands. To ensure safety when carrying out work, it is necessary to disconnect the negative terminal of the battery.
To make it convenient to work, the wheels must be turned left or right, depending on the side of dismantling.
- Removing the front bumper on a Priora begins with unscrewing the screws securing the structure to the fender liner;
- the buffer is secured with 3 screws on each arch;
- after that, unscrew 4 screws on each side that hold the plastic covers protecting the headlights;
- then unscrew the 2 screws that secure the upper part of the part to the cross member of the engine compartment;
- if there are fog lights, it is necessary to disconnect the contact connectors of the electrical wires;
- the headlights are removed along with the entire structure;
- Having finished removing the bumper under the hood, they perform work under the car body;
- additional lighting will be required for further operations;
- use a socket wrench to unscrew the 5 nuts securing the buffer to the engine protection;
- after this, it remains to unscrew 3 screws on each side that hold the wings of the part;
- When all the fasteners are removed, it is necessary to disengage the side parts of the Priora bumper. The action is carried out first on one side and then on the other.
When replacing the front bumper on a Priora, the body kit (decorative grille, boot, etc.) is removed. They are fastened with self-tapping screws and clips. If necessary, parts are transferred to another structure. If you know how to remove the bumper correctly, you can complete the work yourself in 15-20 minutes.
How to put the bumper back
After installing the body kit and preparing another buffer, installation can begin. Before starting work, the accessible part of the body is inspected for cracks and rust. It would be a good idea to lubricate the joints of the body parts with mastic.
Installation of the front bumper on a Priora is carried out in the reverse order of removal. The structure slides into place along the existing grooves. There is no need to apply excessive effort during installation. A correctly positioned buffer should snap into place without effort. After this, it is bolted to the housing bracket. Having installed and secured the structure, its side edges extend beyond the edge of the wing casings.
Rear bumper
To carry out body work or replace damaged elements (reflectors, parking sensors), you need to remove the bumper on the Priora. This work is simple and differs from dismantling the front structure only in the number of fastening screws.
In some cases, difficulties arise when removing the side wings from the grooves, especially at low air temperatures. Doing these steps may cause the plastic to crack. The same problems arise on Kalina 2. Due to the unique shape of the buffer, it can be difficult to push it out. However, if you follow all the requirements of the vehicle’s operating instructions, dismantling can be carried out without difficulty.
How to remove the rear bumper from a Priora
For cars of different versions, the dismantling of the buffer differs only in the locations of the fasteners. For example, on a sedan the screws are screwed into the trunk frame vertically from top to bottom, while on a Priora station wagon - horizontally. Due to the shortened end part of the hatchback body, it is difficult to reach the structure fasteners in the arches.
For comfortable work, it is recommended to remove the rear wheels.
To remove the rear bumper on a Priora you must:
- Unscrew the 2 fastening bolts on the trunk frame, and then the 2 nuts connecting it to the body at the bottom of the car.
- The wings of the structure are held in place by 3 screws located in the wheel arches.
- After dismantling the fasteners, the buffer is removed.
- Inside it there is a structural reinforcement, which is fastened with self-tapping screws.
- The reflectors are screwed on with one nut.
Installation
If the structure being installed does not have an amplifier and reflectors, then use the corresponding elements from the removed part. Installation of the bumper on the Priora body is carried out in the reverse order of removal. The work is easy to do with your own hands. After the structure is installed in place, it is secured with bolts and screws.
When installing the SE bumper, problems arise with the installation of the amplifier. To secure it to the structure, it is necessary to cut off the upper horizontal shelf of the attachment to the body. The amplifier located inside the buffer is attached using self-tapping screws. Some car enthusiasts do not install this part. Lastly, screw the wings to the arch and install the wheels.
For several years now, a new Lada Priora has appeared on the market, with an improved appearance. So what has changed in the new model? Looking at the car, the front bumper on the new Priora immediately catches your eye; it is this that has undergone significant changes. Thanks to this, the front of the car got a fairly solid look.
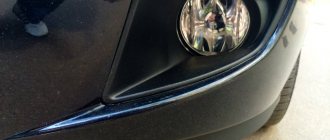
Let's take a closer look at the front bumper of the Priora in the photo:
As you can see, the radiator grille also received changes; its appearance has become more aggressive.
The bumper consists of the following separate parts: guides, the bumper itself, two eyelashes, upper and lower radiator grilles, frames for fog lights, chrome radiator grille molding, amplifier and plug for the towing eye.
The appearance of a plug, which can be easily removed if necessary, cannot but please, because now a protruding eye only spoils the appearance of the car.
As for the fog lights, the old version had a choice. It was possible to install 2 or 4. In the new version, their number remains equal to two.
In terms of strength, the new sample is in no way inferior to the old one, and it is quite difficult to break it, for example, on snow in the winter.
If necessary, you can easily find a front bumper for a Priora in any auto parts store for domestic cars. It can be purchased in both painted and black versions.
The price for a painted front bumper of the new Priora model in color is relatively not high. At the moment, the price for the main part ranges from 1800 to 2400, and for the entire set you will have to pay about 4500 rubles.
There should be no problems during installation, as well as dismantling, the main thing is to follow the instructions and have approximately 50 bolts with you.
Moreover, such a bumper can also be installed on Priors of earlier years of production. At the same time, if you buy an original Priora front bumper, then only one problem will arise, which can be easily solved.
On Priors of the first family, the towing eye is welded to the side member; you will have to get rid of it. The next step is to drill a hole and weld our nut into it, further strengthening the welding site.
Next, we treat with mastic the places where rust may form, as well as the welding seam. If all measurements were carried out correctly, then no further problems will arise.
We finish installing the bumper, after which we admire the more solid and aggressive appearance of our car.
How to remove chrome molding
For a long time I was confused by the chrome moldings on my car, and then there was such a dance with the painting that I decided to get confused and remove it. Besides, it was also swollen in one place. I brought this six-part device to Alehandros and pointed my finger, saying I want it! And he’s like that, but by skinning it, you can skin your hands to the bone and have time to grow a beard!
I scratched my butt, read the net, asked my friends and found a way out.
You buy this magical powder called ferric chloride. It is diluted 1 to 2 and the chrome-plated part is immersed in this mixture of the color of childish surprise.
We needed a container to put all this stuff in so as not to dirty everything around. I bought a pipe of 110 diameter, assembled it, cut a hole and the container was ready.
I removed the moldings. (You need to be careful not to break the clips, I did get one stuck)
After dismantling, the coupe moldings can be disassembled into three parts each. I didn’t do this, but if you use Feng Shui, it’s possible. This purely affects the aesthetic appearance, the solution has eroded the chrome and is assembled under the guides.
Then we immerse it in a container so that the part is completely immersed, otherwise the chrome will not come off in places where it is not completely immersed.
And voila, the next day I got them from there looking like this
Why did I do this? The price of black moldings for a coupe ranges from 500 UAH to 100 USD. Besides, they still need to be painted, since I want them to match the body color.
The budget for this experiment is 36 UAH* 3 kg of ferric chloride, 100 UAH of pipe and two pairs of gloves. Total about 220 UAH. I'm pleased with the result.
And finally, photos of the car with and without chrome moldings. What do you think ?
Topic in the “4F C6” section, created by blood85, July 8, 2011.
You are using an outdated browser. This and other sites may not display correctly. You need to update your browser or try using a different one.
Yesterday I disassembled my car - getting ready for painting. To do this I had to remove all the plastic and jelly. As the work progressed, I encountered some difficulties associated with dismantling parts that I had never removed. You should not apply force to such parts because... something can be bent, broken or scratched. I will look at the following details here: 1) molding under the rear side window of the luggage compartment 2) chrome molding running along the roof 3) metal lining of the pillars 4) plastic threshold (doorway) 5) door moldings 6) molding on the roof running in the groove 7) arches on the roof Door glass molding (chrome) 9) Trunk lid molding (chrome)
The molding under the rear side window of the luggage compartment sits in latches and can be removed very simply by picking it up with something that will not scratch or chip the car’s paint. It is better if it is something wide to reduce the likelihood of bending the molding.
Chrome molding running along the roof It took a lot of time to remove this molding. It starts from the lower rear corner of the luggage compartment glass and ends at the junction of the A-pillar and the wing. I began to pull it out by analogy with the molding described above, which is a continuation of the one being considered now. At first it clicked off perfectly, but when I got to the rear pillar the process stopped... The molding didn’t want to come out at all. I decided to try to move in front - the same parsley (sitting dead). I didn't really find any information on the Internet. It turns out that this molding throughout the car is tightly riveted to the body (just drill it out), and sits on latches above the rear window. But we still need to get to these rivets...