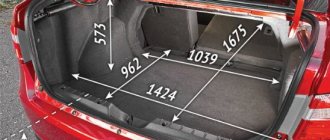
V-belt (profile A) Used on “Classic”, Samara, Niva 710 mm cars – VAZ 2108-21099 with a carburetor engine and generator drive. Of the most common 715 BRT cat. number 2108-3701720-01RU,
820 mm – VAZ 111, 1113 (OKA) – generator drive The most common are BRT 1111-3701720-01RU (geared), BRT 1111-3701720RU (simple).
840 mm – used on LADA 4×4 in a variant version to drive the power steering pump (vehicles of new years of production)
940 mm – for the generator drive of the VAZ “Classics” 2101-2107 of their modifications, the VAZ 2121 NIVA, the generator drive and the steering hydraulic pump drive of the VAZ 21213 (costs 2 belts) in a variant version a poly V-belt is installed, we will consider it below. AvtoVAZ 21010-1308020-82 (geared), BRT 2101-1308020RU (can be either simple or geared).
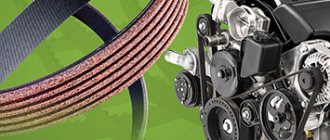
Poly V-belts (ribbed) are used to drive the generator and auxiliary mechanisms.
6PK698 – drive of the VAZ 21093 generator with an injection motor, 2113-2115 with an 8-valve injection motor. The belt tension is produced by a generator, without additional rollers or mechanisms. BRT 21082-3701720RU
6PK742 – drive of the VAZ 2110-2112 generator without power steering, found on the first production LADA Priora. BRT 2110-3701720RU
6PK823 Lada Granta – generator drive. Engine 2116, 8 valves. There is no belt tensioning mechanism. Elastic belt used 6PK823SF
6PK882 – drive of the LADA Kalina (1118) generator with an 8-valve engine, the belt tension is carried out by a mechanism.
4RK913 – drive of the generator and air conditioner Lada Largus, engine 1.4 BRT 4RK913RU
5K990 – alternator belt Lada Largus BRT 5K990R
6PK1005 – Lada Kalina (1118-1119) generator and power steering drive.
6PK1015 – drive of the generator and power steering VAZ 2110-2112 with a 16-valve engine, LADA Priora, Priora2 with a 16-valve engine, LADA Kalina, Kalina2, Kalina-cross with a 16-valve engine, LADA Granta with a 16-valve engine. Motor VAZ 21126, VAZ 21127
6PK1025 drive of the generator and air conditioning compressor of VAZ 2110-2112 with a 16-valve engine, LADA Priora, Priora2 with a 16-valve engine, LADA Kalina, Kalina2, Kalina-cross with a 16-valve engine, LADA Granta with a 16-valve engine. Motor VAZ 21126, VAZ 21127
5РК1110 – generator drive LADA Largus engine 1.4. BRT 5RK1110RU
5PK1747 – generator drive, power steering, air conditioning LADA Largus 8 valve engine. BRT 8200833541RU
6PK1822 – drive of generator, power steering, air conditioner LADA Largus 16 valve engine BRT 8200598964RU
5PK1885 drive of generator and auxiliary mechanisms LADA 4x4 21214, 21230, Chevy Niva 2123
–> Auto-moto-bicycle equipment –> Posted: 12/16/2015
How to replace the alternator belt on a VAZ 2114?
Replacing the alternator belt is not very difficult, and it does not take very long. You can buy an alternator belt at any auto parts store. Its cost is around 100-200 rubles, the most important thing is to choose the alternator belt in size, since not all VAZ 2114 have the same ones.
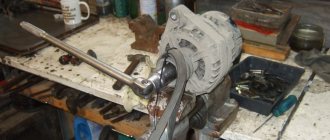
The alternator belt is located on the left side of the engine. To start work, you need to prepare a place so that there is access to the belt. To do this you need to: remove the wheel, crankcase protection and fender protection, but this is if there is not enough space to comfortably get to the belt. Then you need to remove the tension on the generator belt, loosen the nut securing the generator and tensioner. It is very important to pay attention to how the alternator belt is located and what elements it is attached to.
If you can’t remember, it’s better to write it down or take a photo, because this is important, and you will need to put it in the same place where it was installed. Now that you have removed it from its original place, take it in your hands and inspect it, compare it with the new one to see if they match in length.
If the length is different, it means the new alternator belt will not suit you. When you are sure that the belts are the same size, begin installing the new belt. Install everything in its place, and in the same order as everything was.
V-belts A - description and dimensions
The belts correspond to class IV GOST 1284.1-89 - 1284.3-89. Designed for drives of machine tools, industrial installations, agricultural machines, ventilation equipment, compressors. Transmitted power up to 20 kW, permissible linear speed up to 30 m/s. The width of the larger base is 13 mm (+ 0.6; - 0.4); belt height 8 mm (± 0.4). Operable at temperatures from -30°C to +60°C
Profile A or 13/A - refers to classic V-belts (normal section belts), where the ratio of the width of the larger base to the height is in the range of 1.5-1.7. Meets GOST 1284, DIN 2215, ISO 4184
W = 13 mm (+ 0.6; - 0.4) Wp = 11 mm T = 8 mm (± 0.4) α - belt wedge angle equal to 40°±1
| La – belt length along the outer line (larger base) | Li – belt length along the inner line (smaller base) | Lp, Lw, Ld – belt length along the design line (cord) | |
| A or 13/A | La = Li + 50 La = Lp + 20 | Li = La – 50 Li = Lp – 30 | Lp = Li + 30 Lp = La – 20 |
The maximum deviations along the length in accordance with GOST 1284.1-89 are as follows:
Source
Replacing the alternator belt on VAZ 2113, VAZ 2114, VAZ 2115
Welcome! Alternator belt - thanks to it, the generator begins its work when the car’s engine starts, and the generator is a very important part in which an electric current is generated when the engine is running and this current that is generated in it is sent to the entire on-board network, including the battery (Therefore especially the battery is not discharged when the engine is started, but on the contrary, it is recharged from the generator), thus all devices burn stably (This is if the generator is working) and voltage surges are not observed in them (For example, the dashboard shines either brighter or weaker, perhaps You’ve even seen this in some cars, and it indicates that the alternator voltage regulator is faulty), but if the belt is removed, then the entire load will immediately be applied to the battery (the car will start without the alternator belt, but it will only drive a little and as soon as the battery completely discharged, then all the devices will first turn off in the car and you won’t be able to start it with the key) and therefore you must definitely monitor this belt and, if necessary, change it to a new one when necessary.
Note! In order to replace the alternator belt in a car, the following tools will be useful to you: Wrenches and that’s it, but if you are going to change the belt from the top of the car, some people just change it from the bottom (It’s easier from the bottom, but it takes longer) and in this case, you will need to take a wheel wrench to unscrew the wheel mounting bolts, a jack with which you will raise the car, and the same set of wrenches, a socket wrench, you can also use other keys that you have in your toolbox!
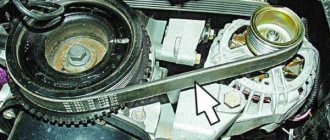
Where is the alternator belt located? On most cars that are produced or were produced by VAZ, the generator is installed in the same place (This only applies to front-wheel drive), namely on the right side of the car (If you look in the direction of travel of the car) deep in the engine compartment you will find the generator and as soon as it will be found (Indicated by a blue arrow), find a roller next to it (a round roller comes from the generator, on which the belt sits, but behind the belt you will not see this roller, well, only if part of it sticks out a little) on which the generator belt is attached ( For clarity, the belt and a small part of the roller are indicated by red and yellow arrows in the photo below).
When should you change the alternator belt? As such, there is no rule of frequency in its replacement, that is, exact numbers, for example, after 30,000 thousand km. you will need to change it, no one will give it to you, since everything is determined by appearance and if the belt is worn out, that is, there are cracks on it, it whistles (By the way, you have 100% heard this whistle many times in your entire life, because it is on many happens in cars), drops of various kinds of liquids are visible on it (This may be due to torn pipes of the cooling system or due to a leaky radiator of the same system), then such a belt needs urgent replacement (Although the liquid can be wiped off from it and therefore in this case, the belt may not need to be replaced at all, but only before wiping off the liquid with a rag, eliminate the reason why water or some other liquid gets on it, otherwise there will be no use in wiping it with a rag), but By the way, a whistle can still occur if the belt is poorly tensioned, in this article we indicated how to tighten it correctly, so if anything, use it to tighten the alternator belt on the car.
What V-belt profiles do you know?
V-belts come in classic, narrow-profile and shaped tooth types. Let's start looking at the first one - the classic type.
All types of V-belts have standard width and height. But the length may vary.
The standard type is used in production device and agricultural machinery. Its sides can provide an even load. The upper part of the product is slightly prone to bending and curvature. This helps improve the durability of the product.
The next type under consideration is narrow-profile. Unlike the classic one, the depth of the section is much greater, the wedge shape is narrower and the length of the belts is shorter than that of the first type.
Such products are used when there are increased requirements for energy distribution and smooth operation. Also, the narrow-profile type is capable of providing reliable and productive activity with enormous energy.
There are also V-belts with shaped teeth.
A gear product is needed to work at high rotation speeds. This type can transmit great energy with ease. This type is made using ethylene-propylene-diene rubber, which is capable of operating in aggressive environments and at high temperatures. It differs from others in that it has a narrow cross-section and raw edges. It is used for constant energy drive. Also, thanks to its teeth, this belt may not heat up.
Unlike the trademark or manufacturer, the parameters of V-belts are determined by their profile. Believe it or not, this material has many technical specifications, which we presented in the form of a slide show.
As we see above, these are all domestic, European and international standards that are characteristic of a V-belt. Measurements are taken in millimeters.
How to replace the alternator belt on a VAZ 2113-VAZ 2115?
Removal: 1) First, decide which side will be easier for you to replace (You can replace it from above, but this is not very convenient, or crawl under it from the side, but this requires more time), once you have decided, proceed to it, at the beginning we will describe how to replace it if you crawl under it from the side (Even if you are going to change it from above, still read this and do not jump to another point, because you will miss very important details that we will not describe in the next paragraph) , to do this, lift the right front side of the car with a jack and as soon as it is raised, remove the right wheel (For information on how to properly remove a wheel, read the article: “Replacing wheels on a car”), after which you will have excellent access to the alternator belt (If you have you have the fender liner installed, then remove it too, all the fender liners are attached with screws, so they will need to be unscrewed), but by the way, if the crankcase protection still bothers you (there are simply bulky protections that cover the entire bottom, how to remove the protection, read the article : “Replacing the crankcase protection on a VAZ”), then remove it too, and now proceed with the replacement, to carry it out, loosen the two nuts securing the generator (One nut is indicated by a red arrow, the other white in the small photo) and then completely unscrew the bolt to the maximum amount by which it will turn away (Indicated by the blue arrow) and thereby remove the old alternator belt from the side through the arch, but before removing it, pull the alternator itself completely to the car engine until it stops.
2) As for replacing the belt from the top, in this case there is no need to remove any wheel and you also don’t need to lift the car into the air, but simply unscrew the two nuts securing the generator (They are shown in the photo above, one of them is shown with a red arrow, and the other white, by the way, if the bottom nut cannot be unscrewed, it is still indicated by a white arrow, then do not unscrew it, the red one will only need to be loosened thoroughly and that’s it) and after that, unscrew the bolt itself to the maximum value (Indicated by the blue arrow in the photo above) and likewise With one hand, bring the generator close to the car engine, and with the other, remove the belt itself from it and pull it out through the top if you succeed.
Installation: Installation of a new belt begins with putting it on the generator drive pulley and only after that it is put on the generator roller (So that you can distinguish the pulley and the roller from each other, we will tell you right away that the pulley is a large part, and the roller is small and it comes out exactly from the generator, we also indicated the roller with a yellow arrow in the second photo from the top), after the belt is on, proceed to adjust it, to do this, move the generator itself away from the engine with your hand (It moves because its fastening nuts are loose) and then adjust tighten the bolt (Indicated in the photo below by an arrow) clockwise (This way the belt will tighten), but if you suddenly overtighten it, then loosen the belt tension a little, to do this, loosen the adjusting bolt counterclockwise and at this time move the generator itself closer to the car engine, all this is done until the belt is adjusted normally, as soon as you have achieved the correct belt tension, tighten all the nuts previously turned out until they stop and you can start the car and check the operation of the new belt on the car, let's immediately note the fact that It shouldn’t make any extraneous sounds (Whistling), if it does, it’s either too loose, or it’s very cold outside and the car hasn’t warmed up yet, or the material itself from which the belt you bought is made is too oak and that’s why this is happening. whistling sound in a car engine.
Find out the country of manufacture
If there are any identification marks left on the belt, try to determine from them whether it is imported or domestic. If the product is made in Russia, you will need to measure its working length. It is listed in catalogs with the designation Lw.
If you need to buy imported V-belts, you will need to measure the internal length. In the catalogs of European manufacturers, it is indicated under the marking Li and is indicated in millimeters. American-made belts are measured in inches, so sizes will have to be converted from one measurement to another. If the profile height of Russian and European belts is indicated by numbers, then for American products it is indicated by letters.
How to replace the alternator belt?
Replacing the alternator belt is not a very complicated process. Even an inexperienced driver in these matters can replace the alternator belt. You can buy an alternator belt in every store that sells spare parts, and it is not too expensive, about 100-200 rubles. When purchasing, it is important to know the size of the alternator belt you need, since this element is not the same on all cars. Well, let's get to the point!
The alternator belt is located on the left side of the engine. So, how to change the alternator belt? First you need to free up space to ensure normal access to the belt.
How to remove the alternator belt?
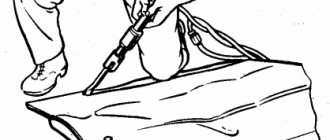
To do this, sometimes you need to remove the wheel or fender protection, and sometimes the crankcase protection, but we can do without it. Fortunately, Samara has enough space in the engine compartment than, for example, Kaliny. We remove the tension on the generator belt - to do this, you need to loosen the nut securing the generator and tensioner (see the figure). Before removing the generator belt from its place, it is best to carefully inspect and remember it (and for accuracy, sketch or photograph) then how the belt is positioned, as well as what elements it hooks onto. Often the belt is driven by several units at once. This is necessary so that the new alternator belt is installed strictly in its place.
How to install the alternator belt?
That's it, the belt has been removed from its place. Now you need to carefully examine it and compare it with the new one; the length of the alternator belt must be identical, otherwise the belt will not fit your car. If both belts are the same, then installation of the alternator belt begins. This must be done by completely repeating the installation drawing, and be very careful. After all, a mistake made during installation can lead to various consequences: incorrect operation of units and components, or even breakdown of the car. The belt can be considered correctly installed if its sag is approximately 1-1.5 centimeters.
After the alternator belt is installed, the alternator belt needs to be tensioned. Once you've completed this simple process, make sure you don't leave any unnecessary items anywhere under the hood. That's it, the belt is installed!
Checking the alternator belt
Now you need to check whether the generator drive belt is installed correctly! To do this, you should start the car and turn on all the electronic units; if the belt does not make noise or whistle under heavy load, and all the lighting works normally, then you have installed the alternator belt correctly! If the belt does not whistle, but the problem with voltage sag remains, then you need to check the generator and determine the specific malfunction. By the way, if you are not sure that you can do everything correctly, it is better to immediately take the car to a workshop and entrust it to specialists.
Fan belts - description and dimensions
Fan belts GOST 5813-93 for cars, tractors and other equipment are designed to transmit motion from the engine shaft to auxiliary units.
For fan belts in accordance with GOST 5813-93, the belt length is indicated along the design line (cord). Operable at temperatures from -40°С to +60°С. Wp - design width of the belt, mm (cross-sectional width of the belt under tension at the level of the neutral line); W—width of the larger belt base, (mm); T—belt height, (mm); α - belt wedge angle equal to 40°±1°
Example of a symbol: Fan belt 11x10-1500, where: 11 - estimated belt width (mm); 10 — height of the belt section (mm); 1500 - estimated belt length (mm)
| 8.5×8 | 11×10 | 14×10 | 14×13 | 16×11 | 19×12.5 | 21×14 | |
| W | 10.5 | 13 | 17 | 17 | 19 | 22 | 25 |
| Wp | 8.5 | 11 | 14 | 14 | 16 | 19 | 21 |
| T | 8 | 10 | 10 | 13 | 11 | 12.5 | 14 |
| α | 40° | 40° | 40° | 40° | 40° | 40° | 40° |
Table 1: Fan belts GOST 5813-93 - application
Source
Characteristics of poly V-belt:
- high efficiency, about 98%;
- used in high-speed, highly loaded units;
- Poly V-belts (PR) operate with minimal noise than conventional belts;
- Wide range, can be used on shafts with small diameters, less than 20 mm.
- The wear threshold is high, long service life.
Thanks to its geometry and quality of materials, a poly V-belt or ridge belt transmits power with virtually no loss. Where such belts are installed, there must be tensioners.
Where is the longitudinal groove belt used?
Ribbed or multi-ribbed belts have a wide range of applications:
- in units operating under high loads;
- in designs with high gear ratios;
- in structures with high angular velocities;
- in designs with small diameter belt shafts.
PRs are in demand in the automotive industry, tractor, machine tool, metallurgical, chemical, household, and nuclear energy industries.
Such a simple element in belt drives as a belt solves many issues. Thanks to the use of a high-quality rivulet-type belt, the following indicators are improved:
- Reduced noise levels.
- Increased turnaround time.
In order not to reduce the life of the alternator belt, you should monitor the operation of the alternator overrunning clutch.
Performing tension
If there is no wear on the V-belt drive, but there is a whistle, first of all, check the tension level. We will not use complex terminology, but will simply advise you to press with some force on the belt in the middle.
The problem is not the whistling. Due to weak tension, the battery does not charge effectively, and the drive itself begins to wear out faster. Excessive tension can lead to damage to the alternator bearings and stretching of the belt.
Correct tension of the VAZ 2110 generator belt is performed as follows:
- Loosen the generator from the bottom and top. A nut is used for this;
- Turn the adjusting bolt and adjust the belt;
- If you want to increase the tension, the bolt is turned to the right. Thus, you move the generator away from the cylinder block;
- To loosen the tension, move in the opposite direction - to the left;
- Use a wrench to grab the fastening bolt and turn the crankshaft a couple of turns, then check the tension;
- If all is well, the tension is correct, the nut can be tightened back.
Worn poly V-belt
No matter how high-quality the product is, when its service life expires, it is subject to significant mechanical wear. A worn-out part in the design of a car assembly can affect the quality and safety of movement and the operation of the engine.
For those who do not yet know that you can diagnose the main components of a car with your own hands, we have prepared material: How to diagnose a car using a laptop.
Therefore, it is recommended to periodically carry out diagnostics of belts:
- Inspection of external condition. Visual inspection is the main way to detect mechanical damage. If thread delamination or cracks appear, it must be replaced as quickly as possible.
- Inspect not only the belt, but also the pulleys. If there are chips on the pulleys, they create scuffs on the side surfaces of the belt, which leads to very rapid wear.
- Inspect the pulleys for oil. Oil and other fuel and lubricant products should not be present on the surfaces of pulleys and belts.
- In addition, it is necessary to regularly inspect the tension rollers. Make sure that the tension rollers hold the belt properly.
- Check the belt tension level.
The belt and tension rollers should be checked every 15 thousand km. When replacing the belt, it is recommended to change the tension rollers as well.
When a heavily worn belt, not only a rivulet V-belt, but also other types, extraneous noise appears.
Car repair and maintenance professionals recommend changing the alternator belt at least every 50,000 km. The belt must be tensioned so that the deflection coefficient is no more than 0.5 cm. If it is impossible to tension so that the deflection is less than 0.5 cm, then the problem is in the rollers.
Important! Inspect the belt when purchasing to ensure there are no burrs or cracks. Even expensive belts need to be inspected. All types of goods have their own percentage of defects.
Cost of poly V-belts:
- for AUDI cars - BOSCH belt - from 251 rubles;
- for Porsche cars - Contitech 3РК600 belt - from 255 rubles;
- for Ford cars - BOSCH belt - from 253 rubles;
- for Citroen - Skf belt - from 259 rubles;
- for Alfa Romeo - Bosch belt - from 250 rubles;
- for BMW - Skf - from 250 rubles;
- for Cadillac cars - Gates belt - from 825 rubles;
- for a Hummer car - Contitech belt - from RUB 2,701;
- for Jaguar - Dayco belt - from 305 rubles;
Then the list continues, approximately in the same price range - from 250 rubles for 2022. VAZ LADA, AUDI, BMW, Mercedes, cars from Korea or China, etc., do not require large investments to replace the belt. For Rolls-Royce, Bentley, Ferrari and other top world cars, accordingly, belts cannot be bought in ordinary car stores.
Structure of a poly V-belt:
- Bearing layer. This layer is made of durable composite material threads. The threads are distributed evenly around the perimeter of the product. They are both durable and capable of slightly extending. Attached securely to the base layer. At large stretches, belts with such threads evenly distribute the load over the entire belt area, which promotes smooth energy transfer.
- Coating. This layer must be flexible and have a long service life. This coating reliably protects the supporting layer.
- The basis. The base consists of rows of parallel V-shaped grooves. Such teeth create good adhesion to the shaft pulley. The base layer is made of a durable material, such as polychloroprene elastomer, covered with transversely reinforcing fibers.