The basic design of the VAZ 2106 fuel pump can be seen below.
According to its principle of operation, the “six” gasoline pump is focused on creating excess pressure, which, regardless of the stage of engine operation, must constantly maintain the required level of gasoline in the float-type fuel chamber. The diaphragm is designed and developed such that fuel flow is stopped or reduced when the fuel line reaches a pressure limit.
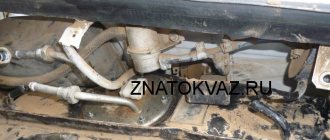
The standard fuel pump is located on the left on a special boss of the engine block and is secured with studs through a thermal spacer and an adjusting gasket. This spacer also serves as a guide element for the VAZ 2106 fuel pump pusher, driven by an eccentric through the fuel pump drive, powered by the gas distribution mechanism in use. The length of the new fuel pump rod is 82.5 mm, the permissible value for operation is 81.8 mm; if this parameter is reduced, the product must be adjusted by selecting installation spacers or replaced with a new spare part.
For manual supply of gasoline using the pumping method, the product has a special lever, which is recommended to be used after a long period of use of the vehicle to fill the fuel line with fuel. It is capable of creating a pressure of 20-30 kPa with an injection rate of at least 60 l/h at a frequency of 2000 frictions (pumping) per minute.
Our online resource describes the design of the VAZ 2106 fuel pump under the nomenclature number 2101-1106010, produced at DAAZ in Dimitrovgrad. As an alternative, you can use a Pekar gasoline pump manufactured at the Saratov Fuel Equipment Plant. The design and development of the product was carried out by Pekar JSC from St. Petersburg.
By the way, many car enthusiasts praise the so-called. “VAZ 2106 plunger fuel pump”, which improves vehicle starting and operates with a high degree of reliability. A product of this type is nothing more than a Pekar gasoline pump, the top cover of which is made in a high style and resembles 2 cylinders connected to each other, on the end parts of which arrows in the direction of gasoline flow are stamped. The valves inside the product are very similar to plunger pairs, and with the light hand of car enthusiasts they began to be called “six” plunger fuel pumps.
Gasoline pump for carburetor VAZ 2107
One of the mechanisms of the power supply system of any engine is the fuel pump. The startup and operation of the power unit directly depends on its performance. Mechanical fuel pumps of the diaphragm type DAAZ 2101 were installed on carburetor “sevens”. Thanks to the simple design, the mechanism is repairable. However, it often causes problems for Zhiguli owners. Therefore, it is worth dwelling on the operation and malfunctions of this unit in more detail.
Main functions
The job of the fuel pump is to move fuel from the tank to the carburetor.
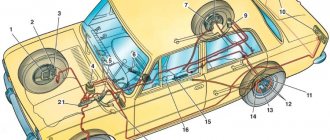
The power supply system of a VAZ 2107 with a carburetor engine consists of the following elements: 1 - fuel pump; 2 — hose from the fuel pump to the carburetor; 3 - carburetor; 4 — rear tube; 5 — sensor for level indicator and fuel reserve; 6 — safety shield; 7 — tank ventilation tube; 8 — fuel tank; 9 — gaskets; 10 — fuel tank mounting clamp; 11 — front tube; 12 — fine fuel filter
The design of the unit is not ideal, so it is one of the weak points in the car. This is explained by the fact that the impact of constant loads and low quality gasoline lead to natural wear and tear of the elements. This is what causes the device to fail. If a problem occurs with the pump, the engine begins to work intermittently or stops functioning altogether.
The fuel pump has a simple design, but is one of the weak points of the car
Design and operating principle
The mechanism is made of several parts connected to each other by fastening elements. There are two fittings in the upper part of the body through which fuel is supplied and pumped into the carburetor. The design includes a lever that allows you to manually pump gasoline from the tank into the fuel system, which is important after the car has been parked for a long time. The main elements of the node are:
- pusher;
- spring;
- balance;
- lid;
- cover screw;
- screw;
- mesh filter;
- membranes (working and safety);
- lower and upper plates;
- stock;
- valves (inlet and outlet);
- manual pumping lever.
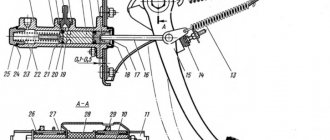
Fuel pump design: 1 - discharge pipe; 2 - filter; 3 - body; 4 - suction pipe; 5 - cover; 6 - suction valve; 7 — rod; 8 — manual fuel pumping lever; 9 - spring; 10 - cam; 11 — balancer; 12 — mechanical fuel pumping lever; 13 — bottom cover; 14 — internal spacer; 15 — external spacer; 16 - discharge valve
The principle of operation of a classic fuel pump is based on creating the pressure necessary to maintain the required fuel level in the carburetor chamber. Thanks to the diaphragm, the flow of gasoline stops or decreases when a maximum pressure value is established in the fuel line. On carburetor “sevens” the fuel pump is located under the hood on the left side of the cylinder block. It is secured to two studs through a thermal spacer and gaskets, which are also used for adjustment. The spacer is also a guiding part for the pump rod.
The device operates in the following order:
- the pump pusher is driven by a drive cam operating from the gas distribution mechanism;
- the membranes located inside the gas pump move and alternately create pressure and vacuum in the chamber;
- if the pressure decreases, the outlet valve closes and fuel flows through the inlet valve;
- when the pressure increases, the valve at the pump inlet closes, and gasoline is supplied through a hose to the carburetor.
Under the action of the pusher, which is controlled by the gas distribution mechanism, a vacuum and pressure are alternately created in the fuel pump chamber, due to which the fuel suction strokes and its supply to the carburetor are ensured.
Which fuel pump is better
When there are problems with the fuel pump, the question of choosing a new device often arises. Owners of Zhiguli cars mainly prefer products of two. If problems arise with the factory mechanism, for example, when it overheats, many change it to the second option, explaining that Pekar pumps do not have a tendency to form a vapor lock, which causes defects in the operation of the device in hot weather. In fact, this opinion is wrong, since they also have this problem, as evidenced by numerous reviews from car owners. It is also worth considering that Pekar costs 1.5–2 more than DAAZ. Therefore, a standard fuel pump is the best choice based on criteria such as reliability, price and quality. The cost of a factory pump is 500–600 rubles.
The Pekar fuel pump, along with the DAAZ, is considered one of the best for classic Zhiguli cars.
Table: parameters of different fuel pumps
| Test results | "Baker" | DAAZ | QH | OTA |
| Zero supply pressure (at a crankshaft speed of 2 thousand rpm), kgf/cm² | 0,26 | 0,28 | 0,3 | 0,36 |
| Capacity for free drainage (at a crankshaft speed of 2 thousand rpm), l/h | 80 | 76 | 92 | 74 |
| Suction period at a crankshaft speed of 2 thousand rpm, s | 4 | 13 | 9 | 6 |
| Valve tightness at a pressure of 0.3 kgf/cm² (fuel leakage within 10 minutes), cm³ | 8 | 12 | 8 | 8 |
| Place | 3 | 4 | 1–2 | 1–2 |
QH petrol pumps are manufactured in the UK, while OTA petrol pumps are manufactured in Italy. However, these devices have some features: the QH pump does not have a lever for manual pumping of fuel, and the housing is non-separable. The Italian mechanism has excellent parameters compared to others, but its price is almost 3 times higher than Russian products.
Diagnostics and replacement of the electric fuel pump on cars of the Zhiguli family
In injection engines of classic VAZs, the fuel pump may lose its functionality both due to problems with the power supply to it and due to a malfunction of its electric motor. In the first case, the situation can be corrected by diagnosing and repairing the electrical circuit of the device. But if the electric motor of the pump fails, only replacing it will help.
Checking the protection devices for the electrical circuit of the fuel pump on injection VAZs of the Zhiguli family
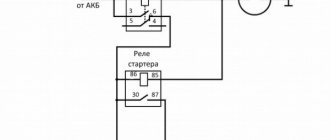
If there is a problem with the electrical equipment of the fuel pump circuit, it usually does not turn on at all. Turn on the car's ignition without starting the engine and listen. First, you should hear a click from the relay, and then a characteristic “squeal” emitted by the pump’s electric motor. If you don’t hear anything like this, start diagnosing with the electrical circuit of the device.
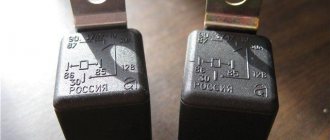
The pump circuit is connected to the on-board network via a separate relay, and its protection is provided by a fuse. Both of these devices are located in the vehicle's optional mounting block. You will find it under the glove box. It contains 3 relays and 3 fuses. The fuel pump relay (indicated R2 in the diagram) is located in the middle, and the fuse (F3) is to the left of it. We pull the fuse out of its seat and check it by “ringing” it with a tester. If a malfunction is detected, we replace it, not forgetting to comply with the rating (15 A).
You can check the functionality of the relay by installing a known working device in its place. Instead, replace it with the relay located to the right of the one being diagnosed, which is responsible for the radiator fan circuit. If this option does not suit you, turn on the ignition and measure the voltage between the pink wire going to the relay and the vehicle ground. The device should show 12 V. This means that the device is powered. After this, you need to connect the pink wire with the gray one at the relay terminals. So we will connect the fuel pump directly to the battery. If it works (that same “squealing” sound will be heard), simply replace the relay.
The fuel pump relay is located in the middle (R2), and the fuse is located to the left of it (F3)
Checking the fuel pressure in the system
The main indicator of the operation of a fuel pump is the pressure it creates in the system. If the device turns on, pumps fuel, but the engine runs intermittently, take the time to check the pressure. To do this, you will need a pressure gauge with a measuring range of 5–7, equipped with a gas-resistant hose and a threaded fitting (if there is no special one, you can use a regular tire pressure gauge). The sequence of actions is as follows:
- On the fuel rail we find a fitting closed with a plastic cap. Unscrew the cap and connect the pressure gauge hose to the fitting. If your device is not equipped with a special threaded fitting, the hose can be secured to the “nipple” using a small clamp.
Pressure connection - We start the engine and look at the instrument readings at idle. The pressure in the system should be between 2.8–3.2 atmospheres. Otherwise, the fuel pump is faulty.
The pressure in the ramp should be 2.8–3.2 atmospheres - Just in case, let's check the pressure regulator (also located on the ramp).
Without disconnecting the pressure gauge, disconnect the vacuum hose from it. The pressure should rise by 0.2–0.7 atmospheres. The pressure has not increased - we are replacing the pressure regulator. When removing the vacuum hose from the regulator, the pressure should drop by 0.2–0.7 atmospheres
Fuel pump drive
The VAZ 2107 fuel pump operates from a pusher (rod) and an eccentric located on the shaft of auxiliary devices (“piglet”, intermediate shaft), which is driven by the timing mechanism through a gear. Auxiliary devices include distributor, oil and fuel pumps.
Operating principle
The drive works as follows:
- the intermediate shaft rotates via a timing chain;
- the eccentric acts on the rod and pushes it;
- the rod presses the fuel pump lever, ensuring its operation.
Fuel pump drive malfunctions
As the fuel supply unit wears out, problems may occur that affect the performance of the latter.
Rod wear
The main sign of a worn-out rod is that the car does not reach the required speed. If the car accelerates, but, having gained speed to a certain value, does not develop it anymore, the reason is precisely the wear of the rod. Recently, the pusher has been made from such low-quality metal that it leads to wear out literally after 500–1000 km. The edge of the rod on the eccentric side is simply flattened, which indicates the need to replace the part.
Rod wear directly affects the performance of the fuel pump
The fuel pump rod should be 82.5 mm long.
Disassembling the pump housing
To carry out all the work on disassembling the mechanism, you will need a pair of screwdrivers, a small hammer, a needle file, and a scraper. The disassembly looks like this:
- Unscrew all the bolts that secure the housing halves.
- Remove the diaphragms by pressing them and turning them 90 degrees.
- Carefully remove the diaphragms and remove the spring.
If you want to experiment, try removing two valves and installing new ones in their place, which are included in the repair kit. Please note that if there is even minor damage or cracks on the housing, the entire assembly must be replaced. Don't even try to restore it. Repairing the fuel pump in this case is not cost-effective.
The most common failure of this type of pump is destruction of valves or diaphragms. In any store you can purchase these parts, which are installed on fuel pumps without the slightest modification. But the kit does not include plastic spacers. Therefore, you will have to use this element from an old fuel pump.
Replacement stages.
1. First of all, it is necessary to loosen the fastening of the fuel mixture supply and discharge hoses. To do this, use a Phillips screwdriver to unscrew the holders located on the clamps.
2. The next step is to remove the fuel conductors from the fitting. You should first prepare the bolts that will act as plugs. Of course, you don’t have to use bolts, but in this case most of the gasoline will spill out.
3. Next, unscrew the nuts that secure the pump. To do this, you will need a thirteen socket wrench.
4. After the fastening nuts have been loosened, it is necessary to remove the element from the racks and at the same time dismantle the sealing element.
5. The next step is to dismantle the heat insulation element along with the drive mechanism.
6. Now, let’s begin installing the new original VAZ 2106 fuel pump. A working pump is installed in the complete opposite order. To increase the service life of a new fuel system element, it is worth periodically checking the adjustment of the sealing gasket. Correct shim adjustment is determined as follows.
Once the new pump is in position, the pump wire should protrude approximately one millimeter (plus/minus 0.2 mm).
The optimal thickness of the gasket between the cylinder block and the heat insulation element is 0.3 millimeters (an error of no more than 0.03 mm is also allowed. The seal located between the heat insulation attachment and the pump itself is selected individually. Most often, this element is made by the hands of a car enthusiast.
As it turned out, replacing an element of one of the most important vehicle systems turned out to be quite affordable
The fuel pump is an important part of the engine fuel supply system
Given the importance of this component of the vehicle system, it is worth paying due attention to its maintenance
In most cases, the cause of fuel compressor failure is the use of a low quality fuel mixture. The presence of abrasive particles in gasoline leads to premature wear of the pump and other elements of the fuel system. To increase the service life of the pump and other elements of the fuel system, it is worth regularly checking the condition of the fuel filter and replacing it in a timely manner.
The VAZ 2106 fuel pump is very picky about the quality of gasoline. Of course, the car will operate on low-quality fuel, but in order to avoid unexpected costs for car repairs and maintenance, we recommend filling up with gasoline at trusted gas stations.
Posts 8
1 Topic by pfz 2009-09-09 19:38:40
- pfz
- User
- Offline
- Registered: 2009-06-28
- Messages: 4
- Reputation: [ 0 | 0 ]
Topic: Fuel pump rod
VAZ-2109 carb camshaft new
This problem constantly flattens the fuel pump rod (this iron rod) on the camshaft side. Accordingly, the pump stops pumping. I'm tired of changing them. Sednya already installed 4. I tried it on with the new one, but the old one had 2-3mm off. people say that the spare parts are crap and only hardening the rod will save them. I would like to hear your opinion.
2 Reply from Lacoste 2009-09-10 02:52:35
- Lacoste
- User
- Offline
- Registered: 2009-04-12
- Messages: 10
- Reputation: [ 0 | 0 ]
Re: Fuel pump rod
This problem constantly flattens the fuel pump rod (this iron rod) on the camshaft side. Accordingly, the pump stops pumping. I'm tired of changing them. Sednya already installed 4. I tried it on with the new one, but the old one had 2-3mm off. people say that the spare parts are crap and only hardening the rod will save them. I would like to hear your opinion.
I had this happen. Only the pump got terribly hot. I changed the pump and rod and then had no problems.
3 Reply from maniboo 2009-09-10 06:40:03 (2009-09-10 06:40:45 edited by maniboo)
- maniboo
- Moderator
- Offline
- Registered: 2008-11-10
- Messages: 2,196
- Reputation: [ 0 | 0 ]
Re: Fuel pump rod
which rod is that pusher? Did you set it up by eye or by letter? There should be a certain number of spacers and some of them of different thicknesses to set the correct distance.
4 Reply from Driver 2009-09-10 17:24:17
- Driver
- User
- Offline
- Registered: 2008-12-08
- Messages: 460
- Reputation: [ 0 | 0 ]
Re: Fuel pump rod
Still, I think it’s a problem with the pump.
5 Reply from pfz 2009-09-10 17:46:47
- pfz
- User
- Offline
- Registered: 2009-06-28
- Messages: 4
- Reputation: [ 0 | 0 ]
Re: Fuel pump rod
yes it's a pusher. the pump is new. I installed the old one the same way. I installed the gaskets that were included in the kit, one thinner and the other thicker. installed correctly
6 Reply from maniboo 2009-09-11 06:27:51
- maniboo
- Moderator
- Offline
- Registered: 2008-11-10
- Messages: 2,196
- Reputation: [ 0 | 0 ]
Re: Fuel pump rod
4 pumps in a row? I doubt that they are all marriageable, unless of course they were bought in one place, maybe it’s a batch. As far as I remember, the kit includes gaskets, but when I changed the pump I had to buy a different thickness, because... those that were in the box did not provide the required gap. In mm I don’t remember how much it should be, I can’t tell you
7 Reply from GUTA 2009-09-11 16:30:42
- GUTA
- User
- Offline
- Registered: 2008-11-12
- Messages: 402
- Reputation: [ 0 | 0 ]
Re: Fuel pump rod
Why did he get eaten the first time? because of which? This is almost wear-resistant weight. The car will be completely rotten, the engine will have been capitalized 10 times, and this pump rod - a fucking stick - will still work. Here you need to find out the reason, if you installed a new pump and it was immediately chewed up, then the problem is in the pump and it is not a fact that you installed everything correctly. I'm talking about gaskets. You need to accurately measure the output of the pusher with a barbell or ruler. and then install gaskets of the required thickness. Like that:
Before installing the pump, we measure the minimum amount of protrusion of the pusher (when turning the crankshaft) from the end plane of the heat-insulating spacer.
The protrusion is regulated by selecting sealing gaskets of different thicknesses.
Gaskets are available in thicknesses of 0.30, 0.75 and 1.25 mm. We install a 0.30 mm gasket between the heat-insulating spacer and the engine, and a 0.75 mm gasket on the outer side of the spacer (facing the fuel pump) and check the minimum protrusion of the pusher from the spacer, which should be 0.8–1.3 mm. To do this, slowly turn the engine crankshaft, pressing the pusher with your finger and periodically checking its protrusion above the plane of the gasket. If the minimum protrusion is less than specified, the outer gasket is replaced with a thinner one, if more, with a thicker one.
8 Reply from kos127 2009-10-24 12:06:27
- kos127
- User
- Offline
- Registered: 2009-01-12
- Messages: 6
- Reputation: [ 0 | 0 ]
Re: Fuel pump rod
It seems to me that the pushers are completely G. As an option, remove the distributor and look at the camshaft cam, maybe there’s something wrong with it (it’s crumbled, for example). I understand that this is unlikely, but still. On my car the cam itself is polished to a shine.