Tips for motorists
In the operation of the submersible electric fuel pump on a Gazelle car, the following take part: the main relay, the fuel pump relay, the electronic control unit, and fuses protect this electrical circuit. In addition, if the car has an anti-theft system installed, then another relay will be added to the circuit, which will cut off the voltage supply to the fuel pump terminals.
And those Gazelle cars that run on gas will still start on gasoline and in their electrical circuit of the fuel pump, an additional relay will also be installed that will turn off the operation of the fuel pump at the moment the engine switches to gas.
Therefore, when troubleshooting problems associated with a non-working gas pump on a Gazelle, you need to start by checking the integrity of the fuses . You also need to check the condition of the contacts for oxidation. Next, we check the operation of all relays that are used on this vehicle in the electrical circuit for supplying voltage to the fuel pump terminals. If this does not help, then you will have to check the wiring and connections from the electronic control unit to the main relay and the fuel pump relay.
Another common cause of fuel pump failure is oxidation or burning of the negative contact located on the fuel pump inside the tank. There is a white block there, but please do not confuse it with the block that is located on the surface of the gas tank. Typically, this malfunction initially manifests itself by periodically turning the fuel pump on and off. If this problem occurs, then these contacts will have to be periodically cleaned by removing the module or connected directly once and for all, bypassing the terminal.
Unfortunately, the driver is not always able to independently find faults associated with the failure of the submersible fuel pump on a Gazelle car and has to look for a competent auto electrician to solve this problem.
If the starter of your car turns normally, but the car does not start, the first thing you need to do is check that the fuel pump is turned on. On domestic cars, its operation can be heard from the passenger compartment; when the ignition is turned on, a characteristic buzzing sound comes from under the rear seat or trunk. If the fuel pump does not work, you need to check the integrity of the fuses and the activation of the main relay of the engine management system and the fuel pump relay. On the VAZ-2107, VAZ-2108, VAZ-2109 and their modifications, relays and fuses are located on the shelf under the glove compartment or under it. On VAZ-2110 and similar ones, you should look in the heater console on the passenger side by unscrewing the fastening screws and removing the side cover. On GAZ cars they are located under the hood on the front wall of the cabin, closer to the passenger side.
General scheme
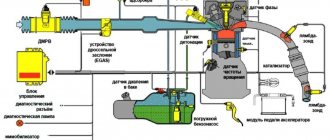
Modern engines are largely focused on economical operation with reference to environmental requirements.
Therefore, they differ:
- A large number of various sensors;
- Increased length of wires;
- Electronic control units for subsystems and the entire power unit;
- On-board diagnostic module (computer).
Poster from the service manual for a GAZelle with a ZMZ-40522 engine
Accordingly, the wiring diagram for the Gazelle 405 has its own characteristics, most of which relate to ensuring the correct operation of the injection system, often called the injector.
This is where, according to many diagnosticians and auto electricians, lies the weak link that affects the car engine. And one such feature will be discussed in this publication.
Electronics help
On cars with EURO 3 engines, the wiring diagram for the 405 Gazelle provides a diagnostic module.
Its frequently encountered names among motorists:
- on-board computer,
- trip computer;
- multitronics (by manufacturer's name), etc.
In addition to its basic information functions, the on-board computer is also able to inform the driver:
- Stepper motor position.
- Engine speed.
- Injection controller error codes.
- Mass air flow.
- Throttle position.
- Onboard voltage value.
Note. If a malfunction occurs in the operation of the power unit, the route PC will report errors. From their decoding, you can guess which electrical wiring diagram for the Gazelle 405 is subject to close monitoring. But he, of course, “will not say” about the true reason, but will only point out the probable reason that caused the unstable operation of a particular node.
Vehicle weight
Let's look at an example when a car stops obeying the gas pedal . The car refuses to move, when starting it keeps the speed at 2000 rpm and does not allow movement.
Read more: Motorhome, what category of license is needed?
The trip computer often reports in such situations that there are errors:
- With throttle;
- With crankshaft sensor;
- With air flow sensor.
The example shown in the video below shows unstable operation of the power unit.
The factory instructions prescribe diagnostics using special equipment, as a result of which the owner, using a brute force method, excludes one or another node from the “suspect list”.
In fact, the reason for the failure is tritely simple - a break in the throttle ground wire , which, being screwed to the exhaust manifold stud, is subject to vibration and simply falls off (this kind of trouble happens not only with GAZ products - see the article original wiring diagram for VAZ 2112).
Please note: For better contact with the vehicle ground, the throttle electronics are powered by a separate wire - in the photo below.
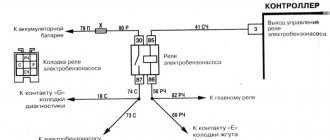
The fuel pump relay does not turn on.
If the fuel pump does not work, then first of all you need to check the attraction of the main relay and the fuel pump relay. If the main relay does not click, then it is necessary to check its switching circuit and its serviceability. How to do this is described in the article the main relay does not turn on,
In the case when the main relay turns on, but the fuel pump relay does not, it is necessary to check the power at pins 85 and 86. When using a test lamp, its current consumption should not exceed 0.25A, otherwise damage to the controller may occur. If the control lamp does not light up on any terminal, then the relay is not receiving power. This may be caused by a blown fuse or a broken power cord.
In the case when the lamp burns brightly on one terminal, and at half-glow on the second, and the relay may be activated, you should remove the relay from the socket and connect terminals 85 and 86 with a test lamp. When the ignition is turned on, the control lamp should light up and go out after approximately 20 - 30 seconds. If the lamp lights up and there is poor contact in the connection between the block and the fuel pump relay. If the lamp does not light up, there may be a break in the wire connecting the relay to the controller or the controller itself may be faulty.
Fundamental differences in the design of the fuse box depending on the Gazelle model
This is what the fuse box of the new model looks like.
The design differences of the modification of the Gazelle class, based on various electrical equipment protection systems, can be divided into the following main groups and their features can be highlighted. Watch the video on how to install a new fuse box.
Cars with carburetor-type gasoline engines
- Cars produced before 2003:
- equipped with old-style electrical fuse modules with cylindrical type fuses with a nominal value of 8 and 16A;
- control relays are installed separately from the mounting block;
- the engine compartment block (BPR-2) has power fuses of 40A for the light circuit and 60A for the general plus.
- Models 2003-2010:
- new-style units with plastic fuses with protection thresholds of 5, 10, 15, 20 and 25A were installed, depending on the equipment;
- control relays are also located independently of the unit;
- the power protection module can be different: BPR-2 with protection of 90A for the light and generator circuits and 60A for the general plus.
- BPR-4 for cars with a pre-installed anti-lock braking system and additional 25 and 40 A electrical fuses.
Cars with gasoline injection engines
- The main fuses of plastic type 25, 10, 15, 20 and 5A for various circuits are combined into a single mounting module located in the cab.
- The main control relays are included in the unit.
This is what control relays look like for a Gazelle car
Installation process of protective relays
Diesel vehicles
- A main safety module is installed, similar to fuel-injected cars, with additional 5A electrical fuses for the engine management system.
- Modified engine compartment, including protected circuits:
- air heating system with 125A protection;
Schematic design of the air heating system in a gazelle
Diagram with car fuse sizes
The variety of factory configurations of Gazelle cars, both in terms of the pre-installed engine and additional equipment, and the multiplicity of their combinations leads, in turn, to differences in the electrical protection system and the design of the mounting block.
Thus, the Gazelle fuse box is a mandatory element of the protective mechanism of the vehicle’s electrical equipment and is implemented taking into account the design features of a specific modification of the vehicle.
The two-level construction of the safety circuit provides reliable protection of on-board devices, both from a short circuit in the machine network and from voltage surges, thereby ensuring their trouble-free operation.
The fuel pump does not work, the relay turns on.
Checking relay power.
In the case when the fuel pump relay turns on when the ignition is turned on, but the pump itself does not work, you need to check the power at terminal 87 of the fuel pump relay. To do this, touch terminal 87 of the relay socket with the output of the control lamp connected to the vehicle ground, and the lamp should light up. If the lamp does not light, it means the fuse has blown or there is a break in the wire.
If there is power at terminal 87, you should remove the relay from the socket, and instead place a jumper between pins 87 and 30. In this case, if the pump and connecting wires are working properly, the pump should start working and if this happens, the relay should be changed. If the pump does not start working, then, without removing the jumper, you need to touch the power wire on the fuel pump with a test lamp connected to the vehicle ground.
Checking the fuel pump power circuit.
If a submersible pump is installed on the car as part of the fuel module, you need to remove the connecting connector and touch one of the thick wires. When you touch one of them, the indicator lamp should light up. If the lamp does not light up on any of the wires, then it is necessary to eliminate the break in the wire from the fuel pump relay to the module connector or the pump itself, if the pump is of a remote type. One of the reasons for the break may be the anti-theft blocking of an installed non-standard alarm system.
In the case when the test lamp lights up on one of the thick wires of the connector or one of the terminals of the remote pump, you need to connect these terminals with a test lamp to each other. In this case, the control lamp should light up. If the lamp does not light, it is necessary to eliminate a break or poor contact in the wire connecting the pump to the vehicle ground.
If, when checking the wires and relay for turning on the fuel pump, no malfunction is detected, the electric motor of the fuel pump or its connection to the module connector is faulty. It is not difficult to find the cause by removing the fuel pump module from the tank. If there is poor contact with the connector, melting of the plugs will be visible. If melting is not noticed, then to check the pump itself, you can connect it to the battery. It should be taken into account that operating a submersible pump without liquid will damage the pump. A faulty pump should be replaced.
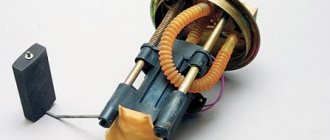
One of the most important elements of the fuel injection system of a gasoline engine is the electric fuel pump, which is located in the fuel tank of the car. The fuel pump pumps fuel into the system from the gas tank, creating a certain pressure.
Auto repair experts identify the following common fuel system problems that are related to the fuel pump:
- The fuel pump pumps poorly and does not create the required pressure;
- the fuel pump does not pump when the ignition is turned on;
Considering that the fuel pump is an electromechanical device, the most common fuel pump malfunctions are related to both the mechanical and electrical parts. Next, we will look at what signs indicate a breakdown of the fuel pump and why the fuel pump stops pumping partially or completely.
Read in this article
Checking with a pressure gauge
It is also possible to check the performance with a pressure gauge. This method is also quite accurate if you check the fuel pump correctly. We will need a special pressure gauge to measure the pressure in the fuel network of the GAZelle 405 injector. You can do all the operations yourself; you don’t need the help of specialists. The instructions for such a pressure gauge say that it must be connected to the injector rail and secured so that the pressure gauge readings can be seen from the passenger compartment. When the driver turns on the ignition, the pressure gauge starts working and takes readings of the pressure created by the fuel pump. The norm for pressure fluctuations in the fuel system of the GAZelle 405 injector is from 300 to 380 kPa (kilo Pascal). After this, you need to drive along such a section of the road that at least third gear is engaged and then measure again. If the pressure gauge readings have not changed, then there is no need to worry about anything yet, and something else needs to be repaired, not the fuel pump.
If there are significant changes in the readings, you will have to contact a GAZelle 405 injector repair specialist.
If the car starts to stall while driving, then the problem lies in the electrical component. You can check if this is why the fuel pump is not working correctly by performing a test of the fuel pump relay. To do this, we need a regular control lamp, and the test itself looks like this: when the lamp is connected to the yardarm and the ignition is turned on, the lamp should light up for a few seconds. If a leak was noticed at low pressure and it was determined that it was the culprit, then it needs to be eliminated. To do this, you need to establish where exactly the leak is, and then, depending on the situation, choose what will help - replacing some gaskets, valves, diaphragms and other things. In order to quickly understand what exactly is broken and how best to fix the breakdown, it is necessary to clearly understand the diagram of the fuel equipment of a particular machine, and what place the fuel pump occupies in it.
In this article I will tell you what steps to take to find and troubleshoot the fuel pump of a gazelle car. If, when you try to start the engine, the starter turns, but nothing happens, then it is quite possible that the fuel pump has failed. This is also evidenced by the absence of a characteristic sound of its operation when turning the key in the ignition switch.
First of all, we check the fuse. It is located in the passenger compartment on the driver's door side. We remove the plastic cover and look at the upper block 12 fuse for 15 amps. There is a sticker on the fuse cover that says it is responsible for the engine management system. But it also carries a fuel pump. If the fuse is good, then move on to the next step.
The fuel pump relay is located in the engine compartment above the engine on the partition with the cab. In the standard configuration of a gazelle car with a ZMZ 405 euro2 engine, there are four relays. From right to left are the main relay, fan clutch relay, fuel pump relay, starter relay. We directly close contacts 87 and 30 of the relay, the hum of the fuel pump should appear - change the relay. If it is not there, then we move on to the module located in the tank.
I have a farmer's gazelle, and in order to get to the fuel pump module or at least its connector, I need to remove the fuel tank. We remove the tank, disconnect the tubes, disconnect the connector. Often the cause of malfunction of the gazelle fuel pump is oxidized connector contacts. We use a tester or control to check whether the voltage is coming. If yes, then remove the module from the tank and check the fuel pump motor directly.
Before dismantling the fuel pump module, I advise you to purchase a filter. It costs about fifty rubles and usually requires replacement. If the fuel level sensor readings do not correspond to reality, then most likely its contacts on the float are worn out. And it is better to replace the fuel pump module assembly. If only the motor needs to be replaced, it is held in place by a metal latch bracket. Disconnect the connector and remove the motor. We install a new one, its price is about a thousand rubles.
Next, put the fuel pump module in place. There is a small nuance when collecting. There are marks on the module and on the pressure ring. You need to align them so that the holes of the mounting bolts match. We screw the fuel line tubes, connect the connector and secure the tank. In a regular gazelle, everything is much simpler and dismantling the tank is not required.
That's all! For information about gazelle repairs and cargo transportation, see my Channel!
The fuel pump does not pump: causes and diagnostics
Let's start with the fact that if the gas tank is full, the battery is charged, the spark plugs are dry and there is a spark, the starter turns the engine normally, but the engine does not seize, then you should pay attention to the gas pump. A common problem is that there is no power to the fuel pump after the ignition is turned on. In a similar way, the malfunction manifests itself in motion, when the power to the fuel pump is lost and the engine suddenly stalls.
An equally important point is how much the fuel pump pumps. In other words, the pump may hum and buzz (power is being supplied), but not create the required pressure in the fuel line. The pressure in the fuel system with a working fuel pump must be more than 3 bar (which depends on the specific car model). The indicated pressure is accumulated in the fuel rail and has an indicator of 300 kPa and above.
To check, you need to measure the pressure in the fuel rail with a pressure gauge, taking into account the indicators that are the norm for a specific car model. Using the example of injection VAZs, the pressure when the ignition is turned on is 3 atmospheres, at idle the figure is 2.5 atmospheres, when you press the gas 2.5-3 atmospheres. This method will help you accurately determine:
- malfunction of the fuel pressure regulator in the rail;
- breakdown of the fuel pump or a noticeable decrease in its performance due to wear;
- severe contamination of filters (fuel filter and/or fuel pump mesh);
In the second case, when you press the gas, the pressure does not increase; in the latter case, the pressure gauge needle rises, but very slowly or jerkily.
A decrease in pressure below the norm will lead to the fact that the engine may not start or start with difficulty, stall, jerk, operate unstably and with failures. If this happens due to the fault of the pump and not the fuel filter, then there is a high probability that the coarse filter screen of the fuel pump is clogged. In this case, there is no need to change the fuel pump itself, since it will be enough to replace or even clean the mesh.
If you suspect that there is no voltage to the fuel pump, there is a quick way to check. It is enough to turn the ignition key and listen, as when you turn the key you should hear a slight hum from the fuel pump. If such a buzzing noise is not heard, it means there is no power to the fuel pump, there are problems with the wiring, etc.
Also in the general list of possible reasons why the fuel pump does not pump, the following are noted:
- failure of the fuel pump fuse;
- fuel pump relay failure;
- problems with the ground of the fuel pump;
- malfunction of the electric motor of the fuel pump;
- oxidation or damage to fuel pump contacts and terminals;
- the fuel pump itself is faulty;
Wiring to the fuel pump
On most cars, the wiring to the fuel pump consists of three wires: “plus”, “minus”, and also a wire for indicating the amount of fuel in the gas tank. If the fuel pump does not pump, then the cause may be a lack of power.
To check the power to the fuel pump, just take a 12-volt light bulb and supply it with power from the external connector of the fuel pump. After turning the ignition, the control lamp should light up. If this does not happen, then the problem is in the external circuits. If the lamp comes on, it will indicate the need to check the internal contacts of the fuel pump.
To check the external wiring, you should alternately connect the positive and negative contacts, which are removed from the fuel pump power connector, to the ground of the pump. The contacts must also be connected to the fuel pump relay. If you place the negative contact on ground, after which the ignition is turned on and the light comes on, then this means that this contact is faulty. If the light bulb does not light up, then problems with the “plus” are obvious. If you place a contact on the relay and the light comes on, there is probably damage to the wire on the section that connects the relay and the fuel pump itself.
Checking with a pressure gauge
It is also possible to check the performance with a pressure gauge. This method is also quite accurate if you check the fuel pump correctly. We will need a special pressure gauge to measure the pressure in the fuel network of the GAZelle 405 injector. You can do all the operations yourself; you don’t need the help of specialists. The instructions for such a pressure gauge say that it must be connected to the injector rail and secured so that the pressure gauge readings can be seen from the passenger compartment. When the driver turns on the ignition, the pressure gauge starts working and takes readings of the pressure created by the fuel pump. The norm for pressure fluctuations in the fuel system of the GAZelle 405 injector is from 300 to 380 kPa (kilo Pascal). After this, you need to drive along such a section of the road that at least third gear is engaged and then measure again. If the pressure gauge readings have not changed, then there is no need to worry about anything yet, and something else needs to be repaired, not the fuel pump.
If there are significant changes in the readings, you will have to contact a GAZelle 405 injector repair specialist.
If the car starts to stall while driving, then the problem lies in the electrical component. You can check if this is why the fuel pump is not working correctly by performing a test of the fuel pump relay. To do this, we need a regular control lamp, and the test itself looks like this: when the lamp is connected to the yardarm and the ignition is turned on, the lamp should light up for a few seconds. If a leak was noticed at low pressure and it was determined that it was the culprit, then it needs to be eliminated. To do this, you need to establish where exactly the leak is, and then, depending on the situation, choose what will help - replacing some gaskets, valves, diaphragms and other things. In order to quickly understand what exactly is broken and how best to fix the breakdown, it is necessary to clearly understand the diagram of the fuel equipment of a particular machine, and what place the fuel pump occupies in it.
The heart of a car is often called the engine, because it is very important for a car, just as the heart is for a person; you can often hear in conversation how the human heart is called an “engine”.
However, if we go a little deeper and draw some parallels, then it would be more correct to call a fuel pump a heart, since, like the heart, it pumps liquid, it also has its own line of “vessels and veins” through which fuel is supplied to the “vital organs” ICE. The fuel pump is the topic of our article today, in which we will try to tell you what a fuel pump is, how it works, its main faults, and also how to check the fuel pump at home, that is, with your own hands.
Other causes of fuel pump malfunctions
Quite often, unprofessional installation of additional electrical equipment or security anti-theft systems leads to the fact that the power to the fuel pump is lost due to mixed up contacts or other connection errors.
Finally, let’s add that the gas pump in the gas tank is immersed in gasoline, in which it is actively cooled. The habit of driving with an empty tank can quickly damage the electric motor of the fuel pump, as it burns out.
What functions does the fuel pump relay perform, signs of breakdown. Where is the fuel pump relay installed, how to properly check the fuel pump relay.
Why does the starter turn normally, but the engine does not catch and does not start? Main causes of malfunction, checking fuel supply and ignition systems. Adviсe.
Diagnose faults that may indicate problems with the fuel pump. Self-check of the device, measuring the pressure in the fuel rail.
The causes of whistling and increased noise during operation of the fuel pump are overheating of the pump. How to diagnose and fix the problem yourself. Tips and tricks.
What to do if the car accelerates worse, does not pick up speed, or has failures during acceleration. Why the engine does not pull, how to find the reason for the decrease in power.
How to change a fuel pump. Location of the fuel pump, releasing pressure in the system, unscrewing the fuel lines, removing the pump, reassembling.
We fix it ourselves
As a rule, the price of diagnostics and work by a service station technician or electrician is quite expensive. Therefore, it makes sense to check the GAZelle wiring yourself . Very often, the cause of such sudden failures is loss of contact with the vehicle's ground. Moreover, such a problem occurs in many domestic cars - the same wiring Moskvich 2141, for example.
This wire should always be kept under control. Source
When detected, such a malfunction can be repaired quite easily:
- Cut the fallen wire 5-7 centimeters below the oxidized contact;
- Clean up;
- Screw on the new contact;
- Isolate;
- Screw it to the stud, having previously cleaned the contact area with a small file.
Advice: if you have to replace the wiring yourself, then do not be too lazy when removing the old harnesses to mark on the new wiring the nodes and contacts to which it will be connected. To do this, you will need tape and paper with a pen - sign and stick handmade clues to the wiring (this advice will also help when using parts from other cars - see the article GAZelle 406 wiring diagram).
Replacing fuses
Gazelle Business stove fan does not work
Before installing a new fuse to replace the faulty one, find out and eliminate the cause of the burnout (see “Checking electrical circuits” above). Disconnect the battery.
Replacing the central fuses of the vehicle's on-board network
Using your fingers, squeezing the latches on both sides, remove the block cover.
Using a “10” wrench, unscrew the two nuts and, having removed the wires from the studs, replace the faulty fuse with a similar one (40A or 60A).
Spare fuses are stored under the cover plate...
...which is held on by two clamps.
Replacing fuses for electrical equipment circuits
Remove the block cover. 8 A fuses have a black insulator, 16 A fuses have a green insulator. They are arranged in numerical order from left to right. The list of equipment protected by each fuse is given in the table “Electrical circuits protected by fuses”.
We remove the faulty fuse and install a new one.
Fundamental Concepts
Opening the hood of a Gazelle 405 you can see a huge mass of wires, especially if an injector is installed there. As you know, the operating principle of an injection engine is very different from a carburetor engine and includes a lot of electrical elements, which only an electrical circuit can help you find. It looks like a large map on which all the wires and cables that are laid in the car are marked, where and where they go, what is connected to what. The need to draw up these diagrams is due to the fact that the car uses alternating current, and there is no easy way to figure it out. Graphically, on the Gazelle 405 diagram you can see absolutely all the elements, both the main ones (battery, distributor breaker, ignition coil, starter, generator, spark plugs) and all the secondary ones (headlights, wipers, radio, power windows, etc.).
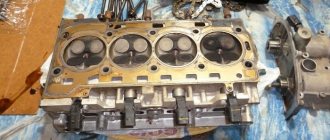
Engine ZMZ 406
This is the next stage in the development of engines for the Gazelle, which replaced the ZMZ 402.
Despite the slight differences in numbers between them, this motor has undergone dramatic changes compared to its predecessor.
The main differences include the following changes:
- changing the location of camshafts;
- 16 valve engine;
- hydraulic compensators are installed, which avoids the constant need for their adjustment;
- a significantly improved timing drive, the service life of which is 100,000 km, but in most cases can withstand loads twice as large. The engine camshaft is driven by gears with helical teeth. At the same time, a steel gear is mounted on the crankshaft, and a textolite gear with a cast iron hub is mounted on the distribution shaft to ensure silent operation.