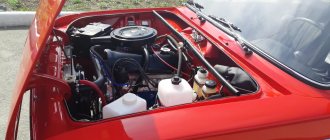
A car owner who independently maintains equipment needs to know how to determine early or late ignition on an engine. If adjusted incorrectly, the power unit loses power and consumes more fuel. Please note that adjustment is only possible on some types of motors equipped with a mechanical pulse distributor.
The car driver needs to be able to determine late and early ignition.
Early or late ignition: what is it?
When a gasoline engine is running, the spark must jump between the electrodes before reaching top dead center. The advance is set manually or programmed in the control unit.
... about the value of the ignition timing
A broken angle causes premature or late ignition of the mixture, which negatively affects the operation of the power plant.
An identical problem is possible on a diesel engine due to incorrect fuel injection timing.
Total:
It is absolutely necessary to set the OZ, do not listen to anyone who says “The OZ is set by itself thanks to the computer.” Yes, this is partly true. But the computer either subtracts or adds angles. When draining, you need 12 degrees, this is the standard angle on Honda D series engines. If you know the matter, the angle can be set for different fuels, this especially helps with bad fuel. Incorrectly set OZ is a common cause of poor starting, high fuel consumption and, of course, loss of power. In rare cases, as a catalyst for reducing engine life. The OZ must be set after overhauling the engine or during any work with the distributor. Exposing it by ear is not fashionable. If you start tuning an engine and find firmware that matches your spec, be sure to find out the base angle at which the ignition map was built.
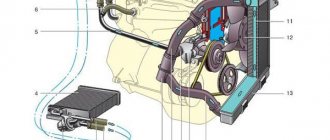
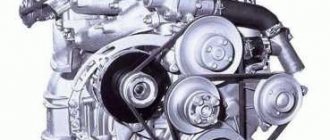
Operating principle of the ignition system
Regardless of the type of power system, candles are used to ignite the mixture; a high-voltage discharge pierces the air gap. In autodiesel engines, the air is pre-compressed, which allows the temperature to reach +600°C. The fuel injected by the nozzle ignites and the expansion stroke begins, accompanied by the downward movement of the piston.
On the injector
On engines with an early type injector, a contactless system with a distributor and a Hall sensor is found. Later, they began to use a control unit that determines the position of the shafts and automatically adjusts the advance angle. It is impossible to say unequivocally which ignition is better, since each of the systems has its own advantages and disadvantages.
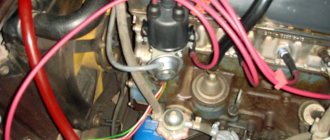
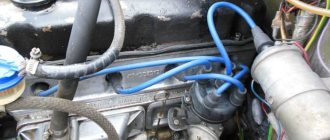
On the carburetor
On engines with a carburetor, a mechanical distributor is used that distributes current pulses among the cylinders. Instead of a contact group, a switch can be used that works with a Hall sensor and controls the operation of the coil. But the distribution of high-voltage pulses is carried out by a mechanical device. Spark discharges appear after the starter starts turning the engine shaft. After successive flashes of the mixture, the power unit will start working.
On engines with a carburetor, a distributor is used to adjust early or late ignition
Reasons for settings failures
Before telling you how to adjust the ignition, you should find out what causes the factory settings to be lost. Most often, the culprit for this is the driver of the car, motorcycle or other equipment. Car enthusiasts can remove the distributor or distributor for various reasons. After servicing it, repairing other components and returning the distributor to its rightful place, the engine can no longer operate efficiently. Sometimes it won't even start.
Why is that? It's all about the tags that were installed at the factory. Novice car owners rarely think about the importance of matching marks.
How to determine early and late ignition
The following are signs of incorrect setting of the ignition timing on engines:
- with forced ignition (liquid and gaseous fuel);
- with ignition of fuel from compression.
On gasoline
Signs of early combustion of the mixture:
- difficult starting with attempts of the crankshaft to start rotating in the opposite direction;
- unstable operation in idle mode;
- drop in dynamics and detonation combustion of fuel (with the correct octane number).
A sign of early ignition of the mixture is a drop in dynamics.
With late ignition, the car owner notices an increase in fuel consumption while maintaining the standard driving style. The engine warms up quickly, the cooling system fan operates more often. Many drivers note a decrease in power, which negatively affects the dynamics.
On diesel
Diesel engines differ from gasoline engines only in the way the mixture is ignited. If the timing of the start of fuel injection is incorrectly adjusted, malfunctions appear that are identical to problems caused by incorrect adjustment of the ignition system on gasoline engines.
... about adjustments on a diesel engine
It should be noted that on a diesel engine, the injection timing is adjusted according to the marks on the fuel pump drive.
On a car with HBO
When using gaseous fuel, it is necessary to set the ignition early to reduce emissions of the burning mixture into the exhaust manifold. Signs of mistuning are no different from those on gasoline engines.
Walk-behind tractors
Manufacturers install contactless electronic systems on modern walk-behind tractor models. They consist of a magnetic circuit in the flywheel, a coil, a high-voltage cable and a spark plug. All settings are set at the factory and often do not require adjustment. How to adjust the ignition on a walk-behind tractor with electronic ignition? By analogy with automotive systems.
You can also adjust the gap between the coil and the magneto element. This gap is adjusted using two screws and the displacement of the coil. On modern walk-behind tractors, the gap should be no more than 0.8 mm.
On some models of such agricultural machines, adjustments are not provided at all. For example, in DM type engines the manufacturer did not provide the opportunity to regulate anything. But modern technology provides such an opportunity. How to adjust the ignition on a walk-behind tractor - by changing the gap between the magneto and the coil.
Consequences of an incorrectly set ignition
With early or late ignition, symptoms are observed:
- drop in engine power and vehicle acceleration dynamics;
- difficulty starting the engine (the problem progresses as the air temperature drops);
- increased fuel consumption;
- unstable operation in idle mode;
- overheating and combustion of the working mixture in the collectors;
- the appearance of engine detonation during fuel combustion, destroying pistons and rings.
Late or early ignition increases fuel consumption.
Adjusting the torque using a light bulb
To do this, you need to connect a pre-prepared light bulb with one end to the coil, and the other end to ground.
Turn on the ignition and slowly rotate the distributor clockwise. If the lamp goes out, then everything is correct. If the lamp does not light up initially, then everything is set correctly. Now rotate the distributor counterclockwise. When the lamp lights up, fix the position of the rotor and tighten the fastening nut. Now you can turn off the engine and return the distributor cap to its place.
Methods for setting the ignition timing on a car
To configure the following methods are used:
- using a special device;
- connecting an incandescent lamp;
- by the sound of work;
- by spark.
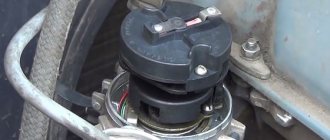
By strobe
A stroboscope is an optical device that allows you to control the moment a spark is fired.
...about diagnostics using a strobe light
To adjust, you need to set the marks on the crankshaft pulley to the required angle and check the position of the slider in the distributor.
Then you should connect the device to the battery (observing polarity) and install the sensor on the wire of cylinder 1. Before checking the correct angle, you must connect an additional cable to the ignition coil terminal connected to the breaker or switch.
Algorithm for adjusting early or late ignition when using a strobe light:
- Clean the surfaces of the pulley and engine crankcase from any dirt covering the ignition adjustment notches. The position of the marks depends on the car model.
- Start and warm up the engine to operating temperature.
- Remove the distributor cap and make sure the slider is in the correct position.
- Press the button on the side of the device and direct the light mark onto the pulley; the applied mark should not jump and be perceived as stationary. Assess the position of the light spot relative to the notch on the front cover.
- Adjust the angle (if necessary) and recheck the settings.
The stroboscope controls the moment of spark supply when determining early or late ignition
According to the control light
In the absence of special equipment, the owner can set the ignition using a light bulb. The technique is characterized by reduced accuracy and is used for repairs on the road. To perform the work you will need a 12 V incandescent lamp, a socket with wires 400-500 mm long and a set of wrenches.
To find out when the spark is fired, you need to:
- Set the piston in cylinder 1 to the upper position (for example, according to the marks on the gas distribution mechanism drive or along the notches on the crankshaft pulley or flywheel).
- Connect the light bulb to the terminal on the coil connected to the breaker or switch.
- Connect the opposite wire to the negative terminal of the battery or body.
- Loosen the distributor, turn on the ignition and rotate the assembly until the lamp turns on.
- Tighten the fastener and check that the settings are correct.
Aurally
When adjusting, the technician detects signs of early or late ignition by rotating the distributor relative to the base with the engine running and warm. It is necessary to achieve maximum idle speed without dips, and then tighten the distributor mounting bolt.
... about hearing diagnostics
The technique is not highly accurate, requires experience and good hearing from the tuner, and is used in case of roadside repairs.
By spark
The technology is identical to adjustment using a lamp, but involves removing the spark plug from 1 cylinder (the piston is at the top point). Then you need to turn on the ignition and rotate the distributor, determining the moment the spark appears. Then you should tighten the fastening, install the spark plug in the well and check the correct operation.
What equipment will you need?
A complete list of required equipment is presented below:
- crooked starter or ratchet wrench;
- a flat-head screwdriver equipped with a wide, powerful blade;
- open-end wrench 12×13;
- a set of different probes;
- rubber cone plug;
- spark plug key;
- vehicle operation and repair manual from the manufacturer;
- strobe;
- protective gloves and closed shoes;
- surface degreasing agent and lubricant;
- cloth rags and paper towels.
Checking for correct installation
After setting the angle is completed, it is necessary to check:
- Warm up the power unit to operating temperature and drive onto a flat, straight section of the highway.
- Accelerate with gear shifts up to a speed of 50 km/h.
- Stabilize the movement, and then sharply press the throttle pedal.
If the settings are correct, a brief knock will appear, indicating detonation combustion of the mixture. The absence of sound indicates a delay in the pulses, and prolonged detonation indicates an early spark. In this case, it is necessary to make additional adjustments and recheck the result.
What needs to be considered in order to make the correct adjustment
You can do it once over a long period of time, for example a year or two, or you can do it monthly, and in some cases more often. All this depends on whether the conditions necessary for the successful completion of the undertaking are met:
- Before starting the adjustment, you need to make sure that the entire set of spark plugs is in working condition.
- Clean the breaker contacts, check its condition and gaps.
- BB wires must be in good condition. They must not be damaged; the spark plug caps, ignition coils and contacts with the distributor must be in perfect order.
- The vacuum ignition drive must be connected and it must be free-wheeling.
Only if all these instructions are followed can adjustments be made.
This is interesting: Do-it-yourself replacement of valve seals
Adviсe
- When carrying out any work on a car, it always makes sense to clean the removed parts and troubleshoot them before reinstalling them.
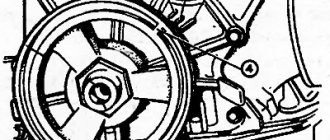
- Thoroughly clean the scale on the flywheel and, to make it easier to read, mark the center mark corresponding to TDC with a white or yellow marker.
- Remember that you are working under the hood of your vehicle with the engine on (or off). Take all necessary safety precautions, including wearing protective gloves and closed shoes, and avoiding loose clothing that could become caught in moving engine parts.
Sources
- https://proautoprom.ru/kak-vystavit-zazhiganie/
- https://carrepair7.ru/kak-vystavit-zazhiganie-na-dvigatele
- https://bumper.guru/klassicheskie-modeli-vaz/elektrooborudovanie/zazhiganie/kak-vyistavit-zazhiganie-na-vaz-2106.html
- https://ru.wikihow.com/%D0%BE%D1%82%D1%80%D0%B5%D0%B3%D1%83%D0%BB%D0%B8%D1%80%D0%BE %D0%B2%D0%B0%D1%82%D1%8C-%D0%B7%D0%B0%D0%B6%D0%B8%D0%B3%D0%B0%D0%BD%D0%B8% D0%B5
- https://remkasam.ru/ystanovka-zajiganiia.html
- https://avto-idea.ru/remont/zazhiganie-rannee-ili-pozdnee-sposoby-regulirovki-zazhiganiya/
- https://carnovato.ru/kak-vystavit-zazhiganie-na-vaz-2106/
- https://djago.ru/sistema-zazhiganiya/kak-vystavit-zazhiganie/
- https://scart-avto.ru/remont/zazhiganie-rannee-ili-pozdnee-sposoby-regulirovki-zazhiganiya/
Testing
Testing can be done using a special device - a strobe light. The positive terminal of the strobe light must be connected to the positive terminal on the car battery. This ensures convenient and simple further adjustment of the system. Next, you need to find the tip of the high-voltage wire on the distributor cap in one of the cylinders and carefully remove it. Next, we carry out the adjustment by connecting the negative ignition terminal to the negative terminal on the battery.
With the utmost care, insert the strobe sensor into the cylinder and connect it to the wire located in this cylinder. Let's start the engine. Now we observe the engine flywheel, on which the flow of light from the strobe will create a stationary mark. If the ignition parameters are set correctly, the point will be located between the flywheel notch and the previous division. If the readings are different, then you need to slightly loosen the distributor mount for the flywheel. After the point is finally set in the desired position, remove and disconnect the sensor from the cylinder and reassemble the parts in the reverse order.
Warning:
- Before performing work, you need to wait until the engine cools down;
- The distributor parts are live. If the distributor or spark plugs are faulty, you may receive a painful electric shock.
Be extremely careful when performing this work. Good luck.