- cap for the fitting of the bleeding hoses from the clutch release cylinder;
The brake master cylinder repair kit should be used if malfunctions occur in its operation. More about them later.
Signs of a faulty master cylinder
There are a number of objective signs indicating that the GTZ is faulty. These include:
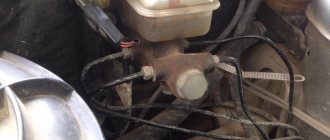
- The appearance of brake fluid on the housing of the vacuum brake booster at its junction with the main brake cylinder. The reason for this is that the low-pressure collar cuff in the GTZ has failed, as a result of which its replacement is required.
Brake master cylinder device
Knowing the structure of the brake cylinder, you can easily cope with its repair by using the necessary elements from the repair kit. Most modern cars use a GTZ, consisting of two sections, each of which is responsible for the operation of a pair of wheels. In the case of a front-wheel drive vehicle, one circuit works with the front left and rear right wheels, and the other circuit works with the front right and rear left wheels. If we are talking about rear-wheel drive cars, then one circuit is responsible for the front brakes, the second for the rear. The use of two circuits makes the braking system much more reliable.
The brake master cylinder consists of the following parts:
- Frame. It contains all the working mechanisms of the cylinder.
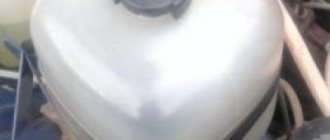
- Expansion tank. Its task is to supply the hydraulic system with working fluid.
- Working tubes designed to pass fluid through a circuit.
- Pistons. Thanks to it, the necessary pressure is ensured in the system.
- Return springs. They work as a counterweight to the pistons, lifting them and holding them in their initial position provided there is no resistance.
- Cuffs and rings for sealing. Their task is to ensure the required level of tightness both in the cylinder and in the hydraulic brake system as a whole.
- Differential pressure sensors. They transmit information to the ECU, which, in turn, informs the driver about any malfunctions in the hydraulic braking system (pressure drop, low fluid level, etc.).
Without knowledge of the principle of operation, you will hardly be able to check that it works correctly. So we further suggest understanding how the GTZ works and checking its serviceability.
Algorithm of operation of the main brake cylinder
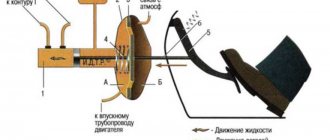
The main task of the GTZ is to convert the pressure available on the vehicle's brake pedal into hydraulic pressure of the brake system using the working cylinders. That is, it is the main distribution link, thanks to which the working fluid is supplied to the actuators.
When you press the brake pedal, pressure is created in the line, causing the vacuum booster rod to push the first piston of the cylinder, which closes the compensation hole. As a result, the pressure in the first and then in the second circuit increases. And the voids that arise during the movement of the pistons are filled with working fluid. In this case, the movement of the pistons themselves will continue as long as the return spring allows it.
When the maximum pressure in the circuits is reached, the brake mechanism is activated. After the driver removes his foot from the brake pedal, the springs return the pistons to their original position, and the pressure in the system normalizes (becomes atmospheric). There is an expansion tank in the system where the brake fluid returns, thus preventing the creation of vacuum in the system. If one of the cylinder circuits fails, the other will continue to operate, providing braking, although with less efficiency.
Checking the brake master cylinder
The design of the brake master cylinder involves the use of rubber sealing parts, which periodically fail and become the main problem during testing. Therefore, if the brake system has problems described above, it is necessary to check its operation. And you need to start with the GTZ. The check is performed in the following sequence:
- It is necessary to check for drips on the body, as well as for cracks on it.
- Next, you need to check the tightness and condition of the cylinder sealing elements. For any amount of repair work carried out, it is necessary to replace all rubber seals that are included in the repair kit for the main brake cylinder.
If the check shows changes in the operation of the gas turbine engine, then without waiting for it to completely fail, we recommend repairing it by replacing some elements from the repair kit. Please note that it can only be used to fix minor problems (for example, brake fluid leaks).
If the cylinder mirror is damaged , that is, scratches, cavities or other damage appears on it, then it becomes unrepairable. The only way out in this case is to completely replace it.
Repair and replacement of the brake master cylinder repair kit
After you have found out the cause of the breakdown, you need to buy a repair kit for the brake master cylinder. They are divided into two main types - complete and incomplete. Some cars require an additional special key (for example, for a VAZ 2110). The complete set includes: plastic cones for installing new cuffs on the piston body, washers, springs, boots, all the necessary cuffs. If the kit is incomplete, then, as a rule, it only includes GTZ cuffs.
How to change the brake master cylinder repair kit? The algorithm for performing the work is as follows:
GTZ repair kit for VAZ 2108-2109
- Remove the negative terminal from the battery and the terminal from the brake fluid reservoir. This is done so that the electronic control unit does not display an error message in the future.
- Next, you need to drain the working fluid from the system. This is done using a medical syringe and tubes. Some liquid will still remain in the system, so prepare a rag in advance to remove drips. All disconnected pipelines must be “plugged”.
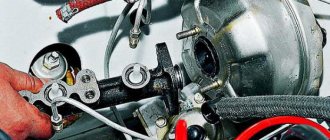
- After this, you need to start removing the GTZ itself. This process will literally differ slightly for each car model, so it is impossible to give definite recommendations within the framework of one article, but one thing can be said with confidence that it is screwed to the vacuum seal with only two studs.
Further repairs to the brake master cylinder must be carried out on a workbench. As practice shows, major repairs of the gas turbine engine in a garage are impossible or do not bring the desired results. Therefore, we will limit ourselves to considering the case of replacing rubber seals from the brake cylinder repair kit.
Main brake cylinder VAZ-2109: device, diagram and reviews
The main brake cylinder of the VAZ-2109 is necessary to ensure the normal operation of the cylinders and calipers, which clamp the pads and stop the car.
The design of the entire system is quite simple - there are no frills like a traction control system, and you won’t even find sensors signaling excessive pad wear. The condition of the elements must be monitored by the driver. To help him, there is only a level sensor on the expansion tank. When the brake fluid level drops below a critical level, a warning light on the dashboard will light up.
Further dismantling
Holding the caliper in a vice, unscrew the two bolts under the Torx head and remove the guide pins. After this, the assembly unit splits into three parts: a movable bracket, a brake cylinder and a fixed bracket.
All these three parts must first be cleaned with a brush clamped into a drill. Then you need to proceed to the main part of the repair - restoring the mobility of the piston. To remove it from the brake cylinder, do the following:
- Using a flathead screwdriver, remove the retaining ring that secures the boot. Thanks to it, dirt does not get inside the mechanism.
- Remove the VAZ-2108 caliper boot.
- Remove the piston. Ideally, it is removed using compressed air, which is supplied to the brake fluid supply hole. If the compressor is not available, then the piston is removed using pliers. It is necessary to apply efforts alternately to opposite sides so that there is no distortion, which will complicate dismantling.
- Remove the bleeder fitting.
- Remove the sealing ring between the piston and the cylinder walls.
Algorithm for removing the GTZ VAZ 2108
- Remove the reservoir cap from the brake fluid and brake fluid, remove the reservoir from the brake fluid, using something wooden to remove it from the seat.
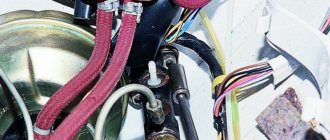
- To prevent brake fluid from getting on electrical wiring and other elements, you need to place some kind of rag under the turbocharger. After this, use a special key, which eliminates the possibility of “licking” the edges, to turn off the pipes.
TJ is toxic, leaves stains on clothes, plastic, rubber. It is better to leave marks on the tubes with paint or a marker.
How to disassemble the GTZ VAZ 2108?
Once the brake master cylinder is removed, disassembly can begin. Provided that you are not going to completely change the GTZ, but only want to change worn out elements (rubber seals, cuffs and brake pistons). Check the condition of the parts and, if necessary, replace faulty parts. The pistons are removed simply by hand or by supplying compressed air to the nozzle of the second chamber; the openings of the tank must be closed. Before assembly, make sure there are no burrs or scratches on the surfaces of the cylinders; if there are any, you will have to completely replace the VAZ 2108 GTZ.
If repairing the VAZ 2108 GTZ is impractical and you are going to completely change the master brake cylinder, then put the brake reservoir on it and put everything in place. Further details on how to install a new GTZ on a VAZ 2108.
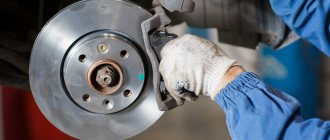
Caliper device
In the family of front-wheel drive VAZ cars, disc brakes and, accordingly, calipers are installed only on the front axle. There are drum brakes at the rear.
The VAZ-2108 caliper is clearly visible if the steering wheel is turned all the way and the wheels are at an angle to the car’s axis. It is also clearly visible with the front wheels removed. The massive part that fits the brake disc is the caliper. It consists of the following elements:
- Fixed metal bracket. It plays the role of a frame on which the entire structure is assembled. Attached to the steering knuckle.
- Movable bracket. It moves relatively movably with the help of connecting fingers that serve as guides.
- Working cylinder. It is an oblong part that houses a hydraulic piston. It is fixed to the movable bracket of the brake caliper - VAZ 2108. The working cylinder has a fitting for pumping and bleeding air. As well as connection to the hydraulic brake system.
- Brake linings. Using cotter pins, they are fixed in a movable bracket.
In addition to the listed parts, there are several bolts that are used to secure the caliper.
Replacement of VUT
First, remember that repairing the vacuum booster is impossible. This unit is removed and replaced with a new one. In theory and in practice, some do. But at your own responsibility.
Now about the replacement itself.
- Disconnect the brake pedal from the booster rod. The units are connected to each other by a pin. Dismantling is carried out in the area of the pedal assembly and here you will need a simple flat-head screwdriver.
- Let's go and open the hood.
- Disconnect the power supply to the brake fluid level sensor.
- Remove the bracket that holds the hydraulic lines to the frame. A 10mm socket is useful, which is used to unscrew the nut.
- Disconnect the brake master cylinder. To do this, unscrew the 2 nuts holding it to the vacuum unit. Assess the condition of the GTZ. If necessary, replace it too.
- It is not necessary to disconnect the hydraulic lines from the brake cylinder (master). The pipes are quite long, so they can easily be moved to the side so that they do not interfere with the work process.
- Disconnect the pipe that connects the vacuum chamber to the intake manifold.
- Remove the spacer from the front struts.
- Unscrew the 4 nuts that hold the vacuum housing to the car body studs.
- Remove the unit from the studs and pull it out through the engine compartment.
- On the drive fork side, there is a seal with a bracket on the return of the amplifier. He secures the assembly to the frame with 4 studs. They need to be removed. To do this, use a 17mm head to remove 2 nuts, after which the iron structure is removed. Just pull it towards you. Be sure to pull the boot off the stem.
- Install the mounting bracket and a new rubber seal onto the new vacuum booster. Now you can begin full reverse assembly.
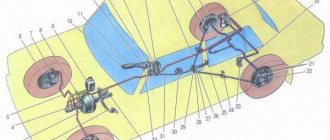
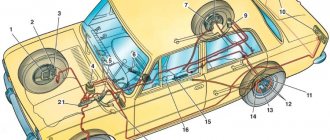
Brake system design
There are only two circuits in the system; they operate relatively independently. In other words, if something suddenly happens to one of them, the second one continues to work. In this case, the main brake cylinder of the VAZ-2109 may even have a leak. And if it is not fatal, then the car will continue to operate normally. Of course, when operating on one circuit, you will feel some inconvenience - the car will definitely move to the side when you press the pedal.
In addition, braking efficiency becomes extremely low. Therefore, you cannot drive with faulty or leaking brakes. The main element is the main brake cylinder of the VAZ-2109, it is with its help that the force you apply to the pedal is converted into fluid pressure. The actuators are cylinders on the rear wheels and calipers on the front wheels. With their help, the pads and drums are pressed against the discs and brake the car. But now in more detail about what the rear and front brake mechanisms are.
Checking status
The corresponding signs may indicate the need to change the vacuum booster or the brake master cylinder.
The primary sign of VUT failure is an increase in the force that must be applied to the pedal to brake.
To be sure of the problem, perform the following check:
- Turn off the engine;
- Press the brake pedal 5-6 times in a row;
- Press the pedal to the floor;
- Start the engine;
- If the VUT is working properly, the pedal will immediately go up.
Checking the condition
If you have a VAZ 2109 carburetor engine under the hood, you can determine the VUT malfunction a little differently in the initial stages:
- Initially, the pedal will work normally, you will have to apply a little force, braking occurs normally;
- But at the same time the engine stalls at idle;
- When you press the brake pedal, the idle speed calms down;
- By pressing the gas in neutral gear, failures occur in the carburetor;
- If such symptoms are observed, with the engine running, remove the pipe from the VUT fitting and plug it with your finger or other available tool;
- Has the idle speed stabilized? In this case, replacing the vacuum seal cannot be avoided.
If such a malfunction is detected while driving, you can continue driving only if the VUT is turned off.
Basic technical information about the braking system
Replacing the cuff of the main brake cylinder VAZ 2109
To have a practical understanding of the functioning of the car braking system, it is necessary to at least roughly consider its structure. So, the vehicle consists of:
- axles;
- bearings (there are two of them);
- wheel hub;
- brake disc.
VAZ 2109 disassembling the main brake cylinder
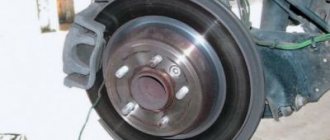
When the car moves, not only the wheel rotates, but also the brake disc.
Note. The main thing is to practically understand how the brake disc reduces the rotation speed. It is the brake pads, which are located next to the disc, that are the starting point for activating the vehicle. As soon as the disc is clamped on both sides by the pads, due to friction forces its speed either decreases or stops altogether.
In this case, it is useful to know that:
- In order for the brake pads to press the TD, pistons are needed, which in turn directly press the pads themselves. The pistons themselves are enclosed in the brake cylinders. As soon as they are filled with a specialized liquid, the pistons begin to press the pads, and they, in turn, directly press the disc itself. Thus, due to the creation of a high degree of friction, the speed of the vehicle is significantly reduced, and sometimes it stops altogether.
- When a driver presses the brake pedal, it begins to push the rod, which in turn pushes the piston, which compresses the specialized brake fluid. As a result, the created brake fluid pressure is directed directly to the wheel cylinder. This fluid then presses on the brake pistons, which in turn exert pressure on the brake pads. Thus, the braking system functions on almost all cars from the national manufacturer.
Note. It is very important to understand, at least in general terms, the holistic mechanism of functioning of the car braking system. To do this, you need to thoroughly study the information described above.
The nuances of operating the brake system
VAZ 2109 master cylinder
- While the brake pads rub against the disc due to a high degree of friction, they wear out (thinner) over time and lose their functional ability. Due to this phenomenon, it is necessary to regularly replace the pads. Replacing brake pads is a simple procedure, however, if possible, it is better to entrust it to a specialist and a car service center.
- There is another practical subtlety in operating the brake system, namely: a special reservoir is installed above the main cylinder, which stores a supply of brake fluid. This brake fluid can often leak, and in order to avoid getting into an extremely awkward situation, you need to periodically check the brake fluid. You can determine the level of brake fluid visually; to do this, simply visually inspect the level of brake fluid in the spare tank.
What problems occur
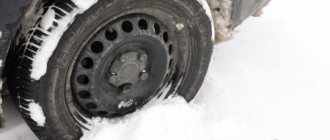
When the VAZ 2108 caliper starts to malfunction, the braking behavior of the car changes. She may skid instead of moving straight. This is especially noticeable in winter - the car begins to turn when braking.
The next sign is that the master cylinder piston is stuck in the working position. In this case, there will be a constant sound of the brake linings rubbing and a very high temperature of the brake disc. Moreover, such a malfunction can lead to its deformation. This happens when a car with a hot brake disc drives into a puddle. A sharp change in temperature leads to warping of the surface. As a result, a beating sensation begins to be felt when braking. The foot on the brake pedal will feel a jolt.
The reasons leading to malfunction can be of two types:
- Rust. Due to deep corrosion, the brake piston stops working normally. It either gets stuck in the initial position, which leads to weak braking, or does not return to its original position, which is why the brake linings constantly rub against the disc.
- Caliper deformation due to impact. In this case, the piston jams due to the incorrect position of the parts in the assembly unit.
In the case of corrosion, you can try to restore the performance using a VAZ-2108 caliper repair kit. Deformation resulting from an impact cannot be eliminated by repair - only replacement of parts.
Replacement of VUT
First, remember that repairing the vacuum booster is impossible. This unit is removed and replaced with a new one. In theory and in practice, some do. But at your own responsibility.
Now about the replacement itself.
- Disconnect the brake pedal from the booster rod. The units are connected to each other by a pin. Dismantling is carried out in the area of the pedal assembly and here you will need a simple flat-head screwdriver.
- Let's go and open the hood.
- Disconnect the power supply to the brake fluid level sensor.
- Remove the bracket that holds the hydraulic lines to the frame. A 10mm socket is useful, which is used to unscrew the nut.
- Disconnect the brake master cylinder. To do this, unscrew the 2 nuts holding it to the vacuum unit. Assess the condition of the GTZ. If necessary, replace it too.
- It is not necessary to disconnect the hydraulic lines from the brake cylinder (master). The pipes are quite long, so they can easily be moved to the side so that they do not interfere with the work process.
- Disconnect the pipe that connects the vacuum chamber to the intake manifold.
- Remove the spacer from the front struts.
- Unscrew the 4 nuts that hold the vacuum housing to the car body studs.
- Remove the unit from the studs and pull it out through the engine compartment.
- On the drive fork side, there is a seal with a bracket on the return of the amplifier. He secures the assembly to the frame with 4 studs. They need to be removed. To do this, use a 17mm head to remove 2 nuts, after which the iron structure is removed. Just pull it towards you. Be sure to pull the boot off the stem.
- Install the mounting bracket and a new rubber seal onto the new vacuum booster. Now you can begin full reverse assembly.
Drive unit
Drive shaft, CV joint (grenade), Outer CV joint, Inner CV joint, Right CV joint, Left CV joint, CV boot, Tripoid, CV joint nut, Retaining ring, Cardan, Crosspiece, Suspension bearing, Cardan bearing, Elastic coupling, Axle, Front axle, Rear axle, Axle reducer, Gearbox bearing, Gearbox oil seal, Differential, All-wheel drive sensor, Haldex coupling, Differential bearing, Differential oil seal, Planetary gears, Axle bearing, Axle shaft, Axle shaft bearing, Axle oil seal, Axle shank, Shank bearing, Axle bearing, Transfer case, Transfer case, Transfer case oil seal, Transfer case bearing, Transfer case chain
Replace or repair?
Please note that the cost of a VAZ-2109 brake cylinder is about 500 rubles. And it doesn’t matter whether you change it or carry out repairs, you definitely need to drain the liquid. And pumping cannot be avoided. But if you replace the rubber O-rings, there is a considerable probability that the spare parts from the repair kit (usually made in China, or even worse - underground) will turn out to be unsuitable. And do not forget that there is a groove on the inner surface of the cylinder that will not allow the required pressure to be developed. Therefore, replacing the VAZ-2109 brake cylinder is the most suitable option.
vote
Article rating
Necessary tools for repair
To remove the brake caliper VAZ 2108, and then disassemble and restore it, you will need the following tools and materials:
- Balloon wrench.
- Open-end wrenches or heads with a knob for 8, 13, 15, socket wrench for 17.
- Internal Torx for a 15 or 16 bolt, wrench for removing brake hoses. It differs from a conventional open-end nut in that it covers the nut more completely.
- Vise.
- Repair kit for calipers. Suitable for VAZ 2108 - 21099, VAZ 2113 - 2115, Kalina, Grants. The only thing you need to pay attention to is the diameter of the wheels. The VAZ-2108 requires a repair kit for models with 13-inch wheels.
- New guide pins. Often after use they have slight deformations, as well as traces of deep corrosion, which prevents the floating bracket from moving freely. Therefore it is better to replace.
- New bleeder fittings.
- Drill with wire attachment for cleaning rust.
- Solvent, paint, corrosion converter, rags.
- Compressor. Not required, but recommended.