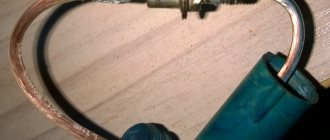
Now the opportunity arose to install wires of a “normal” cross-section. Everyone probably noticed what a “thick wire” goes to the body from the negative side of the battery. I personally picked up a 0.5V drop on this miracle wire. Mine feels like a 4-, but this is not a lot of money, it’s the only MINUS on the body!
As I know from stories on 9s there was a minus from the box to the body. I didn’t find this in myself. With the help of one good person, whose name is Alexey. A kg25 power cable and tinned lugs were purchased. This cable sat in my house while I raised my friends’ ears who could help crimp the ends humanly. I gave up soldering after reading what people ended up doing. What happened was that the cable was tinned 10cm from the soldering point.
Everything is great but something is missing. It is necessary to protect the junction of the wire and the tip to avoid moisture and other garbage.
The vehicle's electrical network is connected to a common “minus”, or mass, which is the entire body. That is, the body as a mass on the VAZ 2114 represents a single source of negative charge. And the source of negative charge is the connection between the case and the negative terminal of the battery.
If the wires connected from the electrical network to ground oxidize (come off), problems arise with the electronics, engine or control system. In case of typical “mass” faults, for example, “blinking” of the rear lights instead of turning on the turn signal or poor cranking of the starter, first check the condition of the wires connected to ground and contact points.
Where is the mass of the ecu for the VAZ 2114
The first ground pin from the ECU on cars with a 1.5 engine is located under the instruments on the power steering shaft mount. The second terminal is located under the instrument panel, next to the heater motor, on the left side of the heater housing.
On cars with a 1.6 engine, the first terminal (mass of the VAZ 2114 ECU) is located inside the dashboard, on the left, above the relay/fuse block, under the sound insulation.
The second terminal is located above the left screen of the center console of the instrument panel on a welded stud (fastened with an M6 nut).
All studs have no corrosion protection other than factory paint. When the paint comes off, the stud rusts. Pay attention to the condition of the stud and treat it with protective lubricant.
Charge the removed battery
- Before charging, clean the battery and, if necessary, remove the oxidative film from the terminals with sandpaper.
- Connect the charger to the battery by connecting the positive wire to the terminal with the “+” sign and the negative wire to the terminal with the “-” sign.
- Connect the charger to the network.
- Turn on the charger.
- Turn off in reverse order.
In automatic chargers, a full charge takes 4-6 hours, and the voltage and current are determined automatically by the device itself.
Maintenance-free batteries are charged in conventional chargers using the constant voltage method. The optimal voltage for charging is considered to be 13.8-14.4 V; it is safe for any condition of the battery and the stage of its discharge. The current strength is set by the charger and depends on the condition of the battery.
In the first hour, the battery gains 50-60% capacity, the second - 65-80%, the third - 71-88%. The battery is charged to 90-95% in 4-5 hours. Charging stops when the current drops to 0.2 A.
Problems with bulk wires
How do problems with ground contacts manifest themselves?
Engine
If the ground wire from the ECM is oxidized or disconnected, this manifests itself in a spontaneous change in operating modes or the car suddenly stalls. Poor contact from the torpedo causes unstable engine operation at idle.
If the contact is broken, the battery charge deteriorates, the starter speed decreases during startup, problems arise in the ECM, because the second ground wire from the battery goes there. To correct the violation, first check the tension of the nuts securing the thick wire to the engine.
Reasons for battery drain
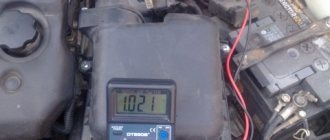
The condition of the generator can be tested at a car service center. Stereo amplifiers, alarm systems and radio tape recorders usually act as power consumers. To determine the causes of the voltage drop, diagnostics are carried out with a fully charged battery, setting 10-20 amperes on the multimeter.
If leaks are not detected, the range is reduced to 2 amperes, and then, if necessary, even lower. Significant leaks are considered to be consumers of 600 mA and above.
Current leakage is most likely caused by energy-hungry cables connected to the cigarette lighter. Most often these are cables from chargers to tablets, GPS navigators, and mobile phones.
Additional ground wires
An additional ground wire from the dashboard can be routed from the cigarette lighter ground to the inner metal base of the center console of the dashboard. As a rule, the additional weight of the VAZ 2114 from the torpedo is installed if the car has a standard dashboard. The cross-section of the additional wire must be at least the same as that of the standard wire.
You can check which panel you have by looking at the mounting of the ECM controller - with a plastic adapter between the controller and the metal base, and the presence of a diagnostic connector in the standard place under the ashtray (behind the decorative plug). If both signs are present, you have a standard panel.
Additional wires are often installed on cars with high mileage. Such cars often have ground problems, and instead of searching, owners install new wires, for example, on the alternator with the battery, or on the metal part of the center console with the battery, to prevent battery charge from leaking.
Knowledge of where the ground is located on the VAZ 2114, what signs indicate poor contact with the ground and the ability to troubleshoot problems will always be useful in order to prevent serious damage to the electronics and engine of the car in time.
Power supplies
On the vast majority of modern cars, the power source is a three-phase alternating current synchronous generator driven by the main engine; three-phase alternating current from the generator is supplied to the built-in three-phase rectifier and voltage regulator circuit - in modern cars the voltage regulator is built into the generator housing. A car battery is used to provide constant and continuous power to some consumers when the engine is not running, such as lighting, car radio, brake lights, anti-theft alarm, as well as to fully power all vehicle systems when the engine is started. After starting the engine, the battery is recharged from the generator, and then it works in a buffer with the generator, smoothing out voltage drops when connecting powerful consumers. The generator power of a modern middle-class passenger car ranges from about 900-1300 watts.
Older cars used DC generators that were larger and heavier than three-phase generators; To maintain a constant voltage, a relay regulator was used, consisting of three devices - a voltage regulator, a current limiter and a reverse current relay.
In a number of cases, on special-purpose vehicles, as well as on armored vehicles, an additional generator driven by a separate internal combustion engine (the so-called auxiliary power unit) is installed, which makes it possible to supply consumers with electricity regardless of the operation of the main engine.
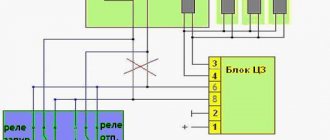
These include: switches and switches, relays, fuses, connector blocks, distribution and switching boxes, as well as power units.
How to replace terminals on all VAZ cars?
Removal: 1. Let's start with the fact that all the terminals are made differently and they hold the wires in different ways, some in the middle part clamp the wire, and some in the side, some terminals are connected to not even one, but two or even three wires (You can see a striking example in the photo below), after you look at your terminals and understand how many wires they hold, proceed to disconnect all the wires from the terminals, the side wires are easily disconnected, just unscrew the bolts that hold them and after that removed the wires from the terminal (Bolts are indicated by red arrows), but the middle wire (the largest) is the hardest to disconnect from the terminal and there are two options, either saw it at the root (as close as possible to the terminal, in the place indicated by the blue arrow), or cut the middle part that holds the wire (see small photo), in the first case you must take into account the fact that by cutting the wire it will become shorter and therefore immediately try on whether the terminal will reach the battery terminal after it is combined with this wiring, The second option is the best, but only for it you will need additional ones. tools, because you won’t be able to cut the metal with just anything (As a last resort, try using a hammer and a large flat screwdriver; if the metal is old, it will break it and the wire will be removed, but you will only have to remove the wire completely so as not to damage the car when you hit you will hit a screwdriver with a hammer).
Electricity consumers
Vehicle systems, depending on model and configuration:
- ABS - anti-lock wheel system (anti-skid automatic braking)
- SRS - safety system (airbags, belt tensioners, etc.)
- EFI, ECM - electronic engine management systems
- Electronically controlled automatic transmission
- Trip computer
- and other
Lighting devices
Main article: Car lighting devices
Automotive lighting devices are divided into external and internal.
- External ones include headlights (with low and high beam), side lights, turn indicators (combined with hazard warning lights), brake lights, reversing lights, license plate lights, fog lights, contour lights, spotlights, and in some cases decorative lamps.
- Internal lamps include interior lighting lamps, engine compartment lamps, trunk lighting lamps, glove box lighting lamps, instrument panel lighting lamps, etc.
Other consumers
- Starter
- Ignition system
- On-board computer
- Electric power steering
- Fan motors, windshield wiper drives, power windows, etc.
- Heated glass
- Parking sensors (parking sensors)
- Reversing cameras
- Seat servos
- Cigarette lighter
- Radio (radio), TV, multimedia entertainment system
- Sound signal
- Anti-theft alarm
- GPS navigator, built-in or separate,
- Seat heaters,
- as well as other auxiliary and information systems and devices.
Some types of household appliances, also adapted for use in a car, can receive power from the car's electrical network (connection is made either through a special socket or through the cigarette lighter socket). For this purpose, various adapters are used - from the simplest voltage dividers to switching power supplies with double current conversion. But the cigarette lighter socket was not initially designed to connect consumers other than the heating element of the “electric lighter”, so blown fuses and thermal damage to the socket are common (it is necessary to calculate the permissible current consumption based on the cigarette lighter fuses).
Putting the battery back into the car
Step-by-step instruction:
- Inspect the terminals attached to the ends of the battery cables to make sure they are clean and free of corrosion. If not, clean them up using a terminal cleaning tool. There is a special tool on sale that fits onto a stand, with another brush that is inserted into the clamp. In its absence, a sturdy wire brush can do the job. The cleaner the clamps, the better the connection.
- Try on the battery so that the red positive terminal matches the positive terminal and cable location.
- Reinsert the battery. Secure it with the clip or retaining system you removed earlier.
- Remove the plastic covers that cover the battery terminals and install anti-corrosion washers on them.
- Apply a thin layer of grease to the terminals before connecting the positive terminal for the first time. A special anti-corrosion lubricant can be purchased to prevent the formation of fluffy greenish-white corrosion that can actually prevent the battery from charging. As a last resort, use regular Vaseline. Using a wrench, tighten the connector until it stops. Then repeat the same steps for the negative post and terminal.
- Try rocking the battery slightly. If it moves, tighten the clamp or retaining system. You have finished installing your car battery.
Source
The principle of operation of the device and its diagram
The electric generator acts as an autonomous source of energy in any car; it is designed to evenly recharge the battery.
If the generator fails or wears out, the battery stops receiving the required amount of energy and cannot ensure stable operation of the technical component of the machine. As soon as its charge runs out, the vehicle stalls. Starting a car after something like this is not the easiest task. To get a visual representation of the operation of the electric generator, you will need its diagram. The VAZ 2108 generator diagram is shown in the figure
All elements that are important in the operation of the device are numbered on it.
- Electric generator.
- Negative diode.
- Spare diode.
- Positive diode.
- Battery discharge control lamp.
- Instrument block.
- Voltmeter.
- Mounting block.
- 100 ohm backup resistors.
- Ignition relay.
- Ignition power.
- Battery battery.
- Capacitor.
- Rotor winding.
- Voltage controller (available only in car models produced before 1988).
VAZ 2108 generator diagram. 1 - generator; 2 - negative diode; 3 - additional diode; 4 - positive diode; 5—battery discharge warning lamp; 6 — instrument cluster; 7 - voltmeter; 8 — mounting block; 9 — additional resistors of 100 Ohm, 2 W; 10 - ignition relay; 11 — ignition switch; 12 — battery; 13 - capacitor; 14 — rotor winding; 15 - voltage regulator
The electric generator on the VAZ 2108 is located under the hood of the car; it operates using a special belt. The main reasons for equipment failure are:
- brush wear;
- charging relay failure;
- diode bridge malfunction;
- rotor shaft bearing stopper.
Selecting terminals when replacing
There are a large number of battery terminals available on the market. Before replacing the old terminal, you need to know how to select a new one.
The part must match the size of the electrodes on the battery, otherwise it will not fit or tighten. The size of the terminal should be such that when tightened tightly there is a margin of 3-5 mm.
It is also necessary to match the diameter of the hole for the high-voltage wire, which must be tightly secured in the terminal.
When choosing the material from which the terminal is made, preference is given to lead. It has good conductive properties, is soft enough for crimping and does not form a galvanic couple with the battery electrode. If you cannot find these, you can use brass or copper.
Those who use modified acoustic systems in their car, with a large number of components, should pay attention to the terminals that have additional places for attaching power wires.
There are also kits on sale that consist of a terminal with a pressed wire. This replacement option is preferable, but requires more effort.
If your car does not have a protective cover for the positive terminal, it is advisable to purchase it separately. It will protect the connection from foreign moisture, dust, as well as from accidental short circuit of the “plus” to ground.
An important role is played by the ability to quickly remove the terminals from the battery, since when carrying out repair work or a short circuit occurs in the electrical wiring, you need to turn off the power to the car.
Basic principles
Regardless of the type of engine used, the basis of the wiring used in the VAZ 2110 car is the same. It's easy to find a diagram, but not so easy to understand.
Let's look at the basic principles of wiring.
- All equipment and devices powered by electricity in the VAZ 2110 are based on a single-wire connection. VAZ designers specially provided for wires of certain colors to each be responsible for their own functions. Therefore, certain equipment is connected using wires of their own color. This allows you to independently understand the wiring, make it easier to carry out repair work and not spend money on car repair services.
- The downside to the VAZ 2110 is that the mass is the car body itself.
- The positive wire of the batteries on the top ten always comes only in red. Therefore, when making repairs, try not to change the color of the wire, so as not to confuse yourself.
- For each system that is connected to the electrical system, it is equipped with its own separate wiring harness.
- The VAZ 2110 is designed in such a way that when the battery is turned on, all electrics and electrical equipment are energized. This is related to the most common recommendation, which you have seen more than once in our materials, where we described the repair or replacement of certain components - disconnecting the negative terminal from the battery.
- Do not forget about the existence of the so-called contactless system. This system is required to create a high-quality spark, which is simply necessary to ensure combustion of the air-fuel mixture. In order for a contactless system to function, high voltages are indispensable.
Carburetor models
The first versions of the VAZ 2110 model, which the domestic plant began to produce, were equipped exclusively with carburetor engines. Only after some time more modern injection versions appeared. They are objectively better. But this does not take away the fact that many have dozens of them under the hood with a carburetor.
Are there any significant differences in terms of electrical circuitry between a carburetor and an injector? We can say no. The carburetor systems used are almost entirely the same as on the more modern version.
Also, you will not encounter serious problems in the form of electrical wiring if you suddenly want to replace a carburetor engine with an injection engine or equip the car with additional electrical equipment. You will even find identical plugs in the engine compartment.
The only nuance of switching from a carurator to an injector is the need to install additional wiring from the fuel pump to the on-board computer.
Causes of broken or loose terminals
- Frequent removal of the battery or “throwing away” terminals. To connect the battery to the car, terminals made of soft metals such as lead, copper, aluminum, and brass are used. Due to frequent removal and installation, their clamping force disappears, and in some cases the terminal is completely destroyed
- Too much effort
when tightening. Despite the fact that the metal is soft, when tightening too much force, the terminals can crack or break off
- High heat. If there is poor contact or problems with the wiring, the terminals may become hot, causing them to become deformed.
What manufacturers say
Car repair and operation manuals directly indicate the need to remove the negative terminal from the battery when carrying out repair work, including those not related to electrical wiring. During repairs, there is a risk of wire breakage or insulation damage. It is especially important to disconnect before performing electrical welding work. When welding, currents of tens and hundreds of amperes flow through metal parts with powerful surges of voltage. By disconnecting the negative conductor, we are guaranteed to open the power circuit of all consumers at once, thereby eliminating the possibility of unwanted currents flowing through them.
A lead-acid battery can retain its charge for a long time. When preserving the car or putting it into long-term storage, it is advisable to disconnect the battery from the on-board network. The fact is that even with the ignition turned off, there is a small consumption of electricity by on-board systems, such as an alarm system, a radio tape recorder, and some electronic units. Current leakage, together with self-discharge, can completely discharge a working battery within 3-6 months. In addition, the on-board network of a car under voltage that has been left unattended for a long time is unlikely to add peace of mind to the car owner on vacation or a long business trip.
It should be borne in mind that with the removal of any terminal, all systems are de-energized. The alarm system, tracking beacons, multimedia system, remote door opening key fob, and electric central locking will not work. If the car does not have or is disconnected a mechanical lock that allows the key to open the door or hood, you need to take care of how to open the car and get inside after disconnecting the battery and closing the hood.
Removing the voltage from the multimedia system (radio) will most likely lead to its blocking with the requirement to enter an unlock code.