VAZ 2110 error codes are presented numerically on the display, and they are transmitted from phase sensors to the on-board computer. This is convenient, but a novice driver will not understand much and will not be able to figure out how to use this equipment. But you need to know and be able to do this, since the system, thanks to the built-in self-diagnosis function, will help to identify a malfunction in the early stages, which means it is possible to eliminate it in a timely manner.
Diagnostics
There are two ways to diagnose the condition of car systems. Let's start with the first one, which does not involve the use of additional equipment.
To start the self-diagnosis function, you need to press a button that resets the mileage for the day. Turn on the ignition. You will see how the arrows on the instruments begin to move from one position to another. This means that the diagnostics of the VAZ 2110 has been launched and information has begun to flow from the phase sensors to the ECU. After the process is completed, the RAM will transmit numbers to the display that will show the state of the car’s systems.
VAZ 2110 car
Decoding combinations
When the self-diagnosis is completed and the number 0 is displayed, this means that everything is in order with the vehicle and all systems are working as expected:
- if 1 is displayed, this indicates that there are problems with the microprocessor or the RAM is failing;
- 4 — high voltage in the network, more than 16 V;
- if 8, then low.
If there is not one fault, but several, then a figure equal to the sum of faults will be displayed. If 6 lights up, then this will mean the sum of the numbers 2 and 4. If 14, then most likely there are three malfunctions at once, namely 2, 4 and 8.
The simplest diagnostics that is available to the driver without the use of additional equipment. It will, of course, help identify some faults, as well as show the condition of the components and systems of the VAZ 2110 as a whole. But to specifically identify all faults and decipher information coming from phase sensors, additional tools are needed. For example, the on-board computer STATE, which provides more data.
Daily mileage reset button
Diagnostics using additional tools
To diagnose cars, including the VAZ 2110, various equipment is used, which is connected to a special connector. Thanks to this equipment, which is not particularly complicated or expensive, you can get a complete picture of the condition of the car.
The service station uses a personal computer to which data from phase sensors is transmitted via a special cable.
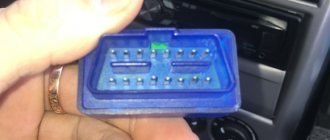
Adapter for car diagnostics
Bluetooth devices have appeared on the market that allow diagnostics using a smartphone, tablet or laptop.
They work according to the scheme. The device is connected to the connector, the ignition is turned on and the diagnostic process begins. The data comes from phase sensors to the ECU. From it to a mobile device on which specialized software must first be installed.
This makes it possible not only to obtain more data, but also to present it in a more visual form. This method allows a driver, even with little experience in operating a car (in our case, a VAZ 2110), to obtain all the data about his car.
But most drivers prefer to carry out diagnostics at a service station. So that you are aware of the data that the on-board computer produces through RAM from the phase sensors, we will present the transcripts of common errors.
Decoding combinations
If problems arise with electrical equipment, they must be corrected immediately. Error code 1602 will indicate that not everything is in order in this matter.
Sometimes error 1602 can simply be reset and does not appear in the future. Socialists call such data “good.”
Error 1602 sometimes appears if:
- the battery was disconnected for some time;
- there was a voltage surge when starting the engine, for example, in cold weather.
But if error code 1602 appears all the time, you need to check the entire network. Perhaps there is a break. If error code 1602 constantly appears, you can try cleaning the battery terminals. Check if they are securely fastened. Didn't help, error 1602 still appears? Check the circuit. You need to start from the positive terminal of the battery. Start with the electrical fuse and fuse link.
Other combinations
The errors described above are not the only ones. And in practice you can find a large number of different codes:
- P0101-P0103
these codes are associated with the fuel consumption sensor. Most often the device needs to be replaced; - P0116-P0118
- . There may be a problem with the wiring, so it is advisable to first check the power circuit to the sensor; - P0112-P0113
This code occurs when the sensor indicating the intake air temperature is faulty. Often occurs when there is a short circuit in the wiring; - A number of errors (P2122, P2138, P0222, P2123, P0223) indicate problems with accelerator position control;
- P0130-P0134
- the oxygen level sensor in the mixture should be replaced. Before doing this, check the condition of the wiring supplying power to this sensor; - P0201-P0204
- problems with injectors. Possible blockage or short circuit. Be sure to check the wires supplying power to them; - P0136-P0140
, such codes indicate a malfunction in the sensors that control the formation of the mixture in the injection system; - P0326-P0328
- failure of the detonation detecting device. Occasionally may appear when the engine control unit fails; - P0351-P0352, P2301, P2304 all these readings indicate incorrect operation of the ignition coils; usually with these errors the engine stalls;
- P0691-P0692
- failure of the first fan relay operating in the cooling system; - P0485
- erroneous voltage signal coming from the cooling fan; - P0693-P0694
, the second relay of the cooling system has failed. With such a breakdown, the antifreeze may boil and the engine overheats. To avoid a more complex breakdown, you need to fix the problem; - P0422
The converter has failed; the unit needs to be replaced; - P0560-P0563
- faulty voltage in the on-board network, the condition of the battery is checked; - P0627-P0629
- erroneous signal from the fuel pump sensor. If the engine starts, then the problem is in the sensor. A malfunction of the fuel pump itself makes it impossible to start the engine.
These are the most basic error codes.
More detailed information can be found in the file that usually comes with the diagnostic program. All identified defects must be repaired. After which the errors are reset and a recheck is performed. Reset errors
. To reset the controller readings, disconnect it from the power supply. To do this, you need to turn off the engine by turning off the ignition. After which the positive terminal is removed from the battery, after 10-15 seconds it is put back in place. All errors have been cleared. You can start the engine and carry out control diagnostics.
Step-by-step instructions for diagnosing a VAZ-2110 with your own hands
To carry out computer diagnostics of a VAZ-2110 car, it is recommended to contact specialized car services that have all the necessary equipment at their disposal. However, this approach has several significant drawbacks. Firstly, the procedure for identifying faults in a service station can be quite expensive. Secondly, unscrupulous technicians have a bad habit of embellishing the results obtained and claiming faults that actually do not exist.
That is why in this article we will look at how to do computer diagnostics of a VAZ-2110 with your own hands, provide detailed step-by-step instructions and help you minimize costs.
What is needed to diagnose a VAZ-2110
So, to check your car for faults, identify injector failures and on-board computer errors, you will need the following:
- an adapter designed to connect the ECU (electronic control unit of a car) with a PC, as well as display all the results obtained on the display of a tablet, smartphone or laptop. When purchasing an adapter, you should definitely take into account all the features of the car, since these devices are not universal. For VAZ-2110 cars, the ELM327 model would be an excellent choice;
- a cable that allows the adapter to be connected to a personal computer and the vehicle’s diagnostic connector. Its length should be no more than 5 meters, so be sure to take this requirement into account when choosing equipment for diagnostics;
- laptop or tablet. Many experts strongly recommend using a portable laptop computer, which will provide you with complete freedom of action in the process of carrying out diagnostic work;
- software. Its most current version can be easily found on the website of the adapter manufacturer or on specialized websites dedicated to the diagnosis and repair of the VAZ-2110.
Troubleshooting methods
What are the troubleshooting options:
- If there is no backlight, you need to check the fuse and replace it if it is blown. All failed light bulbs must be replaced.
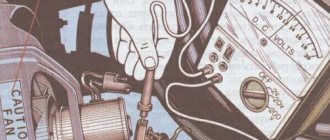
- If the sensors are not working, you should check the integrity of the wiring with a multimeter or other tester to check the wiring. Damaged sections of wires also need to be replaced.
- If the car interior is humid, over time this can lead to oxidation of the shield contacts. If such a malfunction occurs, the contacts must be cleaned or replaced.
- If the problem lies precisely in the inoperability of the instrument cluster, then it is better to entrust the repair to specialists. It is possible that in the process you will have to resolder some elements, so if you do not have experience in carrying out such events, then contact an electrician (the video was shot by Alexey Lipatov).
Instructions for dismantling the tidy
So, how to remove and disassemble the device for its subsequent repair or replacement:
- To begin, you will need to use a Phillips screwdriver to unscrew the two self-tapping screws located on the top trim.
- After this, you also need to unscrew two more bolts, they are located on the bottom of the lining.
- Then you need to carefully detach the cover and put it aside.
- Next, the connectors with wiring from the buttons located on the sides of the device are disconnected. This will allow you to move the trim to the side.
- Only after these steps can you unscrew the two bolts that secure the tidy to the center console. They are located at the ends.
- Then you need to carefully slide the combination back, parallel to disconnecting it from the metal plates installed on top.
- For complete dismantling, you also need to disconnect the two connectors with the wiring on the back of the panel. Having done this, you can remove the device from the mounting location and begin repairing or replacing it. The assembly procedure is carried out in reverse order.
Photo gallery “Removing the tidy with your own hands”
Features of computer diagnostics of a car
How is diagnostics carried out using all the equipment and software listed above? A detailed description of this procedure will help you answer this question:
- diagnostic software transmits a request to the car controller via the adapter;
- the controller, in turn, provides all the necessary information about the state of the main on-board systems of your car;
- the software analyzes the data and displays the result in the most readable form;
- Using information on the Internet, you decipher error codes obtained as a result of diagnostics and identify problems with certain components and mechanisms of the car.
Data is transferred to the computer via the ODB II protocol. It has a number of disadvantages, but the VAZ-2110 is quite suitable for diagnosing a car, since domestic cars are equipped with significantly less electronic equipment than modern imported equipment.
How to choose the right service for diagnostic and repair work
In the age of computer technology, information about self-diagnosis behavior is widely available. Private salons and services are not uncommon, as are craftsmen working on the road. If a problem arises with the operation of your car, it is important to understand whether you can fix the problem yourself or whether it is better to seek the help of a professional. Not all workshops have licensing documents from the manufacturer or certification to provide services. The result of dishonest work will be poor functioning of the ECU or other components of the diagnostic system.
You have every right to demand documentation confirming the qualifications and professional level of employees, their ability to handle special equipment and the electronic system of the car. For computer diagnostics, it is important to have the appropriate equipment, for example, a stand with which work is carried out in parallel with a laptop. It is thanks to the stand that the information will be more accurate and a comprehensive picture of the condition of the machine will be revealed. You should not pay money to specialists who offer the service of flashing the on-board computer or controller to change the technical characteristics of the car.
Main types of computer diagnostics
The adapter, which is connected to the on-board computer system and your laptop (or tablet), allows you to carry out the following types of diagnostic work:
- assessment of the technical condition of the engine. It will allow you to find out why the power unit suddenly loses its original power, and will also help you understand why fuel consumption increases and problems arise with starting the engine;
- suspension diagnostics, which is simply necessary if problems arise with the maneuverability of the car, tires wear unevenly, or extraneous sounds appear while driving;
- checking the condition of the automatic transmission. You will not need this function, since the VAZ-2110 is equipped with “mechanics”. However, it is of great importance for diagnosing other machines.
How to independently diagnose a VAZ-2110
The last question that remains to be addressed in our article is the sequence of diagnostics of the VAZ-2110. It looks like this:
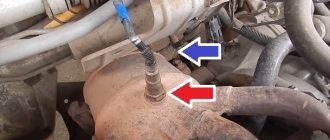
- connect the adapter to the ODB diagnostic connector, which is located under the steering column;
- turn on the tablet or laptop, on the screen of which the diagnostic results will be displayed;
- turn on the car ignition. To check the engine and suspension, as well as to display the necessary information on the display, a mandatory power supply to the on-board network of the machine is required;
- launch the software and get the results of diagnostic procedures;
- We decipher error codes and determine malfunctions of certain components and mechanisms of the car.
As you can see, there is nothing complicated in self-diagnosis of the VAZ-2110. You can easily navigate all its intricacies without having the appropriate knowledge and skills, you will be able to identify existing problems without contacting car services, and you will be able to significantly reduce the financial costs of servicing your car.
Traffic rules
According to the Rules of the Road, a driver in the dark is required to illuminate the side lights on his vehicle when moving. At this time, the instrument panel is also illuminated.
Causes and repairs
The left side parking lights and instrument panel lights are connected through fuse F1, and the right side lights through F11. Both are rated for 5 Amps.
Sometimes the backlight may not work. In this case, you need to check fuse F1, which is located in the passenger compartment on the driver's side in a special block. You also need to check fuse F11.
If the fuses are normal, you need to check all the wiring and lamps on the dimensions.
Computer diagnostics
For computer diagnostics of the VAZ 2110, you will need a KKL adapter (other names 2KL, KL, K-line).
More often this adapter is found under the name “VAG Com 409.1 KKL”. In this abbreviation, “VAG Com 409.1” is the name of the program that comes on the disk along with the cable. This program is intended for diagnosing Audi, WV - it will not be useful to us.
To connect the VAZ 2110 to a computer, download and install the OpenDiag program.
In general, there are quite a large number of programs for connecting a VAZ using a KKL adapter, you can install everything and choose the one you like. OpenDiag is a free program, the project is in constant development. New blocks are constantly being added and functionality is expanding. The program almost completely implements diagnostics of ECUs of VAZ family cars, as well as support for many ECUs of the GAZ/UAZ/ZAZ families.
How can you tell if your car is faulty?
There is a special lamp on the instrument panel with the inscription CHECK ENGINE. When you turn on the ignition, it lights up, and until you start the engine, a special program reads data from all systems and components of the car, thus transmitting data to the on-board computer to identify faults.
After you start the engine, the lamp should go out, but if it stays on for another 10 seconds, it means that some problems have been identified and error codes have been entered into the on-board computer programs. Communication with the controller is carried out using the diagnostic block.
CHECK ENGINE control signal on the instrument panel of a VAZ 2110
Malfunctions and repairs
Instruments or indicators may fail. This could be part of the indicators or even the entire speedometer. VAZ 2110 owners rarely encounter this situation, since the dashboard works properly, especially in domestic cars. Before changing the instrument panel or repairing individual parts, you should make sure that the sensors are working properly - we use the on-board computer.
Inaccurate installation leads to failure of elements. On the instrument panel board, the parts are attached using simple rivets, hence the negative result. The body is constantly subject to vibrations, so the installation simply “falls apart” and breaks appear in the circuit. Repair in this case involves soldering the rivets and thoroughly cleaning the contacts.
Removal of the upper part of the instrument panel
- It is necessary to remove the plug; the board does not need to be disconnected from the case.
- The next step is to apply flux to the places on the board with arrows (photo below). Both pads also need to be removed and thoroughly lubricated.
Arrows indicate. where re-soldering is required.
- Prepare the solder, bring the soldering iron to the desired temperature and begin soldering. During the process, you can hear a creak - these are the rivets “sitting” on the board.
After soldering is completed, the instrument panel can be returned to its place. If you have free time, you can go through the contacts using sandpaper. On older cars they usually oxidize, which can prevent the devices from functioning properly.
You can see how to remove the dashboard in the video below.
Source
Calculation of codes
Most often, diagnostic program codes are “deciphered” using a special device. However, on VAZs it is not so difficult to do it yourself.
ECU January 4 for VAZ 2110
The diagnosis itself goes like this:
- Connect contact “B”, which has the diagnostic block and “ground”;
- Turn the ignition key to the third position, do not start the car;
- First, the aforementioned “CHECK ENGINE” lamp flashes code 12 three times in a row. It, in fact, does not signal any malfunction, but simply shows that the diagnostic programs are working. On the VAZ 2110 this happens in this order: the lamp blinks briefly once (which should be considered the designation of number 1). After a pause of at least two seconds, it flashes twice in a row (two). So we got the number two. And this is repeated three times so that the driver can understand these signs;
- Now you need to be careful not to miss any faults. After the diagnostic program has declared its serviceability, it will begin to display error codes, if any. In the same way - flashes and pauses.
Installing a new adapter
Modern adapters elm 327 with the OBD-II program (puncture) are suitable for the VAZ 2110 . You can also install them yourself. First you need to purchase an elm 327 and a cable for it. You already know the location of the diagnostic connector. Be sure to study the instructions, which indicate the pinout of the block and the location of each connector.
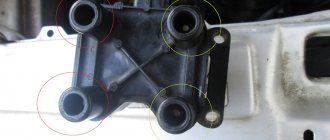
Connection diagram for ELM327 to 12 PIN diagnostic block
The pad can be removed quite easily. Insert your own cable into each connector of the block, making sure that the pinout of the elm 327 complies with the manufacturer’s instructions. Check that each connector is connected correctly and each cable is in the correct place. After this, the block is installed in its place.
Connecting the diagnostic connector to the block
Fault detection programs for elm 327 can be downloaded on the Internet, many of them in a free version. Now your VAZ is ready to detect errors in various car systems, and you can always download error codes from us.
Connecting the diagnostic connector to the block Connecting the diagnostic connector to the block
Dashboard diagram
Connection diagram taken from the VAZ 2110 operating manual.
The figure above shows the connection diagram of the instrument cluster. That is, using this diagram you can determine the connection location on the dashboard of the faulty indicator. You will need it if you have to change, for example, the battery warning lamp due to a malfunction. But in addition to the wiring diagram, you also need a pinout diagram, which is described below.