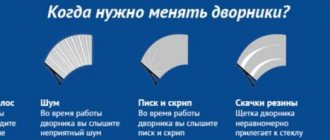
When to change
The cabin filter is an integral part of the car's interior heater. Therefore, it is recommended not to delay replacing it. Neglecting a change can be disastrous both for the car’s heater radiator and for your health.
The manufacturer recommends replacement every 10,000 km. Or before the change of seasons. A clogged filter will have poor air flow, which will affect the air flow coming out of your car's air ducts. In winter this can result in a lack of heat in the cabin, and in summer it can result in a lack of air conditioning cooling.
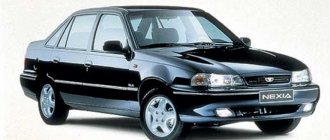
What cabin filter is installed on Lada Priora
So, if the car is equipped with Halla air conditioning, the following filters will suit you:
- /2170 Priora/ Fc-011 HALLA (Legion)price from 140 RUR
- /2170 Priora/ with air conditioning HALLA (Tolyatti) price from 250 rub.
- /2170 Priora/ FS-6 with air conditioning. HALLA (Kilometer) price from 130 rub.
If the panasonic air conditioner fits the filters:
- Cabin filter /2170 Priora/ Fc-011 Panasonic (Legion) price from 150 rub.
- Cabin filter /2170 Priora/ with air conditioning. PANASONIC (Moscow) price from 300 rub.
If the car does not have air conditioning, you can select one of the following filters:
- /2170 Priora/ without air conditioning (Fortech) price from 200 rub.
- /2170 Priora/ without air conditioning coal (Fortech) price from 220 rub.
- /2170 Priora/ without air conditioning (Pilenga) price from 200 rub.
Once we have decided on the choice of filter and purchased it, we can begin replacing it.
Charcoal or regular?
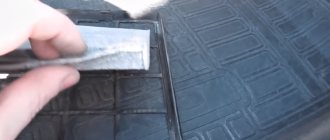
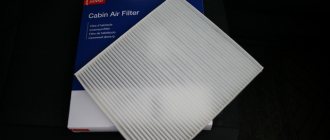
Carbon filter on the left, regular on the right.
There are two types of filters on the market: carbon and regular.
Charcoal is a little more expensive than regular paper. The difference between a carbon filter is that it fights car exhaust gases much more effectively. For example, when standing in a traffic jam with the interior heater working, the car will suck in air from the exhaust gases of cars standing nearby.
A regular paper filter will not be able to effectively deal with this problem and will allow the smell of exhaust gases to enter the cabin. Coal will cope with this task perfectly, and will kill particles of exhaust gases, leaving them on the other side of the car interior.
So when choosing, you should rely on the operation of the car, but if the car is rarely used in traffic jams, then you can get by by installing a regular paper filter.
Manufacturers and prices of analogues
The following list of analogues is known for the air-purifying elements of the Hull air conditioner on Priora:
- QML CF1007 = 86 rub.
- SibTek AC15 = 115 rub.
- ALPHA FILTER AF5034 = 162 rub.
- TSN 97671 = 96 rub.
- TSN 97672 = 297 rub.
- LGR LGR7409 = 164 rub.
- Nevsky filter NF6008 = 207 rub.
- Nevsky NF6008s = 253 rub.
- BIG Filter GB9937 = 214 rub.
- BIG Filter GB9937C = 275 rub.
- Sintec SNF2170HC = 230 rub.
- Ekofil EKO0416 = 275 rub.
- MITWELL MA2721 = 143 rub.
- Goodwill AG932CFC = 188r.
- LGR LGR7412 = 242 rub.
- LGR LGR7410 = 221r.
- Fortech FS017 = 265 rub.
- Fortech FS017C = 355 rub.
- Analogues for Panasonic:
- BIG Filter GB9957C – 265 rub.
- BIG Filter GB9957 – 234 rub.
- SibTek AC0416C – 195 rub.
- Fortech FS054C – 266 rub.
- Fortech FS054 – 224 rub.
- QML CF1008 – 107 rub.
- LGR LGR7411 – 231 rub.
- TSN 97739K – 211 rub.
- TSN 97739 – 135 rub.
- Ekofil EKO0417 – 238 rub.
- Ekofil EKO0407 – 128 rub.
- Nevsky filter NF6007 – 259 rub.
- Nevsky NF6007s – 304 rub.
- SCT SAK286 – 277 rub.
- Sintec SNF2170PC – 318 rub.
It is impossible to say for sure that the analogues will last longer and better, but they cope well with their main task - cleaning the air entering the cabin.
Replacing the filter
Below are detailed instructions for replacing the cabin filter on a Priora. There is nothing difficult about this process. This can be done by a person who has no skills in car repair.
On Priora without air conditioning
When performing work, you must do the following:
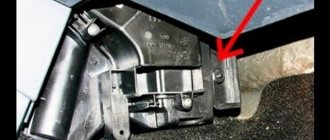
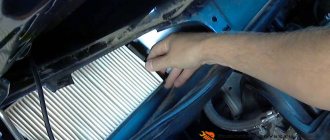
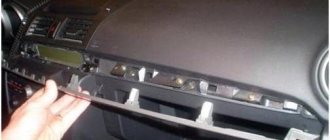
- It is necessary to remove the hood seal as shown in the picture.
- Then dismantle the right side of the Jabot (in the direction of travel of the car) by unscrewing 6 screws. Three screws are located on top of the frill, and the remaining three are under the hood seal.
- Remove the cabin filter cover; to do this, you need to unscrew 4 screws.
- We take out the old filter and install a new one.
Attention:
Install a new cabin filter with the arrows downwards, in the direction of air movement in the Lada Priora stove.
- Assembly is carried out in reverse order.
Video on replacing the cabin filter in Lada Priora without air conditioning
On a Priora with Halla and Panasonic air conditioning
The process of replacing the cabin filter for these climate systems is similar. The only difference is that on the Halla climate the filter plug is secured with a clamp, and on the Panasonic with a screw. Otherwise the process and placement of the filters are the same.
Replacement process:
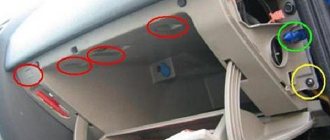
- We unscrew the two bolts securing the sound insulation of the engine compartment.
- Next, remove the cabin filter plug.
- We remove the old cabin filter and install a new one.
Attention
When installing a new cabin filter, the arrows on the filter must be directed towards the expansion tank. Also, for ease of installation of the filter, it can be bent twice at 45 degrees, which will facilitate the installation of a new filter.
- Assembly is carried out in reverse order.
The cabin filter installation is complete.
Types of salon cleaners
Before replacing the cabin filter on a Priora, it is recommended to understand the types of products. They come in the following types:
- Conventional - these are the devices that are installed on Priora cars from the factory. Compressed paper and synthetic fabric are used as a filter element. Such products trap small impurities in the air, dust and large substances. These are the cheapest product options that are used by 80% of car owners. They are white in color and as soon as they turn gray or black they need to be replaced.
- Carbon - such purifiers are impregnated with activated carbon, due to which they have the property of not only trapping various particles, but also filtering air. Coal acts as an absorbent, trapping harmful substances in the air. Such products are not much more expensive than conventional ones, but at the same time they guarantee effective air purification.
- Carbon filters with polyphenol coating - such filters have the property of neutralizing allergens. On one side, the cleaning element is coated with activated carbon, and on the other, with polyphenol impregnation. It is recommended to use if the driver is allergic to any substances that can enter the car interior with the air.
There are more modern cleaners, but conventional and carbon products are available for Priora cars.
This is interesting! The cabin filter removes substances such as asphalt particles, bacterial spores, pollen and salts from the road surface.
Selection and cost of a new filter element
There are 3 types of filter elements for the LADA Priora car:
- For cars not equipped with air conditioning.
- For vehicles containing air conditioning. At the same time, air conditioners in the Lada Priora car are manufactured by Halla and Panasonic (2 different sizes).
The above types of air conditioning systems are by no means interchangeable - in addition to the nuances in design, cost and functionality (we will not consider them here), they have a significant difference in fastening the cabin filter: Halla air conditioners have a plug with a latch, and Panasonic products are fastened using self-tapping screws.
The average cost of a good interior cleaning filter for a LADA Priora car without air conditioning starts from 300 rubles, for systems equipped with Panasonic air conditioning – about 500 rubles, and Halla – about 700 rubles.
However, all three sizes are different, this should be kept in mind when purchasing. The standard size of the Priora filter element without air conditioning is fully compatible with the “decimal” (latest generation).
Let's sum it up
It is better to purchase air purification devices for Lada Priora in specialized stores. When purchasing, you should check the filter for defects and make sure that the selected model is suitable in shape and size.
Cabin filter
After reading the step-by-step instructions for replacing a used Lada Priora filter, it becomes obvious that this is a simple, inexpensive procedure that can be done with your own hands. If an independent change is not suitable for you, you can apply for the service at any specialized salon or auto repair shop. The replacement procedure will cost about 500 rubles.
It must be remembered that the system requires timely inspection, cleaning and replacement. It is necessary to pay attention to the cabin filter both in summer and in winter, because the device not only cleans the air, but is also needed to heat the cabin. You can take the advice of experienced car enthusiasts and carry out an annual replacement once a year, with the onset of spring.
Manufacturer's promises
The creators of the Lada Priora car assure that, having replaced the filter at the beginning of summer, this procedure will have to be repeated at the end of the hot season. Otherwise, the cabin filter on the Priora will stop working properly, and dust particles will begin to penetrate into the cabin. The poor performance of the protective mechanism is especially noticeable on the highway, when the windows are closed and a truck with disgusting exhaust emissions is overtaking.
To ensure carefree travel, the Priora cabin filter should be replaced periodically. The process of changing the cleaning element itself differs depending on:
- Lack of air conditioning system in the car.
- Availability of air conditioning (there are two types).
We will consider each of the subspecies and the sequence of replacement below. The only warning for those wishing to carry out this work independently is confidence in their actions and knowledge. Without additional knowledge, you may not only fail to replace the Priora cabin filter, but also spoil or break other related elements. This can lead to even more expensive repairs.
Life time
The frequency of replacing the cabin filter depends on the operating conditions of the vehicle. The manufacturer recommends replacement every 15 thousand kilometers. The old filter must be disposed of; cleaning and reusing it is not recommended.
- Author of the material
- Other materials
Author Auto mechanic
- Fuelfree fuel saver: scam or truth? (+ real reviews) — 04/26/2020
- Infiniti QX50 (infinity qx50) 2018-2019: review, prices and reviews - 04/26/2020
- Tire markings and full explanation of their designations - 02/04/2020
- Rating of the best crossovers up to 2,000,000 in 2022 - 02/01/2020
- How to pass the traffic police exam the first time: tricks and tips from the inspector - 01/16/2020
View other articles
Replacing the filter element on a car with air conditioning
As in the previous case, you will need to open the hood of the car. Then you will need to find where to attach the filter. In this case, the filter is located behind the engine, and its mounting location is embedded vertically in the engine compartment.
Remove the hood seal. For a more comfortable replacement, disconnect the brake booster pipe. Using a Phillips screwdriver, you will need to unscrew the two screws securing the engine compartment trim. After this, you will see the filter landing site.
Depending on the systems:
- Panasonic. Unscrew the filter cover using a Phillips screwdriver.
- Halla. Press the lid latch with two fingers, then slightly pull the edge of the lid towards you, it will open.
Pull out the used air purifying filter.
There are bend points on the new element (they are located at the top and bottom). This is necessary so that you can install the filter element by bending its three parts alternately. Otherwise, you simply will not be able to install the element.
So, bend the filter element along the slots made on the material, then slowly begin to put it in its place in the cabin. You should not make any special efforts, as this may damage the filter element. Close the locking cover, screw it in with screws (Panasonic), or place the bottom of the cover in the groove and snap the lock onto it (Halla).
Then tighten the engine compartment trim with self-tapping screws.
After this, replacing the filter on a Lada Priora with an air conditioning system is considered complete.
Why is it necessary to replace this element?
Dust in the summer, sand, leaves, dirt - all these particles can get into the cabin when you are at speed. But this is not the only thing that can happen if you do not have a filter installed in your cabin. If the purifier becomes dirty, air from the street will stop flowing into your car altogether. The result is foggy windows, poorly functioning air conditioning, or simply blowing air into the interior.
Therefore, you need to seriously approach the issue of regularly replacing the purifier. It is recommended to control the replacement time according to one of the criteria. Replacement is carried out:
- or once every 20,000 km of travel;
- or every year, before spring.
It is better to be guided by the first option, and your salon will always be clean. In winter, a cabin filter element is also necessary. Because the furnace is also powered by the air conditioning system, and clogged air paths also impair the operation of the furnace.
For greater efficiency, it is recommended to install carbon purifiers.
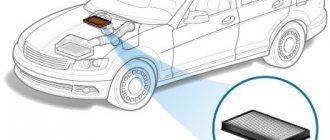
Where is the cabin filter on the Priora?
In order to answer the question of where the cabin filter is located in the Lada Priora, you need to clarify its configuration. If your VAZ-2170 has an air conditioner, then you will find the filter in the front part of the heater.
But if we talk about where this element is located on a Priora without air conditioning, you can even refer to the VAZ-2110 operating manual, because the configuration in this place has not changed since its predecessor family. On Priora trim levels, the norm and standard filter element for the cabin heater is located at the top left of the heater body.
What functions does the device perform?
Actually, the answer to this question is known without any additional explanation. However, it is only worth noting that this element protects not only from dust and carcinogenic substances resulting from car exhaust, but also from the smell of windshield washer fluid. The so-called “anti-freeze” is composed of various chemicals, the inhalation of which can cause headaches. Constant inhalation of such substances can cause serious respiratory diseases.
The cabin filter on the Priora is designed not only to clean the air entering the cabin, but also to eliminate the possibility of clogging the air ducts, heater and air conditioner (if equipped) with various contaminants in the form of leaves, insects, dust, etc. A clogged cabin filter on a Priora negatively affects the operation of the heater fan drive, since a heavily contaminated element does not allow air to pass through, resulting in increased air resistance and accelerated wear of the electric drive.
If you are careless about your health, then you should think about the safety of passengers. And if you nevertheless neglect the rules of the need to regularly replace the cabin filter, then the heater drive may eventually fail, the replacement of which will require significant financial costs.
Video “How to properly change an air purifier?”
User Andrey Frolov shot and published a video that shows in detail the procedure for replacing the cabin filter on a Priora that is not equipped with an air conditioning system.
Good afternoon, dear friends)
Since the epic with the Conder is not yet over, and I still crave, the passion to make cars out of is an ideal, my credo does not lag behind me, I began to study further.) It’s just a small matter:
refill the air conditioner.
Remembering that I did not change the cabin filter, which is one of the most important attributes of high-quality operation of the air conditioner
First I went looking in my city: First store: empty Second: empty Third: yes, but Halla Fourth: yes (Halla),
The seller assured that it would fit on
Panasonic
.
I didn’t argue with anyone, I said that the truth is on your side and left. I went to Likino-Dulevo at 777 (three sevens).
By the way, I wanted to take from Exist,
but after going through the catalog and seeing the prices, I silently closed the page of this store. Attaching photo:
Later I began to study what kind of filters there were, carbon not carbon, I didn’t bother to think about it, I wrote to LPC and based on people’s reviews I decided that people don’t feel the difference, they install any. So I decided so, I changed it today: 6 June
. So let’s say before the summer, I’ll change it somewhere before the winter, then the same.
Okay, you're probably already waiting for photos and how to do all this? Let's get started
!)
We will need: 1) Car: Priora with air conditioning (Panasonic/Panasonic)
Okay, I won’t torment you) Let’s go 1) Unscrew this self-tapping screw:
3) There is a kind of film “eye” on the filter that you need to pull and the filter supposedly should come out, I pulled and left this sticker in my hands and tore the filter (well, after 100 thousand km, of course) I doubt that they changed it before me. If so, Using the gynecologist’s method, we climb there:
Of course, I’m not a car mechanic, but something tells me that he’s a little dirty:
4) Difference between two cabin filters:
5) So, to insert the filter we need to turn it under the spiral, thus
7) Tighten the bar...
Do you want a joke? Do you see how the bar should stand, with open rectangles facing us?
I let's push it in there with the back side, I see it doesn't go in, after 10 minutes of poking, I tried the opposite and voila!))))
From the theory, it seems like everything) All that remains is to drive with the new filter, try to feel the changes and refill the air conditioner)
That seems to be all!) Regarding the fact that I burned in the 10th photo, I won’t say anything yet, but briefly: I hate it!)))) I wish it would all be over soon!)
Have a nice weekend everyone, take care of your cars, keep your tanks full!)LPC, hello!)My evil…
The air filter entering the cabin on Lada Priora cars is located directly in the heater housing, and it doesn’t matter whether your car has air conditioning or without it. But it is worth noting that there are still differences in the design of the stove, and quite significant ones.
And that is why the replacement will be done differently in different versions.
How to choose the right new one
There are two types of air purifiers. Devices with a mechanical cleaning principle are paper cassettes, the fibers of which, due to their special structure, trap dust particles, foreign odors and harmful microorganisms.
Catchers with adsorption filtration type contain activated carbon. They cost a little more than paper ones and provide more thorough air purification. The second type of purifier is recommended to be installed on a car if you are prone to allergies and chronic respiratory diseases.
For more effective air flow filtration, it is recommended to choose multi-layer products that combine paper and carbon layers. They capture coarse and fine impurities well, and also absorb unpleasant odors and chemicals.
The main differences between Hala and Panasonic products:
- The Panasonic climate system has a button to turn on the filter heating; the Halla purifier does not have it.
- The Panasonic device is fixed using a self-tapping screw; in the Hull brand model, a latch is used for this purpose.
- The location of the Panasonic filter capacitor element is on the body, while for Halla it is on the radiator.
- The Halla product has a higher cost.
Without air conditioning
Working with Priora without air conditioning is carried out as follows:
- Remove the plugs on the frill and unscrew the screws. Under the frill you will see screws securing the insulation - they also need to be unscrewed.
- Slowly pull out the rubber seal of the hood and take out the right side of the frill - but it will be more convenient, of course, to take it out completely.
- Remove the inner plastic part of the part.
- In front of you is a cabin filter grille, which is attached with screws - they need to be twisted.
- Remove the cover, under it you will see a cleaning element lying horizontally. You will have to be careful with it: remove it smoothly so that dust does not fall into the heating system. If dust does get in, blow out and wipe the stove.