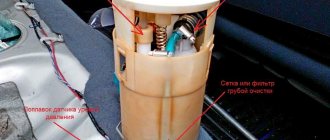
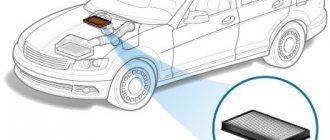
The Nissan Almera G15, like structurally related cars Renault Logan and Lada Largus, is not equipped with a cabin filter. That is, all cars before 2016 do not have this part as standard. Therefore, its installation or replacement often has to be done independently.
Angular cabin filter with cover
Purpose and signs of a clogged cabin filter
We unscrew the seats and prepare the tool (photo)
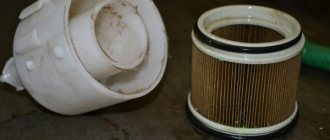
The cabin air filter (CF) consists of a plastic frame (maybe without it) and a fibrous filter element inserted inside. The part is for installing a car heating system unit.
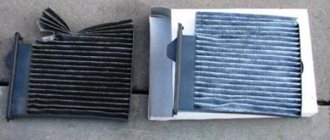
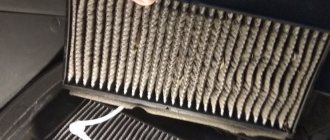
Two types of consumables are suitable for Nissan cars: with carbon and paper filter elements. A simpler paper version is a block of corrugated composite material. Another type contains microparticles of coal. The difference is in the degree of air purification and price: coal copes with the tasks better, but paper costs less.
The filter element cleans the air from dust particles, allergens, soot, and microorganisms coming from outside, but also reduces the concentration of harmful gases in the cabin. In addition, it increases the service life of the Almera G15 air conditioner, protecting its parts from dust.
Regular cabin filter
It is recommended to change the filter element on the Almera G15 every 15,000 km.
It also needs to be replaced if the following problems occur:
- car windows sweat;
- the stove is working worse than usual (a decrease in the performance of a car heater is associated with a decrease in the capacity of the heating system);
- There was an unpleasant smell in the cabin.
When to change, what interior to install
According to the technical maintenance regulations, the cabin filter on the Nissan Almera G15 must be replaced at least once a year. Or when undergoing scheduled maintenance, which occurs every 15 thousand kilometers.
However, when used on Russian roads, within the period specified in the regulations, the cabin filter becomes quite clogged and ceases to perform its functions. Therefore, to ensure normal filtration, owners recommend cutting the time frame for replacing the cabin filter by half.
The ideal option is to change the Nissan Almera G15 cabin filter twice a year, once during the winter season, and once before the summer season. In the spring and summer, it is better to install coal, as it copes more effectively with various allergens and unpleasant odors. And in autumn and winter, ordinary dust is enough.
Although the service book indicates specific terms for replacing the filter element, it is often recommended to carry out the replacement earlier, that is, not according to regulations, but as needed. The basis for replacement are signs of filter contamination:
- When the car is used in the summer on dusty road sections, the filter element becomes much more clogged with fine dust, as a result of which replacement may be required earlier.
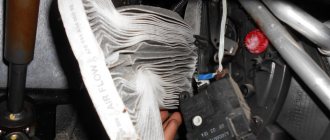
- With frequent idle time in traffic jams, the element becomes clogged with small particles of exhaust soot, as a result of which it may appear relatively clean in appearance, but at the same time the surface acquires a gray color, indicating severe contamination, and permeability is reduced to almost zero.
- In the fall, leaves can get into the air ducts - even a small amount can become a breeding ground for millions of bacteria that cause an unpleasant odor. It is quite difficult to get rid of it; you will need not only replacing the filter element, but also completely cleaning the box.
- Increased air humidity in the cabin (window fogging).
- Reduced ventilation and heating system power.
- Noise appears when ventilation is turned on to maximum.
Suitable sizes
When choosing a filter element, owners do not always use products recommended by the car manufacturer. Everyone has their own reasons for this, some say that the original is unreasonably expensive. Some people in the region sell only analogues. Therefore, there is a need to know the dimensions by which a selection can subsequently be made:
- Height: 42 mm
- Width: 182 mm
- Length: 207 mm
As a rule, sometimes analogues for the Nissan Almera G15 may be a few millimeters larger or smaller than the original, there is nothing wrong with that. And if the difference is measured in centimeters, then of course it’s worth looking for another option.
Selecting an original cabin filter
The manufacturer recommends using exclusively original consumables, which, in general, is not surprising. They themselves are of good quality and are widely available in car dealerships, but their price may seem overpriced to many car owners.
Regardless of the configuration, on all Nissan Almera G15s, the manufacturer recommends installing a cabin air purification filter with article number 27891-AX010 (carbon) or 27891-AX01A (carbon without frame). They are also known under other articles, there are no differences in them, and they are interchangeable:
- 2727700QAA
- 2789100Q0E
It is worth noting that sometimes consumables and other spare parts may be supplied to dealerships under different part numbers. Which can sometimes confuse those who want to purchase an original product.
When choosing between a dust and carbon product, car owners are advised to use a carbon filter element. This filter is more expensive, but it cleans the air much better.
It is easy to distinguish - the paper filter accordion is impregnated with a carbon composition, and therefore has a dark gray color. The filter cleans the air flow from dust, fine dirt, germs, bacteria and enhances the protection of your lungs.
Which analogues to choose
In addition to simple cabin filters, there are also carbon filters that filter the air more effectively, but they are more expensive. The advantage of coal SF is that it does not allow foreign odors coming from the road (street) to penetrate into the car interior.
But this filter element also has a drawback - air does not pass through it well. GodWill and Corteco carbon filters are of fairly high quality and are a good replacement for the original.
However, in some retail outlets the price of the original Nissan Almera G15 cabin filter may be greatly inflated. In this case, it makes sense to purchase a non-original consumable item. In particular, cabin filters are considered quite popular:
Conventional dust cabin filters
- MANN-FILTER CU1829 – high-tech consumables from a well-known manufacturer
- FRAM CF9691 – popular brand, good fine cleaning
- KNECHT/MAHLE LA 230 – considered the best on the market, but the price is correspondingly high
Carbon cabin filters
- MANN-FILTER CUK1829 – high-quality and thick carbon coating
- FRAM CFA9691 – activated carbon
- KNECHT/MAHLE LAK 230 – high quality, above average price
It makes sense to take a closer look at the products of other companies - they also specialize in the production of high-quality consumables for passenger cars:
- Corteco
- Filtron
- SCT
- Sakura
- GoodWill
- JS Asakashi
- Champion
- Zekkert
- Masuma
- BIG Filter
- Nipparts
- Purflux
- Nevsky Filter nf
It is quite possible that sellers may recommend replacing the Almera G15 cabin filter with non-original cheap substitutes with a much smaller thickness. They are not worth buying, since their filtering characteristics are unlikely to be at the proper level.
Installing or replacing the filter element
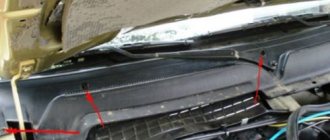
First of all, you need to remove the front passenger seat, then find a rectangular plug under the “dashboard” and carefully cut it along the contour using a sharp construction knife. A small hacksaw for metal is also suitable for this work. At this stage you should be extremely careful: immediately behind the plug, on the left, there is an evaporator, which you do not want to damage. The result should be a rectangular hole with smooth edges. You can clean up the cut line a little.
Carefully cut out the plastic along the contour
After this, the cabin filter is installed in the niche (until it clicks). It is important to make sure that the part is seated all the way and that its filtering surface extends to the entire length of the niche. The interior plastic should not be greatly deformed or burst. If this happens, buy another model and do not use the damaged one. Replacement is much easier. Open the cover, remove the old SF and insert the new one.
Finished hole, evaporator clearly visible
Filters with caps sakura CA18310, azumi AC22204 are suitable for installation on Nissan Almera G15. These SF models are easy to install. You will have to work hard with the remaining articles, since they do not always fit into place the first time or fit in size.
There are many articles of cabin filters that may be suitable for the Almera G15: Alko MS-6283, Bosch 1987432120, Cabin Filter fFS-031 C, Delphi TSP0325178, Eolo G668, Febi 23795, Goodwill AG136 - coal, GUR C1480E, Hengst E2905LI HL, Jakoparts ( Nipparts) J1341015, Knecht (mahle Filter) LA230, Mann & Hummel CU1829 - coal, MAHLE LX 773, Nipparts J1 341 015, Nissan 27891-AX010, Purflux AH207, Zaffo 4800.
All is ready
Almera N15
With this version of Almera there are no particular difficulties when it comes to replacing the cabin filter. Versions of the N15 received a standard paper-type cabin filter from the factory.
It cannot be said that the car has optimal and easiest access to this consumable. But there is no problem in replacing it yourself.
First of all, let's determine where the desired cabin air filter is located. Everything is simple here. You need to look for the element behind the glove compartment, that is, the glove compartment.
Replacing and installing the cabin filter in the case of Almera N15 is as follows:
- First, the glove box is removed. To dismantle it, you need to find two special fastening screws under the glove compartment itself along the edges. They are unscrewed by hand, and it is not difficult to find them even by touch.
- By removing these plastic retaining clips, you can open the drawer, bend it a little and pull it out of its seat. Just remember to remove all unnecessary items from the glove compartment first.
- Now Almera brings another small surprise. This is a metal bar that will prevent you from simply pulling out the filter. The installed limiter is removed after unscrewing 4 screws.
- Armed with a reverse screwdriver or a regular screwdriver, unscrew all 4 fasteners. Move the metal strip aside. Don't lose the screws yourself.
- There is more than one cabin filter located behind the trim. To be more precise, this is one element, but consisting of 2 parts.
- To pull out the consumable, you just need to grab it with your hand and pull it towards you. The presence or absence of a latch depends on whether it has previously been broken. The element is not the most reliable and durable, which is why the Almera N15 often does not have a lock. But this is not scary, since the filter will remain well in its seat without it.
- Having pulled out the first and second filters, which should be positioned vertically, check the opening for contamination. It is wise to use a vacuum cleaner with a flat attachment or blow out the space using a compressor and compressed air. Here you will be guided by the degree of pollution.
- Now you need to take a new 2 in 1 filter and position them correctly. The bottom part is inserted first, and then the second component is installed into the opening.
- Make sure that the arrows on the filter housing are pointing in the right direction. Namely, towards the driver, that is, the arrow is turned to the left.
At this point, replacing the cabin filter is almost complete. All that remains is to screw the metal strip back onto all 4 screws and install the glove box in place.
Installed cabin filter Nissan Almera
It is not recommended to replace consumables in accordance with the established regulations. The figure of 15 thousand kilometers does not correspond to the real life of the filter. Even under relatively moderate operating conditions, the cabin air purifier becomes dirty over 10-12 thousand kilometers, disrupting air circulation and the operation of the stove and air conditioner.
The optimal replacement interval is considered to be from 6 to 10 thousand kilometers. For urban use, it is better to use carbon filters. If you live in the suburbs, drive on dusty roads, but there is no smog or emissions on the scale of a large city, an ordinary paper consumable will do.
Removing a stub
Some Nissan cars do not include a filter, but there is a place for it on the body. There is a plastic plug installed on it. For installation you will need:
- sandpaper;
- hacksaw;
- construction knife.
The place for the filter is marked when assembling the machine with a clearly marked frame on the air duct. The most difficult thing is to stick your head into the hole between the dashboard and the engine compartment shield and the slot with a plastic knife that closes the mounting compartment.
It is important not to trim too much! If you look, a stripe is noticeable 5 mm from the top. It is not recommended to cut above it, since then the filter will begin to dangle. Directly on the filter element itself there is a protrusion, which is a fastener to prevent it from falling out.
When cutting the plug with a hacksaw and knife, you need to be careful near the left side. Keep the blade straight, otherwise you may damage the air conditioner dehumidifier.
The result should be a fairly even hole.
Then the edges of the cut need to be processed with a file or sandpaper.
When installing the filter, most often a lot of debris spills onto the mat. It is recommended to vacuum the inside and directly of the compartment body - the size of the hole for the filter makes it easy to use a thin vacuum cleaner attachment.
In a car with air conditioning, installing a filter in the cabin is usually combined with cleaning it. A large number of aerosol products for disinfecting honeycombs are sold in stores.
You need to insert an elastic nozzle into the filter hole, after which the composition is evenly applied to the entire surface of the climate system radiator, then it simply flows down the drain. You need to wait about 15 minutes and put the filter back.
Diagnostic stages
- Squeeze the handbrake and turn on the ignition.
- Activate the stove heater fan.
- Estimate the volume of air supplied from the deflectors.
- Check and replace the fuse (No. 17) in the mounting block if the heater fan does not rotate when activated.
- Unclip the cover of the glove box housing and remove it.
- Remove the cabin filter housing cover and remove the cleaner.
- Carry out an inspection, assess the degree of clogging of the element. Check for cracks, dents, and damage.
- Use a vacuum cleaner to clean the old element, install a new one, depending on the actual condition of the cleaner.
- Blow out the air ducts with a stream of compressed air.
Checking the ventilation of an apartment building
A properly functioning ventilation system not only provides comfortable living, but also affects the safety of people. Dry and greasy dust filling the channels is highly flammable and produces choking smoke. In this regard, the communications through which fresh air is supplied must be regularly checked and cleaned.
According to sanitary rules, ventilation checks in an apartment building with preventive maintenance are carried out every three months. At least 4 times a year, the management company must inspect communications and, if necessary, bring them to standard condition.
How and when ventilation ducts are checked in residential buildings is determined in Rules 410 (RF RF No. 410 dated). According to paragraph 12 of this regulatory document, it is necessary to analyze the condition of ventilation ducts and chimneys in the following situations:
- when the house is put into operation for the normal operation of gas or heating equipment;
- if the ventilation ducts were repaired or the apartments underwent redevelopment;
- for prevention. As mentioned above, this is done every three months, a week before the start of the heating season and within a week after its completion;
- when poor traction or its complete absence is detected;
- if there is gas equipment in the house and it was installed, maintained, repaired or diagnosed, as well as if emergency dispatch service was provided.
Oil filter replacement process:
- Open the hood and unscrew the oil filler plug.
- Having previously placed a container for collecting waste under the drain hole, unscrew its plug.
- After draining the old oil, you should clean the seat of the drain plug, change the gasket on the plug if necessary, and then screw it into place.
- In order to get to the oil filter, you need to remove the engine protection.
- The old filter is unscrewed using a special wrench. If there is none, you can try to tear it off with a gas gun.
- We inspect the mounting hole and the filter gasket; if there is no damage, it can be reused on a new element.
- Pour a little clean engine oil into the new filter, and then lubricate its gasket with it.
- The new element should be screwed on and tightened only by hand, without applying excessive force.
- Next, fill in the required amount of new engine oil, checking its level using a dipstick, and close the oil filler cap.
- We start the power unit for a few minutes and turn it off. This is necessary to ensure that the oil is evenly distributed throughout the power unit.
- We monitor the oil level and top it up if necessary.
As you can see, there is absolutely nothing complicated in the process of replacing consumables on a Nissan Almera car, and timely implementation of the described procedures will increase the service life of the systems in the design of which they are included.
Recommendations for care and maintenance
- do not violate the deadlines for technical inspection (15 thousand km);
- buy consumables with original serial numbers and articles. A comprehensive list is indicated in the operating manual for your vehicle;
- Order repair services from certified service stations, where they provide a quality guarantee for the work performed. Do not use the services;
- If you find signs of clogging of the element, contact a service station to carry out comprehensive diagnostics using digital equipment (see video);
- do not install spare parts or consumables that are incompatible with the brand of your car;
- Be sure to check the condition of the cleaning element after a long trip through puddles or in the rain. If necessary, dry the element in the sun.
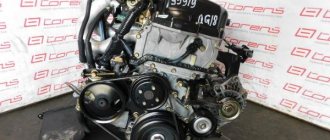
Procedure for replacing the air filter on a Nissan Almera g15
Most often, the air filter in a Nissan Almera G15 is replaced during a routine inspection. However, the driver can handle such work on his own, saving his budget. The replacement procedure is not complicated and consists of several stages:
The procedure for replacing the part itself will not take more than 15 minutes. However, in order for the new part to function like the old one, it is necessary to follow the procedure.
The choice of air filter must be approached with extreme care, since if the dimensions of the part do not meet the standards, the throughput will be minimal, and the engine will become clogged over time and stop working.
Today you can find many models of air filters on sale, which differ in shape, assembly and method of air purification.
Manufacturers of the Nissan Almera g15 recommend installing only the original Nissan part 16546-00QAU. Analogs: Goodwill AG710, Bosch 1457433529, FRAM CA10249, Fortech FA101.
List of necessary tools for replacing the air filter in a Nissan Almera g15:
- New air filter;
- T20 screwdriver;
- Clean rags;
- Cleaning agent (for washing the protective box).
Where is it located?
Finding where the cabin air filter is located in the G15 doesn't require much skill. You just need to look at the central part at the bottom of the panel near the engine compartment partition.
Here is either the part you are looking for, or a plug (if the car does not have this option). In other words, if you sit in the driver's seat, the filter will be on the right side.
The filter installation will make the ride comfortable, so if there is a plug, you need to get rid of it.
The original filter comes without fastening, is inserted and closed with this plug. It’s easy to change, remove the plug, there’s a tab on the filter (convenient) and pull it out