Every driver who has driven a car with an automatic transmission for at least a month is sure that he has thoroughly studied his transmission. However, there are at least three automatic buttons that the vast majority of motorists have never even heard of and never use. What functions are hidden there and how can they be useful?
Question answer
Why are automatic transmissions more economical than manual transmissions?
What is the button on the automatic transmission handle for?
As you know, automatic transmissions are widely used today. Moreover, the modern automobile industry offers a large selection of different types of automatic and semi-automatic transmissions (“classic” hydromechanical automatic transmissions, CVT variators, automatic manual transmissions such as AMT and preselective dual-clutch transmissions).
At the same time, even despite the attempts of manufacturers to simplify the overall process of interaction with the automatic transmission selector as much as possible, owners still encounter difficulties. Often, when changing to a car with an automatic transmission, drivers do not know the purpose of certain additional modes, function buttons, etc.
In this article we will talk about what the button on the automatic transmission lever is needed for and what it is responsible for, as well as what other additional buttons can be found on the selector lever of various automatic transmissions.
Read in this article
This is interesting: How to turn off the Tomahawk z5 alarm without a key fob
Method number 2 - With a battery
The second and no less simple method of testing an RCD for operation is using a regular AA battery. In this case, even an electric kettle can check its functionality. In addition, it will be possible to determine whether the residual current device is working properly in the store when purchasing the RCD.
So, you can independently check the operation of the product as follows:
- Connect a wire at least 10 cm long to one of the poles of the protective automation.
- Place the AA battery close to two wires: you connected the first one, and the second one, as a rule, is installed underneath at the factory.
When the wires touch plus and minus, the RCD should be triggered. If the lever does not operate, turn the battery over and test again. If the residual current device is working properly, the lever should be knocked out, which will indicate the functionality of the automation. You can see in more detail how to check the operation of a protection device using a battery in this video example:
Main (large) button
Big button
VAZ automatic
The main large key is needed to change gears. Without pressing it, you will not be able to change gears on an automatic transmission. On my AVEO, this button is made in such a way that whether you want it or not, you have to press it.
need to press
gear change
Why such buttons for fixing the automatic transmission lever are needed, everything is simple - this is done so as not to accidentally move the selector to an unnecessary position, for example, if you hit it with your hand or dropped something, and a child might pull it. And if you suddenly shift the lever into reverse gear at speed, then it’s not far from a breakdown. This is what the main big button on the automatic transmission lever is for. In principle, this is elementary and everyone knows it.
" " and "-" keys on the lever
Also on the automatic transmission lever you can find the “ ” and “-” buttons; they are made either with a separate “rocking” key (like on my Chevrolet) or with two separate small keys.
“ ” and “-” buttons on the automatic transmission
These buttons activate mechanical modes on the automatic transmission. By pressing “plus” you upshift, but by pressing “minus” you downshift. Some semblance of mechanics, only automatic and without a clutch.
This is such an easy article, I hope it helped you. Read our AUTO SITE.
votes, average: 5.00 out of 5)
How to use "Shift lock"
In order for the button to have the desired effect, you must take the following steps:
- Click on it.
- Do not release until you have moved the shift lever to the “N” position if you need to tow the vehicle with another vehicle.
- Release the button on the machine.
- Then you can push the car or transport it on a trailer.
Read
Which automatic transmission is the most reliable and best, rating of automatic transmissions
Now you know how and where to use this key. It may look different on different brands of vehicles.
For example:
- on Toyota cars you will find it slightly recessed into the selector. And it will be called not just Shift Lock, but “Shift Lock Release”;
- on Kia the switch will be hidden under a special panel. The lid must be opened to use the “Shift lock”;
- There are no identification marks on the Ford Focus and other modifications of vehicles that came off the assembly line of a well-known plant. On the automatic transmission selector of these cars you will find just a button without a name;
- on Nissan Shift Lock looks exactly the same as on Toyota.
Read
Parking with an automatic transmission: parking modes and proper parking with an automatic transmission for beginners
If you need to replace the button, you can contact any auto store. The cost of a key starts from 130 rubles. For Toyota Camry ShiftLock is sold under catalog number 3356333230.
Where is the electrical panel for the meter and automation installed?
The first step is to decide on a place to install the shield. So, experts believe that it is better to fix it near the entrance door in the corridor, because then you will not have to lay the cable from the landing, which will greatly simplify installation.
As a rule, the shield is fixed at the level of visibility of the residents of the apartment - this will allow you to easily take readings and turn off the machines. Therefore, the installation location will differ depending on the height of the household.
Note! There are still electricians who prefer to install meters under the ceiling (as they did before). Old designs were fixed to the wall without drawers, so they were fixed at a height for safety reasons.
Any modern shields have a secure base and are closed with a lock , so strangers or small children will not be able to get there if they do not have access to the keys.
When choosing a location for installation, they also take into account where the cable of the overhead or underground power line will pass from (in an apartment or private house). You can check this information with the employees of the company responsible for electricity.
Buy a ready-made electrical panel or assemble it yourself
Now electricians not only assemble the panels themselves, but also install a ready-made factory version with all the internal contents. Such designs are even made to special order for a specific apartment.
The main point in this matter is the experience of installing branded shields. If the master has already encountered such installation, then there is no need to be afraid. In other cases, it is better to assemble the structure on site, in stages.
Prices for electrical panels
Video - Assembling a panel for an apartment
List of situational moments that require turning on the button
However, if the automatic transmission has gone into emergency mode or the engine has stalled in the middle of a busy highway, you can safely use Shift Lock to, for example, set the rocker to the neutral position. It will be easier for another car to tow your box without harm if there is no tow truck nearby.
Read
Typical problems and repairs of automatic transmission f4a42
Now I will describe situations in which the use of “Shift Lock” on an automatic transmission will be useful to you:
- stopping at a gas station;
- car breakdown requiring towing, as I wrote above;
- stopping in front of the turnstile to deposit money.
Thanks to this key, you can always unlock the automatic transmission and put the rocker in the desired position. By the way, on old boxes, instead of a key, the driver found a hole for the key. The key acted as a “Shift Lock” unlocker, by inserting which it was also possible to change the position of the selector lever on a locked automatic transmission.
Features of connecting circuit breakers
After you decide on the type of machines, you need to connect them. If you follow certain steps, you can cope with this process without any special skills.
Here we will look at the process of step-by-step assembly of an electrical panel for a one-room apartment. First you need to prepare all the tools and components that will be used during the installation process:
Prices for voltmeters
Assembling the shield - step-by-step instructions
Step 1. First of all, we need to place the automation on the top rail, in such a way as it should look after fixing. First we install the switch, then the UZM (protective device), after which three RCDs for different groups (leakage current 30 mA , rated 63.63 and 40 A ).
The first is for 40 A - light, the second is for 63 A - for the hob and oven, the third is for 63 A - for the remaining groups. At the end, one differential machine of type “A” is installed, because such devices are recommended by manufacturers of most household appliances.
Step 2. Next, you need to go to the second rack and place the machines in the correct position. They must be placed strictly under a specific group of RCDs. You should start on the right side.
Step 3. Now the automation needs to be powered together. For such purposes, combs should be used in two configurations. The first is PS-1 for 12 modules. The second is PS-2 for 12 modules. Since we only have 9 modules, the excess section of the comb will need to be removed with a machine with a special disk. So, first you need to power the upper module.
Small button
I’ll say right away that I don’t have one, but on many cars (especially Nissan cars) they have a small key at the bottom under the big one. What is it for? Many people have been tormented by this question for a long time? Everything is also simple, this key activates the OD or Over Drive mode, I won’t focus on it now, but this is one of the operating modes of the automatic transmission and with this button you activate it. In fairness, it is worth noting that sometimes the OD button is sometimes attached to the platform near the automatic transmission lever, or is missing altogether.
small button
Nissan button on the automatic transmission lever
OVER DRIVE on site
This is interesting: How often do you need to change the fuel filter on a Lacetti?
Why and how the performance of the RCD is checked
The main difference between modern electricity distribution networks and their counterparts from the last century is a higher level of fire and electrical safety. The key element that ensures this level of quality is leakage current monitoring devices, so checking RCDs today is included in the list of mandatory operations performed during acceptance and routine tests of electrical equipment.
But control over residual current devices is not limited to laboratory tests alone. Since the life and health of people may depend on the performance of RCDs, they must be checked monthly, which has led to the emergence of independent testing methods.
O/D Off
The second name is Overdrive mode. By default it is disabled and blocks the use of higher gears. The mode status is displayed by a lamp on the instrument cluster or by the backlight of the button: on - off, off - on.
It is recommended to turn on the “Overdrive” mode when driving on the highway at speeds above 80 km/h. This will reduce fuel consumption by reducing the gear ratio between the primary and secondary gears, the engine speed required to maintain speed, and the consistency of the latter.
In the city, it is better not to turn on the mode, since the automatic transmission will often switch between direct and overdrive gears, reducing the life of moving parts.
What are circuit breakers
Automatic switches are specialized devices whose main task is to protect electrical wiring from fire. Of course, they are not able to protect against electric shock or damage to household appliances, but they do control overheating.
Operation is based on the fact that the devices break the electrical circuit in the following situations:
- short circuit;
- a sharp increase in voltage in the conductor (above a certain norm).
Usually the machine is fixed at the entrance, which allows you to protect the section of the chain that follows it. Since all elements are wired differently, protection devices must operate at different current levels.
Manu
Alternative names: Hold, ETC Snow, Snow, current gear lock switch. When pressed, the currently selected gear is blocked from downshifting or upshifting, and a warning lamp in the instrument cluster lights up.
The button can be used in conjunction with the “D” mode and a manually selected gear – values 1, 2, 3, L on the mode scale.
In the first case, the car will start from 2nd gear. This will avoid slipping on ice and snow. In the second case, it makes it easier to climb/overtake and allows you to effectively use engine braking on steep descents, preventing overheating of the brake system elements and saving their life.
Why is leakage current monitoring needed?
Any electrical network is a source of two danger factors: electric shock and the likelihood of a fire due to damage to electrical wiring, but most of the time attention was paid only to the second factor - the fire hazard of the electrical network, and concern for the lives of consumers was entrusted to the consumers themselves.
There are still tens of thousands of apartments in which the only protective device in the electrical wiring is a fuse on the input panel.
The lethal current level is only 100 mA, so at a voltage of 220 V, any damage to the wires in the motor of a washing machine or refrigerator in such an apartment will create a real danger of electric shock. The statistics of medical institutions record many cases when such a possibility turned into a real accident.
Current Hazard Table Electric Shock
This can be avoided if a device for monitoring leakage currents is added to the set of residual current devices. The principle of its operation is simple - if there is a difference between the currents flowing through the neutral and phase conductors, an emergency shutdown occurs.
The definition of “leakage current” in this case means the current that flows from the phase, but does not return to the neutral conductor. In most cases, such an imbalance is a sign of an emergency situation, therefore all modern electrical projects are developed with the mandatory connection of automatic circuit breakers to subgroups of networks with signs of increased danger.
In practice, leakage current monitoring systems today are installed not only on subgroups, but also on the entire network.
It is important to consider that leakage current monitoring devices are not a replacement for short circuit protection circuit breakers. Moreover, they themselves must be protected from overloads, therefore circuits using RCDs must be constructed in such a way that the maximum operating current flowing through the RCD must be greater than the operating current of the residual current circuit breakers.
RCD connection diagrams
Since the level of reliability of protective equipment of this category should be maximum, the frequency of checking their functionality should not be related to the ETL call schedule. The optimal frequency is once a month.
Power
Alternative names – Sport, ETC PWR. When turned on, the gear buttons shift at high engine speeds, and the corresponding indicator turns on on the instrument cluster.
This mode is recommended for use on slopes on the highway, at speeds above 90 km/h. When pressed, the gear will decrease and the car will accelerate.
Which machine to choose
When choosing a device, you should first take into account its maximum permissible current . To do this, you need to calculate what current strength is required for all devices installed in the apartment.
In addition, the thickness of the wiring also matters, since electricity flows through it. The optimum value is required depending on the degree of heating. The presence of poles is also of great importance:
- One . Chains with lighting fixtures and sockets to which only primitive devices are connected.
- Two . It is used to protect electrical wiring that is supplied to large appliances (washing machines, stoves, refrigerators, heating, water heaters). In addition, it is installed for additional protection between the electrical panel and the apartment.
- Three . Relevant in the presence of a network with three phases, which happens at manufacturing enterprises and their own workshops.
The machines are installed in the panel according to the standard principle - from largest to smallest. This means that first they fix the machine with two poles, and only then with one. This is followed by other devices with lower power.
Prices for automatic machines
Video - RCD or differential circuit breaker: what to choose
Overdrive
The automotive industry produces several types of automatic transmissions. These are robotic gearboxes, CVTs, preselective robots with two clutches, as well as hydromechanical automatic transmissions, which are the most common. They have 4 or 6 steps.
Such boxes usually have several selector positions, namely D, R, N and P. The first is “Drive”, which is used while driving, the others are “Reverse”, “Neutral” and “Parking”, which is activated when the car is parked . If you study the console in more detail, you will notice slots for manual mode with “-” and “+” signs, where you can forcefully change gears. However, on old boxes there is another button that is not very noticeable and is sometimes hardly used by the owners. This is an OD (Overdrive) function.
The OD button is usually located outside the selector and placed on the central tunnel, so it is little associated with the operation of an automatic transmission. It is small in size and sometimes marked with a snowflake, hinting that it is recommended to use the OD mode in winter, when the roads are covered with snow. This function allows the box not to go to the highest level and always operate at engine speeds in the range of 2-4 thousand, which makes it possible to always keep the engine at maximum torque. When OD mode is engaged, the 4-speed automatic transmission simply will not shift above 3rd gear. In slushy snow, extra Newton meters won't hurt. High revs also help to effectively brake the engine when releasing the gas.
Question answer
How to slip correctly on an automatic transmission?
The OD button is not always placed directly on the tunnel. Often it is placed on the gearbox lever in some inconspicuous place on the side or bottom of the selector. It is also possible that the automatic transmission does not have an overdrive program at all. On many modern cars it is replaced by a sport mode, which also maintains lower transmission levels for a long time.
What should be in the shield
Both in an apartment and in a private house there are several options for the layout of the shield. This mainly concerns the installation location of the input machine and the counter. In a private house, the meter can be placed on a pole, and the machine can be placed on the wall of the house, almost under the roof. Sometimes a meter is installed in a house, but this is if it was built a couple of decades ago. Recently, metering devices are installed in the house extremely rarely, although there are no regulations or instructions on this matter. If the meter is located indoors, it can be placed in a panel; then when choosing a panel model, it is necessary to take into account the dimensions of the meter.
Read about how to connect electricity from a pole to a house here.
In some apartment buildings, meters are located in boxes on the staircases. In this case, the cabinet is needed only for RCDs and automatic machines. In other houses it is located in the apartment. When upgrading the electrical network, you will have to buy a cabinet so that the meter can fit in there, too, or buy a separate box for the meter with an input machine.
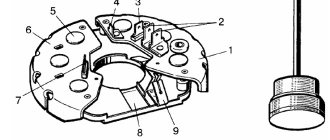
A simple electrical circuit diagram for a small house or apartment
Safety is very important when designing a power supply. First of all, it is provided for people: with the help of an RCD - a residual current device (number 3 in the photo), which is installed immediately after the meter. This device is triggered if the leakage current exceeds a threshold value (there is a short circuit to ground or someone sticks their fingers into the socket). This device breaks the circuit, minimizing the possibility of electric shock. From the RCD, the phase is supplied to the inputs of the machines, which are also triggered when the load is exceeded or when there is a short circuit in the circuit, but each in its own section.
Secondly, it is necessary to ensure the normal operation of household appliances and electrical appliances. Modern complex technology is controlled by microprocessors. They require stable power to function properly. Having observed the voltage in our network for some time, it cannot be called stable: it varies from 150-160 V to 280 V. Imported equipment cannot withstand such a variation. Therefore, it is better to turn on at least some groups of automatic machines that supply power to complex equipment through a stabilizer. Yes, it costs a lot. But during voltage surges, the control boards are the first to “fly”. They are not repaired here, but simply replaced. The cost of such a replacement is about half the cost of the device (more or less depends on the type of device). It's hardly cheaper. When assembling the electrical panel with your own hands, or just planning it for now, remember this.
One example of a panel layout for a small circuit - for 6 machines
The stabilizer is installed on one or several groups and is turned on after the RCD and before the group circuit breakers. Since this is a rather large device, it won’t be possible to install it in a panel, but you can install it next to it.
Also, two buses are installed in the panel: grounding and grounding. All grounding wires from instruments and devices are connected to the grounding bus. The wire comes to the “zero” bus from the RCD and is fed to the corresponding inputs of the machines. Zero is usually designated by the letter N; when wiring, it is customary to use a blue wire. For grounding - white or yellow-green, the phase is carried out with a red or brown wire.
One of the options for an assembled small shield
When assembling an electrical panel yourself, you will need to purchase the cabinet itself, as well as rails (called DIN rails or DIN rails) on which circuit breakers, RCDs and switches are attached. When installing the slats, check with a level that they are horizontal: there will be no problems with fastening the machines.
One of the options for DIN rails in the panel housing
All machines must be connected to each other. This can be done using conductors - connecting their inputs in series, or using a ready-made connecting comb. A comb is more reliable, although it costs more, but if you take into account the time that you will spend connecting all the machines, it is unlikely that a few tens of rubles are of such fundamental importance.
Connecting comb for circuit breakers in an electrical panel: will speed up the self-assembly process
Scheme for several groups
Power supply schemes are not always simple: groups of consumers are divided into floors, outbuildings, lighting for the garage, basement, yard and local area are installed separately. If there are a large number of consumers, in addition to the general RCD after the meter, they install the same devices, only of lower power, for each group. Separately, with the obligatory installation of a personal protective device, the power supply to the bathroom is removed: this is one of the most dangerous rooms in a house or apartment.
It is very advisable to install protective devices on each of the inputs that go to powerful household appliances (more than 2.5 kW, and even a hair dryer can have such power). Together with a stabilizer, they will create normal conditions for the operation of electronics.
Also not the most complex circuit, but with a higher degree of protection - more RCDs
In general, when designing the exact design, you will have to find a compromise: make the system safe without spending too much money. It is better to buy equipment from trusted companies, but it costs a lot. But power grids are not an area where you can save money.
Read how to connect an electric hob here, and about connecting an electric water heater (storage or instantaneous) read this article.
Designations (symbols) on the automatic transmission panel
To learn how to use an automatic transmission correctly, you first need to understand what the alphabetic symbols (English letters) and numbers on the automatic transmission panel with the gear shift knob mean. Let us immediately note that depending on the brand of car, numbers and letters may vary.
- “P”
– “parking”. It turns on when the car is parked in a parking lot. A kind of analogue of a parking brake, only with the shaft blocked, and not with the brake pads pressed. - "R"
- "reverse". Turns on for reverse movement. It is usually called “reverse speed”. - “N”
– “neutral”. Neutral gear. Often called “neutral”. Unlike the “P” parking mode, in the neutral “N” mode the wheels are unlocked, so the car can coast. Accordingly, the car can also spontaneously roll downhill in a parking lot if the wheels are not secured with a hand brake. - "D"
- "drive". Forward mode. - "A"
- "automatic". Automatic mode (practically the same as “D” mode). - “L”
– “low” (low). Low gear mode. - "B"
- Same mode as "L". - «2»
– driving mode is not higher than second gear. - «3»
– driving mode is not higher than third gear. - "M"
- "manual". Manual control mode with up/down gear through the “+” and “–” signs. This mode simulates the mechanical shift mode with a manual transmission, only in a simpler version. - "S"
- "sport". Sports driving mode. - "OD"
- "overdrive". Upshift (overdrive mode). - "W"
- "winter". Driving mode for the winter period, in which starting from a standstill begins in second gear. - "E"
- "Economy". Driving in economy mode. - "HOLD"
- "hold". Used in conjunction with “D”, “L”, “S”, as a rule, on Mazda cars. (Read manual).
When operating an automatic transmission, special attention should be paid to studying the operating manual for a particular vehicle, since some symbols may differ functionally.
For example, in the manuals of some cars, the letter “B” means “Block” - a differential locking mode that cannot be engaged while driving.
And if an all-wheel drive car has the designations “1” and “L”, then the letter “L” may not mean “Low” (lowering), but “Lock”
(lock) – which also means differential lock.
What do the letters on the automatic transmission box mean (P, D, N, R and M)
Selector lever position in P (Parking)
turns on the parking mode, that is, long-term parking, during which the box blocks the movement of the car. In this mode, engine starting is allowed. When parking your vehicle on a slope, you must first apply the parking brake.
Position D (Drive)
- also sometimes designated
A (Automate)
- is the main mode of forward movement of the car with automatic gear shifting under normal conditions. The same mode remains on during short stops, when there is no need to turn off the engine, for example at a traffic light.
R (Reverse)
turns on the reverse driving mode.
The so-called “neutral” N (Neutral)
on the machine is intended mainly for towing the car, or similar service transportation, when it becomes necessary to completely disconnect the engine from the wheels.
In this position, the output shaft of the box is unlocked and the car is not controlled by the transmission, that is, it can move freely. In this mode, engine starting is allowed, and you can put the gearbox on it when parking with the handbrake on, although in this case it is still more convenient to put the selector on P (Parking)
.
Starting the engine with automatic transmission
Starting an engine with an automatic transmission has the following features:
- In a car with automatic transmission there are only two pedals: brake and gas.
. Therefore, the driver's left leg is practically not used. When starting the engine, the gas pedal is not pressed, but in some brands of cars the brake pedal must be pressed, otherwise the engine will not start (read the operating manual).However, driving instructors advise making it a rule to always press the brake pedal before starting the engine with an automatic transmission. This will prevent the car from spontaneously moving in neutral mode “N”, and will also allow you to quickly switch to driving modes “D” or “R”. (It will not be possible to switch to the indicated modes and move away without pressing the brake pedal).
- In cars with automatic transmission, protection is provided - automatic engine start blocking if the gear shift lever is in the wrong position
. This means that an engine with an automatic transmission can only be started if the gear shift lever is in one of two positions: either “P” (park) or “N” (neutral). If the PP lever is in any other position intended for movement, the locking protection against incorrect starting will be activated.This protective function is very useful, especially for beginners, and especially in cities with high “car density”, where cars are parked closely together in parking lots and in traffic. After all, even experienced drivers sometimes forget to “decelerate the car” before starting the engine, as a result of which, when starting, the car immediately starts moving and crashes into the nearest car or obstacle.
You can start the engine with an automatic transmission in both “P” (parking) and “N” (neutral) modes, but manufacturers recommend using only “P” mode. Therefore, it is better to set one more rule for yourself - park and start the engine only in “parking” mode.
- After turning the key in the ignition before starting the starter, it is recommended to wait a few seconds
to give the fuel pump time to turn on and pump up the compression.
It should be remembered that on some brands of cars with automatic transmission, gear shifting is impossible without inserting and turning the key in the ignition (unlocking the gearbox). Also, on some brands it is impossible to remove the key from the ignition switch if the PP lever is in the “D” position. (Read the instruction manual).
Why doesn't the Overdrive button work?
The overdrive button may not work for a number of reasons. Like any other mechanism in a car, the overdrive button on an automatic transmission has its own resource, and can fail during intensive use, simply due to physical wear and tear (which is extremely rare in practice).
The most common reason for the failure of the O/D button is broken wires or poor contact on the connector going to the button. In this case, the problem can be resolved by disassembling the automatic transmission shift knob and restoring the integrity of the wiring.
If everything is fine with the button itself, the wires and connectors are intact, then the problem may be much more serious. In particular, you should check the overdrive sensor and diagnose the automatic transmission itself.
Starting and stopping with automatic transmission
Most drivers who switch from a manual to an automatic transmission initially automatically perform actions that they are accustomed to performing repeatedly when driving a car with a manual transmission. Therefore, before starting to drive with an automatic transmission on the road in general traffic, such drivers are advised to first practice alone.
So, the standard procedure for starting a car with an automatic transmission is as follows:
- Insert the key into the ignition.
- Depress the brake pedal with your right foot (the left foot is not used when driving with an automatic transmission).
- Check the position of the gear shift lever - it should be in the “P” - “parking” position.
- Start the engine (with the brake pedal pressed).
- Also, with the brake pedal pressed, switch the PP lever to position “D” - “drive” (moving forward).
- Fully release the brake pedal, after which the car will move off and begin to move forward at a low speed - about 5 km/h.
- To increase the speed, you need to press the gas pedal. The harder you press the gas pedal, the higher the gears and speed will be.
- To stop the car, you need to remove your right foot from the gas pedal and press the brake pedal. The car will stop.
- If you plan to leave the car after stopping, then with the brake pedal pressed, move the gear lever to the “P” - “parking” mode. If you need to stop in a traffic jam, at a traffic light or a pedestrian crossing, then, naturally, there is no need to switch the PP lever to “parking”. Once you decide to continue driving again, release the brake pedal and press the gas pedal to increase speed.
Many modern automatic transmissions have an imitation of the mechanical gear shift mode “M” (as on a manual transmission) for up/down gears using the “+” and “–” buttons on the gearshift lever. That is, the driver is given the opportunity to manually increase or decrease gears, taking away this function from the “automatic”. In this case, the transition to a mechanical gear shift mode can be made while driving, when the car is already driving in “D” mode.
To prevent engine damage when switching to manual mode “M” while driving, all automatic transmissions have special protection. Switching to manual control “M” is relevant in the following situations:
- When driving off-road, use a lower gear to avoid slipping.
- When coasting down a hill, with engine braking. It is not recommended to use the neutral “N” mode for coasting, as it is harmful to the automatic transmission. And coasting in “D” mode is not entirely convenient, since there is a gradual decrease in speed.
- For comfortable cornering and other maneuvers, including sharp acceleration when overtaking.
Reasons for knocking out a machine gun
So, let's move on to the main question of the article, why does the machine knock out - what are the reasons for this trouble? Let's start with the fact that there are five such reasons:
- Overload in the electrical network.
- The circuit breaker itself is faulty.
- Malfunction of one of the household appliances.
- Light fixture malfunction.
- Short circuit in electrical wiring.
What is network congestion? In essence, this is a current load that exceeds the rated one determined by the machine itself. For example, for socket groups, machines with a current rating of either 16 amperes or 25 are most often used. This corresponds to either 3.5 kW of withstand power or 5.5 kW.
Now imagine a situation where the socket group to which a circuit breaker with a current rating of 25 amperes is connected contains several household appliances, the total power of which exceeds the rated power. For example, a washing machine with a power of 2.5 kW is turned on, an air conditioner - 2 kW, an electric kettle - 1.5 kW. The total power of the three devices will be 6 kW. That is, the machine simply cannot withstand such a load and will definitely turn off (break) the circuit.
What to do in this case?
- Monitor the total power of connected household appliances.
- Redistribute the connection of devices to different socket groups.
But under no circumstances should you change the machine itself to a higher denomination. The thing is that everything will depend on the electrical wires laid in the wiring diagram in the apartment or house. If the circuit used copper wire with a cross-section of 2.5 mm², then a machine with a nominal value of 25 amperes is installed in it, no more. If the wiring is aluminum of the same cross-section, then the switch is 16 amps.
Machine defect
How high is the probability that due to a malfunction of the device itself, the machine will be knocked out? The probability is negligible, especially when it comes to branded models. But it is there. Therefore, the only way to be sure that this is the cause of the knockout is to replace it with another device. Or you can reconnect the circuit to a nearby circuit breaker in the distribution panel. If in this case the machine knocks out, then the reason is completely different.
And one moment. Like any device, the machine has its own service life. Wear of various parts leads to a decrease in its technical characteristics. This also applies to the release contacts, which are responsible for knocking out due to an increase in the current load.
Malfunctions of household appliances
Household appliances themselves can cause the machine to break out. How can this be checked?
- Unplug all connected devices from the sockets.
- If the machine is not knocked out in this position, then start connecting each device separately.
- As soon as the machine turns off, it means that the household appliance plugged into the outlet is faulty. It will have to be repaired or replaced with a new one.
Some equipment is connected to power not through sockets, but, so to speak, directly. For example, air conditioners or dishwashers. The only way to check them is to disconnect them from the machine in the switchboard.
Defects in lighting fixtures
Sometimes situations happen that the machine goes off when the chandelier turns on. This indicates that there is some kind of malfunction in it.
- There is a short circuit in the light bulb base. To do this, you will have to unscrew all the light bulbs, and then screw them in again one by one and turn on the lighting fixture. As soon as the machine turns off, it means that the light bulb in which the base is broken has been found. It will simply need to be replaced.
- The contact between the power wire and the wiring inside the chandelier has burnt out. You just need to inspect the contact, clean it and insulate it well.
- LED chandeliers include a 12 volt transformer. So, it is precisely this that can cause the machine to be knocked out due to a short circuit inside. It will be necessary to remove the chandelier and change the transformer.
Defects in electrical wiring
There are two reasons:
- Poor contact in the socket.
- Deterioration of insulation in the conductor.
In the first case, you need to open the socket, find the burning area, clean it and correctly connect the wire to the socket. The second case is more complicated. It usually concerns a short circuit that occurs within the electrical circuit in an apartment or house. It is simply impossible to find the location of the short circuit without a special apparatus. Not every average person has even heard of him. This device is called a locator.
It is good if the wiring in the apartment or house was done in an open way. Having found the location of the short circuit, you can easily correct the defect. If the wiring was hidden, then you will have to open the discovered short circuit (remove the finishing and plaster), correct the defect, and then seal the hole by carrying out finishing work.
How to properly connect SIP to a machine
SIP is a self-supporting insulated wire that is used almost everywhere to introduce electricity into the house. Therefore, the question of how to connect a SIP to a single-pole circuit breaker is very relevant.
Firstly, the SIP is made of aluminum, and the contact plate of the circuit breaker is made of copper. The correct connection of copper and aluminum requires the use of a special crimp sleeve, and in the case of subsequent connection to the machine, a sleeved tip, at the point of contact of which there is a special copper coating. It is impossible to connect a SIP to a machine without such a tip, since aluminum tends to oxidize, causing the quality of the contact to be lost. And poor contact is the first cause of fire.
The sequence of connecting the SIP to the machine:
- Strip the cable.
- Place a sleeved tip on the open core. It is important to put it on tightly and so that the insulation begins immediately behind the sleeve.
- Using a hydraulic press, compress the sleeve in two places.
- Place a heat-shrink tube over the open part of the sleeve and heat it with a hair dryer.
- Insert the tip into the machine and tighten the contact properly.
This installation method is the same for both single-phase and three-phase machines; you just need more tips.
Connecting two-pole and three-pole circuit breakers
The principle of connecting two-pole and three-pole circuit breakers is exactly the same as in the case of a single-phase packet switch. And if the question arises of how to connect a three-phase machine, then you should perform all the operations that were carried out with a device designed for a single-phase network.
In the same way, strip the wires, crimp them using lugs and a press, and install each wire on the corresponding fixed terminal, and then clamp it with a screw clamp. If a three-pole circuit breaker is installed in a production facility where further connection of asynchronous or synchronous motors is planned, then after installation the phase rotation should be checked using a special device - a phase indicator. If the phases are reversed, the motor will begin to rotate in the opposite direction.
If you do not know how to connect a two-pole machine, then the principle of connecting it is the same as when installing an RCD. Standard places are provided for the connected phase and neutral wires.
It should be immediately clarified that the price for installing single-pole, two-pole and three-phase circuit breakers in Moscow varies. Therefore, it is necessary to take into account the types of switching equipment that will be installed in the panel in the future.
Checking RCD functions
There are five effective ways to check the serviceability of the differential circuit breaker system for leakage current:
- a special button on the switch body;
- a galvanic cell that produces voltage during a chemical reaction, simply put, a battery;
- simulating deterioration of insulation resistance by connecting a resistor to the device circuit;
- using a permanent magnet;
- using a special precision electronic device produced for these purposes.
Let's consider each of the methods of checking a difavtomat in more detail.
Standard button on the case
One of the fastest ways to check both RCDs and automatic circuit breakers is to press the “Test” button, which is most often located on the body of these electrical switching and protection devices. In order to press it, no special skills or special training are required; anyone can perform this procedure. The button is marked with the letter “T” and it is this button that simulates the leakage current of an electrical circuit. This current for different differential circuit breakers is indicated on the case, so when choosing it you should understand that the lower the leakage current, the more sensitive the protection. That is, even if minimal damage to the insulation of electrical equipment occurs, this section of the circuit will be disconnected from the network.
When you press the button to check the functionality of the differential circuit breaker, it should immediately turn off automatically; if this does not happen, then the RCD system installed in the switch is faulty. That is, if the test button does not work, subsequent operation will not provide reliable protection in the event of a breakdown. It is worth checking in this way with the switch correctly connected to the network, since some automatic circuit breakers have an electronic protection circuit and will not operate without connection or if one of the supply wires, be it zero or phase, is broken. These circuit breakers with a built-in electromagnetic RCD must operate and protect a person from exposure to dangerous current, even if the neutral supply conductor breaks.
Which is correct: machine before or after the counter
To answer this question, you should also refer to the PUE, namely to paragraph 1.5.36, which states that for the safe installation and replacement of meters in networks up to 380 V, a circuit breaker must be installed in front of them (at a distance of no more than 10 m) . And this same machine in front of the meter acts as a switching device to disconnect the entire apartment or house, and its nominal values must be appropriate.
The number of machines after the meter is determined directly by the owner of the apartment or house, or by the design organization performing the installation of electrical wiring. There are such electrical panels, the number of devices in which reaches 40-50 pieces, and this is without RCDs and differential circuit breakers. When installing an introductory machine before the meter, the same one can be installed after it. This will not affect the operation of the metering device in any way.
Important! Only representatives of energy supervision authorities can connect the electric meter to the network. Therefore, before connecting an apartment, you should find such an organization in your city and formally call a specialist.