A vehicle often requires adjustments to various controls and systems. For example, you may need to adjust the clutch pedal, which greatly affects the quality of driving a car with a manual transmission. This adjustment is quite easy to do without visiting service centers, and does not require any special knowledge or tools.
Purpose of clutch and its types
The clutch is designed to transmit engine torque to the input shaft of the gearbox and to briefly disconnect the engine from the transmission during gear changes. Depending on the method of transmitting torque, it can be frictional or hydraulic. Friction transfers engine energy to the transmission through friction. It can be multi-disc, single-disc, dry or wet (if the discs are placed in liquid). Hydraulic transmits torque through the flow of a special fluid. All production passenger cars with manual transmission are equipped with a single-plate dry clutch. It consists of the following components and parts:
- The driven disk, which has a damper of 6 springs, absorbs the shock load on its hub when the engine is connected to the transmission. The driven disc hub fits onto the input shaft of the gearbox. The connection of this pair is splined.
- Thrust type ball release bearing with lubricant placed inside it for its entire service life during manufacture. It is designed to disconnect the engine and transmission. It is not maintained throughout its entire service life.
- Flywheel attached to the crankshaft flange. Essentially, it is the master disk.
- The basket is a unit consisting of a pressure plate, a diaphragm spring and a housing. It is attached to the flywheel, and the driven disk is clamped between the flywheel and the pressure plate. Modern baskets do not require adjustment.
- A fork designed to transmit the shutdown drive force to the release bearing.
How to determine the amount of free play
The free play of the clutch pedal is the distance that the pedal must travel before the clutch begins to disengage.
The free travel of the clutch pedal differs from the clutch release travel by a slight pressing force.
The beginning of shutdown can be determined, firstly, by the sound of rotation of the release bearing (if the motor is running), and secondly, by an increase in the severity of pressing (regardless of whether the motor is running).
Which clutch kits are better: opinions of car owners
1. “Why overpay?”
“I had a German Sach kit consisting of a basket and a disc. I drove about 230 thousand km with it, during which the forks and release bearings were changed twice. At the moment I am using a Turkish product from Kraft. Comparing it in the store with the “German”, I did not notice any design differences. Moreover, the Turkish kit is cheaper. So is it worth overpaying?
2. “I just decided so!”
“The factory clutch on my VAZ-2112 lasted 67 thousand km. During this time, the friction linings were worn out almost completely. Today I finally changed the kit along with the basket and release plate. For a long time I was choosing between products from Valeo, Sachs and VIS, but in the end I settled on the option from Luk. Namely, we chose Luk Priora, which is included in the basic configuration of this car. I was mainly guided by positive reviews from experienced drivers regarding stable torque.
It is noteworthy that the first batches of this product, judging by the description, contained copper rivets, and later ones were silver and without inscriptions. The clutch disc looks high quality and neatly made, and the basket also inspires confidence with its appearance.
The release disc has a plastic seating ring, and this fact was alarming. Moreover, this clip turned out to be skewed! Only later did specialists explain to me that such a distortion is considered normal. The disk will self-center and will eventually move into the desired position. However, mistrust of plastic still remains, so let’s watch.
When the trip actuator needs checking
The free play of the clutch pedal must be checked and adjusted every 20 thousand km. This also needs to be done if the car starts to move at the very beginning or at the end of releasing the pedal. A correctly adjusted clutch release drive causes the car to start moving when the pedal is released approximately halfway.
Adjustment of the drive with hydraulics and with a cable is slightly different. To adjust the hydraulic drive, as a rule, you need a pit or overpass. Cable adjustment is usually done in the engine compartment from above, simply by opening the hood.
Adjusting the VAZ-2107 clutch with your own hands step-by-step video instructions
During vehicle operation, an incorrectly adjusted clutch is expressed as follows:
- The clutch drives. When the clutch pedal is fully depressed, the disc does not move away from the flywheel, making it impossible to change gears normally. Thus, the car can start moving even when it is not necessary.
- The clutch is slipping. When the clutch pedal is fully released, the disc begins to slip. As a result, it does not transfer all the engine power to the transmission in full.
In addition, problems with the clutch sometimes result in it setting too early or, conversely, too late. As a result, driving may become significantly more difficult.
Clutch adjustment
The entire clutch adjustment process consists of two parts.
One of them takes place directly inside the car, while the second is performed from below the car while it is either on the inspection pit or on a lift. To adjust the clutch you will need the following tools:
- open-end wrenches for 13 and 17;
- a key for 10 or 8 (it all depends on which model of the clutch slave cylinder).
The first adjustment also involves setting the clutch pedal travel. This stage of work is performed directly from inside the car, under the steering column. There is an adjusting screw that serves to limit the full stroke. It is secured with a locknut. By turning the screw first to one position, then to another, you can achieve normal pedal travel, which, according to the instructions, should be 14 cm.
Adjusting the drive with a cable
Measure the distance from the floor to the corrugated plane of the rubber pedal pad; it should be about 16 cm. The accuracy of measurement with a regular stationery ruler will be quite sufficient. If the result of your measurement differs significantly from the distance indicated above, you need to clarify the value of this parameter recommended by the manufacturer of your car and adjust it. If your car uses nuts securing the cable jacket to the box for adjustment, you can increase the distance from the floor by moving the cable jacket from the box towards the pedal. And, conversely, to reduce the height above the floor, move the shirt from the pedal to the box.
After correct adjustment of the distance from the pedal to the floor, the idle value of the pedal, if the clutch parts are in good condition, is within the required limits.
But this definitely needs to be checked. You should measure the pedal stroke without load by holding the same ruler next to it, with one end resting it on the floor. Use your free hand to press down on the pedal until it becomes harder. Determine the stroke value using a ruler as the difference between the readings at the top and bottom points. Then compare it with factory recommendations.
Adjusting the hydraulic drive
To adjust the hydraulic clutch pedal, you first need to make sure that there is no air in the system. In the absence of air inside the system, the pedal should not be soft when pressed, and after releasing it should return to its original position on its own.
If the tests have convinced you that the hydraulic drive is working properly, check the free play of the clutch release fork. For many models, this parameter should be in the range from 4 to 5 mm. What it should be for your car, check with its manufacturer. After this, check the pedal travel without load; for many models it should be within 25–30 mm. If the free play of the clutch release fork is normal, and the idle value of the pedal does not fall within the recommended limits, look for a malfunction in the clutch master cylinder piston pusher or in the clutch release fork.
If the drive adjustment is incorrect
- Too little free play of the clutch, as well as its complete absence, leads to the fact that the release bearing is almost constantly in contact with the petals of the diaphragm spring of the basket. Therefore, it rotates even when the clutch is engaged and wears out much faster than in a normal situation.
- Too much free play of the clutch leads to insufficient squeezing when disengaging the clutch and, as a result, the disengagement is incomplete, that is, the friction linings touch the driven disk of the flywheel and the pressure plate of the basket. This causes the flywheel and pressure plate to wear out much faster than usual. This means that too much movement without load, as well as too little, will bring the repair of this system of your car closer. In addition, incomplete disengagement of the clutch makes it difficult to change gears (especially reverse) and contributes to rapid wear of the gearbox synchronizers, as well as reverse gears.
The clutch is one of the most important parts of a car's transmission. Thanks to it, it is possible to temporarily disconnect the connection of the engine crankshaft from the gearbox input shaft to adjust the transmission of torque. The clutch pedal is the main link between the driver and the transmission.
The main signs by which you can understand that it is time to adjust the clutch
The approximate mileage interval at which it is recommended to check and adjust the clutch operation is 10,000 kilometers. It is worth checking the car maintenance schedule established by the manufacturer - other numbers may be indicated here.
Clutch adjustment is required after replacing/repairing the clutch or its elements, for example, the drive cable. The procedure is required even if there is a suspicion of deviation of the pedal amplitude from normal values:
- the car starts moving jerkily;
- the clutch pedal sinks or moves with difficulty;
- the fluid level in the hydraulic drive decreases;
- When changing gears you notice shock, noise and vibration.
A simple test will help you determine if the clutch needs adjustment. We start the engine, smoothly release the clutch pedal and slowly move away. If the car remains in place when the clutch is fully released, then the pedal travel has increased. If the car starts moving before you even take your foot off the pedal, its travel is too slow.
Clutch structure and mechanism
Today, most vehicles have a single-plate friction type clutch, which has two main components: a drive and a mechanism. The first is located on static parts of the body or frame. To briefly disconnect the engine crankshaft from the gearbox shaft, you need to press the clutch pedal all the way, “disengaging it.” When pressed, the rod directs pressure from the master cylinder piston to the working cylinder. The latter moves the force to the mechanism through the release fork and the pressure bearing. At the moment the pressure decreases, the drive return springs will return the elements to their original positions.
Most often, you can find several types of drives on cars:
- Hydraulic. The design includes a tube with high pressure of the working fluid, which powers all the mechanisms.
- Mechanical. The force with which the pedal is depressed is transmitted by a cable to the release fork.
- Electric. The electric motor drives the cable, which acts similarly to a mechanical drive.
- Pneumatic. Most often used on trucks, in order to reduce the required effort to release the pedal. The design includes a pneumatic booster, which affects the piston valves.
The clutch design in the crankcase consists of several discs: driven and pressure. The first is located on the gearbox shaft splines, and the second is on the flywheel housing. Separately, there are release levers on the ball joints, and the driven disk is pivotally connected to the structure.
The driven disc is statically secured between the crankshaft and the pressure plate when the clutch is completely disengaged. The coupled structure transmits torque from the crankshaft to the gearbox shaft. When the pedal is depressed, the thrust is transferred and the fork moves the clutch. The latter, using levers, moves the pressure plate.
Malfunctions
Incomplete engagement (slippage) of the clutch occurs when the car starts from a standstill or when driving uphill, when the clutch pedal is released and when the throttle pedal is pressed, the engine crankshaft increases the speed, but the car does not develop the appropriate speed or it decreases (when driving uphill) .
Slippage occurs when there is no free play of the clutch pedal, wear and oiling of the friction linings of the driven disks (due to excessive lubrication of the release clutch bearing), breakage or weakening of the spring that pulls the release clutch, breakage of the pressure springs, warping of the driven disks and wear of the splines of the drive shaft of the gearbox.
Reducing the gap between the end of the release clutch bearing and the levers entails a decrease in the free play of the clutch pedal.
Incomplete disengagement of the clutch is detected by noise when the vehicle is engaged in gear, despite the full “squeezing” of the clutch pedal, and is a consequence of an increase in its free play, jamming (sticking) of the driven disks and misalignment of the clutch release levers, as well as a consequence of air entering the hydraulic drive system or wear of the sealing cuffs of the pistons of the main and working cylinders.
Abrupt engagement of the clutch indicates jamming of the engagement clutch on the drive shaft of the gearbox due to wear and scuffing of the working surfaces or destruction of the surface of the friction linings, and may also be the result of incorrect adjustment of the gaps (the gaps are not the same) between the clutch release levers and the release clutch bearing.
Incomplete return of the clutch pedal to its initial position may occur as a result of increased friction in the joints of the clutch drive intermediate shaft or in the pedal shaft bushings, breakage or weakening of the drive release springs.
Premature wear and destruction of the release clutch bearing can occur as a result of untimely lubrication or too frequent and prolonged clutch disengagement.
Features of clutch in automatic and manual transmission
The clutch can be single or double disc. Depending on the principle of operation, it is divided into “wet” (in the presence of oil or lubricant) and “dry”. So, automatic transmissions most often have a multi-plate wet clutch.
Due to the absence of a pedal, the force in the automatic transmission is transmitted by a servo drive, or actuator. The entire installation is controlled using a control unit and a hydraulic distributor. In a manual transmission, two types of clutch operate alternately. Actuators differ in their operating principle:
- Electric (otherwise known as a stepper motor). The control unit constantly receives data on engine speed, and at a certain speed the servo drive receives a corresponding signal. The transmission mechanism disconnects the crankshaft and input shaft.
- Hydraulic – hydraulic cylinder. In the drive mechanism, the oil pump transmits pressure to the distributor, under certain conditions to the servo drive. After changing gears, the pump force decreases.
Reasons for adjusting the clutch pedal
It is important to understand that improper clutch operation may create virtually no problems when driving, but nevertheless it will significantly reduce the life of the clutch mechanism and gearbox. Over time, the discs wear out, which increases the clearance between the bearing and discs.
There are two main reasons why pedal adjustment is necessary:
- Replacing the clutch cable in a mechanical drive or replacing the slave cylinder. After such an intervention in the operating structure of the drive structure, adjustment is a mandatory procedure.
- Changing the pedal stroke. Excessive travel can occur as the friction linings wear out. To avoid negative consequences, it is better to regularly measure the working stroke.
In most foreign cars, adjustment is not required, since they have a self-regulating mechanism installed. The difference between the foreign-made design and the domestic one lies in some details of the ratchet mechanism.
A separate reason for adjustment is interruptions in the operation of the gearbox. If the desired gear does not engage, or is difficult to engage, the clutch is not pressed enough. Otherwise, the car may not move when the clutch is engaged. Then we can talk about a highly tensioned mechanical drive cable.
Basic clutch malfunctions
Video: Clutch malfunction on VOLGA
If you do not pay attention to the operation of the clutch at all, this often leads to the following problems:
- When the pedal is fully depressed, the car continues to move - the clutch “drives”. This is precisely due to wear of the discs, and the gap that appears as a result of wear is not sampled. Increased free play leads to the fact that it is not possible to completely disconnect the engine from the gearbox and torque continues to be transmitted even when the pedal is fully depressed. This is accompanied by complicated gear shifting and a crunching sound when the gearbox gears engage;
- The opposite situation described is clutch slipping. The reason for slipping is the lack of free play and the tightening of the fork position. As a result, the release bearing constantly presses the springs of the drive disk a little, which is why it does not fully press the driven disk. Signs of slipping include more difficulty gaining speed, a specific smell in the cabin due to constant overheating of the linings, and increased operating noise due to the constantly rotating release bearing.
- Increased noise during operation may also be due to low free play, when the release bearing is pressed against the basket levers, but does not squeeze them out. That is, there is no slipping, but the bearing is constantly rotating.
How to check pedal free play
Clutch free play is the period of pedal movement from the moment it is pressed to the moment it is activated. You can notice that when you press the clutch, at first there is no proper resistance, and somewhere in the middle of the stroke an increase in rigidity appears.
If the vehicle starts moving immediately when you touch the pedal, then it is better to make the adjustment urgently, since there is no free play at all. Otherwise, the pedal can be pressed to the floor, but the car does not move.
Free play is required for all manual transmissions, since it indicates clearance between the fork, bearing and disc levers and prevents constant contact of the bearing with other elements of the mechanism. It is important to monitor the size of the free play, because if it is too large, full pressure will not be enough to transmit sufficient force to squeeze the drive disk.
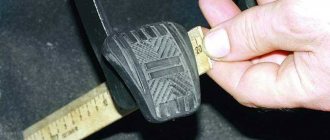
A separate reason for checking free play is noise and jerking when interacting with the clutch. You can measure this indicator yourself using a ruler.
It is necessary to measure the perpendicular distance from the floor to the pressure pad. Next, when you gently press the pedal, you should measure the stroke until resistance first appears. The result must be checked against the data in the vehicle's operating manual.
The general average clutch stroke for a car is 160 mm. It is recommended to carry out preventive maintenance and adjustment every 20 thousand km.
Clutch diagnostic methods
The main symptoms of a faulty mechanism:
- Slippage (when the disk and basket, when connected to the motor, rotate at different angular speeds).
- Strong vibration inside the mechanism, especially noticeable when starting from a standstill and accelerating.
- Noise generated when the clutch operates.
- Violation of the accelerator stroke.
Diagnostics of the clutch of modern cars requires the use of professional equipment. However, you can do a simple test yourself. To check, press the pedal several times with the engine off. Then listen. Creaks, clicks, and other extraneous sounds will indicate problems with the box.
Another test is carried out in neutral speed mode. The clutch pedal is pressed all the way, then reverse gear is engaged. If you hear a crunching or crackling noise, one of the drives is faulty.
The check at the third stage is carried out in motion. The gears are sequentially switched to 3, then the gas pedal is sharply depressed. If the car does not accelerate, but the crankshaft speed increases on the tachometer, this is a sign of a malfunction. At the same time, it begins to smell unpleasantly of burnt rubber.
Serious damage to the transmission device can be judged by an unsuccessful attempt to engage one of the gears. Therefore, when the motor is turned on, you need to use all speeds.
Checking the gap and adjusting the clutch fork
To check the operation of the clutch fork, you need to find the threaded bushings at the end of the clutch cable and measure the difference in the gap between them at rest and in the recessed position. The ruler must be placed near the cable and the edge of the housing. After the lever is pressed all the way, the distance is measured.
The second step is to pull out the lever and repeat the measurement. The indicators are compared against the manufacturer's data and, if necessary, adjusted. To do this, loosen the lock nut (VW has a wing nut) and turn it out as necessary, reducing or increasing the gap. After all the actions, firmly fix the clutch pedal and squeeze it several times. To check the effectiveness of the actions taken, the measurements must be repeated and the results compared.
How to check and adjust a hydraulic clutch
The operation of a mechanical and hydraulic drive has its own design differences. In this regard, in order to adjust the hydraulic clutch, it is necessary to check the total length from the pusher rod to the fork. According to the standards, it should be about 5 mm.
Then disconnect the spring from the working cylinder bracket. There is an adjustment nut on the rod, by unscrewing which you can change the stroke of the fork to the desired result. The general concepts of changing the working and free play may differ depending on the vehicle manufacturer. Before you begin self-adjustment, you need to read the manual for your vehicle or watch training videos:
Clutch maintenance
When servicing the clutch mechanism, check the free play of the pedal and the nature of the clutch operation when engaging gears: absence of slipping when transmitting torque, complete disengagement, smooth engagement (with a lubricated clutch drive mechanism). The specified clutch state is achieved by correctly adjusting the free play of the clutch pedal.
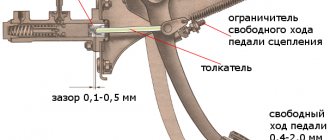
The amount of free play of the clutch pedal corresponds to the set gap between the clutch release bearing and the release levers (1.5 - 4 mm) and for most domestic cars is: passenger cars - 32 - 40 mm, trucks - 32 - 50 mm.
The free play of the clutch pedal is measured with a ruler (Figure 1, a) with two sliders 1 and 2. The free play of most cars is adjusted by changing the length of the clutch rod by rotating the nut or fork of the clutch (Figure 1, b).
Figure 1 – Clutch adjustment
a – checking the free play of the pedal; b – adjustment of the pedal free play; 1 and 2 – engines on the ruler; 3 – base of the ruler; 4 – clutch pedal; 5 – adjusting nut; 6 – clutch drive rod
The gap between the pressure levers and the clutch bearing is adjusted with the clutch removed in a special device by rotating the nuts of the set screws.
When adjusting clutches, in which the compression of the driving and driven disks is carried out by one central spring , it is necessary to first adjust the force of pressing the spring, then the free play of the clutch pedal.
In a hydraulically driven clutch, the free travel of the pedal is determined by the gap between the pusher and the piston in the master cylinder (Figure 2), the idle stroke of the master cylinder piston until the compensation hole is closed, the gap between the release clutch bearing and the heads of the release levers.
Figure 2 – Clutch release drive of the GAZ-21 Volga car
1 – threaded tip; 2 – plug; 3 – pedal release spring; 4 – buffer; 5 – release clutch bearing; 6 – switch off lever; 7 – clutch release fork; 8 – release spring for the release fork; 9 – eccentric pin; 10 – pedal axis; 11 – pusher; 12 – piston of the main cylinder; 13 – cuff; 14 – main cylinder; 15 – bypass hole; 16 – cap; 17 – bypass valve; 18 – piston of the working cylinder; 19 – working cylinder; 20 – pusher tip; 21 – lock nut; 22 – pusher
Most often in operation, the amount of free play of the clutch pedal changes as a result of a decrease in the gap between the clutch release bearing and the heads of the release levers.
This gap is checked by the free play of the end of the clutch release fork (3 - 4 mm for GAZ-21 Volga cars) and is adjusted by changing the length of the working cylinder pusher. The gap between the pusher and the master cylinder piston is adjusted with an eccentric bolt connecting the pusher to the pedal lever.
In the clutch mechanism, the release clutch bearing and the bushing of the pedal axle and release fork are periodically lubricated . On some cars, grease is added to the release clutch bearing at the factory when the clutch is assembled.
Source: carspec.info
Free play of the clutch pedal - prevention and care of the system
To monitor the condition of the clutch mechanism, it should be checked after the next 20,000 km mark . Repair and adjustment are required if a fluid leak is detected due to ruptured hoses or when the clutch accelerator stroke is increased. Even a novice driver can set the pedal free play. To do this, it is first important to make sure that there is no air in the hydraulic system.
First of all, fill the drive reservoir with liquid to the required level, put the hose on the bleeder valve and unscrew it half a turn. Dip the free end into a jar of liquid. Now push the clutch all the way in so that all the fluid flows out. Close the valve and release the pedal. Add the missing amount of liquid to the tank and repeat the entire process in the same order. The system is considered to be pumped if the leaking liquid does not contain air bubbles. Then it’s time to screw the valve and close it with a protective cap.
Don't forget to check if there is fluid in the drive tank; if necessary, add it immediately. Now is the time to turn to direct adjustment of the pedal.
How much free play should the pedals have?
The clutch accelerator will require a change in cable length if the fork free play exceeds 3mm. To check it, you need to move the fork back. If this value does not correspond to this value, the clutch pedal free play is adjusted using a special nut located on the threaded part of the cable.
Not only the clutch assemblies need periodic adjustment, but also the brake drive mechanism, since over time it will naturally wear out, that is, an increased amplitude of the pedal will form. As manufacturers recommend, after even a new car has traveled 2,000-3,000 km, it is necessary to check the technological clearances in the brake system components.
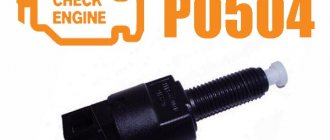
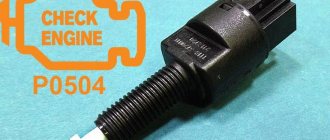
With a working brake mechanism, the unimpeded accelerator stroke (with the engine turned off) should be within 5 mm. If there is a lot of free play in the brake pedal, the gap is set by moving the brake light. What are the dangers of regulatory violations? In the absence or extremely small stroke, spontaneous braking may occur, which leads to overheating of the pads and brake drums.
Measuring and adjusting the free play of the brake pedal
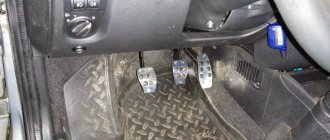
In all the described cases, the car owner should look into the mechanisms of his vehicle. How to make the adjustment? First, we will describe how to measure the pedal stroke and then correct shortcomings in this value. You should:
- Place the car on a level surface.
- Press the brake until the pedal stops and lock it in this position. The easiest way is to use a hammer.
- Place a ruler next to the pedal, resting its end on the floor. Mark the distance of the pedal from the floor.
- Release the pedal without lifting the ruler from the floor. Place the upper part of the ruler on the accelerator and take measurements.
- Press the pedal until you feel noticeable resistance. Take measurements. The difference between the top position and the last reading will be the amount of free play.
After receiving the results, it will become clear whether adjustment of the brake pedal free play is necessary. If it is still required, then to do this you need to loosen the brake light lock nut only 1 turn. By screwing or unscrewing the switch, set the required gap between it and the brake pedal. After completing the described adjustment, tighten the lock nut and re-check the stroke as described in the previous paragraphs. The clutch accelerometer is also adjusted by a nut, it is located on the cable.