The air conditioning compressor did not turn on - Chevrolet Lacetti, l., year on DRIVE2
The latter connects the electrical circuit of all elements in accordance with the pulse received from the pressure sensor.
Air conditioning does not work on Chevrolet Lacetti
If the air conditioner in a Chevrolet Lacetti car does not turn on, if this controller breaks down, the control system will not be able to connect the circuit, and this, in turn, will lead to the inoperability of the unit. As practice shows, most problems in the operation of the condenser can be avoided by periodic cleaning and refueling. You need to refuel at least once a year, before checking the freon level in the system.
More details on how the air conditioning system should be charged are described. If you don’t want to do this yourself, you can contact a service station. Using a filling machine, specialists will be able to quickly and efficiently clean and refill the unit with consumables. If, when you turn on the button, the indication lights up, but the Lacetti air conditioner still does not work, then, most often, this is an insufficient amount of refrigerant in the system.
Pressure in the Chevrolet Lacetti air conditioning system in the Chevrolet Explorer diagnostic program. I advise you to immediately go to a service station with this problem, rather than try to figure it out yourself.
There are instructions online for refilling air conditioners yourself from cans and monitoring pressure on pressure gauges.
But this is an incorrect filling.
It serves to reduce the freon pressure in front of the evaporator. Air conditioner fan. Designed to enhance heat exchange with the environment.
Repair and maintenance of air conditioners on Chevrolet cars
Low and high pressure connecting pipes. They serve to create a closed circuit of the system and circulate freon through it.
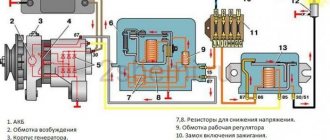
Features of the Lacetti air conditioning system Features include the operation of the compressor, more precisely the operation of the electromagnetic clutch. It is controlled not only by pressing a button on the heater control unit, but also by the electronic engine control system (ECM). The ECM receives data from pressure sensors in the air conditioning system and from various engine systems that affect the engagement of the electromagnetic clutch.
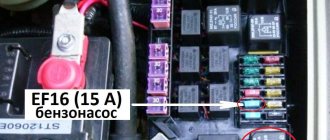
For example, the ECM may disable the clutch when: In this case, there is a problem with the button contacts or the board. A blown fuse F6 de-energizes the excitation winding of the air conditioner compressor relay K6, and a blown fuse Ef17 de-energizes the power circuit for switching on the electromagnetic clutch of the compressor.
The K6 air conditioning compressor relay, located in the mounting block of the engine compartment, may also fail. To verify that it is faulty, simply remove it from the mounting block, and instead place a jumper between contacts 30 and the air conditioner in the Chevrolet Lacetti does not turn on. In this case, the air conditioner, on the contrary, works too well. There is information that this is due to a small amount of refrigerant, Oddly enough, refueling can solve this problem.
If your compressor turns on, the system is charged normally, but there is still no cold, and the pressure values on the high and low pressure sides of the system when the compressor is operating are close, then the compressor does not create the necessary pressure difference.
As a symptom, when you turn on the air conditioner in the cabin, you can hear a soft sound such as a low rumbling or howling.
If the service offers you a replacement compressor, but the compressor does not produce any extraneous sounds during operation, it operates quietly, without rattling or knocking, then do not rush into replacement. Most likely, the control valve in the compressor is simply faulty, which, as it turns out, fails quite often. Even if at the service center they tell you that this does not exist and cannot be, we still recommend starting with replacing the valve, since it costs “a penny” compared to the air conditioning in a Chevrolet Lacetti compressor not turning on and replacing it.
Honor and praise to Albano, which may save you tens of thousands of rubles. Original valve number for
Air conditioning system - description
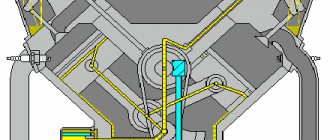
Air conditioning system: 1 - evaporator; 2 - gearbox; 3 — low pressure pipeline; 4 — refrigerant pressure sensor; 5 - valve for charging and releasing refrigerant; 6 - capacitor; 7 - receiver; 8 - compressor; 9 - high pressure pipeline
- Electric fan.
- Heater hoses.
- Fan resistor.
- High speed fan relay.
- Heater/air distributor housing assembly (A/C module).
- Heater heat exchanger.
- Air conditioner pressure sensor.
- Air conditioning compressor relay.
- Air filter.
- Air conditioner expansion valve.
- Air conditioner high pressure piping.
- Evaporator heat exchanger.
- Air conditioner suction hose assembly.
- Outlet hose from the air conditioning compressor to the condenser.
- Compressor.
- Capacitor.
- Receiver-dryer.
- Wide open throttle.
- High engine coolant temperature.
- High engine speed.
- Low refrigerant pressure.
- High refrigerant pressure.
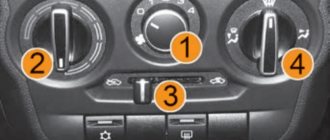
- To increase the temperature of the air entering the vehicle interior, press the top button with the red up arrow.
- To lower the temperature of the air entering the vehicle interior, press the bottom button with the blue down arrow.
- The air mixing damper is controlled by an electric drive.
- The temperature is controlled by mixing air passing through the heater's heat exchanger with air bypassing the heat exchanger.
- Set temperature - shows the temperature set by the temperature controller.
- Automatic control status - shows what mode the system is operating in (automatic or manual).
- Heated glass icon - indicates manual activation of the full heated glass mode.
- Mode - the mode turned on by the system in automatic mode (or by the driver in manual mode) is displayed by luminous arrows showing the directions of air distribution.
- Air Conditioning - The snowflake icon indicates whether the air conditioning is on or off.
- Fan Speed - Indicates the fan speed with light bars, starting with one at the lowest speed, and progressively adding segments up to a fifth at the highest speed.
- Full heating of the windows - electric drives of the mode flaps direct all the air to the windshield and outlets on the windows to quickly remove frost from the glass.
- Air supply - switches between fresh air supply (initial state) and recirculation air. The air flow arrows indicate which mode is on.
- Automatic mode switch - the set temperature is maintained automatically. In this mode, the automatic temperature control (fatc) system controls the following elements:
- Electric drive of the air mixing damper.
- Electric mode damper drive.
- Electric fan speed.
- Electric intake air damper drive.
- Turning the air conditioner on and off.
- Main switch - turns off the automatic air conditioning and ventilation system.
- Mode Switch - Allows you to manually set the airflow direction.
- The selected mode is shown in the function display.
- Each time you press the mode switch key, the next function is displayed.
- Air conditioner switch - allows you to manually turn on and control the air conditioner.
- Fan Control Switch - Allows you to manually set one of five fan speeds.
- Heated glass switch - turns on the heated rear window and outside rearview mirrors if the vehicle is equipped with heated mirrors.
The air conditioner on the Chevrolet Lacetti does not turn on: reasons, repairs, cleaning and refueling
The purpose of the ventilation devices is to create an air flow, which subsequently blows on the condenser and evaporator. The author of the video is the pavel channel. Common malfunctions and methods for eliminating them. Usually, car owners encounter the problem when the condenser cannot turn on in the spring, when it is turned on for the first time after a long break.
As a rule, in this case, the air conditioner does not work due to a lack of working fluid in the system, which is usually caused by freezing of water.
Air conditioning does not work on Chevrolet Lacetti
Accordingly, this leads to the fact that the rubber seals on the tubes lose their tightness. To solve the problem, you need to replace the seals and refill with freon.
If you have never encountered such a task before, then cleaning the air conditioner will not be superfluous - you can clean the system both at a service station and at home, using a special cleaner.
The cleaning procedure is presented in more detail.
Another malfunction typical of Conders is the failure of the control unit, which can be due to various reasons. This is described in detail in this article.
This is a long-known Lacetti problem. It's not difficult to fix it yourself. If, when you turn on the button, the indication lights up, but the Lacetti air conditioner still does not work, then, most often, this is an insufficient amount of refrigerant in the system.
Pressure in the Chevrolet Lacetti air conditioning system in the Chevrolet Explorer diagnostic program. I advise you to immediately go to a service station with this problem, rather than try to figure it out yourself. There are instructions online for refilling air conditioners yourself from cans and monitoring pressure on pressure gauges.
The air conditioner does not turn on in the Chevrolet Lacetti
I was asked to turn on the air conditioner, but the air conditioner did not turn on. At this point they stopped refueling and said that they would not continue pumping until they had to fill it up and that we needed to see an electrician.
I paid for the work done and went home. At home I turned to a familiar master for all questions, that is, to the Internet. Just measuring your blood pressure won't do much. If the question arises whether the air is cooled well, then take a thermometer and measure the temperature at the street entrance, if recirculation is not turned on, and at the outlet of the air conditioner. The degree of cooling is also affected by the cleanliness of the external radiator of the air conditioner.
Diagnostics of the air conditioner, determining why the air conditioner does not turn on on the Chevrolet Lacetti This is a sign of a small, but still sufficient amount of refrigerant.
Lacetti air conditioner does not work
The system needs to be checked and recharged. The ECU does not give a command to turn on the air conditioning - the pressure in the system is most likely below or above critical.
There may also be a problem with the pressure sensor or a broken wiring. Freon pressure sensor.
The ECU gives a command to turn on the air conditioning, but it does not reach the compressor clutch - there is a problem with the wiring. The most likely location is the connector at the compressor clutch.
Possible reasons
Before starting to consider the issue, many motorists write on the forums that the whole problem is in the board that controls the air conditioning, and at the same time turning the rear window heating on/off. But, there are earlier versions of the car on which there was no trace of the Conder.
Before you begin to determine the reasons, it is worth considering the design features of the rear window heating system of the Chevrolet Lacetti. So, the button is tied to the air conditioner control board, but has its own separate tracks. Depending on the modification, it is worth understanding whether the resistor is worth it or not. This is due to the variation of the body, as well as the year of manufacture. On earlier models, the glass heating starts directly, since there is no air conditioning.
So, first you should understand whether the car has air conditioning or not, how the connection goes will depend on this, and then start looking for the causes of the malfunction. Let's look at all the options and where to look for the problem:
- Power button.
- Control board.
- Wiring.
- Heating panel.
- Fuse.
- ECU.
Now that all the reasons have been identified, it’s time to start correcting the problem.
The air conditioner does not turn on — Chevrolet Lacetti, l., year on DRIVE2
No leaks were found, but there was not enough refrigerant because I had never refilled it before. As they say, time takes its toll. This thing cost me when I was 18.
Lacetti air conditioner does not work
Do not leave the air conditioner idle for a long time; turn it on at least once a week, even in winter. It is necessary to check and, if necessary, refill the system. This situation occurs due to low pressure in the system, since after prolonged operation the air conditioner still starts to work.
The system needs to be refueled and checked for leaks. The problem is either excess pressure in the system or the pressure sensor in the air conditioning system.
Lacetti refrigerant leak Before filling the Lacetti air conditioning system with Ra refrigerant, it is advisable to find out the location of its leak.
Air conditioning does not work on Chevrolet Lacetti
So as not to refuel every year. Common places for refrigerant leaks: Connection points of high and low pressure pipes to the compressor.
There is a possibility that it could have been pierced by flying stones. It is necessary to pump out the refrigerant from the system, then weigh it.
Just measuring your blood pressure won't do much. If the question arises whether the air is cooled well, then take a thermometer and measure the temperature at the street entrance, if recirculation is not turned on, and at the outlet of the air conditioner.
The degree of cooling is also affected by the cleanliness of the external radiator of the air conditioner. Air conditioner diagnostics, fault determination: This is a sign of a small, but still sufficient amount of refrigerant. The system needs to be checked and recharged. The ECU does not give a command to turn on the air conditioning - the pressure in the system is most likely below or above critical.
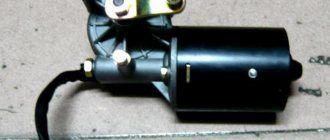
An air conditioning compressor, its purpose is to compress the working gas, as well as support its movement through the tubes of the refrigeration circuit. The air conditioner radiator, also called the condenser.
This element distills the working gas from a gaseous state to a liquid one. The evaporator of the air conditioning system is the same radiator, only installed in the indoor unit.
When turned on, it carries out the process of converting liquid freon into a gaseous state.
Air conditioning Chevrolet Lacetti
The thermostatic valve is designed to reduce the gas pressure level in front of the evaporator. This happens due to water freezing, as a result of which the rubber seals become leaky.
This is due to poor-quality soldering of the contacts of the air conditioner switch button. To eliminate this problem, you will have to remove the glove compartment so that you can remove the center console and unscrew the 4 bolts to remove this unit from the console.
Air conditioner diagnostics
It may not always be clear whether the Chevrolet air conditioning compressor really requires repair or whether the problem lies in completely different parts. This is why we carry out air conditioner diagnostics, thanks to which we can easily detect the unit that needs to be repaired. Only after this we begin work, but we are always sure that we are repairing exactly what is needed.
Of course, the technicians already guess their causes based on the “symptoms” shown, but we always measure the pressure in the system to determine whether the air conditioning compressor is working properly. Sometimes the air conditioner does not work due to a broken fan, and the efficiency will also be low if the radiator is dirty or broken. A freon leak causes an unpleasant odor in the car interior (with the air conditioning on).
Help, the air conditioner won’t turn on – Chevrolet Lacetti/Gentra/Cruze Fans Club
At the service station they connected a miracle device that pumped out everything that was in my air conditioner and vacuumed the system.
Equipment for refilling the air conditioner Refilled as much as necessary and checked for leaks. No leaks were found, but there was not enough refrigerant because I had never refilled it before.
As they say, time takes its toll. This thing cost me when I was 18.
Do not leave the air conditioner idle for a long time; turn it on at least once a week, even in winter. This will extend its service life.
Air conditioning does not work on Chevrolet Lacetti
Peace to your home and good luck on the roads! Probably, the pressure in the system is close to the maximum permissible or there is a problem with the pressure sensor, see. You need to check the pressure and sensor, bleed a small amount of refrigerant if necessary. Unfortunately, there are some other reasons that have not yet been explained. This is especially pronounced during long-term driving with recirculation turned on.
Repair and maintenance of air conditioners on Chevrolet cars
The evaporator freezes. It is necessary to turn off the recirculation and possibly the air conditioner to defrost the evaporator and restore normal operation.
In this case, the air conditioner, on the contrary, works too well. There is information that this is due to a small amount of refrigerant, oddly enough, and refilling can solve this problem. If your compressor turns on, the system is charged normally, but there is still no cold, and the pressure values on the high and low pressure sides of the system when the compressor is operating are close, then the compressor does not create the necessary pressure difference.
As a symptom, when you turn on the air conditioner in the cabin, you can hear a soft sound such as a low rumbling or howling. If the service offers you a replacement compressor, the air conditioner on the Chevrolet Lacetti does not work; the compressor does not produce any extraneous sounds during operation, it works quietly, without rattling or knocking, then do not rush to replace it. Most likely, the control valve in the compressor is simply faulty, which, as it turns out, fails quite often.
Even if at the service center they tell you that this does not exist and cannot happen, we still recommend starting with replacing the valve, since it costs “pennies” compared to the cost of the compressor and its replacement.
Honor and praise to Albano, which may save you tens of thousands of rubles. Original valve number for
Chevrolet Lacetti 1.6 air conditioner does not work well
If you have an old-style adsorption filter, it has a glass window; when you turn on the air conditioner, bubbles are visible in it for about two seconds, then liquid comes out. If everything happens this way, there is enough freon in the system, you need to dig. Most often, the cabin filter is to blame; when it is clogged, hot air also barely blows.
Sometimes the dampers also malfunction. In general, with such breakdowns it is better to contact specialists, I can continue to list faults, but most of them only specialists can fix
The Chevrolet Lacetti air conditioner does not work, why the air conditioner does not turn on
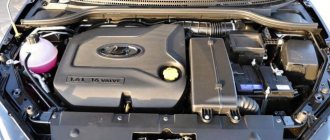
The Chevrolet Lacetti has the status of a luxury car . Already in the basic configuration, the car is equipped with a functional and reliable climate control system. But over time, the standard climate system of this car may malfunction . Most often, the interior air conditioning unit fails. Just for such cases Lacetti spare parts , making it possible to quickly restore the operation of the climate system.
The air conditioner of a Chevrolet Lacetti car operates at an ambient temperature of at least –5˚. The manufacturer recommends periodically turning on the air conditioner, even in winter, so that the refrigerant circulation circuit does not stagnate!
The air conditioning system of this vehicle may not operate due to the following reasons:
- Low pressure in the circulation circuit (low refrigerant or depressurization)
- Broken wiring
- Problems with the control unit board
The lion's share of malfunctions of the Chevrolet Lacetti air conditioner is associated with a drop in pressure in the circulation circuit . This usually happens after a long period of inactivity of the refrigeration circuit . The coolant escapes through the gaskets . In this case, checking the air conditioner on a diagnostic stand may show that the system is completely sealed.
Minute diagnostics are physically incapable of giving a long-term prognosis. Freon can leave the system in microscopic portions over many months.
A malfunction with insufficient pressure can be treated by simply replacing freon at a service station . If the service station has specialized equipment, refilling the air conditioner usually lasts 30-40 minutes . This procedure costs about $20 .
How to restore the operation of the Chevrolet Lacetti air conditioner if the climate control unit is broken
The second most common air conditioner problem is a malfunction of the control unit. Most often, the breakdown concerns push-button contacts. Many Chevrolet Lacetti drivers complain about the poor soldering quality of the climate unit . Soldering cracks over time, which leads to a significant deterioration in contact. Poor soldering causes the buttons to stop responding to pressure.
Diagnosing bad soldering of the control unit is very simple. You just need to turn on the air conditioner button. If the power indicator on the button does not light up, then there is a high probability of solder delamination. The presence of cracks in soldering can only be detected by visual inspection of the contacts. To do this, it is necessary to dismantle the control unit and disassemble it.
How to remove and disassemble the climate control unit
- Turn off the on-board power supply . To do this, you just need to disconnect the negative terminal from the battery.
- We dismantle the glove box . To do this, you need to unscrew the 2 lower bolts and 3 upper ones. Then the glove box is simply removed. Don't forget to disconnect the wire connector from the backlight. And also the wire block from the switch.
- Remove the lower dashboard trim . To do this, you need to open the coins drawer and unscrew the 2 top screws. Next, you just need to pull out the lining. It is attached with latches. the hood opening handle from the trim .
- We disconnect the rods of the temperature regulator and distribution flaps. One rod is located on the side of the glove box, and the second on the side of the driver's seat.
- We remove the center console trim . The cladding itself is held in place by latches. First you need to pry off the decorative frame. Usually, craftsmen use a set of plastic pullers for this task, since the slot of a metal screwdriver can easily scratch the lining.
- Disconnect the wire connectors from the control unit . The terminals have latches that need to be pressed before removing the wires.
- We remove the control unit . To do this, you need to disconnect the rods and unscrew the 4 bolts securing the block to the cladding.
That's it, you can start disassembling the block. This is done according to the following scheme:
- Disconnect the back cover . It is held on by latches. You will need to use force to remove the cover.
- We remove the board . The board itself is fixed with bolts. Additionally, it is held in place by a push-button mechanism. You just need to unlatch the button mechanism.
- We carefully study the technical condition of each contact . It is almost impossible to accurately analyze soldering with the naked eye. For this reason, many craftsmen resort to using a microscope or a jewelry monocular.
Poor-quality soldering can be seen by the presence of cracks. The presence of cracks indicates poor connection of the connection.
- We solder each contact on which traces of delamination are found.
- We assemble the unit in reverse order . You should pay attention to the control unit indicator lights. Poor board soldering is usually the cause of light bulbs burning out. If the light bulbs did not work, then we replace them with new ones.
- Let's try how the air conditioner works . During normal operation of the climate control, when the air conditioning button is pressed, the clutch should be connected. A characteristic click will indicate that the coupling is connected.
Below is a video in which the author clearly shows how to remove the control unit and how to solder it.
Methods for solving the problem
As can be seen from the reasons, the entire malfunction lies in the vehicle’s electrical system. In this case, many car enthusiasts go “where they’re not asked” and get additional damage. Therefore, if a motorist is not sure that he can cope or does not have sufficient knowledge to diagnose and fix problems, he must contact a professional auto electrician or a car service center.
Power button
First of all, you should check the heating on/off button. Historically, the Chevrolet Lacetti has a weak and vulnerable spot, especially on later models, so checking the element should be done first; besides, it can be easily removed.
Control board
One of the most difficult places to diagnose is the control or control board for the heated glass and air conditioner. Firstly, to get to this element you will have to disassemble the instrument console. Secondly, in order to carry out diagnostic operations, you need to have some experience in repairing radio equipment.
Having studied the forum and the stories of experienced car enthusiasts, we can come to the conclusion that cracks, microcracks, desoldering or other damage usually form on the board. If this type of failure is detected, there are two options: 1 - replace the element, 2 - resolder the board itself. Of course, the first option is better and recommended, since there is a 100% guarantee that the part is intact. In the second case, if you solder elements, you can either carry out the process incorrectly or miss something. But, nevertheless, most experienced car enthusiasts recommend contacting a car service to eliminate such breakdowns.
Wiring
Repeatedly, the reason for the sudden lack of heating of the rear window was the wiring, especially in the winter season. So, in order to carry out diagnostic operations you will need a multimeter. All diagnostics come down to a simple “ringing” of the wires and determining the area where the contact has broken. Of course, the manufacturer recommends replacing the wire completely to avoid a short circuit, but our car enthusiasts do it much easier: the wires are exposed, fastened together and insulated with nice electrical tape. Simple, cheap, cheerful.
Heating panel
The last main element is the heating panels. A broken filament in the support group can cause the entire system to short out and fail. A broken element will be immediately visible, so in this case, you will still have to contact a car service to fix the problem.
Fuse
A blown fuse caused by a short circuit causes the rear window defogger to stop working. To troubleshoot the problem, you need to find and look into the mounting block, and then remove the damaged element. Perhaps this is the easiest operation in repairing heated glass and other faults.
On new car models, the wiring ring can go into the electronic control unit, which controls all processes of the vehicle. So, the presence of errors or a minor malfunction can lead to the heated rear window no longer functioning.
To troubleshoot the problem, you will have to connect to the electronic control unit using a special OBD II automotive cable and diagnose the condition of the ECU. Usually, as practice shows, a simple error reset helps. At the same time, you can carry out diagnostic work on other vehicle systems.
vote
Article rating