Print this article Font size 16
Owners of the domestic “ten” know that the standard braking system involves the use of drum brakes at the rear and disc brakes at the front .
In terms of reliability, there are no special complaints about the drums, however, the rear disc brakes on the VAZ 2110 serve better, more efficiently and longer. Replacement is especially relevant in cases where the power of the power plant increases. The brake system must be modernized.
pros
Let's look at why disc brakes are better than drum brakes:
- Braking becomes more reliable, braking distance is reduced;
- Braking forces are distributed more evenly, given that the VAZ 2110 is a front-wheel drive car;
- There is an effect of faster response after pressing the pedal;
- Unsprung masses are reduced;
- Heat dissipation occurs better, which is especially important when driving on a mountain road or during active acceleration/braking. For this reason, the brake system is cooled better;
- Disk ones are much easier to dismantle and replace;
- There is no need to adjust the handbrake after each repair of the rear brakes, although this will have to be done the first time;
- They do not freeze in winter after washing, like drum ones;
- Rear disc brakes installed on the VAZ 2110 are much more convenient to control and promptly notice pad wear.
This article will help you replace the rear brake pads if they are worn out:
Advantages of a disk system
If, nevertheless, the advantages of disc brakes prevail over common sense, then we will try to install a kit for replacing drums with discs. But you should select only certified parts, no amateur activities. Disc brakes will give your car the following:
- The braking distance may be reduced.
- More uniform distribution of braking force, subject to modification of the pressure distributor.
- The mass of disc brakes is less, as a result, the unsprung masses become smaller.
- Disc brakes are easier to maintain.
- Better thermoregulation.
- The pads do not stick or freeze.
Minuses
Replacing brakes with disc brakes was not without the famous “fly in the ointment,” although it rather concerns precisely those problems that their installation can cause.
Firstly, our law enforcement agencies consider their installation on a VAZ 2110 as a design change.
What might this entail?
Following:
- Fine when passing a technical inspection;
- You can be simply wrong in a controversial accident if traffic police officers emphasize that you have “wrong” brakes;
- And the insurance company may also consider this a reason for non-payment of insurance.
Secondly, the handbrake will additionally need to be modified - or replaced with a hydraulic handbrake, although the latter weakens over time.
An article containing step-by-step instructions for replacing the handbrake cable can be found here:
Thirdly, it is necessary to refine or carefully adjust the sorcerer so that on the VAZ 2110 the rear wheels do not brake more than the front ones, as this will certainly cause a skid, especially on ice or wet asphalt. To do this, sometimes you even have to grind down the pads by a quarter, or even more.
Design Features
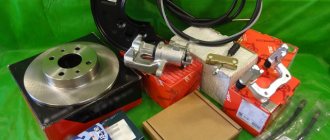
It is better to purchase rear disc brakes as a complete set. The VAZ 2110 fits 13 or 14 inch brake discs (ventilated or non-ventilated). Try to purchase certified discs so that they do not have to be modified.
Rear disc brake kit with necessary components
You also need a caliper, which comes in three types, so you need to select it to match the disc. The caliper comes with a hose and brake pads. The kit includes a universal clamp suitable for all calipers - a faceplate.
Selecting disc brakes
When purchasing, pay special attention to the quality and equipment of disc brakes. The choice should be made in favor of trusted manufacturers who can provide certificates of conformity.
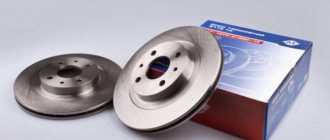
Discs
You understand that it is stupid to save on brakes, at least from the point of view of your own safety. It is also recommended to purchase ventilated discs. Additionally, it can be equipped with the option of ABS or hydraulic parking brake.
If you have not previously upgraded the brakes on the front wheels, then 13-inch discs are installed at the rear. If the front wheels are larger in size than the standard ones, then choose the rear ones 1 inch smaller.
Don't forget the importance of the caliper, which is available in three versions. It is selected according to the disk. The caliper comes with a brake pad and hose. Plus, each kit includes a faceplate. This is a universal clamp that will fit any type of caliper.
Dismantling
Before installing disc brakes, you need to dismantle the old rear brake mechanisms of the VAZ 2110.
This is done like this:
- Remove the wheel;
- Remove the brake drum;
- Remove the pads;
- Remove the hub from the wheel, having first unscrewed the brake pipe.
You should prepare for the fact that dismantling will not be easy. Not only do the brakes have the unpleasant tendency to stick during operation, but the bolts are also “welded” by corrosion. Therefore, it is advisable to treat the nuts and bolts themselves with a special agent (for example WD 40) so as not to tear off their edges.
It is important to plug the removed pipe with something so that brake fluid does not leak out and air is not sucked into the system. After that, knock down the hub. This works best if you attach a board or lath to the back of the support disk and hit it with a hammer, moving the blows: one from below, the other from above. This will prevent you from causing serious damage to the disk.
Installation
It's time to install disc brakes instead of the removed rear drum brakes.
Having knocked off the hub, we will put it back, but in a different way:
- It should be installed through the plate into which the caliper is already mounted. Carefully ensure that all holes line up. Particular attention to alignment;
- Next, use a hammer to straighten the corner of the beam so that the caliper does not rest against it;
- Now you can put the brake disc on the hub, placing spacers between these parts, and secure the disc with a bracket;
- We install brake pads from VAZ 2110;
- First, carefully and securely attach the brake hose to the caliper, and then to the tube;
- To reduce the braking force of the rear brakes compared to the front, you need to partially grind off the friction material of the pads.
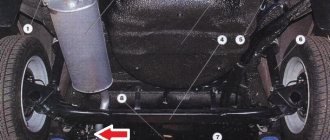
Rear beam
Grindable tab on the hub
Grindable tab on the hub
Grindable tab on the hub
Grindable tab on the hub
Grindable tab on the hub
Axle with dumbass
Adjustment plate on axle with hub
Hub installation
Grind down the corner of the beam that prevents the caliper from getting into place
Installing the brake disc using 2 washers and attaching the caliper to the special. plate
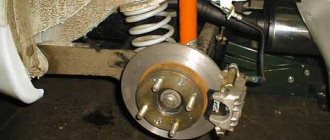
Rear disc brakes installed
Finalization
As mentioned above, after installing the rear discs, the car will brake much more efficiently. But if you don’t modify a few things, the rear brakes will work before the front ones. As mentioned above, to reduce the braking force, some of the friction material of the pads is ground off. That's all. As you can see, we managed to carry out a difficult operation with our own hands, which makes the car’s brakes more effective. The instructions given above include all the important operations and should be followed carefully. According to the latest data, the price for a set of rear brake discs is not that high, and if the replacement is carried out independently, then a lot of money will not go out of the family budget.
Examination
Having carried out all the above operations - first on one wheel, and then on the second, you also need to check the system for leaks. The first phase is to simply press the pedal.
The fact that everything is done normally is indicated by the fact that the pedal is pressed with force, quite tightly.
But this is not enough. Have someone else press the brake pedal while you try to rotate the parts that make up your new rear disc brakes.
If nothing moves, it means that your VAZ 2110 now has new rear disc brake systems - better and more reliable than the previous ones.
To minimize the braking distance, it is recommended to install a vacuum booster. Details: https://vazweb.ru/desyatka/tormoza/vakuumnyi-usilitel-tormozov.html
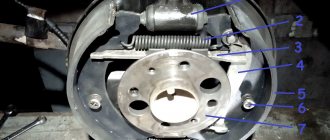
Stages of work on installing brake pads on the rear of the Priora
Considering the structure of the HAZ assembly, the hub is connected directly to the beam of the rear of the car on both sides. It has a braking disc and ensures the necessary rotation of the wheel system. The caliper, consisting of a hydraulic brake system, is also connected to the rear beam using a faceplate.
The caliper includes an integrated parking brake system or no parking brake. For sport class vehicle models, a manual brake system is not provided.
To eliminate the disadvantages of braking with the rear axle of a vehicle, remember that the best solution would be to install braking discs that have a smaller diameter compared to the front ones.
To carry out a qualitative change in the mechanism of the rear wheel braking system of a Priora model car, it is necessary to take into account three features.
- Braking discs produced for models with front-wheel drive have sizes from 13 to 14 inches, are divided into types: ventilated disc size from 14 inches (2112), ventilated disc size from 13 inches (2110), non-ventilated disc size from 13 inches (2108 ).
- The caliper is also classified into the same types, which directly depend on the discs used for installation. It comes complete with brake pads and a hose.
- If it is necessary to carry out work to attach the beam located at the rear of the machine, a faceplate is needed.
We begin work on installing the disc braking system:
- The rear axle drum brake system is dismantled. If the work becomes difficult, you can refer to the instructions for servicing the Lada Priora vehicle. Then you need to remove the hub from the lever as carefully as possible. After disconnecting the anti-lock braking system sensor (which prevents the wheels from locking when braking) from the carrier panel, you can begin to remove the brakes. Be sure to make sure that the connector is disconnected; do not forget about the fastening of the anti-lock braking system sensor.
Be sure to remove dirt from the pressure controller and all its parts, the neck of the trigger ring disk, and be sure to clean the hub axle. Poor cleaning will negatively affect further balancing. Be sure to remove the cable by first removing the screws.
- First, you need to install the adapter plate, a protective casing to prevent contamination, and also the hub axle, having previously fastened the casing to the plate in the middle, on the hub axle to the beam. Using torque screws, the bolts are secured; you need to tighten them very carefully, no more than 5.6 kgf/cm using a torque wrench that regulates the tensioning process itself. If the tension is not sufficient, the integrity of the discs will subsequently be destroyed or deformed.
- We attach the washer of the remote plastic sensor, the parameters of which are at least 9 mm. Subsequently, an ABS bracket is mounted in the launch hole and connected. It is very important to ensure that the sensors do not come into contact with the rotor; to check, just spin the brake disc, if a gap of at least 1 mm is maintained, everything is in order.
- Installing the guide caliper bracket onto the adapter plate, using locking screws and the necessary washers, and the tension must be at least 5.6 kgf/cm.
- Braking discs are mounted on the hub using two pieces of rods as guides, and a caliper is also mounted. Be sure to make sure that it is installed with the fitting facing up. First you need to coat the rod bolts with glue, insert the first one into the armhole and tighten it well. Be sure to adjust the cylinders before attaching the brake pads. Moreover, the second bolt must be tightened to no more than 2.5 kgf/cm.
- Be sure to lubricate the spring from the handbrake cable and attach it to the bracket. Only after this procedure do we fasten the following parts using a screw clamp: cable and bracket to the beam.
- Then the handbrake cable is disconnected and the protective cover is detached. Remove the cable from the caliper structure; the mount must be dismantled. Be sure to make sure that the pads move freely without interfering with the brake rotor and caliper, and be sure to note that the protruding part of the pad fits exactly into the opening of the caliper piston. Then you need to secure the cable using a protective rubber cover. Place a cable loop on the manual drive trigger. Be sure to firmly attach the brake hose, keeping parallel between the top of the flange from the beam arm, and part of the hose is screwed into the caliper system.
- The final process in the work will be connecting the brake line. The brake tube must be bent slightly so that its tip is located next to the opening of the hand cable bracket. The end of the hose is inserted into the hole in the bracket, connected to the brake pipe, and the whole structure is fixed quite firmly.
Important! Be sure to check the correct assembly of the entire structure and the reliability of the connections.
After installing rear disc brakes, before all the new parts are ground in, the coating heats up and possibly grinds. Until the mileage of the vehicle with new parts is 300 - 500 km, you should not suddenly brake, because... new parts have not yet been processed properly.
Complete with a disc brake system on the rear of the Priora, it is recommended to also remove the discs intended for the front wheels; it is important to use the well-known Brembo MAX model. The included discs will ensure flawless operation of the braking system, regardless of speed. Among other things, your vehicle will have a more harmonious appearance.
The decisive factor for installing disc brakes on all four wheels of a vehicle is the need to achieve a balanced load during braking, eliminating undesirable consequences during braking. In the case when one of the four brake mechanisms is ahead or behind in its immediate activity, this will cause deterioration in vehicle control.
Before carrying out work on installing disc brakes, really evaluate your capabilities, because... The work is quite complex and has a number of nuances. Therefore, if you are not confident in your own capabilities, the best option would be to contact a specialized service center.
Be sure to watch the video about which discs are better.