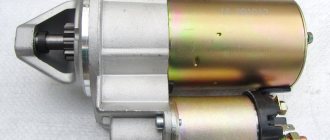
How to remove the starter Niva 21214
It won’t be difficult to remove the starter on a VAZ 21214 (Niva) with your own hands. To get to it, you first need to remove the engine air filter box. And then unscrew the 3 bolts securing the car starter (two starter bolts from under the hood and one from under the car), although craftsmen often do not screw in the third bolt to make it easier to dismantle the starter, because access to the lower mounting bolt is from under the car.
Tools needed for removal:
- The key is "13".
- Ratchet with small extension.
- Head at "10".
Briefly, you learned how to remove the starter on 21214, and now let’s begin the removal in order:
- disconnect the terminal from the battery;
- disconnect the flow meter connector;
- disconnect the clamp of the air filter housing pipe, dismantle the box itself (by unscrewing the 4 fastening bolts) and put it aside;
- remove the front support bracket securing the intake pipe to the engine support bracket;
- disconnect the starter heat shield from the exhaust manifold and from the engine support bracket;
- using a key set to “13”, you need to unscrew the bolt of the upper fastening of the starter to the clutch housing (this bolt also secures the rear support bracket of the intake pipe to the clutch housing);
- in the same way, unscrew the bolt of the middle and lower fastening of the starter, then move the starter forward;
- disconnect the traction relay control wire;
- Using the head at “13”, unscrew the nut of the “positive” wire and remove the starter from Niva 21214;
- move the starter along the cylinder block to the side and remove it;
- removing the starter from a carburetor engine is quite easy due to the lack of support brackets for the intake pipe;
- We install the starter in the reverse order.
You can clearly see the entire process of removing the VAZ 21214 starter in the video.
Source
Fuel system Niva 21214 injector diagram
Lada 4x4 (VAZ-21214): Engine power system
Power system: 1 — inlet pipe; 2 - fuel rail; 3 - electrical connector of the throttle unit control unit 4 - throttle unit; 5 - receiver; 6 — fuel pressure regulator; 7 — adsorber purge valve; 8 - fuel filter; 9 — ventilation tube; 10 - filling pipe; 11 — gravity valve; 12 - separator; 13 — fuel module; 14 — fuel tank; 15 - adsorber; 16 — nozzles
Fuel is supplied from a tank located in a recess in the floor under the rear seat. The tank is bolted to the body and closed on top with a metal lid. The fuel tank consists of two stamped steel parts welded together.
The filling pipe is connected to the tank by two gas-resistant rubber hoses: a thick hose is used to fill fuel, a thin hose is used to remove air displaced from the tank when it is filled with fuel. The hoses are secured with clamps.
The filler plug has built-in inlet and outlet valves that prevent deformation of the tank when the pressure inside it changes.
The fuel module, including the fuel pump and fuel level sensor, is installed
in the fuel tank. For rough fuel cleaning, there is a strainer at the module inlet that protects the bearing units and pump manifold from abrasive particles contained in the fuel.
To access the fuel module under the rear seat cushion, you must remove the fuel tank cover.
The fuel level in the tank is determined using a fuel level indicator sensor mounted on the fuel module.
The fuel pump is electric, submersible, vortex type.
The pump is turned on using a relay at the command of the engine management system controller (with the ignition on). From the fuel pump, through hoses and pipelines, fuel is supplied under pressure through a fuel filter located under the bottom of the vehicle to the fuel rail. Fuel passes through the pump while it is running, lubricating and cooling it.
The pump creates a pressure in the system that exceeds the operating pressure in the fuel rail. The fine fuel filter is non-separable, with a paper filter element.
There is an arrow on the filter housing that must coincide with the direction of fuel movement. The fuel rail is a hollow bar and serves to supply fuel to the injectors.
Fuel rail included: 1 — fuel pressure regulator; 2 — nozzles; 3 - fuel rail
The fuel rail is secured with two screws to the intake pipe.
On the ramp there is a fitting for monitoring the fuel pressure and a pressure regulator. The latter changes the pressure in the fuel rail in the range from 3.0 to 3.2 bar (3.0-3.2 kgf/cm2) depending on the vacuum in the receiver, maintaining a constant pressure difference between them. This is necessary for accurate dosing of fuel by injectors.
Fuel under pressure is supplied to the internal cavity of the ramp, and from there through the nozzles into the intake pipe.
The injector is an electromagnetic valve that allows fuel to pass through when voltage is applied to it and closes under the action of a return spring when there is no power. At the injector outlet there is a sprayer through which fuel is injected into the intake channels. The controller controls the operation of the injectors.
The injectors are sealed in the ramp and inlet pipe with rubber rings and fixed to the ramp with metal clips. If the winding is broken or shorted, the injector should be replaced. If the injectors are clogged, they can be washed without dismantling at a special service station.
The fuel pressure regulator is a fuel valve connected to a spring-loaded diaphragm. The valve is closed under the action of the spring. The diaphragm divides the regulator cavity into two isolated chambers - “fuel” and “air”: the “air” is connected by a vacuum hose to the receiver, and the “fuel” is connected directly to the ramp cavity. When the engine is running, the vacuum, overcoming the resistance of the spring, tends to retract the diaphragm and open the valve. On the other hand, fuel presses on the diaphragm, also compressing the spring. As a result, the valve opens, allowing some fuel to flow through the drain line back into the tank. When you press the gas pedal, the throttle assembly opens the valve, the vacuum behind the throttle valve decreases, the diaphragm, under the action of a spring, closes the valve and the fuel pressure increases. If the throttle valve is closed, the vacuum behind it is maximum, the diaphragm pulls the valve harder - the fuel pressure decreases. Pressure drop determined by stiffness
Possible breakdowns and malfunctions
It is worth thinking about replacing the starter if the car owner notices that:
- The plastic on the plastic cover of the relay began to melt; the power contacts easily turn inside the cover.
- Relay coils are damaged.
- When the control wire was removed, the power contacts were not turned off or were turned on in a free order, which resulted in breakage of the spring. Since most solenoid relays cannot be disassembled, it is not possible to inspect the spring.
- The starter does not start spinning the first time, it jams.
- The power contacts are burnt. The voltage at the contacts of the solenoid relay is less than 0.5 Volts.
If severe external defects appear, you cannot do without purchasing a new starter.
Specific problems and methods for solving them
If it is difficult to turn on the VAZ 21214 engine, there is a possibility that the problem lies in the starter. The most common breakdown is that the starter may not turn, even when the ignition is started. Note that the starter relay is located very close to the ignition relay, under the additional. fuse block.
Let's get acquainted with the typical malfunctions of the Niva starter:
| Complete replacement of the part (retractor relay). | ||
| The battery is low. | Despite the click, the starter does not move. When consumers are turned on, the voltage at the battery terminals does not exceed 12V. | Replace/charge the battery. |
| The starter armature winding is damaged and a short circuit has occurred. | To check the serviceability of the mechanism, use an ohmmeter. Also pay attention to places where the insulation has changed color. Darkening indicates problems. | Complete replacement of components (starter). |
| The battery terminals are oxidized and poorly connected. | Even though the starter clicks, it does not turn over. If you turn it on, the voltage at the starter/battery terminals varies greatly. | The contact connections must be thoroughly cleaned, coated with Vaseline or other lubricant, and then tightened tightly. |
| The ground contact is broken, the relay contacts are oxidized. | The starter does not turn even after a click. The car won't start. For diagnostics, it is necessary to measure the resistance in the circuit, as well as the performance of the relay as a whole. | 1) Completely replace the solenoid relay with a new one. 2) Clean the contacts well, lubricate them with a protective compound and tighten tightly. |
| Flywheel ring teeth/drive gear are damaged. | It is enough to conduct a visual inspection of the components to notice a malfunction. | Flywheel replacement, starter replacement or repair. |
| The freewheel slips. | The starter continues to move, but the flywheel remains in place. | Complete replacement of starter/clutch. |
| Rotating the ring gear on the flywheel. | The starter turns, but the flywheel/crankshaft does not. The clutch housing makes unnatural sounds. | Buying a new flywheel and replacing it completely. |
| The starter commutator is burnt, the brushes are very worn/stuck. | Remove the starter and make sure how tightly the commutator is pressed against the brushes. Determine commutator wear and remaining brush height. | If the commutator is worn out as much as possible, the starter will have to be replaced. The damage is minor - just have it repaired or go to a salon. |
| The ignition contacts (50 and 30) cannot close and the solenoid relay wiring is inoperative. | The relay does not operate when the key is turned. The car owner must measure the voltage at the relay control contact. | Replacing the ignition switch, cleaning contacts. |
| Attachments/engine jams. | Visual check of the coolant pump, as well as the crankshaft and power steering pump. | If problems are detected, the attachments/engine itself will need to be repaired. |
Starter replacement or repair
Algorithm of actions:
- use a key set to “thirteen” to loosen the fastening of the conductor connected to the traction relay. Discard the tip;
- to check the VAZ-2121 relay, apply a voltage of 12 volts to the relay output, and apply “-” to the body;
- connect the resistance meter to the contacts;
- if the relay is intact, then the armature pushes out the overrunning clutch, and the contacts close;
- If a part is found to be faulty, replace it;
- to remove the traction relay, tighten the three screws using a slotted screwdriver;
- pull the rod with the spring out of the device casing, and install the new traction relay according to the reverse algorithm.
If the problem persists, continue repairs:
- take a Phillips screwdriver and twist a couple of screws, then remove the casing;
- To check the integrity of the brushes, twist the fastening screw of the contact conductor, and then use a screwdriver to press out the spring. Next, it remains to remove the brush;
- In the same way, remove the other three brushes and inspect them. If at least one of the brushes is up to 1.2 centimeters high, then it must be replaced (further use of the part is not recommended).
- connect a multimeter to the starter windings (one at a time) and check them for a short circuit. The task is to make sure that there is no short circuit between the turns and on the housing;
- use a screwdriver to lift the locking ring, remove the washer from the shaft and use a ten-key wrench to tighten a pair of tightening bolts;
- separate the starter elements and remove the insulating tubes;
- inspect the appearance of the windings and commutator. Remove burn marks from the collector using sandpaper. If this part is severely worn or charred, then repair is useless - the device is replaced. Remove burrs using fine-grained sandpaper, then polish the product;
- use a multimeter to check the armature for a short circuit. If a problem is found, change the unit;
- remove the rubber seal from the drive cover and remove the washer to adjust the armature;
- remove the cotter pin of the lever axle and select the last one. Next you need to remove the armature along with the drive.
Selection of components
The original starter is produced by LADA and comes in the original blue packaging. It is marked with article number 21214-3708010-01. The cost of this part is from four to five thousand rubles, depending on the store.
To avoid stumbling upon a fake, carefully examine the box. The presence of extraneous logos, absence of an article number on the box, or color mismatch is unacceptable. The low price should alert you.
Alternative options are produced by companies such as Fenox, Krauf, Valeo. The listed brands are distinguished by high quality products and fairly affordable prices. The price for starters varies from 2200 to 4700 rubles.
What original or analogue can I supply?
If the starter does not turn, you can simply replace it. Typically, in a store, the buyer has a choice between two options:
- original;
- analogue
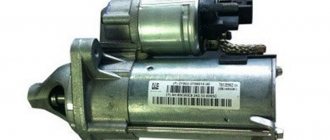
They differ not only in their quality, but also in their durability. The easiest way to study visual differences is in the photo. Original starter:
| Model | Manufacturer | Catalog number | vendor code | Price, rubles |
| 21213 | KATEK | 21213-3708010-00 | 5722.3708 | From 3 300 |
But the cost of the original starter is usually at least 3.5 thousand rubles. That’s why many people opt for analogues. There are many other manufacturers on the Russian market that are not certified by AvtoVAZ. If possible, you should choose well-established brands. The optimal solution would be:
| Model | Manufacturer | Catalog number | Price, rubles |
| 21213 | TRACKMAN | 21013708 | 2900 |
| GANZ | GRP14005 65 (Similar to 5722.3708) | From 2,000 | |
| FENOX | AN 5722.3708 NM 1.55 KW | From 4 3000 |
It is important to remember: all starters have different resources and may differ in size. It is advisable to arm yourself with a ruler and tape measure before going to the store. This will allow you to avoid purchasing a device that is not suitable in size. Some manufacturers produce equipment that can be installed on various vehicle models. The price depends significantly on the manufacturer.
Before purchasing an analogue, you need to familiarize yourself with the brand. For example, Bosch has proven itself to be good. The equipment he produces is durable and does not cause difficulties in repair. There is a list of manufacturing companies recommended by AvtoVAZ itself. It is advisable to familiarize yourself with all the nuances and subtleties of installation in advance. This will allow you to select it at the start and install it later yourself.
Replacing the starter on a VAZ 21214
The process of replacing the starter is quite simple and can be done at home. You will need a key “13”, as well as a new replacement part:
- If you have an injection engine, remove the generator in advance. The receiver and intake pipe are located close, which can significantly hinder the removal of the starter. Accordingly, the starter can be removed through the lower part of the mechanism.
- The air filter housing must be removed. Then we get rid of the front support bracket connecting the engine mount and the intake pipe. Disconnect the starter heat shield from the engine support bracket and exhaust manifold.
- You can get rid of the upper starter mount using a 13mm wrench. To move the starter forward, you also need to remove the bolts of the lower and middle mountings. Carefully disconnect the traction relay control wire.
- We take the head “13” and get rid of the positive wire of the starter. (See photo). By unscrewing the nut, you can remove the wire and remove the starter. We move it strictly back, along the cylinder block.
- We remove the starter. We take a new part and install all the elements of the mechanism in the reverse order.
If you are not confident in your abilities, we recommend contacting a car dealership.
Source
Where is the Niva starter relay located?
VAZ (Lada) 2121 (4x4) 1993 - present
Help me determine the location of the starter relay on a Niva.
- The starter, when starting, is disconnected from the flywheel - 3 answers
- Niva 2121 won’t start – 11 answers
- VAZ 2121 starter does not work - 3 answers
- Why don’t the starter relay and fuel pump relay work, Niva 2121? – 3 answers
- The generator does not produce the norm at 14.2-14.5 on Niva - 2 answers
You can determine the location of the starter relay on a Niva using your ears. You take it and listen to where the clicks are heard.
Well, if anything, the starter relay is located behind the upholstery, just to the left of the left leg, under the additional fuse block
To change the relay, you need to unscrew the fastening screw, remove the relay and disconnect the block.
Even more useful tips in a convenient format
The starter, when starting, is disconnected from the flywheel
voice
Article rating
Description of problems with the starter and ways to solve them on the VAZ 21213
On Niva, most of the components are quite reliable and do not require frequent repairs. But there are a number of standard breakdowns characteristic of the vehicle in question. Most often, the starter does not turn for the following reasons:
- turn-to-turn short circuit in the solenoid winding - the relay needs to be replaced;
- open circuit of the power supply - it is necessary to check the connections between connections No. 50 and No. 86 (the most common places of oxidation);
- the relay armature is stuck - it is necessary to replace the armature.
If the solenoid relay is activated, but the starter does not rotate or rotates very slowly, then you must:
- poor contact on the tips and terminals of the battery - it is necessary to stretch it and clean it from deposits;
- the commutator contacts are burnt, the brushes are stuck - you need to clean the commutator and replace the carbon brushes;
- there is a short circuit in the brush holder - it is necessary to replace the cover on the commutator side.
Sometimes it happens that the starter rotates. But the engine flywheel remains motionless. Perhaps the reason lies in clutch slipping. To determine the exact cause and repair, you will need to remove the starter and check it on the stand. The problem can only be solved by replacing the coupling. Sometimes extraneous noise occurs when the starter rotates. The reasons for this may be the following:
- The bearing bushings and armature shaft journals are worn out – the starter needs to be replaced;
- The starter is loose.
To solve most problems that arise during operation, you will need to remove the starter. This procedure may require dismantling the injector. Testing at the stand will not take much time. But it will allow you to determine the exact cause of the malfunction. There is a wide range of breakdowns. They usually occur on cars with mileage of more than several tens of thousands of kilometers.
Dismantling and connecting the generator on Niva 2121: step-by-step instructions
On Niva 21214 cars there is a generator of type 9412.3701, on VAZ 21213 - type 371.3701, on Niva Chevrolet there is a generator 2123.
All of them are alternating current electric machines with electromagnetic excitation, having a built-in rectifier unit with silicon diodes and an electronic voltage regulator.
The maximum current produced by the generator unit type 9412.3701 is 80 A, voltage - 13.2 - 14.7 V, rotation - right.
Design of unit 21214
The unit covers are attached to the stator using 4 bolts. The covers have bearings installed. They rotate the rotor shaft. In the front bearing, the inner race is clamped with a nut along with a thrust ring and washer. The 2nd bearing is also pressed into the back cover.
The stator has a 3-phase winding, one of the ends of which is connected to a rectifier unit consisting of 6 diodes. Of these, 3 diodes are negative, 3 are positive. According to the polarity, they are pressed into the plates. The entire structure consists of a rectifier unit, which is located on the back cover of the generator unit covered with a protective casing.
The design of the unit also includes contact rings and brushes. On the back side of the back cover there is a brush holder, which is structurally connected to the voltage regulator. The rectifier contains a capacitor that protects the electrical network from power surges.
Basic malfunctions and ways to eliminate them
Checking the health of the unit is done using a multimeter. After the engine is started, the voltage at the battery terminals should be 13.6 V. If the value is higher or lower, this indicates a break or short circuit of the windings, oxidation of the slip rings, a malfunction in the brush assembly, or voltage regulator.
The generator unit may not work well due to weak belt tension or its breakage. In this case, you need to adjust the tension or replace the belt. Faulty voltage regulator, needs to be replaced.
If a breakdown, short circuit, or damage to the rotor windings is detected, it should be replaced. If there is a break or short circuit in the stator windings, it requires replacement. If the diodes are damaged, the rectifier unit is replaced.
Nuances of moving a generator
The disadvantage of domestic Niva SUVs is the location of the generator unit - at the bottom of the engine compartment. It constantly gets contaminated when driving off-road, and coolant constantly drips. The problem is solved by moving the generator upstairs (the author of the video is SARTANETS).
To transfer, you will need a set of keys, a bracket, mounting bolts, and a V-belt. You can make a generator transfer bracket with your own hands according to the drawing below.
Drawing of a homemade bracket
Sequence of actions during transfer:
- We dismantle the propeller, pump and remove the belt.
- By unscrewing the standard bracket, you can remove the generator.
- We cut off the bead around the side of the cylinder head and on the cylinder block.
- Then you should unscrew the two bolts and two studs.
- Next, the assembly is installed on a new bracket and final assembly is performed.
1. Schematic illustration of unscrewing the fastening material2. Car with belt removed3. The unit is in a new location
Thus, moving the generator unit upstairs is not difficult.
Guide to removing and connecting the generator
To remove the unit, you need to prepare a set of tools: keys “10” and “19”, ratchets with heads, a hammer and a small extension.
The process consists of the following steps:
- First of all, remove the negative terminal from the battery.
- Next, you need to remove the engine protection and the right mudguard.
- Then, using a hammer, carefully knock out the mounting bolt and remove it.
- At the next stage, you need to disconnect all the wires going to the generator: the plug and the wires secured with a nut.
- Then the fastening on which the belt tensioner is located is unscrewed.
- By removing the belt, the assembly can be dismantled through the hole that was formed after removing the protection.
- After replacement or repair, install the unit in reverse order.
Electrical connection diagram
Price issue
The VAZ 21214 generator has good repairability, which allows you to significantly save money if worn or broken parts are replaced in a timely manner.
If you change the complete unit, the cost of replacement will be as follows:
- generator 21214 – 3125 rub.;
- lower mount – 133 RUR;
- fastening bolt - 53 rub.;
- tension bar - 55 rub.;
- relay RS-527 – 57 rub.
How to replace the starter on a Niva Chevrolet
It may happen that the Chevrolet Niva does not start, or starts, but with periodic interruptions. This may be due to a failure, for example, of the electrical or fuel system. The most common failure is when the starter fails. But in order to correctly and fully carry out diagnostics, it is necessary to remove the starter; the Chevrolet Niva is no exception.
This device is an electric motor with direct current, which is activated by a permanent magnet, which is combined with a planetary gearbox, plus a two-winding electromagnetic relay. Therefore, before dismantling, you should understand whether this is the reason that the engine does not want to start. This can be determined both visually and by replacing the battery.
Preliminary diagnostics
A number of actions need to be taken:
- We check all the existing electrical connections that connect the starter and the battery, since it happens that poor contact between ground and positive leads to poor operation of the device, and the click of the retractor relay is heard, thereby not enough power to crank the crankshaft in the engine. This problem is eliminated by cleaning the contacts of the starter, battery, and various groups of contacts.
- We check the battery itself; it is necessary to replace the load plug itself with a proven one that is working. If there is no result, then it is necessary to remove the unit and replace it.
Replacing and removing the starter on a Chevrolet Niva
To make a replacement you must:
- We disconnect the terminals from the battery; if this is not done, a short circuit may occur, which will lead to a complete replacement of the electrical wiring
- Using a ratchet wrench, remove the crankcase protection
- Loosen the three bolts that secure the starter.
- We dismantle thermal protection
- Together with the wires, carefully pull out the unit; after pulling it out, carefully pull the wires toward you and disconnect them from the device.
- The power wires that are connected can be cleaned; perhaps the reason that the engine starts unstably lies in poor contact.
After it has been removed, diagnostics and subsequent repairs can be made.
How to make repairs yourself
When the starter is removed, you can try to repair it yourself or take it to a specialized service center. If you have experience and an idea of how everything works and you, for example, are sure that the cause of the breakdown, for example, lies in a malfunction of the solenoid relay, then you can start repairing it yourself. But in any case, to be sure that this is the problem, it should be checked on a special stand where there is a load, since at idle it can work as it should, but not under load.
Another reason for poor ignition may be a malfunction of the planetary mechanism, which has plastic parts. You can understand what condition they are in by unscrewing the unit and disassembling it in half; to do this, simply unscrew a couple of nuts in its rear part.
As the experts say, the Chevrolet Niva starter is unsuitable for repair, since spare parts for it are not sold, but time does not stand still and you can do everything yourself. After the repair is completed, everything is assembled and put back in place in the reverse order.
Loading ..
So I immediately unscrewed it. Now you can unscrew the starter. The bottom bolt is fairly easily accessible from below. I unscrewed it with a small ratchet. I unscrewed the remaining two bolts from above. This is what the starter looks like from above. Here I already used a spanner.
The key part of the key is slightly bent, otherwise it would be impossible to get to these bolts. The middle bolt is also more or less accessible.
The power wires that are connected can be cleaned; perhaps the reason that the engine starts unstably lies in poor contact. After it has been removed, you can carry out diagnostics and subsequent repairs. How to make repairs yourself. When the starter is removed, you can try to make repairs yourself or take it to a specialized service center.
If you have experience and an idea of how everything works and you, for example, are sure that the cause of the breakdown, for example, lies in a malfunction of the solenoid relay, then you can start repairing it yourself. Before dismantling the starter, it must be removed completely or, by unscrewing the lower mounting bolt, moved to the side. The starter mount consists of three bolts, by unscrewing which you can remove the Chevrolet Niva starter from the bottom of the engine.
The lower fastening bolt is unscrewed from below using a ratchet wrench. Access to it is simple and does not require much effort.
The remaining two bolts are unscrewed from above using spanners with a bent head or heads with an extension with a cardan. The most problematic is the top bolt, which requires a special approach with a curved key. The key fits onto it quite easily, but to unscrew it the lever travel is small, so you have to turn it for quite a long time.
After unscrewing all three fastening nuts, it is necessary to dismantle or bend its thermal protection. From the side of the box, it will be enough to simply bend the tin, and from the bottom you will need to unscrew the bolt securing it. However, you won’t be able to see it, since it is covered with a heat-protective casing on top. It is also impossible to see it from below, since the crankcase protection covers it there.
Do-it-yourself VAZ 21213 starter repair video
05/28/2018 admin Comments No comments
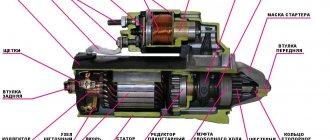
The Niva 21213 and 21214 cars have a starter with mixed-type excitation, with an electromagnetic-type traction relay and two independent windings. Four poles are fixed in the housing, one of which is connected in parallel, and the rest in series. The casing and cover are tightened using a pair of bolts. Inside there is an armature with a collector (the latter is of the end type). The armature rotates on metal-ceramic bushings pressed into the covers.
Despite the apparent design complexity, starter repair is accessible even to beginners. The main thing is to have the necessary tools on hand, diagnose the problem in a timely manner and follow the manufacturer’s instructions. Below we will look at what starter malfunctions exist and how to fix the problems.
During operation, the following problems are possible: 1. After turning the key in the ignition switch, the Niva car does not start, the starter does not turn. Causes of the problem:
In the cases described above, the faulty element is replaced or repaired, and the contacts are cleaned.
2. When the key is turned in the ignition switch, the relay works, but the starter does not turn (hot or cold). Causes:
- The battery is discharged or damaged.
- The fastening of the lugs of the wire connecting the engine with the body part has been loosened.
- The “plus” and (or) “minus” on the power source is oxidized, poor traction.
- The commutator was burnt and the brushes were worn out.
- The positive terminal of the brush holder was at ground.
- There is a break in the armature and (or) stator windings.
How to check it yourself
Without removing the starter from the car, you can only reliably check for poor contact and the fact that the retractor relay control circuit is faulty. If the starter does not respond to turning the key to the Start position, directly jumper the power terminals of the solenoid relay with a screwdriver. Triggering of the starter will indicate a malfunction in the control circuit or the traction relay itself.
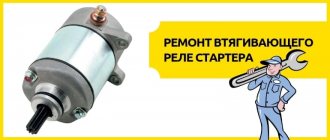
If you know how to use a multimeter, in DC mode, check whether voltage comes to the control terminal after turning the ignition key to the Start position. If voltage is supplied, but the retractor does not operate (there is no characteristic click), the traction relay needs to be repaired or replaced.
Typical breakdowns
- Abrasion of brushes that wear out due to tight pressing against the rotating armature. The degree of wear can be assessed visually or using a caliper. It is enough to compare the thickness of new brushes with worn elements.
- Wear of collector plates. Brushes wear out much faster than armature contact plates, but even after several hundred thousand kilometers they can become unusable. The degree of wear is determined by the depth of the groove, which is formed from friction with the brushes. If the brushes do not fit tightly at the moment of rotation of the armature, a spark discharge may occur, causing burnout and further detachment of parts of the lamellas. Among other defects that arise due to runout and axial play of the armature shaft are ovality and displacement of the friction zone of the brushes.
- Violation of the insulation of the commutator contacts, leading to breakdown of the armature housing to ground; interturn closure.
- Wear of the bushings securing the armature shaft. Critical depletion of bronze or copper-graphite bushings leads to runout of the armature shaft, as a result of which copper-graphite brushes fail much faster, and uneven wear of the commutator is observed. Also, wear of the bushings can cause displacement of the armature plates, which leads to an interturn short circuit.
- Wear or incorrect selection of spacer washers that prevent axial play of the armature shaft.
- Burning of the contact plate of the solenoid relay. Winding burnout, turn-to-turn short circuit of the solenoid coil.
- Worn armature shaft gear.
- Peeling off the magnets from the starter housing.
- Breaking the terminal of the positive wire coming from the power terminal retracting to the brush. Sometimes the terminals become severely corroded due to their location in an aggressive environment.
Repair or replace
Operations that in most cases are limited to manual repair of the starter:
- replacing the brush assembly. We have already looked at how to replace starter brushes with your own hands, so we will not dwell on this;
- cleaning the working area of the collector with fine-grained sandpaper;
- lubrication of the planetary gearbox, armature shaft in the place where the retractor relay fork moves;
- complete cleaning of all parts from wear products of graphite brushes and commutator, dirt.
Many manufacturers do not provide for repair and maintenance of the solenoid relay, so to disassemble it, flare it. This can be done only for the purpose of cleaning the contact areas of the terminal bolts and plates with sandpaper or a file. If an inter-turn short circuit or a breakdown in the housing is detected, we recommend replacing it instead of doing it yourself. We also find the idea of repairing the commutator lamellas and rewinding the starter armature very dubious. For widespread starter models, such repairs are simply unprofitable, since it is often easier to find a working used part at a disassembly site or buy a new starter altogether.
What kind of starter can be installed
- Motorherz STB0373RB. This company is a large supplier of auto parts that has its own production. It sells hydraulic power steering pumps, turbochargers, starters, generators, steering racks, repair kits, etc. The cost of a starter unit for a VAZ 2131 is 3,940 rubles.
- ATE is a plant located in the Moscow region, engaged in the creation of electrical equipment for domestic cars. The ATE-1 starter unit is an inexpensive product that fully justifies its cost. The price of a starter for a VAZ 2131 car is 3250 rubles.
- The production of a starter for this vehicle is also carried out by the Stary Oskol Automotive Equipment Plant. The history of the enterprise goes back more than 55 years. The cost of a starter unit for a VAZ 2131 is 3,400 rubles.
In some cases, the car will not start because there is a malfunction in the power plant. The main reasons may be: thick oil that does not match the season, as well as jamming of the power unit shafts. In most cases, the starter relay fails.
The solenoid relay is replaced if:
- There is a break in the relay winding. It is worth considering that the solenoid relay is equipped with two windings: a starting winding (from the control contact to the output power terminal) and a holding winding (from the control contact to the relay body). It is also possible that an interturn short circuit may occur in the windings. The main symptom of this malfunction is the appearance of a strong smell of burnt insulation. The windings are checked on the table by applying voltage from the battery: the “negative” contact is connected to the housing and the output power terminal, and the “positive” contact to the control contact.
- If the voltage drop across the solenoid relay is more than 0.3-0.5 volts. This phenomenon indicates that the power contacts have burnt out.
- If an external inspection indicates the presence of burnt areas on the plastic cover, near the power contacts.
Location of fuse and relay blocks Lada 4×4
Almost all electrical devices on these cars are designed for 12 volts. In this case, the amperage can vary from hundreds of amperes to tens of milliamps. To separate power and control currents, a switching relay is used. This prevents the wires from getting too hot or catching fire. At the same time, it reduces the overall amount of wiring in the car. Location of switches in the car:
- On the left under the dashboard is block 1 under the first set of fuses. Here are the relays for the Niva 21214 fuel pump, ignition, main switch and both electric fans.
- To the right of the steering column, the relay block is responsible for the fog lights, heated rear window of the trunk door and both types of light (two elements for high and low beam).
- Above the second block are the hazard warning and turn signal relays.
- The starter relay on Niva 21214 is designed for several hundred amperes and is installed in the engine compartment.
It is important to maintain the normal condition of electrical circuits and replace their elements with original ones. Otherwise, complete failure of the controlled unit and a complete stop of the vehicle are possible.
| Purpose of the fuse | ||
| Fuse box located under the control panel | ||
| 1 | 16 | Heater fan - electric motor Headlight cleaner and headlight wiper motor in all wiper positions except the original Heated rear window - power relay (winding) Rear window cleaner and washer Windshield washer |
| 2 | 8 | Turn signal, turn signal and hazard warning signal breaker relay - turn signal mode Reversing lights Windshield wiper (gear motor and relay) Generator - field winding Warning lights: brake fluid level, oil pressure, carburetor choke, parking brake Coolant temperature gauge Gauge fuel level, reserve indicator lamp Voltmeter |
| 3 | 8 | High beam - left headlight, control panel warning lamp |
| 4 | 8 | High beam - right headlight |
| 5 | 8 | Low beam - left headlight |
| 6 | 8 | Low beam - right headlight |
| 7 | 8 | |
| 8 | 8 | Side lights: right front and left rear Lights: instrument panel, cigarette lighter, switches and interior switches |
| 9 | 16 | Turn signal and relay hazard warning light interrupter Hazard warning light indicator Heated rear window: heating element and switching relay (contacts) |
| 10 | 16 | Horn Light socket Interior lighting Brake light - tail lights |
| 12 (13) | 8 | Fog lights - rear |
| 16 (15) | 16 | Cigarette lighter |
| For VAZ-21214, the injection system fuses are located in a separate block on the left side under the instrument panel. | ||
| 1 | 30 | Cooling fans |
| 2 | 15 | Electric fuel pump |
| 3 | 15 | Control block |
| 4 | 15 | Main injection relay |
We hope that this information was useful to you if you encounter problems with the electrical equipment of NIVA. We will be glad to see you in the Niva owners club on our forum.
Any car is equipped with fuse blocks (FBs), which are responsible for the safety of electrical circuits. Their location differs not only depending on the make of the car. Even models from the same manufacturer that are close in year of production can be placed in different patterns. However, in some cases the location may coincide completely.
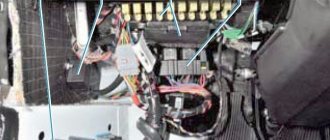
The main power supply in these models is located under the lower edge of the instrument panel protection. Additional fuses in Niva 21214 for the injector are located to the left. This block is responsible for controlling fuel injection. There are also relays for monitoring the operation of the wipers and a set responsible for the motion control system.
Another fuse box is installed in the body to the left of the main one. They are responsible for the cooling system and how the engine works. There is also a diagnostic connector. The relay that controls the starter is located either next to the main power supply, or under the hood next to the brake fluid reservoir.
Car owners are well aware that the VAZ 21214, 21213 (Niva) fuse box is a critical detail that requires detailed study. Knowledge of the electrical circuit allows you to avoid many problems and carry out timely diagnosis of breakdowns. Since the family has existed for many decades, it has managed to go through a number of radical changes - the transition from carburetor to injection engines, for example. This did not entail a radical change in the location and content of the mounting blocks, of which there are two in the cabin and one under the hood.
The Niva with fuel injection has today almost completely replaced the carburetor models of the family. With the transition to a new injection system, the manufacturer tried to minimize the inconvenience for the car owner and not radically change the location of the mounting blocks, as well as their filling with protective elements. Traditionally, there are two of them in the cabin. Another one, in the back, is responsible for controlling the engine.
Modern AvtoVAZ SUVs use injection power units. If a malfunction is detected in the electrical equipment of the car, you should first check the serviceability of the fuses and relays. Next, we will show where the mounting block is located (fuse box or black box), as well as the location of the elements inside it.
1 — engine control system fuse box; 2 — windshield wiper relay; 3 — fuse blocks; 4 — relay block of the engine control system.
No. 1 Rear fog lights relay No. 2 Heated rear window relay No. 3 Low beam headlight relay No. 4 High beam headlight relayThe fourth relay block is located above the gas pedal.
1 — engine control system fuse box; 2 — windshield wiper relay; 3 — fuse blocks; 4 — relay block of the engine control system.
The turn signal relay (part number 8450082700, 9-pin), as well as the windshield wiper relay, are located under the trim in the driver’s feet, to the left of the fuse mounting block.
On Niva, most of the components are quite reliable and do not require frequent repairs. But there are a number of standard breakdowns characteristic of the vehicle in question. Most often, the starter does not turn for the following reasons:
- turn-to-turn short circuit in the solenoid winding - the relay needs to be replaced;
- open circuit of the power supply - it is necessary to check the connections between connections No. 50 and No. 86 (the most common places of oxidation);
- the relay armature is stuck - it is necessary to replace the armature.
Also interesting: VAZ-2121 technical characteristics If the solenoid relay is activated, but the starter does not rotate or rotates very slowly, then it is necessary:
- poor contact on the tips and terminals of the battery - it is necessary to stretch it and clean it from deposits;
- the commutator contacts are burnt, the brushes are stuck - you need to clean the commutator and replace the carbon brushes;
- there is a short circuit in the brush holder - it is necessary to replace the cover on the commutator side.
Sometimes it happens that the starter rotates. But the engine flywheel remains motionless. Perhaps the reason lies in clutch slipping. To determine the exact cause and repair, you will need to remove the starter and check it on the stand. The problem can only be solved by replacing the coupling. Sometimes extraneous noise occurs when the starter rotates. The reasons for this may be the following:
- The bearing bushings and armature shaft journals are worn out – the starter needs to be replaced;
- The starter is loose.
How to remove the heat shield without removing the starter?
How to remove the heat shield without removing the starter?
Post by Niva867 » 08 Jun 2012, 16:52
There is a problem. You need to get to the wires to the starter, remove them, and clean the contacts in order for it to start. I don't need to remove the starter at all, I just need to remove the heat shield. The heat shield is secured with 3 bolts, 2 at the top, 1 at the bottom. I unscrewed them. But the heat shield cannot be pulled out. I tried it in front, and back, and up and down. Then he turned it around and went to drink beer.
Re: How to remove the starter heat shield?
Post by Anton » Jun 08, 2012, 04:57 pm
Starter diagram VAZ 2121, 2131
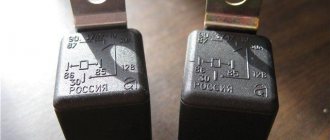
1 – starter; 2 – rechargeable battery; 3 – generator; 4 – starter activation relay; 5 – ignition switch
Starter activation circuit: When the starter is turned on, the voltage from the battery through the auxiliary relay (No. 4 type 113.3747-10) is supplied to the windings of the starter solenoid relay (retractor II and retaining I). After closing the contacts of this relay, the pull-in winding is turned off.
Please note the following points:
Blow the Niva casing and brush holder with air. Lubricate the underwater ring with a lubricating compound (Litol will do). Treat the shaft splines and bushings with engine oil. Proper repair of the starter is a guarantee of a smooth start of the engine both hot and cold. The main thing is to diagnose the malfunction in a timely manner and correct it correctly.
The starter on a Niva rarely has to be changed, but if you have a need for this, the instructions below will be very useful. First, it’s worth considering the necessary list of tools with which doing all this will be very simple and will not take much time.
- Key for 13
- Ratchet with small extension
- Head for 10
Chevrolet Niva LC › Logbook › Replacing the starter (car with air conditioning)
With God's help, I drove a little over 170 thousand km and when I started the car again I heard something like the squeal of Kaspersky of earlier versions (the exclamation of a frightened pig for those who don’t know =)). And this began to happen with enviable regularity. After consulting, they decided on the starter - it does not immediately disengage. The service asked for a kilo-ruble (1000 rubles) for the replacement procedure. ***After the operation I realized that I couldn’t have done it cheaper myself*** I went to buy KZATE (aka KATEK) without any doubt. For some reason I thought that it was he who should have been on the car. What prompted me to do this feat were the comments to this www.drive2.ru/l/464844929995112589/ entry that everything can be unscrewed and screwed in, removed and inserted without any problems with the wheels turned all the way to the right. I don't have a protective screen either! ))
When unscrewing, the 82-piece tool set helped a lot:
The contents of all of these are the same, the difference is in the layout of the suitcase. We used both ratchets and all their extensions and universal joints so that we could reach the bottom bolts and a “13-socket” for the top bolt.
I removed the “-” from the battery. I unscrewed the bolts and lowered them a little to make it easier to unscrew the wires:
I pulled this miracle down: it really squeezes between the suspension parts)) And now let’s compare...
Not a very good angle: the original starter is closer to the phone, because of this its size is slightly exaggerated. In reality, it is noticeably smaller - both shorter in length and smaller in diameter.
Here he is - dear (closer):
Full sizePramo
For reference, power characteristics: Pramo - 1.4 kW, KZATE - 1.55 kW.
We install a new miracle in the same sequence and... nothing happens. Because the new KZATE is bigger - it doesn’t interfere from any side. I had to lower (unscrew) my pants =)
As a result, the new starter is in place, it seems to turn more powerfully than the old one, but for a longer time. The squeal is gone)) Don't break! All blessings!
How to remove the Niva 21214 starter in 10 minutes. The cause of the malfunction of the removed starter NIVA VAZ 21214
Published on August 29, 2016
Preparation for quick removal of the starter in extreme conditions. Quickly remove the starter and eliminate the cause of a possible malfunction. How to remove an acoustic pipe from a Niva receiver Why is an acoustic pipe needed? As you noticed, the lower bolt of the starter was never intentionally screwed in again, after the first removal of the starter during the initial period of operation of the car. Also, the heat shield of the starter, whose lower mounting bolt quickly sticks when driving through mud, was not put in place. Because of this, in order to remove the screen, you have to cut off the lower attachment point or tear the screen itself. I don't want to go through this procedure a second time. The fact that there is no lower mounting bolt for the starter and a heat shield has its advantage for field drivers who often operate their vehicles, for example, in the conditions of Siberian swamps, river fords and frosts. Very often the cause of a starter malfunction is simple. For example, as in this video, or even funnier - the red wire (also shown in the video) from the solenoid relay has simply oxidized or weakened. It is enough to MOVE it and the starter will spin. You can make the starter spin if the nickels in the solenoid relay are burned by closing (carefully, with something not large in size, but massive and iron, without touching the mass of the engine body) the power wires on the solenoid relay. It's easy to do all this without a screen. And if necessary, the starter can be easily removed. It happens, for example, that the starter breaks down, and the car is parked at the entrance, and it’s -30 outside! Yes, even in the summer! You still need to remove the starter. Negotiate with your neighbor about a garage? Or take it to service? But you can remove it EASILY AND QUICKLY yourself, right at the entrance. Buy a new starter or solenoid relay from your local store. And an hour later the car drove off. And if the car is parked in a puddle or mud, then crawl under the car and turn the bottom bolt? In short, there are many life situations where the absence of a bolt and a heat shield will greatly simplify your life. The author of the video does not pretend that others will perceive his opinion and his proposed method of solving the problem as the only correct one. Decide this for yourself. The author simply suggested the option: “How to remove the Niva 21214 starter in 10 minutes and determine the cause of the malfunction of the removed Niva 21214 starter.” There will also be solutions to problems encountered in the Niva on the channel. If you are interested, subscribe.
It's better to put up protection. Otherwise, in the heat, the starter will overheat and catch the wedge.
For + Stanislav G. I don’t argue. But according to my experience of operating several fields, in the difficult mountain conditions of Altai in the summer, in the hottest months. Constantly reduced, etc. And from morning to evening we move through the mountains and swamps. All this summer, having come on vacation from Siberia on a field, I exploited a field in the Krasnodar region, stood in traffic jams in the heat for 2-3 hours, getting to the sea and from the sea back to friends in Krasnodar. The engine was not turned off. And so the whole vacation. So in the Krasnodar region, in the heat and in traffic jams, without a screen on the starter, there have been no problems yet. I have been using Niva for 25 years in both Siberian frosts and heat. The starter never caught a wedge. The statistics of my use so far are as follows: the absence of a screen did not affect the operation of the starter. The downside may be this: without a screen, the lubricant inside the starter dries out faster. But usually the starter fails due to something other than dry lubricant. In some fields, starters worked for 5-10 years without problems, without a screen. Then the car was sold. It is difficult to judge further statistics. I initially received all the Nivas (mostly) with good mileage. In addition to the first one bought back in the USSR and another one, which he himself drove from Tolyatti to Siberia. Again, I don't insist. Decide for yourself.
Electrical equipment VAZ 21213, 21214 Niva
Electrical equipment
The electrical equipment is made according to a single-wire circuit: the negative terminals of sources and consumers of electricity are connected to the “ground” - the body and main components of the car, which serve as the second wire.
The on-board network is DC with a rated voltage of 12 V. When the engine is not running, all consumers are powered by the battery, and after the engine is started, by an alternator with a built-in rectifier and electronic voltage regulator.
When the generator is running, the battery is charged.
Most electrical circuits are protected by fuses. Electric motors of gear motors (windshield wipers, tailgate glass, headlights - if installed) are protected by automatic reusable bimetallic fuses.
The power supply circuit of the injection system (VAZ-21214 engine) is protected by a fuse-link made of wire with a conductor of reduced cross-section (1 mm2). The battery charging, ignition (VAZ-21213 engine), engine starting, and the “generator – ignition switch – fuse box” circuits are not protected.
The fuses are grouped in two fuse blocks located on the left under the instrument panel. The fuse ratings and the circuits they protect are shown in the table.
The injection system fuses (VAZ-21214 engine) are located in a separate block on the left side panel under the instrument panel.
A 30 A fuse protects the power supply circuit of the electric radiator fans, and three 15 A fuses protect the electric fuel pump, the control unit (constant power input) and the injection system main relay circuits, respectively (see also Injection engine control system).
When repairing the electrical system, disconnect the negative terminal of the battery (with the engine off). Before installing a new fuse to replace the blown one, find out and eliminate the cause of the burnout. Do not use oversized or homemade fuses - this may cause a fire. Due to the risk of short circuits, do not pry open fuses with metal tools (screwdrivers) unless the corresponding circuits are de-energized.
Circuits protected by fuses
Fuse No. Circuits protected (current)
1 (16 A) Heater fan motor. Relay (winding) for headlight cleaners and electric motors for headlight cleaners in all brush positions except the initial one. Relay (coil) for turning on the heated glass of the tailgate. Electric motors for cleaning and washer of the tailgate glass. Electric motor for windshield washer
2 (8 A) Relay and windshield wiper motor. Turn signal lamps and relay-interrupter for turn signals and hazard warning lights (in turn signal mode). Turn signal indicator lamp. Rear lights (reversing lamps). Generator field winding (when starting the engine) and battery charge indicator lamp*. Differential lock warning lamp. Relay breaker and warning lamp for the parking brake system. Warning lamp for insufficient brake fluid level. Oil pressure warning lamp. Coolant temperature gauge. Fuel level indicator with reserve indicator lamp. Tachometer
3 (8 A) Left headlight (high beam). High beam indicator lamp
4 (8 A) Right headlight (high beam)
5 (8 A) Left headlight (low beam)
6 (8 A) Right headlight (low beam)
7 (8 A) Left front lamp (side light). Right rear light (side light). License plate lights. Side light warning lamp
8 (8 A) Right front lamp (side light). Left rear light (side light). Instrument cluster lighting lamps. Illumination panel for heater control levers. Cigarette lighter lamps. Switch illumination lamps
9 (16 A) Direction indicators and relay-breaker for direction indicators and hazard warning lights in hazard warning mode. Rear window heating element and relay (contacts) for its activation
10 (16 A) Sound signal. Plug socket for portable lamp. Interior lamps. Rear lights (brake lamps)
13 (8 A) Rear lights (fog light). Electric motors of headlight cleaners at the moment of start-up and at the moments when the brushes pass the initial position. Relay (contacts) for headlight cleaners. Headlight washer motor
15 (16 A) Cigarette lighter
* On cars produced before 1996, a voltmeter was installed in the instrument cluster instead of a warning lamp, which was also protected by fuse No. 2.
The starter does not start the crankshaft
If the starter rotates, but the engine does not run, experts recommend checking the condition of the teeth on the flywheel and Bendix gear. When a car is used intensively, these teeth can become critically worn. Check their condition through the special mounting hole. You can replace them by purchasing a recompilation kit for the Niva Chevrolet starter. Its cost is about 500 rubles.
Read
At idle the same symptoms also appear. If the starter gear fits well into the engine flywheel but does not rotate, check the starter for wear and other mechanical damage. The unit may not be installed correctly.
When it comes to starter repair kits for Chevrolet Niva vehicles, they can vary greatly in their equipment and prices. But most often, manufacturers take into account all the parts that are subject to wear and need to be replaced.