If for any reason your battery runs out or the charging indicator on the dashboard lights up, don’t panic , because most often the problem can be found and fixed on your own. Charging the battery is required to maintain a constant voltage on the on-board network; the generator is responsible for its presence. Modern cars can travel approximately 250 thousand km. without generator repair. Therefore, if your car has less mileage than this, then you shouldn’t be too upset because the repairs can be done yourself and at an affordable price.
In this article we will not consider simply a dead battery due to frost or from the car being idle for a long time . This problem can be solved simply: “light a cigarette” in a “healthy” car or simply charge the battery. It is advisable to charge the battery for a long time so that it can fully gain a charge. In this case, recharging the car using a generator will not give the desired result, especially if it is not a long route around the city. Don't be surprised if you find yourself in the same situation the next morning. In general, the battery must be looked after and maintained. This article describes in detail how to extend the battery life.
Today we will talk specifically about the reasons for the lack of battery charging.
Let's look at it in order. First, you need to know how the battery in a car is charged. In a nutshell, this can be explained as follows: in a car there is a unit called a generator ; it generates electric current by forced mechanical rotation from the engine by a drive belt. The current generated by the generator charges the battery.
Features of the battery charging system on the VAZ-2107
On the VAZ-2107, the battery or battery performs the same functions as on other vehicles. The battery must support the vehicle's electrical system when the engine is turned off. If the car is in working condition, then all its electrical equipment receives power from the car generator. Its functions include providing electricity to the following equipment:
- Engine ECU (electronic control unit);
- nozzles;
- fuel supply pump (gasoline pump);
- AKB (rechargeable battery).
The fact is that when the engine is running, the car battery must be charged from the generator, which is the source of energy for charging the vehicle battery. But failures occur when there is no charging on the VAZ-2107 (injector).
The reasons for this can be very different, and to find out they need to understand the battery charging circuit.
Why does the charger not charge the battery?
There may be several reasons: improper charging of the battery , damage to the wires, malfunction of one of the working elements, loss of current at a certain stage. To determine exactly what malfunctions of the car battery charger are occurring, you need to disconnect the device from the power supply and disassemble it. To do this, use a simple screwdriver to unscrew the screws and remove the cover. The transformer type charger will have the following composition:
Before repairing the charger, you must disconnect it from the network and disassemble it.
- Diode bridge.
- Ammeter.
- Galetny switch.
- Power transformer.
- Fuse.
Diagram of the battery charging circuit on the VAZ-2107
The battery charging circuit diagram for the VAZ-2107 is the same as for other passenger cars. The mechanism of its action is as follows:
- The battery is connected by its “negative” terminal to the body using a copper busbar.
- The entire electrical system is connected to the positive terminal of the battery using two buses:
- the first tire goes to the starter;
- the second bus is to the generator.
- The “positive” terminal of the generator transmits voltage:
- on the fuse block;
- to the ignition switch.
- From the ignition switch, electricity is transmitted to the mounting block, which houses fuses (the one that protects this conductive circuit is marked “F10”).
- Voltage is supplied from the fuses:
- to the “Charge Level Signal” control lamp (it is intended to notify you that the battery is insufficiently charged);
- on a voltmeter, which shows digital voltage readings in a current-carrying circuit.
- The next stage in the battery charging circuit is the transfer of current to:
- fuse box;
- generator terminal 61 (brush assembly).
As you can see, a malfunction in this battery charging circuit can appear almost anywhere. For example, the contact breaks down, as a result of which the generator will stop efficiently charging the vehicle’s battery.
What are fuses for?
Each circuit has its own fuse. Large fuses with high current ratings protect multiple circuits at the same time or high current circuits, such as power steering or radiator fan circuits.
There is also at least one main fuse. Often the main and power fuses are installed closer to the battery. See this fuse box diagram.
Modern cars have at least two fuse boxes. In most cars, one fuse box is located under the hood and the other is located inside the car.
When any electrical device in your car is not working, the first step is to check the fuse that protects the circuit to that device.
You can find the fuse map in your owner's manual or on the fuse box cover. Many vehicles have a fuse puller, which may be located in the fuse box or in the fuse box cover.
How to determine why the battery is not charging on a VAZ-2107
Experts recommend several effective steps to identify faults in the vehicle battery charging circuit.
First, diagnose all fuses, especially those marked “F10”. It is this safety element that is responsible for feeding the excitation winding of the generator.
Secondly, check the drive belt: if there are any breaks in it, and if it is tensioned correctly. If you have to adjust the tension of the drive belt, you should take into account an important nuance: you should not allow it to be over-tensioned. This can affect the bearings (they can deteriorate much faster than their service life is prescribed), and the battery will not be recharged.
Thirdly, pay attention to the lamp for monitoring the battery charge level. If it burns at half intensity, it means that the battery is not charging well, and the wiring is to blame. That is, the fault must be looked for in the conductive connections running from the battery to the car body. The cause of the breakdown may be oxidation of the contacts. To check this, you should:
- unscrew the nut;
- clean the contact terminal;
- clean the body surface;
- install the wire in its original place.
The fourth step in troubleshooting may be to check the voltage regulator. Its function is to stabilize the voltage output from the generator. If its direct functions are violated, the battery stops charging normally. Unfortunately, this part cannot be repaired; it is simply replaced with a new one.
If the voltage regulator is working properly, then you need to look for the cause of the malfunction in another place - in the brush assembly. The battery will not be charged from the generator if the wires connecting the contacts to these brushes are broken. Although the reason may lie either in clogging of the brushes themselves, or in their excessive wear.
If the brush assembly is in full working order, but the battery is not charging, then there is only one way out: completely disassemble the car generator. After dismantling and disassembling it, you will have to diagnose it using a tester and megger, this will help identify the possible cause of the generator malfunction.
Causes of malfunction of starter car batteries
Starter batteries can fail under improper operating conditions. If a small battery is installed on a powerful car, which will need to work in high load mode to start the engine, then very soon the battery plates will be destroyed and its further operation will become impossible. Batteries with significant capacity indicators, on the contrary, will not be fully charged when installed in small cars, and the generators of such cars will constantly work at the power limit.
Incorrect operation of the battery may also involve failure to comply with basic safety standards. For example, the use of tall batteries with terminals on the top cover in vehicles with insufficient space under the hood where a chemical power source is installed may result in a short circuit between the terminals. One such event is enough for the battery to completely fail.
You should not leave a discharged battery in an unheated garage or in a car outside in cold weather. The density of the electrolyte in such batteries is extremely low, so freezing of the liquid can occur even at a relatively low sub-zero temperature. As a result of ice pressure, the plates inside the battery will be destroyed, which will also make further operation of the device impossible.
Battery testing and restoration
If the performance of the battery can be restored, then this can be done in a garage using a minimum set of tools and materials. Even a short circuit of the plates can be eliminated if there is a desire to spend a significant amount of time and effort.
Low electrolyte density
On maintained batteries, the density of the electrolyte may decrease significantly. As a result, the battery will not be able to accumulate sufficient energy even with a working generator. A decrease in density occurs due to dilution of the electrolyte with distilled water due to loss of liquid through cracks in the battery case or as a result of splashing through traffic jams when driving on a bumpy road or when the electrolyte is constantly boiling.
The density of the electrolyte can be determined using a hydrometer. This device is a small elongated tank in which there is a submerged float with a scale. The electrolyte is drawn into the device by means of a vacuum that appears when the bulb in the upper part of the measuring device is squeezed. The less dense the electrolyte, the lower the float will fall in the collected electrolyte. The exact measurement result can be determined by the point at which the electrolyte level coincides with the scale.
Low electrolyte density can be eliminated by pouring a new mixture of water and sulfuric acid into the jars.
Short circuit of plates
If the plates are short-circuited, the battery will also not charge. This malfunction is determined by the absence of boiling of the electrolyte in the damaged jar. Repairing this fault is very labor-intensive. The performance of the battery is restored by replacing the can where the plates were shorted. For this purpose, you can use a battery of the same brand as a “donor”. Despite the possibility of fully restoring the battery in this way, it is much easier to purchase and install a new battery.
Sulfation of plates
Sulfation is a natural process during the operation of a car battery. To reduce the intensity of this process, you should not leave the battery discharged for a long time. Low electrolyte levels also negatively affect the condition of the plates. Under such conditions, exposed internal elements are coated with a sulfide layer much faster than parts of the gratings in liquid.
In addition to using special chargers to train the battery, you can use periodic discharge (up to 10.5 V) followed by complete restoration of the charge. By repeating several similar cycles, you can largely get rid of the oxide layer on the lead plates.
If the battery is not charging, you should not postpone diagnostic measures. Regardless of the reason for the lack of charging current, delays in repairs may lead to the need for more complex and expensive work. Most of the testing and restoration operations are easy to carry out in a garage, but by contacting a specialized workshop you can significantly save time, because experienced technicians can easily detect the reason for the non-standard operation of the vehicle’s electrical system devices.
Causes of generator malfunction on the VAZ-2107 (injector)
Experts suggest that on a VAZ-2107 with an injector, the standard generator is 5142.3771 (eight).
It has one very important feature: it produces more current - not 55A per hour, like other generators, but about 80-90 A. This is due to the properties of the injector, which requires more electricity (but also has a higher power density). Experts advise checking the generator for malfunctions in the following order:
- inspect the diodes that supply electricity to the excitation winding of the generator (if they are burned out, they should be replaced with new ones);
- use a tester to measure the voltage level in the current-carrying circuit (if its value is less than 12 V, then there may be a short circuit, which means the wiring is overheating).
If it is difficult for the car owner to carry out such diagnostics, he can contact the nearest car service center for help from qualified specialists.
In this article you will learn why the VAZ 2107 does not charge, as well as how to fix this problem. There are quite a few reasons for this behavior of the car’s electrical equipment, so you will have to look for a breakdown using the elimination method. It doesn't matter if the generator is working properly. It may function normally, but it will not charge. Now let's try to find out all the possible reasons.
Problems with the steering wheel
When the contact ring on the steering wheel becomes dirty or oxidized, this also leads to a break in the electrical circuit. But if you close the contact plates to the body of the central switch, the sound signal starts to work. During work, the opposite can also happen. When the tracks and rod in the slip ring are erased, the audio signal spontaneously turns on when the steering wheel is turned. It is better to replace this ring
To do this, you will have to remove the cover with the inscription “Lada”, carefully pry it off with a screwdriver, unscrew two screws and remove the horn trim. Then loosen another screw and carefully pull the steering wheel towards you
Only by removing it completely will you see the slip ring. To remove it and replace it with a new one, you will have to unscrew three screws on it. After replacing the ring, screw the screws into place and reassemble the steering wheel in the reverse order. If the ring is not worn out, it will be enough to clean it and adjust it during installation. The sound signal will not work even if the steering wheel fittings are distorted or the warning device linings are incorrectly installed. They have to be adjusted.
How the charging system works
The battery in any car, in particular in the VAZ 2107, is only necessary for the functioning of the power supply system while the engine is turned off. But when the engine is running, all electrical equipment runs from the generator. It provides power to the injector - nozzles, fuel pump, electronic control unit. But the main load is the battery. It charges while the engine is running.
And the service life of the battery directly depends on how well the charging occurs. A generator is just one source of electricity. But it may be in working condition, but charging is not going to the battery. There can be a lot of reasons for this behavior; you need to thoroughly study the electrical circuit of the charging circuit of the VAZ 2107 car.
VAZ 2114 2115 2113 fuses and relays
Lada Samara is a general designation for the VAZ 2113 2114 2115 . They were produced with a sedan body, as well as 3 and 5 door hatchbacks, mainly with 8 and 16 valve gasoline engines. Years of production: 2000, 2001, 2002, 2003, 2004, 2005, 2006, 2007, 2008, 2009, 2010, 2011, 2012 and 2013. During this time, some models were updated. In this publication we will show a description of VAZ 2115 2114 2113 fuses with block diagrams, their locations and photographs of the design. Note the cigarette lighter fuse.
The design of the blocks and the purpose of the fuses in your VAZ 2114 2115 2113 may differ from the one presented and depends on the year of manufacture and level of equipment.
Battery charging circuit
The same scheme is used not only on the VAZ 2107; a similar one is used in any other car. The only difference is in the components - they are designed for different currents and operating modes. Charging circuit:
- the negative terminal of the battery is connected to the metal body by a thick copper bus;
- the entire electrical system of the car is connected to the positive terminal - there are two buses: to the starter and the generator (“30” terminal);
- from the positive terminal of the generator, voltage goes to the fuse box and ignition switch;
- from the ignition switch the voltage goes to the mounting block with fuses;
- only after it is power supplied (protected by fuse F10) to the control lamp, signaling insufficient charging, as well as to the voltmeter - a device that measures voltage;
- After this, power is supplied to the fuse box and goes to the “61” terminal of the generator set - to the brush assembly.
How to check the main fuse
All cars have at least one main fuse. It is usually installed on the positive terminal of the battery or in the fuse box connected to the positive battery cable.
Often the main fuse will blow if you accidentally touch the wrong battery terminal while charging a dead battery. A sign of a blown main fuse is a lack of power and lighting inside the car.
Checking the main fuse is easy and you can usually see if it's blown. If the main fuse has blown, chances are that several other smaller fuses have also blown.
Troubleshooting algorithm
There is no need to think that charging is not happening for some very serious reason. Immediately check the condition of fuse F10, which is responsible for powering the excitation winding of the VAZ 2107 generator. But before doing this, it is better to make sure that the drive belt is intact and its tension is normal. But also pay attention to the fact that you cannot over-tighten it - there will be no recharging of the battery (provided that the regulator is operating in the intended mode), but the bearings will fail much faster.
If charging is not going well, the lamp, for example, burns at half intensity, then the fault must be looked for in the wiring. Namely, in the connections between the battery and the car body. Very often oxidation occurs, which prevents normal contact. Unscrew the nut, thoroughly clean the terminal and body surface, and then install the wire in place.
But if everything is fine with the switching, but charging still does not occur, you need to look further for the reason. And the first thing to suspect is the voltage regulator. With its help, the voltage at the generator output is stabilized. If this element fails, the battery overcharges or it does not charge well. Repair of this element is impossible, and the price in stores will be about 300 rubles. There are several options for regulators:
- A separate unit - installed on the body of a VAZ 2107 car.
- Combined with brushes - mounted directly in the generator.
How to check the regulator will be discussed in a separate article. If it is working properly, but charging still does not occur, or it is there, but it does not flow to the battery well, look for a fault in the brush assembly. It is quite possible that the wires that connect the brushes to the contacts have broken. But the most common thing is excessive wear or clogged brushes.
Somewhat less often, failure of the diode bridge or destruction of the stator or rotor windings occurs. To determine these breakdowns, you will need to completely disassemble the generator and carry out diagnostics using a tester and megger. Along the way, of course, it is best to replace the bearings in the VAZ 2107 generator.
Setting the output voltage and charging current
There are two trimming resistors installed on the DC-DC converter board, one allows you to set the maximum output voltage, the other allows you to set the maximum charging current.
Plug in the charger (nothing is connected to the output wires), the indicator will show the voltage at the device output and the current is zero. Use the voltage potentiometer to set the output to 5 volts. Close the output wires together, use the current potentiometer to set the short circuit current to 6 A. Then eliminate the short circuit by disconnecting the output wires and use the voltage potentiometer to set the output to 14.5 volts.
No charging
Auto seven 2010 injector. The battery has failed to charge. When you turn on the ignition, the light on the dashboard lights up, when you start the engine, it blinks at half-glow, when you give it gas, it lights up brighter, but there is no charging at all. It appeared periodically at higher speeds, but now it has disappeared altogether. The Akum is fresh, charged, the light in the instrument panel is working. What could be the reason for watching first?
- Why might the new generator fail? – 6 answers
- Why does the VAZ 2107 battery drain quickly? – 6 answers
- The voltage regulator fails on a VAZ 2107 - 5 answers
- What causes the charging current to decrease as the speed increases? – 4 answers
- Why, when warming up, does the voltage from the VAZ 2107 generator drop? – 4 answers
Remove, disassemble, change the rectifier, eliminate antifreeze leaks from under the thermostat pipes.
Generator, diodes probably burnt out
check the diode bridge, the charge relay may not work due to the diodes, a weak glow is evidence of a broken diode on the bridge
Check it yourself so you know what to change.
Thank you very much to everyone, especially Nikolaevich. The answer was 100% correct. Antifreeze was leaking from the thermostat to the generator. I took it apart and saw the following picture: the winding is attached with 3 wires to the diode bridge and one of them burned out completely and the fastening on the diode bridge burned out. I installed a new one, soldered the contact and everything worked. Thank you all for the advice - everything was correct and to the point! Great site!
Subscribe
to our channel in
Index.Zen
Even more useful tips in a convenient format
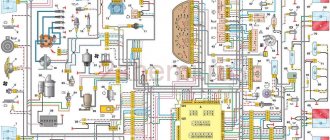
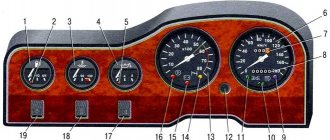
Electrical diagram of VAZ 2115 - 20 cars (left half):
1 – headlights; 2 – fog lights; 3 – air temperature sensor; 4 – electric motor of the engine cooling system fan; 5 – blocks connected to the wiring harness of the ignition system; 6 – engine compartment lamp switch; 7 – block for connection to a single-wire type audio signal; 8 – sound signal; 9 – washer fluid level sensor; 10 – front brake pad wear sensors; 11 – oil level sensor; 12 – generator; 13 – engine compartment lamp; 14 – coolant temperature indicator sensor; 15 – starter; 16 – battery; 17 – relay for turning on fog lights; 18 – coolant level sensor; 19 – brake fluid level sensor; 20 – reverse light switch; 21 – windshield wiper gearmotor; 22 – oil pressure warning lamp sensor; 23 – block for connecting to the rear window washer electric motor; 24 – windshield washer electric motor; 25 – instrument cluster; 26 – mounting block. Conventional numbering of plugs in blocks: A - block headlights; B — electric fuel pump block; C — blocks of the mounting block, ignition switch, windshield wiper gearmotor; D — interior lamp
autovazremont › Blog › The battery light does not light up, the VAZ-2107 is not charging. What to do?
Recently, returning from work, the following situation arose with me - when I turned on the ignition, the battery charge indicator lamp stopped lighting, the charging itself disappeared, and the voltmeter needle showed only the battery charge level.
Therefore, having somehow reached home, I decided to find out the reason and, after rummaging on the Internet, got to work.
First, a little theory: when the engine is running, a dead battery is charged with a constant voltage of 13.6-14.2 V from the car’s on-board network through the generator. Due to the different speeds of the engine crankshaft, in order to maintain the specified voltage, a voltage regulator (PP, “pill”, “chocolate”) is included in the generator excitation circuit, which, when the voltage in the network increases above the rated one, reduces the current going to the generator excitation winding. The magnetization of the rotor poles decreases, which leads to a decrease in its output voltage. Therefore, the reasons that the generator does not charge the battery are associated with the elements of the “excitation circuit” or the “generator-battery” output voltage circuit, including the generator itself. When the ignition is turned on, the lock (14) also turns on the ignition relay (13). In this case, +12V from the battery (1) passes through the relay contacts and fuse No. 10 of the mounting block, then is supplied to the on-board network and to the output of the battery charge indicator lamp (11) and the charging sensor in the instrument panel (12). After this, they go through the diode, the mounting block (10) (plugs Ш5-Ш10), are fed to plug “61” of the generator and go to the terminal of the built-in PP (7) and through the brush and contact ring to the excitation winding (8) - the starting excitation of the generator (4). As the engine speed increases, and with it the generator rotor, the phase voltage increases, and through a block of additional diodes (3) it increases the voltage on the excitation winding and on the output diode of the battery charging indicator lamp. When the output phase voltage reaches +12V at both terminals of the battery lamp, the voltage is equalized, and due to the absence of a voltage difference, it goes out (as when starting a car). In this case, the generator produces a voltage greater than 12V, which charges the battery through output “30”.
The purpose of each of the fuses on the car
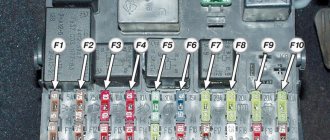
If you turn over the removed cover, then on its inside you will see a diagram of the location of the relays and fuses in the mounting block (fuse block). On it, all these elements are numbered and designated from F1 to F20. Naturally, everyone is responsible for the performance of various consumers in the vehicle’s electrical network:
Diagram with the location of fuses VAZ 2114
- F1 – rear fog light and indicator lamp for turning on the latter (10 A);
- F2 – turn signal breaker relay, VAZ 2114 emergency alarm, turn signals (10 A);
- F3 – front and central interior lighting, trunk, trip computer and brake light bulbs (7.5 A);
- F4 – heated rear window (20 A);
- F5 – sound signal, cooling system fan (20 A);
- F6 – power windows (30 A);
- F7 – electric motor for heater, front window, washer, glove compartment lamp, cigarette lighter (30 A);
- F8, F9 – fog lights, right and left, respectively (7.5 A);
- F10, F11 – left clearance, as well as right, indicator for turning on dimensions, license plate lighting, as well as instrument lighting lamp, ashtrays (7.5 A);
- F12, F13 – right and left low beam, respectively (7.5 A);
- F14, F15 – high beam left and right, respectively (7.5 A);
- F16 – turn signals, dashboard indicators – parking brake, low battery, etc., as well as a trip computer (15 A);
- F17-20 – reserve respectively for 7.5, 10, 30 and 20 A.
The VAZ 2114 fuse diagram also contains backup fuses for 7.5, 10, 20, and 30 A, located in the lower part of the VAZ 2114 fuse block. Having pulled out the supposedly blown one, you should inspect it visually. If it is clear that the integrity of the thread is broken, then it can be unequivocally stated that the reason for the inoperability of the vehicle equipment lies precisely in the malfunction of the fuses. You can replace the inoperative one with a backup one of the same power according to the data that is presented to you by the diagram on the back of the plastic cover of the mounting block.
What to do if the battery on a VAZ 2107 (injector) does not charge?
There are two energy sources in a car. Battery and generator. Moreover, the generator is the main one, since it is able to charge the battery while driving. In the most extreme, desperate cases, battery energy can be used. According to various estimates, in the most optimistic case, you can drive about 100 km on a flat road on a battery. In this case, the headlights should not be turned on, the heater should not be turned off, and, preferably, the ambient temperature should be low and the speed should be constant so that the radiator fan does not turn on. And the battery will be fully charged. Only in this case all the energy will go into the “spark”.
If the VAZ 2107 engine (injector) is running and there is no battery charge, there may be many reasons.
Let's start with the generator. The VAZ 2107 (carburetor) has an alternating current generator (model 372.3701), and an alternating current rectifier is built into the design. This is a synchronous three-phase motor.
The reasons why the battery is not charging can be common, regardless of whether you have a carburetor or an injector. Let's consider the reasons when the generator is to blame, that is, there is no voltage at its terminals. This can happen because the rectifier bridges (diode), the winding and many other reasons have burned out.
Attention! Before claiming that charging has disappeared specifically in the VAZ 2107 generator, check:
- If there is incoming voltage at the generator, this does not yet prove that it is the generator that is damaged and there is no outgoing current. After all, diodes supply current to the excitation winding of the generator. In this case, the battery charge lamp will light up on the dashboard.
- It is also worth measuring the voltage in the network with a tester. If it is below 12 V, then most likely there is a short circuit somewhere, and in this case the wiring may heat up intensely.
- You should check the generator belt, or rather, its tension. If it is loosely tensioned, then instead of driving the generator rotor, the belt slides along it itself, since there is no contact.
- The generator charging relay has failed. We need to talk about this separately.
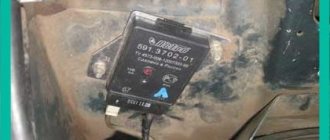
The charging relay on the VAZ 2107 (injector) is located in the same housing with the brush mechanism, and its task is to stabilize the output voltage. Several years ago there were relays that were stamped into a printed circuit board and were located under the instrument panel and were non-separable. In the figure, the relay is indicated by an arrow. In everyday life, due to its characteristic shape, it is called a “tablet”.
Now, with the development of microelectronics, the printed circuit board is successfully replaced by a semiconductor relay. The sizes have become smaller, and there are no problems with installation.
Types of chargers
Now there are several types of devices on the market, which differ not only in name and price, but also in their operating principle. The division occurs in two planes: the design feature and the work feature.
In the first case there are:
- Transformer. Here the design is based on a transformer that lowers the voltage to the required level so that the battery can be charged. Such devices are quite reliable and charge the car battery well. However, they are quite cumbersome.
- Pulse. Here the work is provided by a pulse converter, which is considered less reliable. But the obvious advantage of such devices is their light weight and dimensions.
As for the principles of operation of chargers for vehicle batteries, the division is into two categories:
- Charging and pre-starting devices. Easily recognized by the thin wires that must connect the terminals of the charging equipment and the terminals of the battery itself. Effectively recharges or fully charges the battery, and can be used even if the car battery is still connected to the car. The convenience is quite obvious.
- Starting and charging devices. They are recognized by the presence of thicker wires connecting the battery and the charging device. They can operate in two different modes, which are switched by a special toggle switch. In one mode, the “charger” delivers maximum current. The other is used for automated charging. Such devices can only be used with the battery disconnected from the vehicle. If you forget about this, you can burn out many different on-board system fuses, or even several important parts.
What reasons can cause the charging relay to fail?
Only two, not counting severe damage to the generator housing:
- “planned” wear of brushes, which are graphite electrodes. In this case, the contact is gradually broken and disappears completely. As a result, no current is supplied to the excitation winding of the generator, and it does not work;
- A short circuit has occurred in the electrical circuit itself, while there is an output current on the generator and battery, but it is higher than 14.8 V.
The charging relay is located on the generator, on its back cover, and, no matter what shape and color the “tablet” is, a yellow wire comes out of the generator body to it. The relay is located so that it can be replaced without removing the generator. But for convenience, the pictures show work on a removed generator.
Option 3
This is a particularly simple circuit, which can hardly even be called a circuit, since it uses only 2 components. This is a powerful diode and fuse. This option is quite viable and is even used on an industrial scale.
Power from the charger is supplied to the battery through the fuse. The fuse is selected based on the maximum charging current. For example, if the current is 10 A, then a 12-15 A fuse is needed.
The diode is connected in parallel and is closed during normal operation. But if the polarity is reversed, the diode will open and a short circuit will occur.
And the fuse is the weak link in this circuit, which will burn out at the same moment. After this you will have to change it.
The diode should be selected according to the datasheet based on the fact that its maximum short-term current was several times greater than the fuse combustion current.
This scheme does not provide 100% protection, since there have been cases when the charger burned out faster than the fuse.
From an efficiency point of view, the first scheme is better than the others. But from the point of view of versatility and speed of response, the best option is scheme 2. Well, the third option is often used on an industrial scale. This type of protection can be seen, for example, on any car radio.
How to replace the charging relay?
- Important! First, as always, we turn off the ground, remove the negative wire from the battery terminal, then remove the yellow wire going from the generator to the relay, then use a Phillips screwdriver to unscrew it;
- Then we take it out together with the brushes:
- Now we need to carry out diagnostics. To do this, we test the voltage on the brushes with a voltmeter, and we power the relay itself from the battery, “simulating” the rectified current of the generator. At the same time, we apply (+) to terminal “B”, to the yellow wire, and connect (-) to the other terminal, “ground”. We are familiar with the signs of trouble. If you don’t have a tester, you can take a 1-3 W, 12 V light bulb.
- When installing a new relay, you need to press it firmly during installation, since new, unworn brushes provide more resistance.
If after taking these measures there is no effect, you need to look for the cause in the generator, we’ll talk about this next time. At the same time, remember that if you are removing a generator, then either you have decent knowledge in electrical engineering, or you have someone to give it to. There is no third option, especially if you have an injector.
In conclusion, let me tell you about several other reasons for the lack of charging or imitation, and also give advice:
- If you have a VAZ 2107 injector, then it is strictly not recommended to reset the battery terminal for various “checks” while the engine is running, and especially to allow strangers near the hood for this purpose. This is very harmful to electronic “brains”.
- It is advisable for those who like to “light up” to be able to say a firm “no” if you have a VAZ 2107 injector.
- On the instrument panel, the connectors are not soldered to the board, but riveted. Therefore, in some cars in the cold, while the interior is cold, there is no contact with the charging lamp. It lights up, simulating a lack of current from the generator. After the interior has warmed up, contact is restored and the lamp goes out.
- The next reason for those who like to go to the car wash in the cold. When water gets into the relay and brush assembly and freezes there, there is no charging. The solution is to heat it with any powerful hairdryer.
If you find that your VAZ 2107 is not charging the battery, measures must be taken immediately. Continued use of the vehicle may result in battery discharge. You will have to either look for a travel companion willing to tow the car, or call a towing service.
Theory “on fingers”: how everything works
On the VAZ 2107, devices can receive power from 2 sources. The first is the battery, the second is the generator. The battery supplies energy when the engine is turned off. It has a certain charge, consumed as needed. The generator produces electricity, but only if the rotor is spinning. That is, with the engine running.
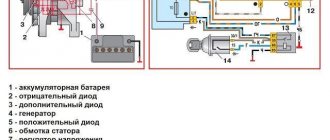
Battery operation diagram: 1. Battery, 2. Negative diode, 3. Additional diode, 4. Generator, 5. Positive diode, 6. Stator winding, 7. Regulator, 8. Rotor winding, 9. Capacitor, 10. Mounting block, 11. Control lamp, 12. Voltmeter, 13. Ignition relay, 14. Lock.
Signs of a relay malfunction
Sure signs that the relay has failed may include:
All these factors, and especially their combination, directly indicate that the device is broken and should be replaced. But before you begin the repair, you should find out where the ignition relay is located on the VAZ 2114? You should look for this electronic element under the decorative trim-casing, to the left of the steering wheel. In order to gain access to the relay, this casing must be removed.
Another, although less rare, but still common problem is overheating of the ignition relay. So, if after a long trip (during which many consumers were turned on, the operation of which is controlled by this relay - windshield wipers, glass heaters) it became very hot, then you should immediately begin searching for the cause, without waiting for the device to burn out or other problems in the on-board network.
As a rule, the high heating of the main relay is due to its low amperage in combination with a large number of consumers (the standard model 14 ignition relay is designed for a current of 70 Amps). In order to check this, it is enough to disconnect a number of devices from the relay (with the exception of the starter, of course) and check its condition after the trip.
If the relay remains cold, then the reason for overheating lies precisely in its low power. To solve this problem, you should install a new relay of a similar design, but designed for a higher current.
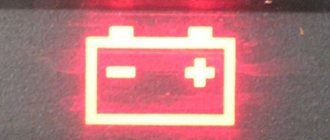
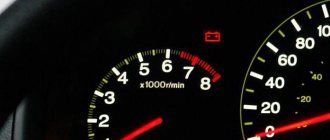
Indicator light
As can be seen from the diagram, the charging system involves a large number of components and each of them can cause poor charging or its absence. To monitor the battery charging process, the car's dashboard is equipped with a control light.
If the system is in good working order, the control signal turns on after the factory. But when the engine enters operating mode, the VAZ 2107 battery charging light does not light up. This means that the battery's energy supply is replenished from the generator. At the same time, the needle on the voltmeter moves to the green sector.
Signs of a battery not charging:
- The VAZ 2107 battery charge arrow twitches.
- The control signal does not go out. In some cases, the VAZ 2107 battery light blinks.
- The voltmeter needle does not go to the green zone after starting the engine.
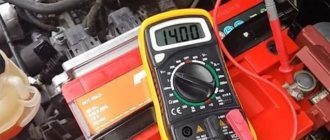
- When the engine is running, the voltage on the battery should remain around 13.9.
- The permissible deviation in any direction does not exceed 0.3 V. Undercharging of the VAZ 2107 battery within these limits is not yet dangerous.
A voltage drop to 12 V says: the generator is not charging! lamp is dimly lit - the battery is undercharged.
Reverse polarity protection
This charger is not afraid of a short circuit at the output, but if the polarity is reversed, it may fail. To protect against polarity reversal, a powerful Schottky diode can be installed in the gap in the positive wire going to the battery. Such diodes have a low voltage drop when connected directly. With such protection, if the polarity is reversed when connecting the battery, no current will flow. True, this diode will need to be installed on a radiator, since a large current will flow through it during charging.
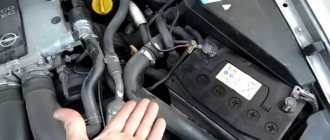
Where to start checking
If the VAZ 2107 battery icon does not light up, the voltmeter gives normal readings, but the battery does not charge, which means there is no (or insufficient) contact at the terminals. Their severe oxidation can cause the voltage from the generator to the battery simply not to flow. Therefore, it is necessary to remove the terminals, thoroughly clean them, as well as the battery terminals, then reconnect the battery to the on-board network and check the functionality of the charging system.
In the case when the voltage on the VAZ 2107 battery is still below normal, you need to measure it at the output from the generator with the engine running. Is there a big difference between the readings on the terminal and on the battery? Try cleaning the contacts and checking the wire connecting the battery to the generator. Broken - requires replacement.
The next element that is checked is the generator drive belt. If it becomes loose, it will slip along the pulley, which is why the generator will not be able to generate the required amount of electricity. And although charging will be carried out (provided the circuit is in good condition), it will not be enough. At the same time, the engine is running, the voltmeter shows the norm. However, if the system is loaded a little more - for example, by turning on the headlights - then the voltage drops sharply. Then, if the battery charge on a VAZ 2107 disappears, this indicates that the tension belt is loose and slipping. The belt should be tightened; if it wears out during operation, replace it. But you can’t overtighten either: excess belt tension puts an overload on the pumps and generator bearings.
The third component of the circuit that is checked during the initial diagnosis is fuse No. 10 (in the fuse box). It is he who is responsible for supplying voltage to the battery: the VAZ 2107 battery charging fuse has blown - the system will not work.
If everything is in order with the terminals, belt, fuse, the reasons for poor charging of the VAZ 2107 battery need to be looked for further.
Option 2
This scheme still has no analogues in many respects. It simultaneously protects against power reversal and short circuit.
The operating principle of this scheme is as follows. During normal operation, the plus from the power source through the LED and resistor R9 opens the field-effect transistor, and the minus through the open junction of the “field switch” goes to the output of the circuit to the battery.
When a polarity reversal or short circuit occurs, the current in the circuit increases sharply, resulting in a voltage drop across the “field switch” and across the shunt. This voltage drop is enough to trigger the low-power transistor VT2. Opening, the latter closes the field-effect transistor, closing the gate to ground. At the same time, the LED lights up, since power for it is provided by the open junction of transistor VT2.
Due to its high response speed, this circuit is guaranteed to protect the charger from any output problem.
The circuit is very reliable in operation and can remain in a protected state indefinitely.
What else to check
- Voltage regulator;
- Generator rectifier unit;
- Diodes;
- Generator for broken windings;
- Generator brush assembly;
- Contacts on the terminals of the generator, mounting block.
A malfunction of any of these elements leads to the fact that the charging system is inoperative and the VAZ 2107 battery is not charged.
Let's continue... Diodes are checked with a test light or multimeter. If one of them is broken, the entire rectifier will have to be replaced.
To check the stator winding you need the same device. The resistance between the fasteners of the rectifier unit is measured. If there are no contacts between them, you need to replace either the winding or the entire generator.
The generator itself often fails due to wear on the brushes. To check them, you need to remove the brush assembly and measure the length of the elements. If it is 5 mm or less, the brushes must be replaced.
Almost all of the above system components are replaced when they fail, since they cannot be repaired. Only some of the generator problems can be repaired, but this can only be done by a qualified auto electrician.
The worst thing is if problems with recharging occur while on the road. Without recharging the battery, it will eventually run out completely. And even if you manage to find the cause of the breakdown and eliminate it, you will no longer be able to start the engine with the starter. It will be possible to start a VAZ-2017 with a dead battery only from a tug or pusher.
Winding destruction
If the generator windings are destroyed, the device will be completely inoperable. Accordingly, the battery will not be charged. It will be possible to visually determine the malfunction only after the generator housing has been disassembled and its interior can be carefully examined. You can assume a breakdown of this type by using a voltmeter. With the engine running, the probes of the device are connected to ground and terminal “30” on the generator. A generator with damaged windings will not generate electric current.
Problem with the regulator relay
A relay regulator is installed in the vehicle’s electronic system to regulate the moment at which charging current is supplied to the battery. If this part is completely or partially faulty, then serious problems may occur with restoring the battery's electrical potential. It is very difficult to repair a faulty relay-regulator, and contacting specialized workshops for this purpose is economically unjustified. For this reason, if the lack of battery charge is caused by the failure of this part, then it must be replaced with a known good element.
In order not to mistakenly dispose of a relay-regulator suitable for further use, it must be checked. This can be done using a multimeter using the following algorithm:
- Switch the device to DC measurement mode.
- Start the engine.
- Set the engine to idle.
- Measure the voltage on the battery (this parameter should be 13.2-14 Volts).
- Increase engine speed to 2500 rpm.
- Measure the voltage again, which should be within 13.8 Volts.
- Increase engine speed to 3500 rpm.
- Measure the voltage again, the value of which should not exceed 14.8 Volts.
If significant deviations from these voltage values are detected, the relay regulator should be replaced.
What to consider when choosing a new battery
According to the passport, the battery is designed for 3-5 years of active use (in reality it turns out to be less). Therefore, over time, it becomes necessary to buy and connect a VAZ 2107 battery instead of a failed one.
When purchasing a new battery, you should consider a number of parameters and characteristics. Battery type: serviced and maintenance-free. The first option allows you to check and replenish the electrolyte level. This makes it possible to use the battery longer.
The next question is: what power will the battery on the VAZ 2107 be most efficient. Batteries with a capacity of 50–60 Ah are suitable for this model. However, given that modern cars are equipped with energy-intensive equipment, it is better to opt for more capacious batteries. In addition, carburetor VAZ models require more powerful batteries - they consume more energy when starting. In terms of dimensions, the VAZ 2107 requires power supplies with dimensions of 242*175*190 mm. The vast majority of samples available on the market fit them.
When choosing a battery, you should also take into account the place of residence of the owner of the “Seven”. For those who live in the south, you can purchase a less powerful battery. Northerners are advised to prefer a battery with a higher capacity: in the cold, the car starts with high energy consumption.
Confronting attackers
Due to the fact that the battery is not cheap, the issue of protecting the VAZ 2107 battery from theft is quite acute. It’s not difficult to open the hood of a “classic,” which is why thieves are keeping a close eye on the “Sevens.”
Experts offer several options for preventing theft.
- Secure parking or secure garage.
- installation .
- Installation of the hood lock. Let’s be clear right away: few people take this step. Welding work is required, the appearance deteriorates, and it is quite easy for a professional to pick the lock.
- Take the battery with you. Labor-intensive, inconvenient, but effective. On the other hand, if the car is left for a short time, it is defenseless: they can even remove the battery in a supermarket parking lot.
- Reliable battery fixation. Almost the most popular method. The fasteners are secured with a secret that prevents dismantling and makes theft difficult. In combination with an alarm it is a very effective technique.
But all experts agree that the most reliable protection for the VAZ 2107 battery against theft is comprehensive. A combination of multidirectional measures will give the best results!
Problems with the sound signal device
The signaling device mechanism is not protected from moisture getting inside. Why contacts and membrane oxidize. If the external contacts of the wire connecting to the signaling device are oxidized, there is no need to remove it. It is enough to remove the connector and clean the contacts. If this procedure does not help, you will have to remove the alarm device by unscrewing the screws to check the condition of the membrane. Sometimes it is enough to wash the membrane with kerosene or clean it with fine sandpaper. But if a crack or other defect is found on the membrane, then you will have to buy a new signaling device and install it.
The strength and timbre of the sound of the signaling device is regulated by rotating the adjusting screw on the front wall of its body.https://youtube.com/watch?v=35urnLX24oA