The mechanical components of a modern car are filled with all kinds of components that ensure a comfortable and safe ride. From old to new car models, most parts are modernized and improved. Advanced materials and manufacturing technologies are used. One of the important elements in the suspension, which designers and engineers pay considerable attention to when designing a car, is the ball joint. The safety of the driver, passengers and surrounding road users depends on the quality of its manufacture, design features and possible malfunctions.
The purpose of a ball joint in a car.
Why do you need a ball joint?
Usually, novice motorists learn what a ball joint is in a car from more experienced colleagues when indirect signs of a suspension malfunction appear. There may be extraneous noise in the wheel area or other factors. In a car, such an element as a ball joint is located not only closer to the wheel. Similar compounds can be found in different parts of the car:
- in the steering linkage;
- on the camber levers;
- in the area of fastening the gas stops of the hood, etc.
In fact, the more correct name for the block is a ball joint. When a node is called that way, its essence is clear.
Important! The main task of ball joints is to provide freedom of movement to each of the wheels in the horizontal plane, while simultaneously blocking freedom in the vertical plane.
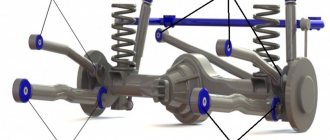
To understand how many supports are installed, it is necessary to consider the type of suspension. The factor influences how many spherical engineers have introduced into their brainchild. The simplest MacPherson pendants make do with two pieces, which are located below. An increase in the number of levers entails an increase in the number of hinges. In double-lever systems, installation of the unit is provided both from below and from above. In German brands such as Audi or Volkswagen, there can be up to five ball joints on one side of the wheel. A few decades ago, the predecessors of spherical elements were pivot analogs. These were heavier products that needed regular lubrication. The principle of their operation implied the possibility of rotation in only one axis, which was negative for controllability. During operation, ball joints work in such a way that they absorb the impact of road irregularities. This creates a huge load on the metal product. However, engineers do not strive to make a ball with maximum strength, giving it a shape so that, if necessary, it can be easily replaced by unscrewing a few bolts. The node has turned into a consumable.
Replacement Tools
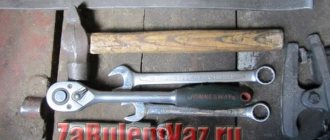
To make repairs you will need:
- Head and collar.
- Liquid WD-40 or similar. It will help unscrew the mounting bolts.
- A puller for removing the ball joint itself.
- ShRB-4 lubricant. It will be needed to lubricate the seats. Since you only need a little of it, you don’t have to buy a whole package.
- Hammer.
Removal process (exact algorithm) on a VAZ-2112
Subsequence:
- Initially, you need to hang the wheel on the side where the ball is worn. Then it will need to be removed from the car.
- Then you need to unscrew the central nut that secures the support to the rack. To do this you need to crawl under the car.
- Next, you will need to unscrew two more bolts that secure the lever to the hub. Initially, you don’t need to completely unscrew them, you just need to let them go. Then they will be removed completely.
- Then, using a puller, the ball is pressed out. After pressing out the pin, you need to unscrew the two bolts that were previously released.
- After this, the support is completely removed from the car.
In the event that a puller is not at hand, you can use a regular crowbar.
It will need to be inserted between the CV joint and the lever. In this case, the crowbar should be used as a lever. You need to press on it until the finger comes out of its seat.
Also, during this procedure, you can lightly hit the place where the finger sits with a hammer. This must be done sensitively so as not to damage the hub.
Installing a new ball joint
Next, the ball is replaced with a new one and assembly is performed. There is no need for a puller here.
To install the pin in place, it must be placed in the socket and pressed with the central bolt until the pin fits into place. To facilitate the landing procedure, you can use lubricant. You also need to lubricate the inside of the ball joint first.
Change the ball joint on time!
When this spare part fails, severe wear of the tires begins, the car stops holding the road, the wheel can fall on its side, making it difficult to drive the car.
If you do not replace a worn-out spare part in time, it will negatively affect the entire operation of the chassis, and will also cause other components to fail.
Classic ball design
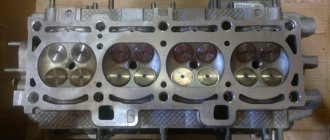
A standard ball joint design requires the following main components:
- metal case;
- pin with ball head;
- compression spring;
- corrugated rubberized boot.
A sufficient amount of lubricant was packed inside at the factory. High-quality lubricant was enough for a long run. At each maintenance, mechanics must check the safety of the boot and the quality/volume of the lubricant, and if necessary, use a lubricant to repress the required amount. In later models, some metal products were replaced with plastic analogues. Also, there are no springs inside anymore (they got rid of them as unnecessary). The spherical head of the finger is now rolled in a hemisphere of liners. In modern models, the latter are no longer made of plastic, but of more durable and durable nylon. Manufacturers began to produce two types of ball bearings, so there are maintenance-free and maintenance-free bearings. Most new machines have a second type of assembly. There is no possibility of disassembly and there is a built-in oiler for adding lubricant. Sometimes there are intermediate types that relate to non-separable design options, but have an oiler.
Smooth micrometer
Smooth micrometers are the most common. A smooth micrometer is a means for measuring external linear dimensions, the base of which is a bracket, and the transforming device is a screw pair consisting of a micrometer screw and a micrometer nut fixed inside the stem; they are often called a micropair. The heel and stem are pressed into the bracket. The part being measured is covered by the end measuring surfaces of the microscrew and the heel. The drum is connected to the microscrew using a cap in which the ratchet body is located. To bring the microscrew closer to the heel, rotate the ratchet drum clockwise (away from you), and to move the microscrew back (from the heel), rotate the drum counterclockwise (toward you). Secure the microscrew in the required position with a stopper.
Mounting methods
The main differences between modern spherical joints are not so much in the design as in the methods of fastening. This is due to labor-intensive costs during maintenance and replacement. The most optimal option, acceptable for the car owner, is considered to be fixing the hinge body to the suspension arm using a threaded or rivet connection. The method allows, if necessary, to quickly dismantle a worn-out unit.
Later, manufacturers began to abandon this method in favor of integrating the lever into the suspension. This design had a disadvantage, since it was necessary to change the lever assembly, even if it was not worn out. The advantage was the lightweight design. Although there is an opinion that marketers lobbied for such a system in order to increase profits from the sale of spare parts, because it is necessary to change the lever assembly. Some automakers have compromised and abandoned the rigid fixation to the lever. An alternative was a retaining ring. The support was only pressed into the lever. Examples are the Jeep Patriot or Opel Zafira C. In this case, replacement will require a press or other type of force.
Useful tips
The service life of a support often depends on a lot of factors and on average ranges from 15 to 120 thousand kilometers. The life of a ball joint can be shortened by even a minimal crack in the boot. Water, sand and dirt can penetrate through it into the hinge. To prevent damage to the ball joint, the condition of the rubber protective boot should be monitored. It is advisable to do this on an overpass or inspection hole.
In order for ball joints to last longer, you need to drive carefully on broken road surfaces and change damaged boots in a timely manner. Do not forget that any vehicle mechanisms and components require regular maintenance and repair. You can learn more about replacing ball joints in this video.
This is interesting: How to change a Duster low beam bulb
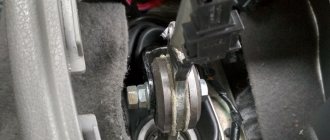
Fixation on the steering knuckle
If the support is located on the lever, then it can be attached to the steering knuckle. Such features are typical for a ball-on-lever. The design can have three options:
- the threaded pin is connected and secured with a nut, which must be cottered;
- for fastening, a self-locking nut is used, which has an internal locking ring;
- a pinch bolt is installed, which is rare, for example, on the Hyundai Santa Fe since 2006.
The last point is less acceptable, since if it breaks and needs to be replaced, it may turn out that the threads have soured. A negative factor is the need for a special wedge used to release the ends of the knuckle bracket where the ball pin is fixed. Sometimes even in the wonderful suspension designs of German cars, stuck bolts create many difficulties during disassembly. The situation cannot be saved by heating the fist or freezing the bolt. Even a ten-ton force from a hydraulic press does not allow the bolt to be pressed out. Owners of an Audi A6, for example, have to part with amounts equivalent to $400-500. In some cases, engineers move the hinge to the steering knuckle from the lever. Although such a solution does not add maintainability. Then there are several ways to fix it:
- bolting;
- pressing;
- in the knuckle bracket the use of a coupling bolt.
Anther
A mandatory attribute of the main suspension joint is the boot. It is used on both removable and non-removable structures. The part is a replaceable one. Experts recommend monitoring its condition at least every 10-15 thousand km. mileage Timely replacement of a worn boot will help save on repair/replacement of the entire ball joint. Its task is to block the penetration of moisture, dust and dirt to friction surfaces, which contribute to rapid wear of metal parts.
Consequences of breakdown
Failure of rubbing surfaces occurs gradually, and faster when defects occur. You can drive, but with greater caution. If any problem occurs, especially in the control system or steering tips, the only means of ensuring safety is to eliminate it. Other elements suffer from the increased gap. Repairs will cost more in the long run.
The biggest danger can happen when the finger is simply pulled out of the body. Most often this happens when turning, when falling into a deep hole. The wheel gets twisted, it can even be torn off, the bottom of the body falls onto the road, becomes deformed, and the entire front part breaks. The consequences depend on the speed of movement. In any case, the cost of restoration exceeds the cost of the supporting spare part.
Possible malfunctions of the ball joint
Even a novice motorist can independently identify signs of wear on a ball joint based on indirect signs. It is necessary to pay attention to the behavior of the car during a turn. When the driver has to make special efforts or a characteristic sound (creaking) appears, then the probability of ball failure is high. An additional negative sign is the appearance of knocking while driving the car at low speed on an uneven surface. We recommend carrying out diagnostics when symptoms of wear are noticeable, such as instability of the front wheels and their wobbling to the sides during straight-line movement. Many experts include uneven wear on a car's tires as signs of a worn-out ball joint.
How to check a ball joint on a car yourself
Proper operation and timely maintenance help to extend the service life of ball joints. Typically, the resource of modern spherical joints in cars, depending on the brand, reaches 30-100 thousand km. mileage Vehicles that meet the following criteria may fall into the risk zone for premature breakdowns:
- the boot on the ball is torn;
- the car is often driven on poor quality roads;
- the unit has insufficient lubricant;
- the hinge pins have worn out and a gap has appeared, leading to loosening.
To check the condition of the ball joints you will need a lift or jack. After lifting the car, the wheel under test should be able to rotate freely. The driver grabs the top and bottom edges of the wheel and rocks it slightly in a vertical plane. You can ask an assistant to turn the steering wheel slightly. The wear can be heard at a certain wheel position. However, play in some cases is the result of insufficient tightening or broken wheel bearings. The gap also occurs due to damage to the silent blocks of the lever. Additional testing will be required. Using the flat part of the mount, we determine whether it is necessary to change the balls. We insert it into the gap between the lever and the pivot pin. We create a slight force on the handle and monitor the knot. If there is a working hinge, there will be no play. Negative factors will be tapping and clicking that occurs when pressing the handle.
Checking the condition of the hinge
For diagnostics, it is best to use a lift or inspection hole. The wheels are hung out, the surrounding area is illuminated with a good light source. To increase the applied force, use a pry bar inserted between the steering knuckle and the lever. The presence of even a slight play indicates a defect in the sealing liner and an increase in the gap.
How to check a ball joint using this method - in the video:
A less common way is to measure the distance between the base and the finger . This is possible if the shell has a hole for an oiler. The car is driven onto a flat area above the inspection hole, and the plug (oil nipple) is unscrewed. Determine the distance from the rod to the lower plane of the body. In the new spare part it is 11.8 mm. For measurements, use a caliper or a bore gauge. This method is suitable for serviceable hinges where there is a service hole for an oil nipple.