A constant velocity joint (CV joint, “grenade”) is a device that transmits torque from the car engine to the wheels. It was invented in the 20s of the XX century. Before the advent of the CV joint, cars with front-wheel drive, which were distinguished by high cross-country ability and maneuverability, lost power when cornering, vibration occurred, and torque was distributed unevenly.
Created for a special purpose, CV joints have high strength. There is an opinion that the CV joint mechanism - with proper care and proper handling, of course - can even outlive the car itself. Unfortunately, problems can arise with the grenade. Read on to learn about the characteristic signs of problems and how to replace a CV joint with your own hands.
What is needed to install a new CV joint
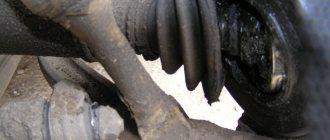
The CV joint, despite its strength, has parts that can wear out over time or if used incorrectly. Often, CV joint replacement occurs due to damage to the boots - during driving, cracks and holes appear that become clogged with dirt, water and dust. This way you can drive hundreds, or even thousands of kilometers, which will finally finish off the mechanism. Boot problems are expressed in a crackling sound when turning the wheels (when turning to the right, the left wheel cracks, when turning to the left, the right one). Sometimes the CV joint has to be replaced due to incorrect actions by the driver. Acceleration of the engine with slipping, starting on the wheels turned out, braking by the transmission - often the cause of the malfunction lies in this.
Play in the ball joint has a negative effect on the CV joint. It occurs when the support itself is already severely worn out. If this problem is not identified in time, it will have a very negative impact on the CV joint. Thus, driving at high speed can tear out the support pin, which can cause the grenade to break.
It is extremely rare that CV joint failures are caused by factory defects in the mechanism parts or initially incorrect installation. Coupled with a worn boot, the problem can reach unimaginable proportions. Many reviews on automotive forums mentioned the poor quality of some parts - both basic functional elements and additional little things, like clamps.
Regardless of the source of the problem, a grenade that is not working properly will require replacement. Machine manufacturers claim that when parts wear out, the entire mechanism must be replaced, even those elements that were not damaged by failure. Considering the high quality of materials, the repair will cost quite a lot. In this regard, the car owner tries to replace the CV joint with his own hands. What will the driver need?
- pit or lift;
- hammer, screwdriver, pliers, jack;
- a set of keys or heads;
- bench vice;
- new clamps, lubricant (CV joint-4, for example), hub nut with stopper.
The latter (consumables) are often provided with a new grenade. All of the above are suitable for replacing outer and inner CV joints.
Service life and maintenance
A grenade in a car is a consumable item. It will have to be changed quite often. Fortunately, the cost of the unit and repairs is usually not the highest.
How much a factory part costs depends on three factors:
- Driving manners;
- Machine models;
- Timely service.
The first factor is critical. Grenades are especially afraid of the trigger falling down when the steering wheel is turned to the extreme position. At such moments the node experiences maximum load.
If you mostly move calmly, then you can look for a resource for your car on thematic forums. There are cars in which a standard product can cost more than one hundred thousand.
Timely maintenance means periodic inspection of the boots, their timely replacement and filling with lubricant. If a crack appears in the rubber, the death of the CV joint will occur in just a couple of weeks. And in rainy weather this can happen even faster. This is due to water, which, when it gets into the assembly, leads to corrosion and leaching of the protective lubricant.
Surely you will be interested to know that in addition to grenades, absolutely all ordinary cars have a TV! Be sure to read our article on this so you can be a knowledgeable car owner.
A torn boot is a typical malfunction.
Boots, by the way, are quite inexpensive. The lubricant is also cheap and is called tritely - “CV joint”. When purchasing, do not forget to check that the anthers come with clamps for tightening them.
Advice on how to extend the life of a grenade:
- Do not press the pedal to the floor when turning, especially when starting off
- Change boots and lubricant in a timely manner
The lifespan of external and internal grenades is very different. The first is subject to great effort, since it is forced to turn at significant angles, and therefore makes itself felt more often.
The internal part may well not be bothered for the entire service life of the car.
Checking the condition of the CV joint
Experienced motorists know that there are external and internal CV joints. There are differences between them. Let's take a closer look at them.
- External (external) CV joints - two pieces, located on the hubs, transmit torque to the wheels. The steering angle is significantly higher than that of an internal CV joint. They also take on more load. Accordingly, they break down more often and require regular inspection and replacement if necessary. They have a smaller size.
- There are two internal CV joints that make the axle shaft move; they are located in the gearbox, one on each side. They are larger in size. They are less subject to stress and, accordingly, can work longer.
You can assess the condition of the CV joint yourself. The easiest way to inspect the external one is to turn the steering wheel all the way (to the right or left) and quietly move away. If there is a problem, a cracking or crunching sound will appear. The more damage is done to the CV joint parts, the louder the sound will be.
If problems with the external grenade are accompanied by a crash when turning, then problems with the internal grenade are accompanied by a crack when moving straight. The sound will intensify if you drive off-road - every bump, hole or ditch will clearly remind you of the problem. If you notice a crunching sound, carry out repairs immediately - problems with the internal CV joint are very dangerous. It's a little more difficult to inspect:
- We put the car on the lift.
- We turn on first gear, the wheels should rotate slowly (the car should be slightly raised).
- The presence of a distinct crunching sound is evidence of problems.
If you hear a cracking sound while driving - when turning, when overcoming off-road obstacles, or sudden acceleration - immediately fix the problem. Timely inspection and repair will help the car owner remain a driver and not a pedestrian. In addition, a problem detected in time will help to avoid critical situations on the road.
Kinds
In a VAZ 2110 car, the CV joint may need to be replaced. But which one exactly? After all, in the “ten” there are two of them - internal and external. They are necessary in order to effectively overcome all obstacles. Here one CV joint will clearly not be enough.
Internal and external
- The first grenade is internal, and it transmits torque to the shaft from the transmission.
- The second grenade is external and engages with the car's wheel hub.
Despite the fact that their operating principle is the same, they differ in design and price.
Is it possible to do without replacement?
Having seen the cost of repairing or completely replacing the CV joint, inexperienced motorists think that they can drive anyway: just think, something crunches down there, a big deal. And it's actually a big deal.
Some car enthusiasts think that the strength and durability of parts makes them completely invulnerable, which is absolutely not the case. Replacing the grenade is the only possible option that will allow you to drive comfortably.
It is necessary to change the CV joint after identifying the slightest problems in its operation. Have you noticed any wear on the boot? Does your wheel crunch when turning? Don't over-tighten, otherwise the machine will just fall into place one day. Why do we need a car that can only remain in the garage as a dead weight? That's right, an experienced driver is not interested in such a car. Moreover, replacing the external CV joint is quite feasible on your own.
Malfunction prevention
In order for this part to last as long as possible, it is necessary to completely eliminate the possibility of dirt and water getting under the rubber cuffs of the CV joint. If there is the slightest damage, this part must be replaced with a new one.
For this purpose, it is better to use original spare parts that are made from high-quality rubber. If you purchase counterfeit cuffs, the procedure for replacing this part will have to be carried out too often.
Another reason why the CV joint often fails is its insufficient fastening to the main gear shaft. If the bolts are not tightened well enough, then over time they begin to unscrew randomly. In this case, the outer CV joint moves significantly away from the shaft, and with a significant gap, knocking noises will be observed in the transmission. If this malfunction is not detected in time and the fastening bolts are not tightened, then in a short time the CV joint will be completely “broken.”
How to change the CV joint and how to determine the malfunction of this part is described in detail in the article. The operation of replacing the CV joint will not take much time, but if you do not want to fix this problem yourself, you can always turn to a car repair shop for help.
If you have any questions, leave them in the comments below the article. We or our visitors will be happy to answer them
Replacing the outer CV joint
An experienced car owner with practical skills will not encounter any problems when taking on the task of replacing the outer CV joint. The list of tools necessary to carry out the “operation” has already been presented above. In addition to tools and supplies, there are a few other things worth doing. Before removing the wheel, drain a little oil from the gearbox - this will make it easier to work with. You will also need a pry bar - it will serve as a lever when removing the drive shaft.
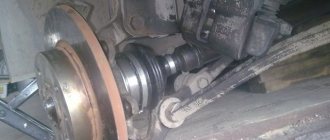
Let's assume that the problem is on the right. Replacing the right CV joint begins with removing the wheel. We unscrew the hub nut, remove the brake disc, caliper, ball joint and steering tip. We take a pry bar or crowbar and remove the splined drive shaft. Using light blows of a hammer (a support, such as a wooden block, will come in handy), we knock out the outer hinge. Next we perform the following steps:
- It is necessary to remove the hub nut and tear off the wheel bolts. We put stops under the rear wheels.
- We jack up the car, hang it up and then remove the wheel.
- Remove the bolts holding the steering knuckle to the ball joint.
- Turn the steering wheel all the way. Pulling back the steering knuckle, we pull out the outer half of the hub along with the old CV joint. If the grenade does not budge, hit it lightly with a hammer.
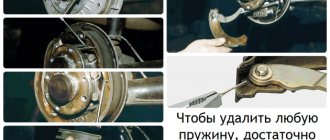
- We remove the old boot and clamps and throw them in the trash.
- We remove the CV joint with hammer blows, rotating it along the axle shaft.
- We fix the installed new hinges in the hub together with the boot.
Replacing the left CV joint is carried out in the same way. When returning parts to their place, the above procedures should be done in reverse order. When knocking down a CV joint with a hammer, hit it clearly - some models are equipped with an ABS ring, which does not like strong blows to it. Don't forget to add gearbox oil. When installing the wheels back, be extremely careful to avoid falling apart.
Adaptations
Professionals do not use any specialized equipment when replacing CV joints. However, if you lack the skills, a device for pulling a “grenade” from the shaft can help, at least psychologically. They can be of different designs; the common thing is a clamp fixed to the drive shaft and a screw puller that pulls the hinge from it.
Sometimes the existing shank of the outer race with a standard hub nut screwed onto it is used as the working thread of this puller. The device is as trustworthy as it is inconvenient in practical work.
The bottom line is that the grenade is held on the shaft by a spring retaining ring, which is recessed into the groove of the splined part under pressure from the inner race. The angle of attack of the cage chamfer on the ring greatly depends on the deformation of the ring, the presence of lubricant and rust, and the chamfer configuration.
Assembly of the unit
The assembly process for the outer CV joint is as follows:
- We stretch a new rubber element onto the shaft;
- We place a washed or new CV joint on the shaft splines (if it is also being changed), and then we stuff it so that the groove in the joint cage fits onto the locking ring, which will ensure fixation from removal;
- We add new lubricant (press it into the hinge itself, as well as into the boot);
- We pull the boot onto the outer casing;
- Use your hand to press the boot a little to squeeze out the air from inside;
- We put on the clamps and fix everything.
After this, the drive is installed back - the hub is put on the splines of the limit switch and the whole thing is secured with a nut. Next, put the rod end, support and wheel in place.
After removing the car from the jack, tighten the drive fastening nut and using a powerful screwdriver, it is cored (its skirt is bent into the groove on the shaft) to prevent spontaneous loosening.
Drive design features
The main advantage of CV joints, in comparison with conventional joints, is the transmission of rotation without loss, even with a strong change in the angle between the components of the shaft (up to 70 degrees).
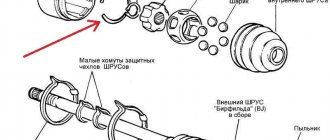
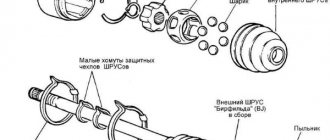
In total, the VAZ-2108 drive shaft includes three components:
- Shaft (with connecting splines);
- Internal CV joint (for interaction with the box);
- The hinge is external (provides interaction with the wheel hub).
Both hinges used on the VAZ-2108 are of the ball type; they are almost identical in design, but differ in size. Thus, the outer ring of the internal element has a significantly greater depth. This provides the possibility of axial displacement of the inner race, and as a result, a change in the length of the shaft, which is necessary for the drive wheels to make turns. In addition, the left and right drive shaft assemblies are different lengths.
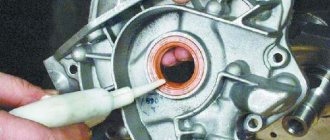
The main components of the CV joint are:
- Outer ring (made in the form of a glass, special grooves are made on the inner surface);
- Inner race (represents a power fist, which also has grooves);
- Balloons;
- Separator (prevents balls from falling out);
Related link:
How to start a VAZ engine in winter
All this is assembled into a single structure, so it is generally impossible to check the VAZ-2108 CV joint, even if it is completely disassembled.
The inner races are connected to the shaft using splines. They are secured against removal with locking rings.
The outer races are made integral with the limit switches, which are splined into the gearbox and hub. But the end stop of the inner CV joint is secured in the box with a retaining ring, but the outer joint is secured with a threaded connection (nut).