How to remove the back sofa
Removing the rear row of seats is done occasionally - only for cleaning or upholstery with new covers. Nevertheless, also read the instructions for removing the rear sofa and keep it in your head “just in case.”
- Unclip the seat cushions on both sides (they are angular) and pull them out of the passenger compartment.
- Find the locking strap above one of the backrests and pull it up. Do the same with the other back.
- Unscrew the bolts securing the armrest and remove it;
- Unscrew the bolts securing the hinges to the body.
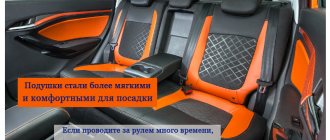
The restyled and pre-restyled Priora, in the opinion of many car reviewers, are practically no different. But, if you dig deeper, you can find one huge difference even in heating kits. In the kit for the pre-restyling version, the switch operates exclusively in 2 modes: ON/OFF. And in the converted version, the entire set is designed so that the heating works in 4 modes: OFF, small, medium, high.
In other words, the kit for the converted version adds something that not all foreign cars have: the ability to change the degree and temperature of the seat heating. On the Priora, which was produced from 2007 to 2012, the heating elements were immediately turned up to maximum.
The standard set for Priora Restyling is also suitable for owners of the first model, because the design has not changed at all. The heating elements themselves will fit perfectly on the seats, and the wiring will be connected the same way – “according to the standard”.
You cannot compromise on comfort in a car, otherwise any winter trip will become true torture. If the stove will not heat the air while the engine is warming up, then you can find other options to warm up. To do this, you will have to spend half a day, but the efforts of this day will “pay off” when it is minus 25 outside.
Removing the rear seats of Lada Priora
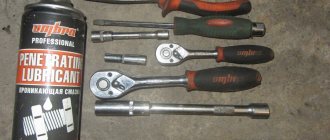
Required tools : 10mm socket, Phillips screwdriver.
- Release the latch by pulling the loop.
- Fold the right side of the seat back forward and unfasten the fastening buttons for the trunk trim.
- Pull the backrest hinges out of the body hooks and remove the right side of the backrest.
The left side of the seat back is removed in the same way.
- Press the latches on both sides of the seat cushion.
- Remove the pillow.
- Unscrew the 2 screws of the upper fastening of the plastic partition using a Phillips screwdriver.
- Unscrew the 2 nuts securing the armrest hinges to the body using a 10mm socket.
- Remove the armrest.
- Remove the plastic partition.
Installing the rear seat of the Priora is carried out in the reverse order.
How to remove the front door trim of a Priora How to remove the front door trim of a Priora
To perform upholstery removal work, you will need a set of screwdrivers. Disconnect the negative cable from the battery. We unscrew the 2 screws securing the inner door handle with the power window control module. We take the module out of the upholstery.
To perform work on removing the rear seat you will need: a 10mm wrench and a Phillips screwdriver.
- Press the seat cushion lock handle.
- Raise the edge of the pillow
- In the same way we release the second side of the pillow
- We remove the pillow.
- Pull up the seat back lock strap.
- Remove the backrest by lifting it up.
- We also remove the second seat back.
- Unscrew the screw securing the armrest to the hinge.
- Unscrew the screw securing the armrest hinge to the body.
- We remove the loop.
- In the same way, remove the second armrest hinge and the armrest.
- If the pillow clamp is broken, then unscrew the screw that secures it.
- remove the lock
- Either we change the spring, or we change the retainer assembly.
- Reinstall the rear seats in reverse order.
How to open the rear seats on a Priora
nik_bel72, I had a metal creaking in the place where the backrest clings to the body from below, I wrapped this place with electrical tape, the sound disappeared, then it appeared again, there was already a problem in the shelf: the body plays on bumps and the shelf creaks, I screwed it in with self-tapping screws, now it’s quiet
Same symptoms. The creaking at the bottom of the backrest disappeared after removal, now it creaks in the area of the shelf on large bumps. We will treat...
There are 2 options: 1, try to snap it firmly or press harder; 2 cut a little splen around the fastening.
I also glued it with 8mm splenium, everything turned out fine for me, just like my own :)
and tried this way and that: on one side it closes, but on the other it doesn’t work. I'm already stuttering)))) what other options??
Hm. Does your seat not reach the mount or does it not fit into it? Is the seat screwed down well and level? Alternatively, look at the lock on the seat.
Has anyone ever had this happen? The ribbon has come off and you have to pull it so that the hook will come off :))) How can I recline the seat now?
Try unscrewing the two front hinges under the seat (they are covered with plastic covers). Approach the nuts on the side with a 10mm wrench. Unscrew it, lift the seat, and then reach the hook.
It didn’t come off for me, but it happened that I fastened the back and there was a ribbon inside)) well, nothing came out of the trunk, something like an electrode, only a thin one (the knitting needle was opened))
You can try this too.
Then it is not a “loop”, but a handle for the back lock. If the T-shaped plastic handle is not lost, then it is put in place and secured through the hole with a new cotter pin or piece of wire. I've already had this happen. If it is lost, then you buy a new one in the store, complete. I think if you look in stores, you will find it.
Removing the rear seat of LADA Granta
Tools needed: 10mm wrench, flathead screwdriver.
- Pull the front part of the rear seat cushion upward.
- Remove the pillow loops from the holders on the body.
- Remove Grant's rear seat.
- Bend the edge of the carpet and unscrew the 3 bolts securing the backrest to the body.
- Tilt the backrest forward and unscrew the 3 bolts that secure the backrest to the body.
- Remove the seat back.
READ How to Remove Peugeot 3008 Battery
Installation of the rear sofa and backrest is done in the reverse order.
Removing and installing the rear row of seats on Priora hatchback 2172
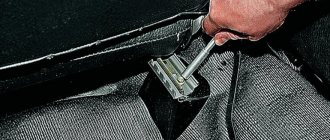
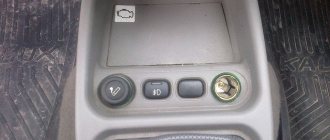
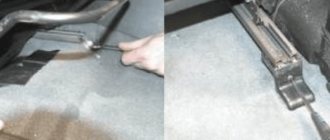
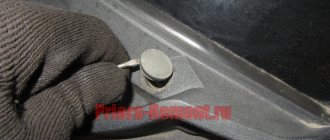
So, the first step is to remove the lower part of the seat, since it is the easiest to dismantle. To do this, use a flat-head screwdriver or use your hand to pry up the canopy cover, as shown in the photo below:
And in the recess we unscrew the nut using a 10 mm socket:
Now the canopy is moved to the side, because nothing else holds it.
We perform the same procedure with the second half. Then, by pulling the special belt in the back of the seat, on both one side and the other, we lift them and remove them from the passenger compartment.
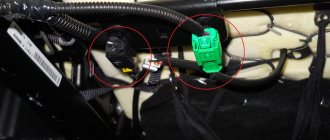
As for the back, everything is also quite simple to do here. First of all, we recline the backrest, lifting the clamps next to the headrests, and from the inside we see several fastening nuts, both on one side and on the other. We unscrew them with a key number 13.
To show everything more clearly, below is another photo.
Also, on the back side there are still nuts that need to be unscrewed:
On the other side we do the same. After which you can begin removing the seats from the Priora. Once again, it is worth noting that the fastenings on the sedan will be different, so this procedure will have to be considered in the following articles. Installation occurs in reverse order.
Removing and installing the rear row of seats on Priora hatchback 2172
So, the first step is to remove the lower part of the seat, since it is the easiest to dismantle. To do this, use a flat-head screwdriver or use your hand to pry up the canopy cover, as shown in the photo below:
And in the recess we unscrew the nut using a 10 mm socket:
Now the canopy is moved to the side, because nothing else holds it.
We perform the same procedure with the second half. Then, by pulling the special belt in the back of the seat, on both one side and the other, we lift them and remove them from the passenger compartment.
As for the back, everything is also quite simple to do here. First of all, we recline the backrest, lifting the clamps next to the headrests, and from the inside we see several fastening nuts, both on one side and on the other. We unscrew them with a key number 13.
To show everything more clearly, below is another photo.
Also, on the back side there are still nuts that need to be unscrewed:
On the other side we do the same. After which you can begin removing the seats from the Priora. Once again, it is worth noting that the fastenings on the sedan will be different, so this procedure will have to be considered in the following articles. Installation occurs in reverse order.
Removing the front seats of LADA Granta
Required tool: 8mm wrench. The front seats of Lada Granta are installed on skids that are attached to the floor.
- Move the seat all the way forward.
- Unscrew the two rear mounting bolts for the guide slides and remove the spring washers.
- We move the seat all the way back, and similarly unscrew the two front bolts with washers.
- If heated seats are installed, then disconnect the block with wires. Raise the seat and disconnect the seat belt sensor wiring harness connectors.
The 2nd front seat is dismantled in a similar way. Installation of seats is done in reverse order.
Rear seats
The rear seats will differ in dismantling depending on the Lada body type. Therefore, we will consider each body type.
Sedan
- In a sedan, the rear seat can be removed much faster than in other body types. To remove the sofa, you need to press on the locks located on the edges of the sofa and lift it up. After which the sofa can be removed from the car.
- The backrests of the rear sofa can be removed by opening the lock located behind the rear headrest. To do this, you need to pull the lock loop and tilt the backrest forward. After which the back is removed from the hooks.
Hatchback and station wagon
- In these types of bodies, the sofa is divided into two parts, each part is attached to two hinges that are screwed to the body with an M6 bolt with a 10mm head.
- To dismantle, you need to pull the loop and open the lock securing the sofa. Then unscrew the 4 bolts and remove both parts of the sofa from the hinges.
Back
- The back of the sofa is also divided into two parts and is supported on hinges, access to which opens after removing the sofa.
- Pull the lock flag to open it and bend the back forward. Then unscrew the bolts on the backrest hinges and dismantle it.
The installation process is performed in reverse order.