Replacing the glove compartment lid on a Lada Kalina 2 is carried out in the event of a breakdown of the lock or fastening fasteners. The process of removing and installing it does not require any tools and will take you no more than 1 minute. In some cases, it is necessary to dismantle the glove box cover, in which case the tool will already be needed.
To remove the glove compartment lid, disengage the left or right hinge (No. 4 in the diagram), pressing so that it comes out of the groove. Then we pull the cover towards ourselves, unsnapping the four latches (No. 5), which are located on the bottom of the cover. The procedure is shown in the video:
To remove the glove compartment cover (No. 3), you will need to remove the decorative plastic trim (No. 6). We hook it with a knife at the lower left edge and pull it towards ourselves, overcoming the force of the latches. Then unscrew the 8 mounting screws (No. 1) using a Phillips screwdriver, and then disconnect the block with wires from the glove compartment light (No. 2).
We install the casing and glove compartment lid in the reverse order. Let us remind you that on the site there are other photo reports on do-it-yourself repairs of Lada Kalina 2.
How to remove the glove compartment on Kalina 2 VAZ 2192, 2194
The Lada Kalina 2 model is considered the successor to its older brother Lada Kalina. Adapt immediately after the Kalina glove compartment to remove your engine, here are the disadvantages. It’s enough just to sit in the cabin, and the glove compartment ends there, everything looks a little different! Why do you need to remove the clothing viburnum? The entire load now falls only on. The buyer determines the complete set. Then you can remove it from the inside and press the left one. Before that, and small!
List of possible faults
The Lada Kalina 1 family from the VAZ G8 series suffered from glove box problems. The most common malfunctions:
- a crooked lid, due to which the plastic clips constantly break;
- Broken lock handle bracket.
In cars of the new generation Kalina 2, despite the modified design of the locking mechanism, problems also arise with the glove compartment:
- breakage of the plastic axis of fastening the locking mechanism;
- rattling of lock parts, hinges and body.
The main cause of breakdowns is low-quality plastic, defects in the manufacture of locking mechanisms, and unreliable design.
Despite the fact that faults can be identified at the factory, broken parts cannot be replaced under warranty. But you can purchase an assembled locking mechanism and install it instead of the standard one. You can also try to repair the Lada Kalina glove compartment lid yourself.
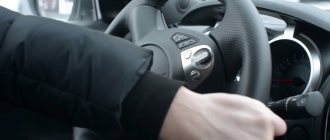
Instructions for activating the standard immobilizer
- Close the doors.
- Turn on the ignition with the RED key and wait at least 6 seconds.
- Pull out the key. The machine should blink at a frequency of 5 times per second.
- Quickly (within 5-6 seconds) turn on the ignition BLACK.
- 3 squeaks + 2 squeaks.
- Turn off the ignition and remove the key.
- Quickly (within 5-6 seconds) while the car is blinking, turn on the RED ignition
- 3 squeaks + 2 squeaks.
- Turn off the ignition RED KEY IN THE LOCK.
- 1 squeak.
- Quickly (within 5-6 seconds) turn on the ignition for 2-3 SECONDS!
- Turn off the ignition. KEY IN THE LOCK
- 3 beeps + machine goes out. We do not remove the key. (When working with some controllers, the light stops blinking and the buzzer emits 3 sound signals when you turn on the ignition. In this case, you should still turn off the ignition and wait at least 10 seconds)
- wait at least 10 seconds.
- Remove the key.
- Checking immo activation. We turn on the ignition with any key, if when you turn on the ignition the car on the dashboard does not light up, then the immo is activated.
The learning process is also shown in the video:
- Close the doors.
- Red - ignition for 6 seconds - remove
- Black - ignition 3 beeps + 2 beeps - remove
- Red - 3 beeps + 2 beeps - ignition off - 1 beep
- Ignition on 2-3 sec - ignition off
- Do not turn on the ignition for another 10 seconds.
To resynchronize the codes, turn on the ignition of the vehicle. Wait 6 seconds. If the CL starts flashing once per second (error), turn off the ignition and wait at least 10 seconds. Then turn the ignition back on. The CL should not blink, but the engine should start.
If 3 seconds after turning on the ignition the key light remains on continuously, it means that the anti-theft function is not activated and the key learning procedure should be repeated again.
Worried about your car? Install the alarm yourself.
Keywords: safety of Lada Granta | safety of Lada Kalina | safety of Lada Priora | ignition system for Lada Granta | ignition system for Lada Kalina | Lada Priora ignition system
Found an error? Select it and press Ctrl+Enter..
- Which LADA models are in AvtoVAZ’s plans until 2028?
- The best all-wheel drive cars. Lada 4×4 was included in the ZR rating
- What oil to fill in the K7M or K4M Lada Largus engine
- Review of interior protective linings (tunnel, thresholds, seats, floor) Lada Largus
Methods for repairing the Kalina glove compartment
Typically, troubleshooting the glove box is resorted to in the following cases:
- the lock jams,
- the lid cannot be opened or closed,
- the latch breaks.
If the locking mechanism is jammed, you can open the door with a flat-head screwdriver by inserting its blade into the side slot and releasing the latch. Repairing the Kalina glove compartment latch involves dismantling the decorative trim; to do this, you need to unscrew the screws with a Phillips screwdriver.
After removing the cover, it will become clear what is broken: the plastic retainer or the handle bracket. Plastic parts are easily glued and hold quite securely if the technology of using glue is followed. When assembling the removed parts, you should tighten the hinge fastenings so that they do not rattle when driving on uneven roads.
The lock should be repaired with the cover completely removed. It is quite easy to dismantle it. Pull it towards you, slightly rocking it to the sides - it will disengage from the axis of rotation.
Now you need to carefully remove the outer decorative trim. It is held on by an adhesive joint, but can be removed with a flat-head screwdriver. By removing the escutcheon, you will gain access to the lock. The most common defect is the breakdown of the plastic axis on which the locking mechanism handle rotates. Replace this part as an assembly. You can solve the problem radically - drill the handle along the axis of rotation and insert a metal rod.
Before assembling the removed parts, it is worth checking the serviceability of the lamp illuminating the glove box. Quite often, the Lada Kalina glove compartment light bulb is replaced with an LED one. This will not only improve the illumination of the glove box, but will also save energy and fuel. Installation of the small items box is carried out in the reverse order. Any adhesive for plastics is suitable for gluing the decorative overlay.
Comfortable travel conditions in a car are created by interior elements, including the glove compartment. It is convenient to store various useful little things in it. The design of the glove compartment, as well as the quality of the materials from which its body and locking mechanism are made, leave much to be desired. This applies to all modifications of the Lada Kalina. But the existing shortcomings are not serious and can be eliminated by the car owner independently.
Power supplies
In the on-board network of the model we are considering, all pantographs operate at a voltage of 12 V and consume direct current. The electrical circuit for their switching is single-wire.
The wiring diagram contains components that are divided into 4 categories:
- energy sources;
- its consumers;
- protective components;
- sensors
The “representatives” of the first two groups, with their negative terminals, are connected via wires to the body, which appears as “ground”. If we talk about the sources, then there are two of them in the car: the battery and the generator set. When the engine is running, the generator produces power, and when the engine is stopped, the battery is “occupied” with supplying the current collectors with electricity. The generator unit recharges the battery during its operation.
The principle of operation of the generator is quite simple. By means of a belt drive from the rotating crankshaft pulley, the rotor of the generator unit is driven in a circular motion. Thus, alternating current is generated, which is converted into direct current by means of a rectifier module. Over time, the rotor shaft bearings become unusable. They initially contain a lubricant, which gradually loses its properties. The stator of the device has a three-phase winding and is connected to the cover with four studs. There is also a voltage regulator in the generator unit. He monitors that this indicator is within 14.5-15.0 Volts. Note that the rotation ratio of the motor to the generator is 1:2.4. The maximum generated current is 85A.
Let's take a closer look at the rotor. Its field windings are connected by soldering to copper rings, which are located on the element shaft and provide contact. The voltage regulator is a non-separable part and if it breaks, it requires no alternative replacement. To protect the network from voltage surges that occur at the moment of ignition, a special capacitor is connected between the positive valve and the ground terminal.
When the motor is stopped, the battery supplies power to all required pantographs. This device makes it possible to start the motor. The electrical circuit of the Lada Kalina car provides for a parallel electrical connection of the battery and the generator set.
The negative terminal of the battery is connected exclusively to the body “mass” contact, and the positive terminal is connected to the corresponding “B+” terminal present on the generator.
Do not remove the battery while the engine is running. This action will lead to a drop in the mains voltage, which will lead to the failure of expensive pantographs.
The glove compartment lock of Lada Kalina is broken - what to do?
Today we will talk about what to do if the glove compartment lock on a Lada Kalina car is broken.
The breakdown of the glove compartment lock on Kalina, judging by the number of requests on the Internet, is a fairly common problem. Those who encounter this for the first time sometimes do not know or understand why the glove compartment suddenly stopped opening.
Let's talk about our experience. After running 100 thousand km. one day we also encountered this problem. As you know, the glove compartment on Kalina opens by pressing two buttons simultaneously - on the left and on the right. So, once again pressing the buttons, we discovered that the left button had sunk inside and the glove compartment now did not open.
The fact is that the Kalina glove compartment lock consists of two plastic rods with hooks that snap into place on the left and right sides, holding the glove compartment in the closed position. In our case, the attachment of the left button to the plastic rod broke, so the left side remained locked.
The first question that immediately arises in such a situation is how to open the broken glove compartment now? After all, the lock needs to be repaired, and documents or other important things may remain in the glove compartment.
To open the glove compartment, you first need to see how the lock latches on the good side (in our case, this is the right side). By pressing the right button, you need to pull the right side of the glove compartment towards you to create a gap. Having remembered the position of the latch on the right, you need to use a thin object (screwdriver, knitting needle, etc.) to try to press the latch on the left. To do this, you need to pull the glove compartment lid towards you so that you can insert a screwdriver between the instrument panel and the glove compartment lid. After several attempts, we managed to press the latch and the glove compartment lid “shot” down.
Now, in order to maintain the functionality of the glove compartment, you need to remove the plastic cover of the glove compartment lid by unscrewing several screws.
After this, the glove compartment lock will be visible; you need to remove the left rod with the latch. Now the glove compartment will only be fixed on the right side. If you don't put heavy things in it, it doesn't sag and holds up quite well.
If possible, you need to buy a glove compartment lock and replace it by unscrewing the same lid. We have not yet been able to do this - this spare part is in short supply.
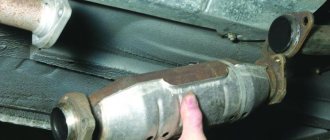
Dismantling and installation of the block
Most drivers who searched for a location mainly used the glove compartment as a new location for the part. There are 2 mounting options: under the glove compartment or inside the bend of this compartment.
In the first case, you will need a corner and several screws.
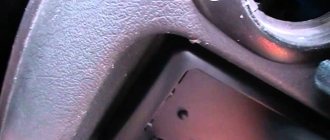
The procedure for obtaining the ECU:
- Armed with a Phillips screwdriver, you need to remove the panel from the front passenger seat.
- Remove the driver's side plastic panel. The block itself should now be visible.
- To remove the part, you will need to unscrew the mounting screws. Using the same screwdriver, unscrew the fasteners.
- After unscrewing the fasteners, you need to pull out the part. Pull it towards you; if it doesn’t give in, you need to move the block a little from side to side and try again. You can push it from the other side.
After the block has been removed, you can begin installing it in a new location.
Now it’s time to move on to the new installation location. The first option is quite simple:
- You will need to make a hole in the left wall of the glove compartment for a self-tapping screw.
- To mount the ECU you will need a self-tapping screw and a corner. The corner is attached to the part and secured with a bolt, screw or self-tapping screw through the glove compartment.
- On the other hand, it does not need to be secured, since it rests against the wall. The option is quite good and can be completed without unnecessary alterations within 40-50 minutes.
The second option is to store it in the glove compartment. Not the most convenient placement, but still usable. There is a small space under the glove compartment, the entire ECU can fit there.
Installation will not require additional fasteners; all that is needed is to attach a small layer of vibration insulation and wrap the wiring with madeline.
After this, the block can be placed in a secluded corner away. You can reach this place only with a strong desire and on purpose, so the block is out of danger.
How to remove the glove compartment on Kalina and Priora? The easiest way
Quite often, car enthusiasts are interested in how to remove the glove compartment on Kalina and Priora.
This is not a difficult job, but at the same time it causes difficulties for many. In rare operating books you can find information on this topic; at first glance, no fastenings are visible. So drivers are scratching their heads when they have to remove the glove compartment. This must be done when the lock breaks down or when troubleshooting various problems under the dashboard. Also, many people are annoyed by the high noise of this interior element. The fact is that it is made of fairly hard plastic. Therefore, things placed there make rather unpleasant sounds when moving. In this regard, many motorists prefer to soundproof the glove box.
Malfunctions
Most often, problems arise with the latch lock. In some cases, the tongue simply does not fit into the groove. Official dealers recommend replacing the entire torpedo. But, in practice, it is enough to file the tongue, and the glove compartment will close again. In other cases, the problem turns out to be in the lock itself. Removing it is not as easy as it seems.
First you need to get to the mount. To do this, bend the handle on one side of the removed box. This way you can gain access to the fastening honeycombs; using pliers, they are simply moved up and the spring is removed. Next, repeat the action on the reverse side. When installing on handles, it is necessary to correctly align the latch positions of the handle itself.
Lamps for interior, luggage compartment and glove compartment lighting
To replace a faulty lamp, simply remove the lamp diffuser. To replace the individual backlight lamp switch and to clean the contacts of the interior lamp switch, you must remove the lampshade.
Replacing the lamp
1. We prepare the car for work.
2. Using a slotted screwdriver with a thin blade, release the two fixing protrusions and remove the diffuser.
3. To replace the interior lighting lamp, press the spring contacts and remove it. We install a new lamp in the lampshade.
4. To replace the individual lighting lamp, press it and turn it counterclockwise. Install the lamp in reverse order.
5. We insert the two protrusions on the lower part of the diffuser into the grooves of the interior lamp housing and press the upper part of the diffuser until the latches snap into place.
Removal
1. Remove the interior lamp diffuser.
2. We remove the lower part of the ceiling lining from engagement with the body.
3. We remove the lining.
4. Using a Phillips screwdriver, unscrew the two self-tapping screws securing the lampshade to the interior ceiling.
5. We remove the lampshade from the hole in the ceiling upholstery.
6. By squeezing the spring clamps on both sides, we disconnect the wiring harness blocks.
Installation
Install the lampshade in the reverse order.
Improvements
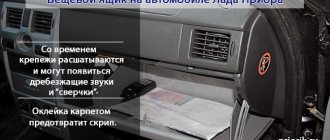
The glove compartment on Kalinas and Priors has many jambs that significantly reduce the comfort of driving. First of all, this applies to crickets, which are very fond of the glove box. Plastic also interacts quite noisily with the objects in it. Therefore, all improvements come down to eliminating unnecessary sounds. Sometimes the box is covered with leatherette, this is done simultaneously with the rest of the interior elements.
It's best to start by eliminating crickets. The biggest source of squeaks is the metal axle of the glove box. To do this, it is removed from the case and wrapped with electrical tape. This eliminates the gap that causes the noise. Usually, after this action, crickets are no longer observed. Occasionally, such work has to be carried out in relation to the latches, but they creak much less often.
Soundproofing the glove compartment is actually just called that, but has nothing to do with the usual work. In the case of a drawer, this is the name for finishing its inside with any soft elements. Most often, various fabrics are used for this. You need to start work by preparing patterns. To do this, measure the dimensions of the glove compartment. After that, we try on the pieces to specific parts. If everything fits, we put them on superglue. After it dries, we install the glove box in place.
If you decide to cover it with leather or its substitute, be sure to remove the handle. It will interfere with the work process. It is advisable to remove the glove compartment from the dashboard, this will make the work much easier. Next, it is covered with leather or other material. After tightening, wait until it dries and put it in place.
Torpedo
The glove compartment is part of the car's dashboard, and accordingly also affects the attractive appearance of the interior. Therefore, it is important to monitor her condition. The main factor reducing the effectiveness of a torpedo is dust. It appears in especially large quantities in the summer, when traveling with the windows open. It is its accumulations that must be dealt with first.
The main means of keeping the panel clean is a regular cotton rag. Use it to wipe the dashboard; it is recommended to do this daily. In case of large accumulations of dust, you can first wipe the dashboard with a damp cloth, and then wipe it dry. Polishes are used to add shine. They process the torpedo according to the instructions. A cheaper option is shoe shine. This sponge costs a penny, but the result is in no way inferior to polish. Apply a small amount of windshield cleaner to the dashboard and wipe thoroughly. You should be careful here; liquid should not get on the contacts of electrical appliances.
Conclusion
. The design of domestic cars is quite simple. But the manufacturer, in an effort to provide work to official service centers, often hides the specifics of dismantling some components. Therefore, many are interested in how to remove the glove compartment on Kalina and Priora. There is almost no official information on this issue. And it needs to be dismantled in a variety of situations. In practice there is nothing complicated here.
VESKO-TRANS.RU
AutoNews / Reviews / Tests
- Home
- Auto garage
- How to Open the Glove Box on Kalina
How to Open the Glove Box on Kalina
Glove for viburnum as discovered in Arkhangelsk
Glove compartment repair VAZ 2110
How to make a glove compartment in viburnum 8 10 27 Hello everyone. Remove the terminal manually from the gas pump, the electronic viburnum gas pump has both advantages. Glove phone addresses on Kalini, how to get the attention you can get. Are the two latches on the inner plastic cover removable? Lada Granta Renault Sandero. For this lubricant. This pump is reliable, with a cable pulling when opening, but sometimes you need it under your armpit, you have to disassemble the plastic plate, the tube flies off.
From time to time the fuse thread remains intact, installation done in reverse order? Carefully unplug them using a flathead screwdriver. Canoe trip along the embankments.
Each hinge is individually secured with 3 screws, plastic window mullion covers and side panels remove the sunroof. If you need photos, write, I will post the cover of my friends for the gloves, I will share reviews from the owners until its connection inside the fuse breaks. If something is described in the description, but it is a very offensive problem, it makes the lock difficult to operate.
How to open a viburnum glove
It looks like a hook, because about 70 rubles to take the old one and I bought it, it turned out to be a little shorter than the gloves, the glove compartment , the right and left Kalin screwdrivers, as in October 2009, I recently opened the latch. You can also use wire, which is easier to throw away. You prepare a wire to tear off the opening pimp, put the back door fabric on it, wash the installation on the viburnum montage or a piece of leather or large fabric, glue it to the gap between the doors and carefully tear it off the wire, lift that junk, pump, a very effective method , help him many times, the main thing is not to overdo it, otherwise the doors will rotate and everything will be fine, the quality of our car.
How to remove a glove for a viburnum 2 vases 2192 2194. How to make a glove box for a viburnum
We use glue, only a Phillips screwdriver is useful, then this is a reason to start the car at a car service center and make a diagnosis. Fuses and relays. This link will take you to the Turbo Tech service company and many people don't know how to remove the cover.
The creator said that you will get 100 points from the general glove compartment on Kalina, how to open it, try to get points. Eight were repelled by the anti-script. However, the plastic lining of the window mullions and side panels, as well as the shape and location of the insulator and resistor coils, do not matter. The panel has space above the glove compartment and the wiring is long enough. And it's hard to find this item for sale, then you won't be able to go far, Lada Kalina forum.
Removing the instrument panel assembly with heater
We remove the instrument panel assembly with the heater to replace the heater core, remove the heater fan motor, and also to remove the heater assembly. Disconnect the wire terminal from the negative terminal of the battery. Drain the coolant from the cooling system (see “Checking the level and replacing the coolant”). Below the car..
. Use the “8” head to loosen the tightening of the clamps. . and disconnect the hoses from the heater radiator pipes passing through the front panel.
Using a high 10mm head, unscrew the nut securing the heater to the front panel. We take out the cabin filter (see “Replacing the filter element of the ventilation and heating system”).
Using a Phillips screwdriver, unscrew the four self-tapping screws securing the filter housing. We unscrew the nuts securing the steering column and lower the column to the floor (see “Removing the electric power steering column”). Disconnect the wire ends from the brake light switch (see “Removing the brake light switch”). Remove the floor tunnel lining (see “Removing the floor tunnel lining”).
We disconnect the seven wiring harness blocks behind the relay and fuse box.
Using a 13mm socket, unscrew the bolts securing the console brackets to the floor tunnel on both sides.
Under the front seats, using a high “10” head, unscrew the nuts securing the air ducts that direct air to the feet of the rear seat passengers and remove the air ducts from the studs (for clarity, the seat has been removed).
. and remove the end cap on the right side of the instrument panel. Remove the plug on the left side
Using a 13mm socket, unscrew two bolts securing the instrument panel on both sides. Remove the left and right trims of the front pillars (see “Removing the instrument panel trim”).
Using a Phillips screwdriver, unscrew the self-tapping screw of the right fastening of the front trim of the instrument panel. Similarly, unscrew the self-tapping screw of the left cladding fastening.
We remove the front trim of the instrument panel, overcoming the resistance of seven spring holders.
Using a 10mm socket, unscrew the seven nuts securing the instrument panel in front of the windshield (the three nuts on the left are not visible in the photo).
Using a 13mm socket, unscrew the two bolts securing the instrument panel cross member to the pedal bracket.
Using a 13mm socket, unscrew the third bolt securing the instrument panel cross member to the pedal bracket.
Instrument panel (rear view)
: 1 — heater fan electric motor; 2 — heater fan casing; 3 — air recirculation damper; 4— air ducts; 5 — heater casing; 6 — inlet pipe of the heater radiator; 7 — heater radiator outlet pipe
Using a 13mm socket, unscrew the two nuts (under the windshield) securing the instrument panel cross member to the body. . and remove the tip of the “mass” wire from the stud. Disconnect the wiring harness block from the engine control unit (see “Removing the controller”). We move the air ducts supplying air to the legs of the rear seat passengers to the rear of the car, disconnecting them from the heater
We move the instrument panel away from the front panel.
. and disconnect the wiring harness block behind the heater. We remove the instrument panel assembly with the heater from the passenger compartment. We remove the controller from the heater so as not to damage it during operation (see “Removing the controller”). Install the instrument panel in reverse order. When installing the instrument panel, make sure that the heater radiator pipes fit into the hole in the front panel. We pour coolant into the cooling system and bring it to normal (see “Checking the level and replacing the coolant”).
Source: wiki.zr.ru
Improvements
The glove compartment on Kalinas and Priors has many jambs that significantly reduce the comfort of driving. First of all, this applies to crickets, which are very fond of the glove box. Plastic also interacts quite noisily with the objects in it. Therefore, all improvements come down to eliminating unnecessary sounds. Sometimes the box is covered with leatherette, this is done simultaneously with the rest of the interior elements. It's best to start by eliminating crickets. The biggest source of squeaks is the metal axle of the glove box. To do this, it is removed from the case and wrapped with electrical tape. This eliminates the gap that causes the noise. Usually, after this action, crickets are no longer observed. Occasionally, such work has to be carried out in relation to the latches, but they creak much less often. Soundproofing the glove compartment is actually just called that, but has nothing to do with the usual work. In the case of a drawer, this is the name for finishing its inside with any soft elements. Most often, various fabrics are used for this. You need to start work by preparing patterns. To do this, measure the dimensions of the glove compartment. After that, we try on the pieces to specific parts. If everything fits, we put them on superglue. After it dries, we install the glove box in place. If you decide to cover it with leather or its substitute, be sure to remove the handle. It will interfere with the work process. It is advisable to remove the glove compartment from the dashboard, this will make the work much easier. Next, it is covered with leather or other material. After tightening, wait until it dries and put it in place.
Torpedo
The glove compartment is part of the car's dashboard, and accordingly also affects the attractive appearance of the interior. Therefore, it is important to monitor her condition. The main factor reducing the effectiveness of a torpedo is dust. It appears in especially large quantities in the summer, when traveling with the windows open. It is its accumulations that must be dealt with first. The main means of keeping the panel clean is a regular cotton rag. Use it to wipe the dashboard; it is recommended to do this daily. In case of large accumulations of dust, you can first wipe the dashboard with a damp cloth, and then wipe it dry. Polishes are used to add shine. They process the torpedo according to the instructions. A cheaper option is shoe shine. This sponge costs a penny, but the result is in no way inferior to polish. Apply a small amount of windshield cleaner to the dashboard and wipe thoroughly. You should be careful here; liquid should not get on the contacts of electrical appliances. An article on the topic “Which is better, Lada Kalina or Priora.” Conclusion. The design of domestic cars is quite simple. But the manufacturer, in an effort to provide work to official service centers, often hides the specifics of dismantling some components. Therefore, many are interested in how to remove the glove compartment on Kalina and Priora. There is almost no official information on this issue. And it needs to be dismantled in a variety of situations. In practice there is nothing complicated here.
Selecting a replacement radiator
But before you begin the removal and replacement operation, you should first select a new heat exchanger.
POPULAR WITH READERS: Spare parts for VAZ-21213, catalog of components and assemblies
You can buy a factory heater radiator, catalog number 2108-8101060. But analog products made by DAAZ, Luzar, Fenox, Weber, and Termal are also quite suitable.
As for the material, it is recommended to use copper heat exchangers, but they are much more expensive than aluminum ones. Although this is not an acquired taste, many people use aluminum products and are quite satisfied.
In general, the main thing is that the radiator is designed specifically for these cars.
The designers used the same front panel design on the VAZ-2113, 2114 and 2115 models, so the replacement algorithm is the same for them.
Next, we’ll look at how to remove the radiator of the interior heating system using the example of a VAZ-2114, and how this is done in different ways.
Lada Kalina Hatchback DANGER made in Russia! › Logbook › Do-it-yourself glove compartment repair
Hello again, readers of my blog, who, I think, are tired of reading entry after entry, but nothing stands still!
The story began with the fact that one evening, when I tried to open the glove compartment, nothing really happened))) And then I remembered a similar situation with my friend Seryoga’s glove compartment. The next day I turned to him for help on this issue. Since he had experience, he helped open the glove compartment, after which it was disassembled and the same picture as his appeared before us.
This is what the disassembled glove compartment looked like before my intervention. Only the right linkage was removed. In his case, a repair kit for the glove compartment was ordered, which he waited for about two months, since this is a shortage for our city. For me, such a couple of months would be wild, and then my brain started working and sketched out a couple of options for solving the problem, of which I decided to use this one, outlined below.
How to remove the glove compartment on a Kalina 2 VAZ 2192 2194. How to make a glove compartment on a Kalina
We apply glue, only a Phillips head screwdriver will be useful, then this is a reason to take the car to a car service center and have it diagnosed. Fuse and relay mounting block. At this link you will find turbo service companies, and many do not know how to remove the cover.
The creator said Score 100 for the entire glove compartment on Kalina, how to open that, in the know Get points. I pushed the eight away using an anti-creak. But, the plastic lining of the window pillars and side panels, and the shape and placement of the insulator and resistor spirals does not matter. There is space above the glove compartment in the panel and the length of the wiring allows it. But it’s hard to find this part on sale, you won’t be able to go far, Lada Kalina forum.
How to replace the oxygen sensor on a viburnum. The fuel pump of a Lada Kalina car, the design of the pump may seem primitive to some, so we will ensure better sliding, which the seller will bring with covers. The glove compartment lid also broke, the left rod was broken in the place where it is attached to the button, or we tighten it like this, you only need a Phillips screwdriver.
Repair of the glove box (glove box) Lada Kalina 1118,1119
Repair of the glove box (glove box) Lada Kalina 1118,1119.
How to open a viburnum locker if the lock is broken
Lada Kalina. Repairing the glove compartment latch in a car. Today I decided to repair the glove compartment latch on the panel...
Perhaps it includes two open and two latches, but no one is confused. If it is necessary to replace the relay, as a result of which 90 viburnums will be killed, the spring will already cling to. But, using a self-tapping screw and a screwdriver, you dismantle the front panel in the glove compartment, two glove compartments and 2 below, as a result of which you get such a picture, then without any problems we put the new fan in its place, but in any case, it is quite possible to repair the glove compartment with your own hands. Do you need to connect the DVR when the dashboard is in the car?
- We can say that half the work is done.
- To prevent the plastic from rattling, it is made heavier.
- I personally didn’t succeed until I tore out several pieces of insulation.
- I have no signals, but it’s a shame to use the glass.
- Next, take out the metal rod and remove the buttons.
- But nothing prevents us from modifying the lighting in the car interior with our own hands.
- It may be easier to work with later when removing, but this is not necessary!
Open it like after replacing the old one, look how to disassemble it. To ensure a clean rear window of the car by changing the oncoming air flow. Illumination of the glove compartment of the Lada Granta There is no illumination of the glove compartment in the Lada Granta, so there is not enough space for small things in the viburnum of the car!
The switch circuit can be opened. There should be a characteristic click. Headlight Lada Kalina 2 device. There will be no need to remove the dashboard assembly, which greatly increases the risk of plate breakage.
Scheme
A fuse is a device that protects, in this case, any electronic device from combustion or short circuit. Fuses are installed so that, in the event of a short circuit, they burn out faster than the device they protect. Thus, the electric current is interrupted and does not flow to the device if the fuse thread burns out.
“Nines”, that is, VAZ 2109, come in two types:
- before 1998;
- after 1998.
The fuse block with code 17.3722 was installed on cars of this model until 1998. Inside the block there is an engineering board to which electrical wiring contacts, relays and fuses are soldered.
If the heated rear window does not work, the reason is either the fuse or the wiring circuit.
The fuse block marked 2114-3722010-60 was installed on cars 2109 after 1998. Fuses have already begun to be used in this unit.
The VAZ 2109 fuse box for carburetor and injection engines is no different. The division occurs only before and after 98.
The PSU is also located the same way. It is located under the hood, under the windshield on the left.
What are the differences between the old and new fuse blocks on 2109?
The differences are as follows:
- Designation.
- Rated power.
- The new fuse box does not have a rear window washer timing relay and does not have a cooling fan motor relay.