Drive installation
Adjusting the position of the trunk lid is possible if, instead of a mechanical lock, you install an electronic device, in this case a drive. To install it you will need:
- universal drive installation kit for the machine;
- metal cable with a cross-section of 1.5 mm and 500 mm long;
- two contact connection wires of 4.5 m each;
- screws with wide heads;
- opening button for the lock;
- retainer;
- fuse;
We install the drive in the prepared place, according to the instructions. Next, you will have to make several amendments to the design:
The VAZ trunk is opened by pressing a button that can be installed in the cabin.
The electronic device is adjusted according to the included instructions. All other nuances that should be taken into account when installing the device in VAZ models have been indicated.
How to open a VAZ 2114 without a key? VIDEO
There may be situations in everyone's life when, due to an awkward accident, the car keys remain inside a slammed car. Usually, a spare set of keys is out of reach (at home, at work, on the other side of town) or is completely absent. What should a would-be motorist do in this case without the help of a locksmith? We’ll look further in our article.
The creation of the Russian automobile industry, represented by the VAZ 2114, unlike its earlier predecessors, is equipped with cylindrical plugs on the door, which eliminates the option of opening the door using a rope or fishing line. In this case, ordinary iron wire will come to our rescue.
So, the sequence of actions will be as follows:
It's no secret that the density of the VAZ 2114 interior is achieved by using a rubber glass seal. To fix the glass, a seal is laid at its base: between the door frame and specifically the window glass. To get inside the car, we need to carefully pry the edge of the seal (from the side of the locking mechanism) and pull it out of the groove. It is most convenient to pry off the material with a narrow, flat object (a nail file, a flat screwdriver or a narrow penknife). It is absolutely not necessary to pull out the entire seal, because for subsequent manipulations a few cm of free space will be enough for us. Next we will need to find a suitable piece of metal wire. Its length should be no less than the height of the door. At the end of the rod you need to make a 2-3 cm long bend at an angle of 45 0. Now you can proceed specifically to the “opening” procedure itself. We insert the bent end of the wire into the door gap prepared in advance until it collides with the “obstacle”. This is usually the locking mechanism. Next, you need to gently twist, advance, and shift the wire to find a way around the lock.
When you feel that the rod has “failed,” you need to carefully move the wire so that the curved end catches on the lever of the locking mechanism. Carefully pull the wire upward to open the doors.
Installation
To make installing the new part easier, secure the clamp(s) in the half-open position on the new block and apply a little silicone grease to the inside of the block. Pull the cracker over the ball, then snap the clamp into place. Repeat on the other end (and the other side if possible) and you're done.
If you encounter a ball joint that is not held in place by a clamp, check to see if the ball joint is screwed into the body panel. If so, use a hex wrench to remove the old ball joint while it is still attached to the post, and use an open end wrench to screw in the new ball joint.
Insert the one-piece ball stud of the strut into the mounting hole and secure it with a nut.
If the stop is rigidly mounted, simply unscrew the bolt that holds the stop in place, remove it and install a new one. If you are dealing with a pin mount, you will need to find some kind of lock washer or pin that will prevent the stop from sliding off the pin.
The lock washer must be pulled or pushed in one direction or the other to release it. Sometimes it is enough to push it slightly with the tip of a screwdriver to remove it. Otherwise, you need to grab one end of the washer with needle nose pliers and pull it out. Then remove the old stop, install the new one, and smoothly return the lock washer into place until you feel it snap into place or see that it is secure.
The trunk lid of a VAZ 2114 rattles, what should I do?
Occurrence of a problem
The new-fashioned body design of many VAZ models was the beginning of problems. In many cars, owners notice unpleasant noises and pops from the rear of the body. These loud noises occur when the car goes over bumps and the trunk door begins to knock. Most likely, this defect resulted from the fact that the car was tested in conditions suitable for travel - on a flat road surface. Under ideal conditions, it is difficult to notice that the locking plate or stem is not in the correct position. In addition, the gap usually appears only after driving on poor-quality surfaces due to vibration that occurs at the joints.
Another reason is wear of the closing mechanism. Because of this problem, the trunk of the VAZ 2114 opens while driving. The same situation occurs in other models. This happens because the locking tooth of the lock is either broken or almost completely worn out. It would seem that what’s wrong with this, because you can go and change the lock for a new one. But the problem will remain unless the approach to it is changed. The main locking mechanism must be replaced with a different type of device.
Also, the reasons that the trunk opens spontaneously while the car is moving may be the breakdown of silumin parts or wear of the seal.
In any case, the mechanism will have to be changed, but to what?
Replacement options
The first option is banal to the point of impossibility - buy a similar lock. Moreover, you will need to buy the entire lock, and not a separate part, because the design of the mechanism is non-separable. Replacement is carried out when the old lock is completely dismantled. This solution should be considered temporary, since the production technology is the same and the problems will remain. Over time, a new lock will have to be replaced. The only positive side of this solution is that it is quite cheap.
The second option involves completely replacing the mechanical lock with an electrically controlled drive. What does this give?
- Secure trunk closure.
- Possibility to control the position of the rear door from the driver's seat.
Installing such a system is not the cheapest pleasure, but the final result will really please the user. The electronic drive is much more convenient to use and is a reliable replacement for its mechanical counterpart.
Dismantling the old castle
The VAZ 2114 model will be taken as an example.
The following tools will be useful in your work:
- set of Phillips screwdrivers;
- key to 8.
The replacement sequence is as follows:
- First of all, in order not to damage the interior lining of the trunk, we remove ten plastic fasteners, and then the plastic casing from the lock.
- We remove the casing, then unscrew the nut that secures the lock in place.
- Unscrew the wires that are in the way.
- Next, you need to unscrew the right fastening nut and remove the inner part of the lock from the fastenings.
- You can inspect the integrity of the spring and core. If these parts are defective, then the problem is in the mechanism. In any case, everything will have to be changed.
If you prefer the economical option of replacing it with a new mechanical lock, then install it in the reverse order as described.
Drive installation
Adjusting the position of the trunk lid is possible if, instead of a mechanical lock, you install an electronic device, in this case a drive. To install it you will need:
- universal drive installation kit for the machine;
- metal cable with a cross-section of 1.5 mm and 500 mm long;
- two contact connection wires of 4.5 m each;
- screws with wide heads;
- opening button for the lock;
- retainer;
- fuse;
How to replace the trunk, aka the trunk lid, aka the tailgate on a VAZ 2108-VAZ 2109?
Preparation for replacement:
Note! Before starting work, remove both gas stops. Both gas-filled stops are removed in the same way, so an example of removal will be shown only on one of them!
1) First, take a stick of a suitable diameter and prop the trunk door with it.
2) Now use a screwdriver to pry up the upper fastening of the gas stop.
Note! After prying, disconnect the upper part of the stop from the bracket!
3) Once the top part is detached, disconnect the bottom part of the gas stop and then remove it.
4) Finally, unscrew the support mounting bracket.
5) And after turning it out, remove it from the tailgate.
Note! After removal, check the condition of the bracket, replace the deformed one with a new one!
Replacing the trunk:
Note! To avoid injury, it is best to carry out the operation of replacing the trunk door with an assistant!
1) First, use a screwdriver to pry out the ten pins securing the tailgate trim.
Note! After disconnecting, remove the casing!
2) Next, disconnect absolutely all the wire connectors that will interfere with removing the trunk lid.
3) After disconnection, disconnect all terminals from the wires.
Note! To avoid confusion during installation about which terminal goes to which wire, it is recommended to mark them with a felt-tip pen!
4) And then remove the wires from the trunk door.
5) Then remove several pins securing the edge of the rear part of the headliner, and then bend it a little so that it does not interfere with the removal of the trunk. (How to remove the pistons and detach the trim, see the article: “Replacing the ceiling trim,” points “1-4”)
6) Then, using an extension with a union head, unscrew the terminal securing nut.
Note! Under this nut there should be a terminal that will need to be removed!
7) Next, on each side, unscrew the two nuts securing the trunk lid hinges.
 Finally, remove the trunk door from the car.
Replacing trunk hinges:
1) First, remove the spacers from both hinges.
2) Next, unscrew the extension with a cap head, and on each side unscrew two bolts that secure the hinges on the tailgate.
3) Finally, remove the hinges and the spacers underneath them.
Installation: Installation of all parts, and these include: trunk hinges, the tailgate itself and gas filler stops, is carried out in the reverse order of removal.
Important! Before starting work, it is advisable to disconnect the negative terminal from the battery so that there are no problems with the electronics! (How to remove the terminal, read the instructions in the article: “Replacing the battery”, point “1”)
Renault Logan device?
Renault Logan trunk - thanks to it, this car was able to overtake many competitors in popularity. Its displacement was developed taking into account the possibility of loading large cargo. To achieve a truly record-breaking luggage compartment capacity without compromising driving performance and passenger comfort, a truly gigantic amount of work was done! The changes affected not only the internal space. Thus, the height of the trunk lid was reduced, and its upper part acquired a kind of “superstructure”, reminiscent of a spoiler.
Renault Logan trunk
The most interesting thing is that the trunk lid does not include any torsion bars. Two springs are responsible for its raising and lowering. Moreover, it is even possible to adjust their force! To do this, you just need to move the end of the spring into the corresponding hole on the bracket, which is fixed to the body. As they say, the comparison here is clearly not in favor of Russian engineers.
However, there are disadvantages here too. For example, the luggage lid fastening loops have a fairly large radius of movement, and therefore can touch things in the compartment. The next “trouble” is the trunk lock, which, unfortunately, is quite delicate, and if handled insufficiently carefully, it can either jam or not latch at all. Fortunately, this shortcoming can be eliminated quite easily. If you have plumbing skills, fixing it will take about an hour. If you don’t have any skills, it’s quite possible to replace the “native” lock with the same or a similar one from Lada Kalina. The latter, by the way, will be cheaper. Well, for those who spare no expense on their “iron horse” and value their time, it is still better to turn to the technical center for help.
Luggage lid mounting hinges
To prevent similar, albeit minor, but nasty “surprises” from happening, the owner of the Renault Logan just needs to adhere to certain rules when using the trunk:
- periodically lubricate the lock, especially when preparing the car for the next season;
- The trunk lid must be closed without excessive force or impact;
- do not allow the trunk to be filled with cargo whose dimensions require closing with force, as well as with objects that significantly exceed the carrying capacity. The fact is that deformation of the body may occur, which will disrupt the sealing and tightness of the lid.
https://youtube.com/watch?v=2AuuUYIyr3I
We remove the trim on the doors of the Lada Kalina - what is the complexity of the process?
The car door trim, officially called the door panel, is most often removed to access the window lift mechanism for repair or lubrication. Much less often, this operation is carried out to install speakers, install noise and vibration insulation, replace facing panels or perform body work. But in any case, sooner or later, almost every car owner has to dismantle the door trim. At the same time, many of them, without resorting to the services of a service station, do it themselves, since this operation is quite simple and can be done by most car enthusiasts.
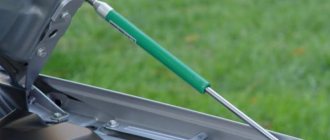
Trunk lid shock absorber: briefly about the device, breakdowns and replacement
Suspension shock absorbers are integral components of modern cars, without which it is completely impossible to imagine them. However, shock absorbers have also found application in car body elements - the hood and trunk lids. True, shock absorbers for hoods and trunks rather make using the vehicle even more convenient and, to a certain extent, safe. Although they are designed quite simply and fail less often than suspension components, they can still bring a lot of trouble to the car owner if they break down. Let's try to figure out why trunk shock absorbers are needed, how they are checked and how they are selected and replaced if necessary.
How to change the lock on the trunk of a VAZ 2113, 2114, 2115
One of the “sores” of the VAZ-2114 car is the trunk lock, which often becomes unusable. It is difficult to drive with such a malfunction; the lid bounces on bumps and can open. Leaving the car unattended is dangerous - it is easy to break into the interior. How is the trunk lock cylinder of a VAZ 2114 replaced?
Types of trunk lock failures
The lock on the trunk of a VAZ 2114 becomes faulty for various reasons.
- The larva breaks. The reason is vibration from the trunk lid.
- Deformation. This is caused by a strong blow from a foreign object.
- Exhaustion of working resource. Associated with abrasion of the locking tooth or breaking off. The part wears out and requires replacement.
- Failure of silumin elements. A complete replacement of the product is required.
- Wear of seals. The lid will rattle and sometimes open on its own.
The problem must be solved by installing a working mechanism.
How to remove an old lock
The process of removal and replacement on hatchback (2113, 2114) and sedan (2115) cars is different, although the principle of operation is the same.
The procedure for removing the mechanism on a VAZ-2114
:
- Remove the plastic cover. The upholstery is attached to 10 pistons, which just need to be pryed off with a screwdriver. Access to the mechanism will open.
- Unscrew the 2 bolts with an “8” key. The action must be carried out carefully; on one side there are terminals responsible for the windshield wiper and brake light on the spoiler.
- Remove the faulty element.
If the lid does not close, adjustment is required.
Removing and replacing the trunk lock of the VAZ-2115 sedan
:
- Remove the plastic cover by unfastening the pistons.
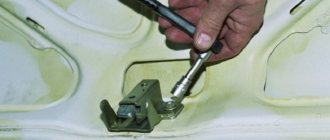
- Access to the faulty part is open; the drive rod needs to be straightened. Unscrew the corresponding screw (not all the way). Remove the rod from the bushing.
- Go to the cylinder lever. Remove the mechanism rod and remove it.
- Unscrew the 3 nuts of the product and dismantle it. Unscrew the cylinder mounting bolt and remove.
Replacing the trunk lock on a VAZ-2113 2114 2115
The old mechanism has been removed, a new one needs to be installed. The process is the reverse of dismantling.
The cylinder is replaced with the lock removed. You need to check the condition of the spring. If the element is weak, it needs to be replaced.
When installing a new element, you do not need to immediately tighten the bolts - the trunk will not close. It is recommended to adjust the position of the cover using the latches. The bolts are tightened slowly. This will allow you to make adjustments so that the lid closes tightly. You need to check the seals. When the elements wear out, the cover hits the body, creating vibrations.
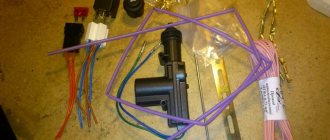
The trunk lock of the Lada Samara family often fails. One simple modification will solve the problem. It is enough to install the product from Lada-Granta.
- Make a mount from a 40 x 40 mm corner.
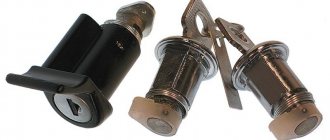
- Install the cylinder plug on the lid.
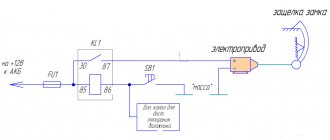
- Connect the wires. “Power up” from the elements going to the wiper. One wire (white with a blue stripe) is connected to the lock drive, the other (yellow with a blue stripe) is connected to the limit switch.
- Install a new product, adjust it, make sure it works.
After these steps, we get a reliable and durable mechanism that will not open on its own and will not rattle.
Before starting work, you need to disconnect the (-) terminal from the battery for safety.
Conclusion
To replace the product, no special skills or experience are required - you can do the procedure yourself. If everything is done correctly, the lid will stop rattling and will not open while moving.
Removal
3. On the connecting blocks of the wiring harness laid in the door, mark the color of the insulation of each wire connected to it.
4. Disconnect the wiring harness block from the windshield wiper gear motor block (see “Rear window wiper - removal and installation”). In the block that supplies voltage to the gear motor block, use a slotted screwdriver with a thin blade or an awl to tighten the locking tendrils of the wire tips. Disconnect the wires from the block.
5. In a similar way, remove from the block the tip of the wire that supplies power to the additional brake signal (see “Spoiler - removal and installation”).
7. Disconnect the wire of the door glass heating element (see “Tailgate glass - removal and installation”).
8. Pull the wires out of the tailgate.
9. Inside the car, after removing the decorative trim, use a 17 mm
Unscrew the upper seat belt mounting bolt.
Warning! Be careful not to lose the spacer located under the bolt.
10. Using a Phillips screwdriver, unscrew the two self-tapping screws securing the rear pillar trim.
11. Release the trim from under the glass seal and move the upper part of the trim away from the pillar. We remove the trim on the other side of the car in the same way.
12. Remove the rear handrail trim. Use a Phillips screwdriver to unscrew the rear handrail fastening screw.
13. Remove the handrail support plate.
14. Similarly, disconnect the rear fastening of the handrail on the opposite side of the ceiling.
15. Using a puller or a slotted screwdriver, remove the clamps of the three holders of the rear part of the headliner.
16. Take out the holders.
18. We move the edges of the upholstery out from under the glass seal and move the back part of the upholstery away from the ceiling at a distance of 5-7 cm.
Warning! To avoid bending the headliner, do not apply force.
19. Under the headliner with a 10 mm
Using a ratchet, unscrew two nuts securing the door hinges to the car body and remove the tailgate.
Warning! One of the nuts on the left loop secures the tip of the “mass” wires. When installing the door, do not forget to connect them!
10 mm socket wrench
Unscrew two bolts securing the hinges to the door frame and remove the hinges.
Hacking the trunk lock
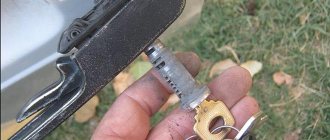
But what to do if you don’t get into the cabin, or you don’t get into the trunk from it? The larva will have to be rolled up. To do this, you will need a bayonet-type screwdriver, preferably with a square screwdriver at the end - drive it into the cylinder and turn it out until the locking plates inside the cylinder burst and it begins to rotate freely. This is an extreme method, after which the larva will have to be replaced.
If you have time, the tool for opening the cylinder is made from durable hexagons or “torxes” of a curved type: carefully, without overheating the metal, we grind one end until it gives it a shape similar to the shank of a key, after which we drive the resulting tool into the cylinder
Video: How to open the trunk of a VAZ 21099 without a key
The main problem when roughly opening the cylinder is that it is often not the cylinder that rotates, but the metal of the trunk lid itself, the grooves of which hold the base of the cylinder in place. On a VAZ of the “classic” family, you will most likely turn the lock on the door rather than roll the cylinder. After this, it is problematic to install a new one - the way out to restore functionality would be to install a plug in the deformed hole, and electromechanical drives with 5-10 kilograms of force on the locking and opening rods.
Replacing the trunk on a VAZ 2108, VAZ 2109
Welcome! Have you decided to replace the trunk with a new one? If so, then today we will analyze in detail the instructions with pictures attached to them for replacing the trunk on cars of the Samara family, but the exception is the VAZ 21099 car.
Note! To replace the trunk, you will need: a wrench with a socket head (Instead of a wrench, you can also use an extension cord with a socket head), and you will also need a flat-head screwdriver and a small set of wrenches!
Summary:
Lada 2114 Robin Hood › Logbook › Replacing the trunk lid and installing GrantoLock
If you have read past entries, then you know about the repair of the wing, the appearance of the car has become very attractive, not counting the rusty trunk... everyone asks every now and then: has the car just been completely painted or is it new? The credit goes to the polishing done at the beginning of summer and the liquid glass that was applied somewhere in September (I’ll write about it a little later, when I’ve collected photos and gathered my thoughts).
In general, the decision was made to buy a new trunk, a new trunk lock from Granta (I have wanted it for a long time) and a new camera, because... the old one started to die)
Trunk - 2500, lock with striker - 1100, camera - 500 (will come to me tomorrow). I didn't have a wiper and I don't like it. The lock can only be opened from the car or by an electric element, so the hole for the lock and the wiper are superfluous. He asked me to weld the entire trunk and paint it. 3000 rubles. Total 7100 rubles.
Then they changed it, killed an hour somewhere and did it slowly. I prepared a 40*40 corner with a thickness of 4mm. (For some reason I thought that this corner would be larger, but it turns out it’s tiny) We cut it at the market for 100 rubles from a long corner.
As best I could, I cut it out according to the drawings using a grinder and made holes with a drill.
Oddly enough, everything worked out the first time, I installed it, it works. Only I had to put a washer under the counter part, the lock couldn’t reach the counter part.
I trimmed the plastic casing in the lock area a little and everything fell into place
source
Purpose of the cladding
To understand how to remove the door trim of a VAZ 2114, you need to find out the purpose of this automobile fragment. The fabric insert enhances the appearance of the interior. If stains, mechanical damage or abrasions appear on it, you will need to disassemble the inside of the door, remove the panel, and attach a new lining. Thanks to this element:
- the interior becomes more attractive;
- additional sound insulation is created;
- a speaker is installed in the facing fragment;
- electrical wiring and fasteners are hidden;
- The corners of the closed plastic panel and iron parts are softened.
The canvas is removed for a number of reasons: increasing sound insulation, installing speakers, deformation, replacing material. There are many options for cladding on the market, but drivers prefer to buy special automotive fabric.
Tailgate - removal and installation
Recommendation: To remove the door, you can unscrew the bolts that secure the hinges to it (access to the bolts is difficult, but you can unscrew them with a spanner). However, the door will have to be held suspended, with the risk of dropping it, damaging the paintwork of the body. It will be even more difficult to tighten the bolts when installing the door. Therefore, the work should be done by disconnecting the hinges from the body (as shown below).
To complete the work, you will need an assistant, as well as a piece of thin steel wire about 1.5 m long.
REAR DOOR OF VAZ-2113 AND VAZ-2114 CARS
REAR DOOR OF VAZ-2113 AND VAZ-2114 CARS
Removing and installing tailgate trim
The trim is attached to the inner panel of the tailgate with ten plastic buttons located along its perimeter.
You will need a screwdriver.
1. Remove the trim fastening buttons from the holes in the tailgate panel...
2. ...and remove the upholstery.
3. Install the tailgate trim in the reverse order of removal. If necessary, replace damaged door trim buttons.
Removing and installing the tailgate lock
You will need: a screwdriver, an “8” key.
1. Remove the tailgate trim (see “Removing and installing the tailgate trim” above).
2. Unscrew the left nut securing the tailgate lock to the door panel and remove the ground wires of the additional brake light and the tailgate wiper motor.
3. Unscrew the second nut and remove the tailgate lock.
4. Install the lock in the reverse order of removal; if necessary, adjust its position using the lock.
Additional modernization of locks
If you dream of your car doors opening and closing as smoothly as in foreign cars, try installing silent locks. Such a device can be installed on any model of Zhiguli. For representatives of the retro era, such modernization is also possible, but the locks themselves will have to be filed a little. By the way, you can also put it on the trunk. In general, there is no limit to perfection.
And the installation is, in truth, very simple and transparent. It is enough to dismantle the old locks, try not to drop the necessary elements inside the door, or remove the trim in advance. And then install new analogues on two bolts. There are situations when, after installation, the door does not close tightly or warps slightly, causing cracks to form. Solving the problem is also very simple by adjusting the location of the device. In general, initially try to secure it exactly where the old one was.
Sheathing installation
You need to assemble the cladding along with the other parts in the same sequence as it was disassembled. After the fragment has completely dried, you must:
- Insert the column into the hole and mount it into the iron frame of the door.
- Connect the electronics.
- Secure the lining with clips to the card.
- Secure the handle with two bolts.
- Replace the plug.
If, before dismantling work begins, contamination is found inside the structure, it is cleaned out. At the same time, it’s worth checking the condition of the wires and tightening the window lift nuts to prevent the door from being disassembled in the near future.
Source: infokuzov.ru
Replacing the cover yourself
To remove the trunk door you will need:
- knob;
- set of socket heads;
- slotted screwdriver;
- set of open-end wrenches.
Replacement procedure
The replacement of the VAZ 2114 trunk lid itself is carried out in the following order:
- Open the tailgate and secure it with a suitable size prop.
- Using a flat-head screwdriver, pry the mounting location of the upper hinge of the gas-filled stop, press it inside the trunk and disconnect it.
Removing the upper trunk mount of a VAZ 2114
Using a flat-head screwdriver, pry up the lower fastening of the gas-filled stop and also disconnect it.
Removing the gas stop
In a similar way, remove the second gas stop. Unscrew the fasteners and remove the brackets used to secure the stops.
Unscrew the brackets
Check the condition and straightness of the stops themselves - if they are bent or deformed, then you should purchase new ones and install them during reassembly. Using a slotted screwdriver or a special puller, pry and remove the 10 pins securing the tailgate trim. Remove the trim.
Removing the casing
Disconnect all terminals and wire connectors connected to the trunk door.
Disconnect the terminals
Remove the wiring harnesses from the cover.
Removing the wires
Remove the trunk lining fasteners. Unscrew the fastening elements of the lock and remove the lock. Using a puller or a flat-head screwdriver, pry and remove several pistons securing the rear edge of the interior headliner. Bend the detached edge of the casing so that it does not interfere with further dismantling of the cover. In the opened technological cavity, find the nut securing the terminal and unscrew it (it is best to use a socket wrench or a socket with an extension). Remove the terminal.
Remove the terminal
On each side of the upper rear part of the cabin, find and unscrew a pair of fastening nuts holding the trunk hinges.
Unscrew the trunk lid hinges
Remove the trunk lid.
After the trunk door is removed, you should carefully inspect the condition of its hinges - if they or their fastening elements are skewed or have cracks, then they should be replaced.
It is produced as follows:
- Remove the gaskets from both hinges.
Removing the hinge pads
Using a socket wrench or a socket with an extension, unscrew the pair of mounting bolts holding the hinges in the door.
Unscrew the hinge mounting bolts
Remove the hinges and the gaskets installed under them.
Dismantling the hinges with gaskets
Install new gaskets and hinges, then secure them.
Reassembly and installation of the tailgate is carried out in exactly the same order as disassembly, but in reverse order.
Adjusting the trunk lid
Having talked about how to replace a door with your own hands, we’ll also tell you how to adjust the trunk lid on a VAZ 2114 after installing it.
Checking the trunk lock cylinder of a VAZ 2114
To do this you will need:
- in the closed state, outline the approximate location of the symmetrical location of the lock and its latch;
- loosen the fasteners, and then fix the lock and its counterpart in the new position (you should not tighten the fasteners “to the fullest” - it is enough only for the lock parts to maintain their position);
- check the functionality of the trunk - if it opens and closes, unlocks and locks without problems, then you should finally fix the position of the lock, but if difficulties arise or a misalignment is observed, the fasteners should be loosened and the position of the lock and latch should be adjusted, and then repeat the check.
Thus, almost every driver can independently repair or replace the trunk lid of a VAZ 2114. The most important thing is not to put off this event “for later”, because when the first signs of distortion or difficulties when locking appear, you can get by with simply adjusting the lock, whereas if the latch bursts, the entire device will need to be replaced.
Adjusting the tailgate lock.
- We unscrew the lock lock so that it can be moved with light force.
- Now you need to close the door and look through the glass to ensure that the lock spike is opposite the latch socket.
- After this, we move the latch all the way back and slam the door. This will ensure the lock lock is in the optimal position.
- Open the door and tighten the bolts securing the clamp in the position in which it was installed.
- It is also necessary to check that the door closes. If the door does not close tightly. then you need to remove the adjusting plate from under the clamp.
- If the door closes too tightly, on the contrary, you need to add a plate under the latch.
Replacement options
The first option is banal to the point of impossibility - buy a similar lock. Moreover, you will need to buy the entire lock, and not a separate part, because the design of the mechanism is non-separable. Replacement is carried out when the old lock is completely dismantled. This solution should be considered temporary, since the production technology is the same and the problems will remain. Over time, a new lock will have to be replaced. The only positive side of this solution is that it is quite cheap.
The second option involves completely replacing the mechanical lock with an electrically controlled drive. What does this give?
- Secure trunk closure.
- Possibility to control the position of the rear door from the driver's seat.
Installing such a system is not the cheapest pleasure, but the final result will really please the user. The electronic drive is much more convenient to use and is a reliable replacement for its mechanical counterpart.
Dismantling the old castle
The VAZ 2114 model will be taken as an example.
The following tools will be useful in your work:
- set of Phillips screwdrivers;
- key to 8.
The replacement sequence is as follows:
- First of all, in order not to damage the interior lining of the trunk, we remove ten plastic fasteners, and then the plastic casing from the lock.
- We remove the casing, then unscrew the nut that secures the lock in place.
- Unscrew the wires that are in the way.
- Next, you need to unscrew the right fastening nut and remove the inner part of the lock from the fastenings.
- You can inspect the integrity of the spring and core. If these parts are defective, then the problem is in the mechanism. In any case, everything will have to be changed.
If you prefer the economical option of replacing it with a new mechanical lock, then install it in the reverse order as described.
Drive installation
Adjusting the position of the trunk lid is possible if, instead of a mechanical lock, you install an electronic device, in this case a drive. To install it you will need:
- universal drive installation kit for the machine;
- metal cable with a cross-section of 1.5 mm and 500 mm long;
- two contact connection wires of 4.5 m each;
- screws with wide heads;
- opening button for the lock;
- retainer;
- fuse;
We install the drive in the prepared place, according to the instructions. Next, you will have to make several amendments to the design:
The VAZ trunk is opened by pressing a button that can be installed in the cabin.
The electronic device is adjusted according to the included instructions. All other nuances that should be taken into account when installing the device in VAZ models have been indicated.
Car audio
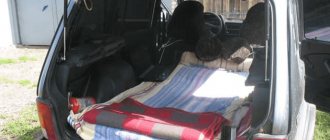
Car audio is not only a reason for pride and an opportunity to show off, but also a kind of modern art. In order to achieve an impressive result, car owners resort to various tricks, and we will consider some of them. Although, if the trunk is intended for transporting potatoes, this is all lyrics.
see also
If the car is for comfort and personal pastime, then you can’t do without music.
- turn your car into a traveling club;
- spend a little money but get good average sound.
For average, but cheap sound, you need an acoustic shelf, it is both sold and easily made independently, put it in place of a standard shelf or convert the standard one into an acoustic one, then problems with fitting disappear completely. It will give a good volume of sound and eliminate unnecessary noise. The shelves that are sold have ready-made cutouts for medium-diameter speakers. Installation will take little time, and the sound will definitely please you.
The trunk door 2109 opens while driving
The door closes well, you can’t open it with your hands, there’s no play, I tried moving the latch and the lock itself to different positions, everything was useless. Even locking it with a key doesn’t help. I tried to correct it with a file, also to no avail.
Anyone who has encountered this problem, please share your experience.
Adjusting the trunk of a VAZ will help get rid of the annoying rattling noise in the rear of the car during a trip. Many car enthusiasts who bought one of the VAZ models have a question: what to do about this noise? Attempts to change the lock most often lead to failure; nothing changes. What measures should be taken in this case?
Basic faults
The main trunk problems that the owner of a VAZ car may encounter include:
- inability to close the trunk - the reason for this is most often the misalignment of the guides or the locking platform;
- inability to lock the trunk - the reason for this, as a rule, is the bursting of the lock mate, made of silumin;
- the appearance of cracks - can occur either due to skewed fasteners or due to damage to the door frame itself;
- the appearance of squeaks during opening/closing - occurs, most often, due to wear of the seal.
Warp trunk of VAZ 2114
To eliminate them, you need to dismantle the trunk and replace worn elements (and in some cases, for example, with a general misalignment, a simple door adjustment is sufficient - we will tell you how to adjust the trunk on a VAZ 2114 at the end of the article).