Replacing intake and exhaust manifold gaskets
The work is performed on a cold engine.
EXECUTION ORDER
Drain the coolant
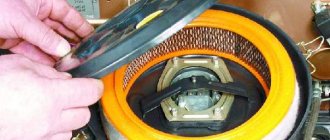
Removing the carburetor
Loosen the fastening clamp and remove the coolant drain hose from the intake manifold,...
...remove the vacuum brake booster hose.
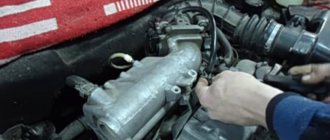
Using a 13mm wrench, unscrew the four copper-plated nuts securing the exhaust pipe to the exhaust manifold. Using a 13mm wrench, unscrew the bolt securing the exhaust pipe to the gearbox and lower the exhaust pipe until it stops
Use a 13mm socket to unscrew the nut...
...and remove the negative wire and the eye from the stud.
Having previously removed the hose from the warm air intake, use the “13” key to unscrew the bottom...
...and the upper air intake nut.
We remove the air intake.
Remove the coolant drain hose from the heater radiator from the outlet pipe.
Using a 13mm wrench, unscrew the second upper fastening nut...
...and use a 10mm wrench to remove the bolt for the lower fastening of the starter heat shield and remove it. Using a 10mm wrench, unscrew the two nuts securing the pipe to the coolant pump...
...and remove it. A sealing gasket is installed between the pipe and the pump.
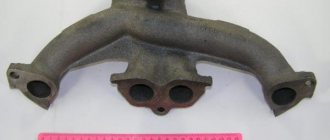
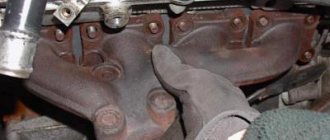
Using a 13mm socket, unscrew the seven nuts securing the manifold...
...and remove the intake...
...and exhaust manifolds.
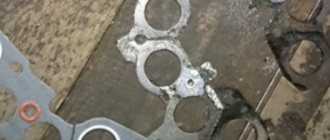
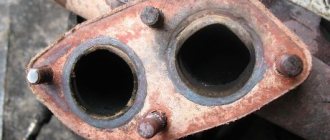
Remove two gaskets from the studs. We install the manifolds in the reverse order, replacing the gaskets with new ones and lubricating the threads of the studs with graphite lubricant. We attach the exhaust pipe of the muffler to the manifold with new brass nuts.
Replacing the intake manifold gasket on a VAZ-2114 car, as well as replacing the exhaust manifold gasket, is a very complex procedure and requires certain knowledge and experience. Of course, you will have to do a colossal amount of work and spend a lot of time, but this will save 4-5 thousand rubles on replacement at a car service center.
The video below will tell you about replacing the receiver and manifold. During the replacement process, the intake manifold gasket is also changed:
The video will tell you how to properly replace the intake manifold gasket, and also tell you about some of the subtleties and nuances of the process.
Removal
1. Place the car on an inspection hole or overpass (see “Preparing the car for maintenance and repair”).
3. Remove the exhaust pipe from the exhaust manifold studs (see “Reception pipe - removal and installation”).
5. Disconnect the choke drive rod and the throttle drive cross rod from the carburetor (see “Carburetor - removal and installation”).
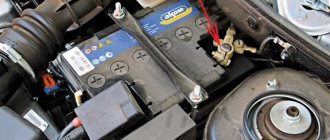
6. To make work easier, remove the battery (see “Battery – removal and installation”).
7. Using a 13 mm socket wrench, unscrew the nut of the lower air intake mounting.
8. Using the same tool, unscrew the nut of the upper fastening of the air intake and remove it.
9. Unscrew the nut of the upper fastening of the starter heat shield (see “Starter - removal and installation”)
10. Using a 13 mm socket wrench, unscrew the nut securing the eye and remove it.
11. Using the same tool, unscrew the nut securing the “mass” wire and remove it from the stud (for clarity, the chain tensioner has been removed).
12. Using a 10 mm wrench, unscrew the two nuts securing the coolant supply tube to the pump and disconnect the tube. A sealing gasket is installed at the connection point.
13. Using a 13 mm socket wrench with an extension, unscrew the seven nuts securing the intake manifold and exhaust manifold. Under the nuts of the joint fastening of the intake manifold and exhaust manifold, washers of increased thickness are installed.
Intake manifold mounting points
and exhaust manifold
14. Remove the intake pipe from the cylinder head studs and move it to the side.
15. Remove the manifold from the cylinder head studs.
16. Remove the gaskets from the studs.
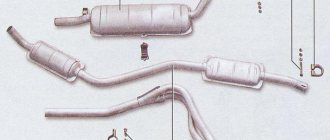
How to change the main muffler
Small fistulas on the body, located in accessible places, are usually eliminated using a gas welding machine or semi-automatic device. Sealing in another way will give a temporary result - gas pressure and high temperature will render any clamp or adhesive patch unusable. To weld a stainless steel muffler, appropriate qualifications are required.
If you do not have the necessary equipment and skills, it is better to replace the worn-out spare part with a new one. The operation is not complicated, and special devices are not needed either. For a beginner, the procedure will take no more than 3 hours.
Preparation of tools and workplace
Since the muffler is located under the car, disassembly requires an inspection ditch in the garage, an overpass in an open area, or a lift. It is extremely inconvenient to remove a part lying on the ground under the car. The main difficulty is to separate 2 sections in this position, whose pipes are inserted into one another and become strongly stuck during operation. Therefore, it is not recommended to change a muffler without a pit.
To complete the work, you will need the usual tools:
To make it easier to unscrew stuck threaded connections and disconnect pipes, it is worth purchasing WD-40 type lubricant in an aerosol can with a tube.
During operation, the rubber suspensions stretch, causing the body to begin to dangle in a horizontal plane. Hence the advice: change the rubber products along with the exhaust element; the kit is inexpensive (about 100 rubles).
Replacement procedure
Before starting work, you should place the “seven” in the pit and wait 20-40 minutes, depending on the air temperature in the workplace. The exhaust tract, which is heated by the engine, must cool down, otherwise you will get burns even through gloves.
Dismantling the old muffler is carried out in the following order:
Many Zhiguli owners have not used a long screw to secure the rear cushion for a long time, because the threads become sour from rust and do not want to unscrew. It is much easier to insert a nail or electrode with a diameter of 3-4 mm instead of a screw and bend the ends.
If sections of the exhaust system cannot be disconnected, use the suggested disassembly methods:
Assembly is carried out in reverse order. Install rubber bands on the new spare part, lubricate the mating surfaces with grease and place the muffler pipe on top of the resonator. Make sure that the pipe is seated all the way, then put on and tighten the clamp.
Repairing minor damage without welding
If small holes have formed on the pipe or muffler body due to corrosion, they can be temporarily sealed and the service life of the part can be extended by 1-3 thousand km. It will not be possible to weld the defects - the metal surrounding the holes has probably already rotted.
For work you will need the following materials:
It is not necessary to remove the muffler; proceed as necessary. If the defect cannot be reached otherwise, carefully dismantle the element. Perform sealing according to the instructions:
A tin clamp is made by double bending the ends of the workpiece. To avoid mistakes during the repair process, first practice on any pipe. When the sealant hardens, start the engine and make sure that the clamp does not allow gases to pass through.
Typically, the lower wall of the muffler tank rusts from the inside under the influence of aggressive condensate. There is an “old-fashioned” method for solving the problem - a hole with a diameter of 3-4 mm is specially drilled at the lowest point. The sound of the engine will remain virtually unchanged, but water will stop accumulating inside the tank.
Video: how to seal an exhaust without welding
Self-replacement of the intake manifold on a VAZ 2107
To be honest, in my practice I have never encountered such cases when the intake manifold of a VAZ 2107 needed to be replaced. Since the part is made of aluminum alloy, it is actually very reliable and lasts almost the entire life of the car. But this manual will help you if you are disassembling the engine, that is, it will clearly show the process of removing the manifold. Below is a list of the necessary tools you will need to complete this repair:
- Pliers
- Ratchet handle
- Socket heads for 13: regular and deep
- Small to medium extension cord
- Vorotok
Before you begin this procedure, you must first remove the carburetor. Once you have dealt with this, you can move on.
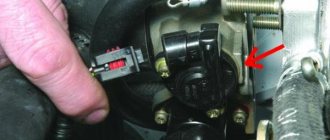
The first step is to disconnect two hoses: the coolant supply and from the vacuum brake booster, this is clearly shown in the photo below:
Now you can unscrew the two nuts securing the intake manifold from above, shown schematically in the photo below:
The most convenient way to do this is with a ratchet and a medium extension:
Then unscrew the three nuts from the bottom, which are visible in the picture below (the central one is not visible):
We also use a ratchet handle to do this quite quickly and conveniently:
After this, you can begin to remove the collector. Pull it slightly to the side and remove it from the studs:
If it is necessary to replace this part on a VAZ 2107, we buy a new one at a price of about 1,500 rubles (500 rubles for a used one) and install it in the reverse order.
conclusions
Replacing the intake manifold gasket on a VAZ-2114 engine is a rather complex and time-consuming process. So, not every motorist can handle it on his own, and therefore he has to contact a car service, where he will need to pay 4-5 thousand rubles for the process, plus the cost of the part and consumables.
According to automotive industry technology, the intake manifold of the VAZ 2107 is made of aluminum alloy; it is very reliable, so it lasts for a long time, almost until the end of the vehicle’s life. Replacing it is a rare case, which cannot be said about laying the intake manifold and pipeline of a VAZ 2107.
A few tips before replacing
Installing a compressor on a VAZ 2107 carburetor
Installing a compressor on the seven is an opportunity to increase the efficiency of pumping hot mixture and accordingly increase engine power. The most popular compressor that car enthusiasts and craftsmen install on the VAZ 2107 is the PK05D
which will be discussed. Why him? It’s just that its characteristics meet the most optimal ones, namely: excess air pressure is only 0.5 bar and this is achieved at 6200 rpm. In addition to this decisive characteristic, there is another fact in favor of this compressor - when installing it, you do not need to interfere with the design of the piston group, which means that installation is extremely simple.
Installing a compressor on a VAZ 2107 carburetor with your own hands
is quite possible without the intervention of specialized craftsmen. Naturally, first, you should familiarize yourself with some of the features of this procedure, as well as know the sequence and order of actions. If you are worried about the benefits of a compressor, then believe me, it has been used for these purposes in sevens for a long time and during this time it has undergone several significant improvements that have made it even better and naturally more efficient. The latest innovation is a significant reduction in the noise characteristics of the unit, so the supercharger operates almost silently.
PK05D
consists of two main elements that deserve your attention and concept. The first is a centrifugal device, and the second is a high-speed multiplier. A special feature of the compressor is that there is no need to service it, and the mechanism is driven by a poly-V-type belt from the engine crankshaft.
In designs of this kind, the multiplier is made on the basis of bearings, which should be replaced after a run of about 50 thousand kilometers. The same goes for the belt, because it is also subject to a certain amount of wear and tear, which goes without saying. It is important to understand that for normal operation of the compressor on a VAZ 2107, the carburetor
, you need to ensure the supply of antifreeze (antifreeze) or engine oil. We have already said above that there is no need to change the design of the power unit, but you still need to replace the generator shaft, crank pulley and water pump. The fact is that now they will use a serpentine belt, rather than a regular one. Where can I get such a strap? Experiments have shown that the Chevrolet Niva is quite suitable. We took measurements, and after installing the compressor, the increase in car power was about 50 percent.
Procedure for installing a compressor on a VAZ 2107 carburetor:
1. Remove the standard alternator belt and dismantle its fastening 2. Remove the air filter 3. Install pulleys from the Niva Chevrolet instead of the factory pulleys 4. Mount the compressor mounting bracket, as well as the compressor itself and the alternator belt according to the diagram below. (the bushings from the kit must be put on the studs between the mount and the compressor) 5. Place the corrugated pipe on the inlet of the compressor and install the filter. 6. We install pipes on the outlet of the compressor (they must be connected by a special pipe with a diameter of 60 mm and a length of 50 mm.) 7. We connect a 60 mm pipe with the valve, install a coupling, as well as a supply flange in the carburetor. 8. Use a blue hose to connect the compressor fitting and the carburetor fitting. 9. Disconnect the hose for crankcase ventilation, and secure all other connections with clamps. 10. The last point is adjusting the tension of the generator belt.
That's it for installing the supercharger, now you've got your 50 percent increase in power. Agree that this procedure is not as complicated as it may initially appear.
Replacing the cylinder head gasket VAZ 2107 injector
The replacement process itself, both with an injector and on an engine with a carburetor on a VAZ 2107, is simple and in order to cope with it, you just need to carefully study the material we offer and watch the video.
Need for replacement
There are few reasons for replacement and some of them require immediate intervention, while others not so much, that is, the vehicle can be used, albeit in a gentle manner.
Stages of work
To replace the cylinder head gasket on a VAZ 2107 you will need a standard set of tools and a torque wrench.
Introduction
Any car makes its owner happy until any troubles begin to happen to it. Naturally, such circumstances upset every driver. If the car is not new, then the repair costs may be too high, and it is very difficult to resolve the issue on your own. However, real VAZ connoisseurs are trying to study their iron horse inside and out and carry out repair work themselves. This primarily concerns the repair of important components; many are interested in installing a Solex 21083 carburetor on a VAZ-2107.
The most popular carburetor for the VAZ-2107 is Solex
Since the release of VAZ cars with carburetor engines, parts from the following manufacturers have been installed on them: Ozone, Solex, Weber. But Solex carburetors were and continue to be the most popular. Let's look at the adjustment and tuning of the carburetor of this brand in a little more detail.
Lada 2107 › Surprises, replacement of manifold gaskets
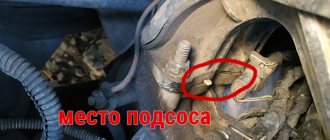
Having completed the plumbing work, I decided to check the condition of the inlet pipe and exhaust manifold. Several reasons prompted me to do this: — engine tripping when warming up; - a gradual drop in engine speed when warming up (rarely - up to a complete stop) and then a spontaneous sharp increase in speed; - steam from the exhaust pipe when warming up (perhaps it’s condensation, but I’m paranoid :)) - engine shaking when starting - almost imperceptible when cold and intensifying as it warms up (as with a crooked clutch disc); — excessive heating of the carburetor body; — traces of either oil or coolant with soot at the junction of the intake pipe and the cylinder head.
In general, a number of symptoms could indicate a burnout of the head gasket, but at the same time: - there are no traces of oil in the expansion tank and the antifreeze is clear, like new; — there are no bubbles in the expansion tank either during or after warming up the engine; — there is no emulsion on the MZG cover or on the dipstick; — the oil is simply dark, with no signs of coolant getting into it.
Therefore, I decided to check these gaskets first, buying 2 pieces for 54 rubles. Moreover, the operation as a whole is simple. I unscrewed the starter shield mounting nut and the M6 bolt of the shield from the exhaust manifold studs (it’s inconvenient to turn, especially when putting everything back together). The heater tube was not yet screwed to the water pump and manifold after replacing the pump. I removed the air filter housing, disconnected all the hoses from the intake pipe and carburetor and crawled under the car to unscrew the clamp securing the exhaust pipe to the gearbox bracket. The first surprise awaited me there:
The speedometer drive seal no longer holds
Okay, we'll deal with this problem later...
I disconnected the exhaust pipe from the exhaust manifold flange and removed the old gasket. More precisely, there were 2 gaskets there. Apparently, last time I put together an issue this way due to inattention - here’s another surprise