“Kalina” is a symbol of the domestic automobile industry, of course we are talking about a car. In 2004, the first copy rolled off the assembly line. Until 2013, the car was not subject to changes or restyling. Everything was the same, no improvements. Few people paid attention to the model and preferred foreign options. But after 2014, everything changed dramatically. The exterior and interior have changed significantly; The designers took into account the clients' comments.
The machine is manufactured in various variations. The engine is equipped with a direct injection system and electronic ignition. The body structure strictly complies with basic safety standards. Maneuverability has been increased by shortening the overall body length. Since the beginning of 2012, all Kalina models have been equipped with an electronic gas accelerator pedal.
Among the bulk of frequent breakdowns and shortcomings, many owners experience difficulties when the standard catalytic filler fails. Using the example of a Lada Kalina with an 8-valve engine, we will consider the algorithm for removing and replacing the seal.
Removing and installing the exhaust manifold on LADA
When servicing the vehicle, it may be necessary to remove the muffler exhaust pipe with the neutralizer assembly (exhaust manifold or catalytic converter).
The process of replacing this element of the exhaust system with your own hands is not difficult, but it has a number of features that it is better to know about in advance. The following instructions use the example of Lada Vesta and Lada XRAY cars. On other modern LADA cars (Largus, Priora, Granta, Kalina, Lada 4×4) all actions are performed similarly. You will find examples of work on other LADA models under the spoiler at the end of the article.
Required
: remove the engine mudguard (for Lada Vesta, for Lada XRAY), raise the car to a height convenient for work. Prepare the tool (flat screwdriver, wrench “10”, interchangeable head “10” and “13”, extension cord and ratchet wrench).
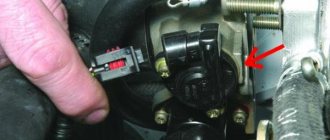
- Disconnect the connectors with the sensor wires (Fig. 8-1, No. 12 and 13) from the brackets on the power unit and from the ignition system wiring harness connectors.
- Unscrew the three nuts (Fig. 8-2, No. 3) of the studs securing the additional muffler (No. 2) to the exhaust pipe with the neutralizer assembly (No. 5). To do this, you must first unlock the washers (No. 1).
- Remove the heat-protective screen of the exhaust pipe of the muffler with the neutralizer assembly. To do this, unscrew the bolt (Fig. 8-3, No. 1), two bolts (No. 2), two bolts (Fig. 8-4, No. 1) with washers.
- Unscrew the M8 nut securing the bracket for the water pump supply pipe, remove the washer.
- Loosen the nut securing the muffler exhaust pipe to the mounting stud of the water pump supply pipe bracket.
- Remove the exhaust pipe of the muffler with the neutralizer assembly. To do this, unscrew the seven nuts (Fig. 8-1, No. 14) and remove the washers (No. 5).
- Remove the gas pipeline gasket (Fig. 8-1, No. 2) and the muffler flange gasket (No. 9).
- Unscrew the oxygen concentration sensors (Fig. 8-1, No. 12 and 13) from the exhaust pipe of the muffler with the neutralizer assembly (No. 1).
- Disconnect the oxygen concentration sensor harness connectors (Fig. 8-1, No. 12 and 13) from the brackets on the power unit and from the ignition system wiring harness connectors.
- Use new nuts for the studs securing the exhaust pipe to the cylinder head (Fig. 8-1, No. 14). The tightening torque of the nuts is 21...25 N.m (2.1...2.5 kgf.m).
- Use a new gas pipeline gasket (Fig. 8-1, No. 2).
- The tightening torque of the sensors is 40...60 N.m (4.0...6.0 kgf.m).
- The tightening torque of the M8 nut is 21...25 N.m (2.1...2.5 kgf.m).
- The tightening torque of the bolts securing the thermal protective screen of the exhaust pipe of the M6 muffler is 7...9 N.m (0.7...0.9 kgf.m); M8 – 18…24 N.m (1.8…2.4 kgf.m).
- The tightening torque of the three nuts securing the additional muffler to the exhaust pipe (Fig. 8-2, No. 3) is 21…25 N.m (2.1…2.5 kgf.m).
You will find other repair instructions in the collection of technological instructions (see TI for Lada Vesta and TI for Lada XRAY).
Source
What solutions to the problem does our car service offer for Lada Kalina owners?
In addition to the standard procedure for replacing a damaged catalytic converter gasket on a Kalina car with an 8-valve engine, our car service specialists offer various options for solving the problem of restoring the functionality of all parts of the exhaust system.
Before performing the described manipulations, it is necessary to determine what toxicity standards are established for a specific vehicle model.
All Kalina cars older than 2008 comply with the Euro-3 environmental standard, that is, the design of their exhaust system includes two parallel lambda probes.
Before removing the neutralizer, our service center specialists must agree with the owners on the following points:
- The converter blend with the exhaust manifold will form a single structure.
- The use of a special blende is justified by the occurrence of high resonance in the exhaust system. Therefore, installing the insert will help to significantly reduce the noise level.
- In Kalina models that comply with Euro-2 standards (that is, produced before 2008), after installing the blende, you need to completely redo the lambda wiring and the junction of the collector with the resonator.
- On models adapted for Euro-3, after installing a special insert to ensure correct operation of the power unit, the ECU firmware will need to be changed.
Tools:
- Medium Phillips screwdriver
- Medium flat screwdriver
- Pliers
- Ratchet wrench
- Extension
- 8 mm head
- 10 mm high head
- 13 mm high head
- Open-end wrench 13 mm
- Open-end wrench 17 mm - 2 pcs.
- Open-end wrench 19 mm
- 10mm straight box spanner
- Knife (or scraper)
- Metal brush
- Chisel
- Hammer medium
Parts and consumables:
- Intake manifold and catalytic converter gasket
- Sealing gaskets for intake module pipes (if necessary)
- Additional muffler gasket
- Aerosol lubricant such as WD-40 or similar
- Graphite grease
- Rags
Notes:
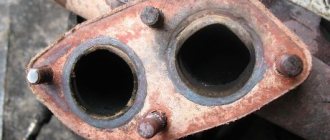
The sealing gasket of the intake manifold of the VAZ 11183, VAZ 21116 and VAZ 11186 sandwich type engines is made of two thin-sheet steel plates connected to each other by contact welding, lined with a non-shrinking heat-resistant material. The gasket is made common to the intake manifold and catalytic converter of the exhaust gas exhaust system.
If the intake manifold gasket is damaged, unstable engine idling may occur due to the suction of additional air into the intake tract, as well as exhaust gas breakthrough (the manifold “cuts”). If tightening the nuts securing the intake manifold and catalytic converter does not restore the tightness of the connection, replace the gasket.
1. Reduce the pressure in the supply system as described here.
2. Disconnect the wire from the negative terminal of the battery.
3. Disconnect the wire connector and air supply hose from the throttle body as described here.
4. Loosen the clamp securing the hose to the vacuum brake booster and remove the hose from the intake module.
5. Disconnect the hoses of the small branch of the crankcase ventilation and canister purge system from the intake module.
6. Using a 13 mm high socket, unscrew the rear nut securing the intake module.
7. Using the same tool, unscrew the front and three lower (not visible in the photo, as they are located below the intake module) nuts securing the intake module.
8. Remove the intake module and throttle assembly from the intake manifold studs.
9. Remove the sealing gaskets of the intake module pipes and install new gaskets in the grooves of the pipes.
Note:
Before installing the intake module, clean the mating surface of the intake manifold from gasket residues and dirt.
10. Disconnect the injector and engine harness connectors and disconnect the fuel supply hose from the fuel rail tube as described here.
11. Disconnect the exhaust pipe of the additional muffler from the exhaust manifold by unscrewing the nuts securing the exhaust pipe flange of the muffler to the exhaust manifold flange, disconnect the suspension cushions from the muffler brackets and remove the muffler exhaust pipe flange from the exhaust manifold flange studs.
12. Disconnect the wiring harness of the control and diagnostic oxygen concentration sensors from the engine control wiring harness, and also remove the wire clamps for these sensors from the steering gear thermal shield. How to do this, see here (control sensor) and here (diagnostic sensor).
13. Using a 13 mm socket, unscrew the two bolts securing the catalytic collector to the cylinder block bracket.
Replacement of the intake pipe gasket and catalytic collector
The intake pipe and catalytic collector are connected to the cylinder head through a common sealing gasket. The gasket also covers two channels of the cylinder head cooling jacket, which extend into the plane of the junction of the head with the intake pipe and catalytic collector. We carry out the work on an inspection ditch or overpass. Drain the coolant from the engine (see “Checking the level and replacing the coolant”). We remove the receiver (see “Removing the receiver”) and the fuel rail with injectors (see “Checking the injectors, removing the fuel rail and injectors”). Disconnect the engine management system wiring harness block from the oxygen concentration sensor wiring harness block (see “Removing the control oxygen concentration sensor”). Having unscrewed the three nuts securing the pipe flange of the additional muffler to the flange of the catalytic collector, we disconnect the additional muffler from the catalytic collector (see “Removing the additional muffler”).
Using a 13mm socket, unscrew the two nuts of the bracket securing the catenary collector.
. and remove the bracket from the bracket studs.
Using a 13mm wrench, unscrew the two bolts securing the catalytic converter bracket to the cylinder block.
Using a “13” wrench, unscrew the nut of the upper fastening of the right support bracket of the intake pipe. Remove the ground wire tip from the intake pipe stud.
Using a 13mm socket, unscrew the bolt of the lower fastening of the right support bracket of the intake pipe.
Remove the spacer bushing from the intake pipe stud.
Using a 19mm wrench, unscrew the nut securing the clutch housing to the cylinder block, which also secures the lower end of the left support bracket of the intake pipe.
Using a 17mm wrench, unscrew the nut of the upper fastening of the left support bracket of the intake pipe.
. and remove the bracket. On the left rear side of the engine...
. Using the “13” head, loosen the tightening of nut 1 securing the coolant pump pipe bracket, unscrew nut 2 securing the catalytic collector and nut 3 of the general fastening of the catalytic collector and intake pipe to the cylinder head (for clarity, shown on a dismantled engine).
Move the coolant pump pipe bracket aside.
Remove the heat shield from the cylinder head studs and the washer from the top stud. On the right rear side of the engine.
. Using the “13” head, unscrew the two nuts securing the heat shield and the eye.
Remove the heat shield and ring from the cylinder head studs. ..using the “13” head, unscrew the nut for fastening the catalytic collector and the nut for the general fastening of the catalytic collector and inlet pipe, located on the same studs. Remove the washers from the studs.
Using a “13” socket, unscrew two nuts 1 of the upper fastening of the intake pipe and one nut 2 of the upper fastening of the catalytic collector. Remove the washers from the studs.
Using a “13” socket, unscrew the two nuts of the common lower fastening of the catalytic collector and the intake pipe to the cylinder head. Remove the washers from the studs.
Remove the sealing gasket of the intake pipe and catalytic collector.
After each removal of the intake pipe or catalytic collector, the gasket must be replaced with a new one. Before installation, we clean the mating surfaces of the cylinder head, intake pipe and cathode from remnants of the old gasket and carbon deposits. Apply graphite lubricant to the cylinder head studs. We carry out assembly in reverse order. At the four common fastening points of the intake pipe and the catalytic converter (their joints), it is necessary to install thick washers with a large outer diameter on the studs.
Common mounting points for the intake pipe and catalytic collector (shown on a dismantled engine for clarity).
Source
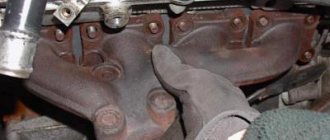
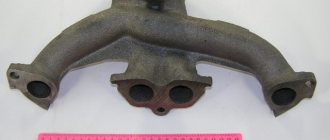
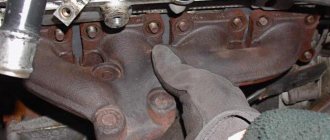
Replacing the exhaust manifold and gasket
When dismantling the manifold, the gasket is destroyed in almost any case. Therefore, it is worth removing its remains from the parts. Replacing the Kalina exhaust manifold gasket is a simple process. The use of sealants and other third-party substances is not recommended. They may later get into the crankcase.
Replacing the manifold itself is simple - just take a new part and install it according to the principle in which it was attached. Assembling the system is simply the reverse order of the steps outlined in the last section.
Advice! Don't forget about cleanliness. This is an important factor in long and trouble-free operation of the car.
Retail store at Uralmash, Baku Commissars St., 113. 8 (343) 221-35-35
02. By courier for orders over 2000 rubles, in Yekaterinburg from 20:00 to 22:00
Delivery only to the entrance. Additional +100 rubles to the apartment.
02.2. By courier for orders less than 2000 rubles, by EKB from 19:00 to 22:00
Delivery to the entrance or to the gate. To the door +100 rubles for the courier.
Gasket for Kalina manifold 8 valves
These are: fuel system, exhaust gas recirculation system. After a run of 80-100 thousand km, the metal housing of the exhaust manifold begins to crack at the seams.
Flange connections are torn away from their seats.
Replacing a catalyst with a spider, as a process, is divided into several stages.
This does not take into account the fact that the catalyst itself needs to be changed due to burnout of internal parts due to systematic contact with a hot flame flow. The average gas temperature reaches 600℃.
So, division into stages: collecting data on the number and location of catalysts in the car; preparation of spare parts in each specific case for modification;
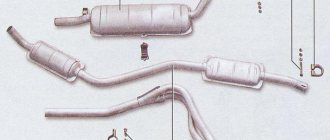
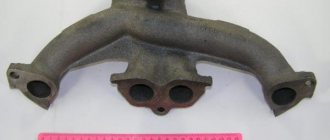
What does the muffler consist of?
The main part of the exhaust system serves to absorb noise. On the Lada Kalina car, this function is performed by a pipe, which includes the muffler itself and its resonator.
The thickening is the resonator, the end is the muffler itself
The pipe has a completely sealed body, which is manufactured using the rolling method, that is, without the use of a welding machine. Thanks to this, the muffler is durable and does not corrode. And the resonator, which is also located in the pipe, consists of several closed chambers. These chambers are connected to each other by small tubes with holes in them. Thanks to this structure, the resonator can quickly smooth out all acoustic vibrations. In the latest modifications of the Lada Kalina, the inside of the resonator is lined with sound-absorbing material.
The main reasons for replacing the catalyst gasket
One of the main reasons for catalytic converter failure is that the exhaust channels become clogged. The formation of plugs leads to the deposition of soot, soot, and other solid deposits. Sources of clogging can be:
- low quality fuel;
- the use by the owner of the technical equipment of all kinds of chemical additives in the combustible mixture (these reagents only have a detrimental effect on the performance of the fuel system);
- possible mechanical damage to the housing or internal connections;
- long-term operation without replacement or prevention;
- faulty engine ignition system;
- unstable operation of the oxygen sensor, due to which the combustible mixture is lean or enriched, which also has an extremely detrimental effect on the performance of the entire system.
Reasons for removing and replacing the exhaust manifold Lada Kalina
The exhaust manifold is made of cast iron, which is very resistant to temperatures. However, a critical temperature - 800-900 degrees - can render the distributor unusable. In addition, there are many other factors that negatively affect it. This list can include:
- Mechanical damage;
- Loss of tightness at the junction with the cylinder head (cylinder block);
- Inoperative condition of the gasket between the BC head and the manifold;
- Due to constant overheating, cracks or warping may occur.
Sometimes replacing the exhaust manifold on Kalina 8 valves is necessary in order to install a more advanced and high-quality part.
Important! The exhaust manifold gasket is created from pressed reinforced asbestos and is necessary to create a tight connection between the BC head and the distributor. The fact is that the BC head is made of aluminum, and the manifold is made of cast iron. Therefore, under the influence of temperature, these two elements expand and contract differently. And asbestos allows you to coordinate the difference in thermal expansion. The main threat to the gasket is constant exposure to high temperatures.
There are a number of symptoms that will tell you that you need to replace the exhaust manifold of your Lada Kalina:
- In any operating mode, the engine makes an unpleasant characteristic sound;
- Exhaust gases enter under the hood or even into the interior of your car;
- The engine loses power due to a mismatch between the BC head and the manifold.
How to determine the malfunction of the Lada-Kalina muffler
To find a faulty exhaust system, you don’t have to be a car mechanic or have extensive experience in car repairs. To identify problems, you need to act in the following sequence:
- Pay attention to noises that are made while driving. If the muffler is faulty, the sound will be quite loud. Extraneous noises also indicate problems with the exhaust system.
- Raise the car with a jack or drive onto an overpass and inspect the system body. A working device should have no holes or rust. The presence of traces of corrosion indicates that, most likely, there is a problem with the housing.
- While driving, you need to monitor the color of the exhaust: the periodic appearance of black and dense smoke will indicate that there are problems with the exhaust system.
- Start the engine and press the gas pedal for several minutes. Then turn off the ignition and check the engine temperature. During this time it should not get very hot. If it has risen significantly, it means that there are problems in the performance of the mechanism.
Quite often, the muffler body is exposed to corrosion, which leads to the appearance of holes and, as a result, a loud exhaust sound.
Malfunctions of various types can occur with the exhaust system, but the most common is unreliable installation of muffler elements. As a result of poor-quality connection, the unit quickly fails. In addition, common malfunctions include:
- loss of tightness as a result of burning out of individual elements (corrugations, gaskets);
- catalyst problems;
- mechanical damage;
- exposure to corrosion, which leads to the appearance of holes.
One of the malfunctions of the Lada-Kalina exhaust system is burnout of the corrugation
When should the Kalina catalyst gasket be replaced?
Most vehicle owners mistakenly think that the catalytic converter, even if in good condition, is the reason for the reduction in power of the power unit.
In view of this, owners of budget car models deliberately exclude this part from the exhaust tract. However, the power of the power unit is reduced solely due to a violation of the throughput of the exhaust gas converter, due to damage to the honeycombs inside it.
Our car service specialists identify the main reasons for premature failure of parts and wear of gaskets:
- Low fuel quality;
- Use of various additives;
- Mechanical damage to elements;
- Incorrect operation of the ignition system;
- Failure of the lambda probe, as a result of which the process of formation of the fuel mixture is disrupted.
If the catalyst fails, the following symptoms are observed:
- If the throughput of the neutralizer is completely impaired, the vehicle's power unit will start and immediately stall, or not start at all. You can diagnose catalytic converters as quickly as possible in our service center. But you can also perform an independent check, however, it is not always highly accurate. To carry it out, unscrew the lambda located in front of the catalyst, and then start the engine. If it starts, the catalyst is faulty.
- The acceleration dynamics of the car are noticeably reduced, the speed of the power unit drops.
- Fuel consumption increases significantly. However, this evidence of a catalyst malfunction only applies in the event of a noticeable decrease in the power and acceleration dynamics of the vehicle. To put it simply, if the vehicle begins to become “stupid” and fuel consumption increases, therefore, the converter needs to be replaced.
- The “CHECK ENGINE” indicator on the dashboard came on. But this is not always direct evidence of a catalyst failure. In this case, you need to contact a car service for detailed diagnostics.
How to repair a muffler
If your car's muffler requires repair or complete replacement, it is not recommended to do this work yourself, since there is a high risk that you will only worsen the condition of the exhaust system, and possibly the entire vehicle as a whole. In order to prevent such a situation, contact only specialized car services. In our car service center, qualified specialists with the necessary competence in the field of working with exhaust systems will competently diagnose the exhaust system of your car, and, if necessary, repair or install a new muffler in the shortest possible time.
Replacement of the intake pipe gasket and catalytic collector
The intake pipe and catalytic collector are connected to the cylinder head through a common sealing gasket. The gasket also covers two channels of the cylinder head cooling jacket, which extend into the plane of the junction of the head with the intake pipe and catalytic collector. We carry out the work on an inspection ditch or overpass. Drain the coolant from the engine (see “Checking the level and replacing the coolant”). We remove the receiver (see “Removing the receiver”) and the fuel rail with injectors (see “Checking the injectors, removing the fuel rail and injectors”). Disconnect the engine management system wiring harness block from the oxygen concentration sensor wiring harness block (see “Removing the control oxygen concentration sensor”). Having unscrewed the three nuts securing the pipe flange of the additional muffler to the flange of the catalytic collector, we disconnect the additional muffler from the catalytic collector (see “Removing the additional muffler”).
Using a 13mm socket, unscrew the two nuts of the bracket securing the catenary collector.
. and remove the bracket from the bracket studs.
Using a 13mm wrench, unscrew the two bolts securing the catalytic converter bracket to the cylinder block.
Using a “13” wrench, unscrew the nut of the upper fastening of the right support bracket of the intake pipe. Remove the ground wire tip from the intake pipe stud.
Using a 13mm socket, unscrew the bolt of the lower fastening of the right support bracket of the intake pipe.
Remove the spacer bushing from the intake pipe stud.
Using a 19mm wrench, unscrew the nut securing the clutch housing to the cylinder block, which also secures the lower end of the left support bracket of the intake pipe.
Using a 17mm wrench, unscrew the nut of the upper fastening of the left support bracket of the intake pipe.
. and remove the bracket. On the left rear side of the engine...
. Using the “13” head, loosen the tightening of nut 1 securing the coolant pump pipe bracket, unscrew nut 2 securing the catalytic collector and nut 3 of the general fastening of the catalytic collector and intake pipe to the cylinder head (for clarity, shown on a dismantled engine).
Move the coolant pump pipe bracket aside.
Remove the heat shield from the cylinder head studs and the washer from the top stud. On the right rear side of the engine.
. Using the “13” head, unscrew the two nuts securing the heat shield and the eye.
Remove the heat shield and ring from the cylinder head studs. ..using the “13” head, unscrew the nut for fastening the catalytic collector and the nut for the general fastening of the catalytic collector and inlet pipe, located on the same studs. Remove the washers from the studs.
Using a “13” socket, unscrew two nuts 1 of the upper fastening of the intake pipe and one nut 2 of the upper fastening of the catalytic collector. Remove the washers from the studs.
Using a “13” socket, unscrew the two nuts of the common lower fastening of the catalytic collector and the intake pipe to the cylinder head. Remove the washers from the studs.
Remove the sealing gasket of the intake pipe and catalytic collector.
After each removal of the intake pipe or catalytic collector, the gasket must be replaced with a new one. Before installation, we clean the mating surfaces of the cylinder head, intake pipe and cathode from remnants of the old gasket and carbon deposits. Apply graphite lubricant to the cylinder head studs. We carry out assembly in reverse order. At the four common fastening points of the intake pipe and the catalytic converter (their joints), it is necessary to install thick washers with a large outer diameter on the studs.
Common mounting points for the intake pipe and catalytic collector (shown on a dismantled engine for clarity).
Replacing the Kalina exhaust manifold gasket
on the injection engine of a VAZ 2107 car
2. For the convenience of replacing the manifold gasket, remove the battery (see “VAZ 2107 - removal and installation”).
3. Drain the coolant from the cooling system of the VAZ 2107 car (see “Coolant - checking the level and replacing”).
5. Unscrew two nuts and a bolt securing the starter shield and remove the starter shield from the exhaust manifold studs (see “Starter of a VAZ 2107 car - removal, installation”).
6. Using a 13 mm socket wrench, unscrew the bolts of the upper fastening of the front and rear braces to the intake manifold of the VAZ 2107 pipeline.
7. Loosen the tightening of the lower nut securing the front brace to the stud of the bracket of the right support of the unit and move the brace to the side.
8. Loosen the bolt of the upper fastening of the starter (see “Starter of a VAZ 2107 car - removal, installation”) and move the rear brace to the side.
9. Using a 13 mm socket wrench with an extension, unscrew the nut securing the ground wire tip and disconnect it.
Replacing the gasket under the manifold 2108, viburnum, grant
Thank you very much for watching my videos, tell your friends, leave comments and subscribe.
I disassembled the Viburnum exhaust manifold. We'll take a new one)
Lada Kalina
catalyst.
substitution
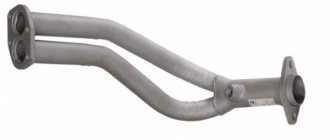
for spider 4-2-1. nothing complicated.
11. Using a 13 mm socket wrench with a deep head, unscrew two nuts A of the joint fastening of the intake manifold of the pipeline with the exhaust manifold and two nuts B of the fastening of the intake manifold of the pipeline.
12. Using the same equipment, we unscrew two nuts A for the joint fastening of the intake manifold of the pipeline with the exhaust manifold and nut B for fastening the exhaust manifold.
13. On the VAZ 2107 car engine, unscrew the exhaust pipe clamp to the bracket and remove the exhaust pipe from the exhaust manifold studs (see “Muffler exhaust pipe - removal and installation”).
14. Using a 13 mm socket wrench with a deep head, unscrew the nut of the front fastening of the exhaust manifold.
16. Remove the washers from the studs. Under the nuts of the joint fastening of the intake manifold of the pipeline and the exhaust manifold, washers of increased thickness are installed.
17. Moving the exhaust manifold away from the cylinder head, remove the intake manifold pipeline from the studs.
18. Remove the sealing gasket of the intake manifold of the pipeline and the exhaust manifold. We replace the manifold gasket with a new one.
We install all the removed parts on the injection engine of the VAZ 2107 car in the reverse order. And we fill the cooling system of the VAZ 2107 car with coolant.
Dismantling
There is only one difficulty in this process - the inaccessibility of some fasteners. It is best to carry out this “operation” in a viewing hole or on a lift. Of course, this is not necessary, but it is much more convenient.
Work order:
- First you need to remove the negative terminal from the battery or turn off the mains switch.
- Next, it is recommended to drain all the antifreeze into a container prepared in advance.
- Next, you need to disconnect the fuel pipes. If the coolant is not drained, at this stage it will go into the cylinders.
- Now you have to find the throttle position and idle speed sensors, and then remove the wires from them.
- We first remove the crankcase ventilation from the hoses, then the brake booster.
- Remove the intake manifold (receiver) together with the throttle assembly.
- Then remove the fuel rail (without disassembling) and the wires from the injector.
- There's not much left. Now you need to remove the heat reflecting screen. The exhaust pipe of the muffler is unscrewed from the manifold.
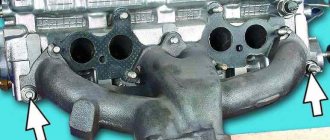
- We remove the exhaust manifold Kalina 8 valves from the BC head studs, to do this we unscrew the fastenings shown below in the figure
How to install a 4-2-1 spider in place of the standard converter on a Lada Kalina 8V
In a car exhaust system, a catalytic converter is needed to burn harmful elements in the exhaust gases to the level of H2O and CO2. It is quite difficult to predict its service life, since it depends on many factors. But many owners of VAZ cars prefer to get rid of the collector before the end of its service life. For these purposes, they use special inserts, which are an inexpensive alternative to a neutralizer.
Contents Some car enthusiasts are sure that even a working neutralizer prevents the engine from developing the power it needs. This is not true. As for clogged or melted honeycombs, this phenomenon is the result of careless handling of the vehicle and its operation with a faulty fuel supply and ignition system.
The main reasons for device failure:
- Unbalanced fuel-air mixture due to a broken oxygen sensor.
- Unsatisfactory fuel quality.
- Incorrect ignition operation.
- Mechanical damage to the collector.
- Use of fuel additives.
For the most part, replacing the catalyst on Kalina 8 valves is done as a result of using low quality fuel. Its slow combustion occurs partly in the exhaust. The detonation of gasoline destroys the ceramic structure of the honeycomb, which over time begins to crumble and clog thin passages.
Technical features of the insert for Lada Kalina 8V
The industry offers two types of tuning inserts, the design of each of them depends on the location of the pipes. Moreover, each design is designed for a specific power unit:
- Insert 4-1 is installed on forced engines with a speed range from 5,000 to 10,000 rpm. structurally suitable only for 16-valve engines.
- The 4-2-1 insert operates over a wider range and is considered a "low-end" insert. It is possible to increase engine power by about 3-5%. This is the model most often installed on the VAZ 1118.
Content
Actions in emergency situations Daily checks Operating instructions Warnings and technical rules Basic instruments, measuring Engine and its systems Transmission Chassis Steering Brake system Vehicle electrical equipment Body Interior ventilation and heating system Applications Fault codes Electrical diagrams
Sources
- https://expertvaz.ru/2110/premer-komplektatsii-tsena.html
- https://videoremont-mashin.ru/remont-kpp-vaz-21108/ustanovka-konditsionera-v-vaz-2110-ot-priory-svoimi-rukami/
- https://monolith.in.ua/predohraniteli-lada-2110/
Lada Kalina (8, 16 valves): replacing the catalyst with a spider or flame arrester
LADA Kalina has been produced since 2003, when the first copies rolled off the assembly line. Before this, prototypes of future production models were repeatedly tested.
The process of creating the model itself turned out to be quite difficult and lengthy.
The first developments began back in 1999 and lasted until 2003.
During its existence, the model has undergone repeated updates. There were four in total:
- 1.4 liter engine, 16 valve mechanism, Euro standardization – 3, 4;
- 1.6-liter engine, 16-valve mechanism, Euro standardization – 3, 4 (production started in December 2009);
- 1.6-liter engine, 8-valve mechanism, Euro standardization – 2, 3 (subject to the “Basic” package);
- 1.6-liter engine, 8-valve mechanism, Euro 4 standardization (Lux+ package from November 2011).
Despite the many positive aspects of the car and the brand as a whole, it is necessary to highlight a number of weak points. These are: fuel system, exhaust gas recirculation system.
After a run of 80-100 thousand km, the metal housing of the exhaust manifold begins to crack at the seams. Flange connections are torn away from their seats. This does not take into account the fact that the catalyst itself needs to be changed due to burnout of internal parts due to systematic contact with a hot flame flow. The average gas temperature reaches 600℃.
Product delivery options
Note! Below are the shipping methods available specifically for this product. Payment options may vary depending on the shipping method. Detailed information can be found on the “Delivery and Payment” page.
Parcel by Russian Post
Available payment methods:
- Cash on delivery (payment upon receipt)
- Using cards Sberbank, VTB, Post Bank, Tinkoff
- Yandex money
- QIWI
- ROBOKASSA
Shipping throughout Russia. Delivery time is from 5 to 12 days.
Parcel by Russian Post 1st class
Available payment methods:
- Cash on delivery (payment upon receipt)
- Using cards Sberbank, VTB, Post Bank, Tinkoff
- Yandex money
- QIWI
- ROBOKASSA
Shipping throughout Russia. Delivery time is from 2 to 5 days. More expensive than regular delivery by Russian Post, approximately 50%. Parcel weight up to 2.5 kg
Express Parcel EMS
Available payment methods:
- Cash on delivery (payment upon receipt)
- Using cards Sberbank, VTB, Post Bank, Tinkoff
- Yandex money
- QIWI
- ROBOKASSA
Shipping throughout Russia. Delivery time is from 3 to 7 days. More expensive than regular delivery by Russian Post, approximately 100%.
Replacement of intake manifold gaskets VAZ 2114 8 cl (Kalina, 2110)
It is recommended to replace the gaskets on the VAZ intake manifold after each removal. But I had to do this prematurely, as I discovered a significant air leak, which mainly manifested itself on a cold engine. Every cold start was accompanied by a terrible tripping.
In addition to the tripping when cold, there was a slight drop in speed when sharply pressing the gas pedal. This applies to both a cold and a hot engine.
A homemade smoke generator made from a cigarette helped me detect the air leak. A very simple and primitive contraption that has helped me out more than once.
My car (Kalina 1.6 8 valves) has a plastic intake manifold (receiver). The same will be installed on all VAZ family cars with an 8-valve 1.6-liter engine (2114, 2110, etc.). 4 rubber rings act as gaskets. According to reviews, black rings last much longer than white ones. And I was convinced of this personally - these gaskets lasted for about six months and began to let air through. They felt like plastic to the touch. Unfortunately, I didn’t find black ones, so I’ll install white ones again. I hope these last longer.
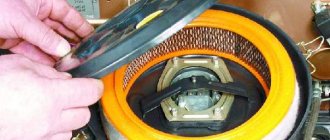
To remove the intake manifold (receiver), you must first unscrew the corrugation from the air filter, the throttle cable, and the small crankcase ventilation hoses. I will not remove the throttle and its heating.
The intake manifold is attached to 5 studs - one in the center, two on the sides. To unscrew them you will need a 13mm socket. After unscrewing the nuts, you need to remove the receiver itself from the studs and move it to the side. Remove the old gaskets and wipe the seats from oil and dirt. You also need to wipe the seat on the engine.
The manifold has special grooves for guides on the gaskets. The gaskets must be installed with the higher side in the plastic manifold. It is the guide that will prevent you from making mistakes.
I additionally coated the areas near the guides with sealant on the outside of the gasket. Because it felt like that was where the ring entered the groove the deepest. In addition, there was a place for air leaks on the old gaskets.
After all procedures, the intake manifold can be installed back. I couldn't find any information on how tightly to tighten the mounting nuts. I delayed it at my own peril and risk. The main thing is not to overtighten, as the manifold is plastic and can crack.
This is how I replaced the old intake manifold gaskets on my Kalina with new ones. There is no more air leakage, the engine stopped stalling when cold and began to behave much better when warm.
Replacing the intake manifold on a Prior
Welcome! Intake manifold - someone calls this part an intake manifold and someone calls it a receiver, but if you read the terminology of these two words, these are completely different things, for example, a receiver is needed only to smooth out the pulsations of air that goes into the cylinders of a car engine, but the manifold is already needed in order to distribute this air to the necessary cylinders and the fuel-air mixture is also mixed in it, so these are two different things, but since people call them with the same words, you can assume that they are one and the same thing yes and besides, the can itself at the intake manifold can essentially be called a receiver, since it contains only air and has a fairly large volume, and if you remember the terminology, it says, the receiver is the thing in which the smoothing of air pulsations occurs (The car is moving in this case, more smoothly) and it has a size 50-70% larger than the car’s cylinders, so the receiver and intake manifold can be considered a single whole, but this no longer applies to carburetor cars.
Note! To replace the intake manifold on a car, you will need to stock up on: A set of wrenches and to all this, a socket wrench of size “8” will also come in handy; in addition to this wrench, you will also need various kinds of screwdrivers, wire cutters, or instead of them, you can also stock up on a knife (Knife By the way, it will even be more comfortable)!
Where is the intake manifold located? In all sixteen valve engines, even though this is even a sixteen valve engine that was installed on cars of the tenth family (It’s just that the 16 valve engine of the VAZ 2110 car is slightly different from the Priorov’s), the intake manifold is in the same place and they have an absolutely identical shape and design made of plastic, so for clarity, the collector in the photo is indicated by an arrow, but the car as you see is a VAZ 2110, but on the Priors it will be visually the same.
Note! To fully see the collector, you will also have to remove the engine screen, the screen is a thing that reduces the noise from the engine a little and covers it from dirt getting on it. When carrying out a lot of work, you will have to remove this screen because it covers almost the entire part of the engine and itself Moreover, you will not see the collector without removing the screen from the car; for more details on how to remove this screen, read the article: “Replacing the engine screen on cars”!
When should you replace the intake manifold? Since the collector on Priors is made of plastic, it is not so difficult to bend it or pierce it with anything, dropping it, for example, on a sharp stone from a height, besides this, the collector is no longer necessary to be replaced in any case (with the exception of replacing it with some be it sports), but the manifold also needs to be removed in the following cases, firstly, when carrying out any work due to which the manifold interferes, and secondly, the manifold has its own gaskets (the intake manifold has only five of them, one of them is located between throttle valve and manifold, and the other four at the end of the pipe are installed, how to replace them as you read the article, you will find out) when they wear out, the air begins to come out, and if the air is simply released (that is, comes out), then the car will drive worse and its consumption will increase , since you will have to press your foot harder on the gas pedal.
When is it necessary to replace and remove the exhaust manifold on a VAZ-2114
Huge temperature changes are the main problem faced by the exhaust manifold and the gasket, for which it is removed. The collector itself is made of a special grade of cast iron; it can withstand high temperatures (up to 800-900 degrees), however, these are critical values, after which the collector may warp or crack.
Exhaust manifold VAZ-2114
Its main task is to collect exhaust gases and distribute them into the exhaust pipe of the muffler.
Replacing or dismantling the VAZ-2114 exhaust manifold is necessary in the following cases:
- Mechanical damage to the collector.
- Warping and loss of tightness at the junction with the cylinder head.
- Burnout of the gasket between the head and the manifold.
- The appearance of cracks as a result of engine overheating.
- Replacing the collector with a device of a different configuration, adapted to a more severe operating mode.
In the event that we are not going to participate in high-speed races for the prize of the head of the regional traffic police, replacing or dismantling the collector may be necessary in a number of cases.