Priora fuel system
Lada Priora cars use forced injection, which has already become a classic in the automotive industry. Power system composition:
• fuel tank; • the pump and filter are located in the tank; • fuel line; • pressure regulator; • Fuel rail; • four nozzles; • throttle; • intake manifold; • electronic engine control system.
The work is based on the fact that when the ignition is turned on, the electric fuel pump starts working, increasing the pressure in the rack. In addition, when the engine is started by the starter, the electronic control unit opens and closes the injectors, and the air-fuel mixture enters the combustion chambers according to the operating diagram.
As soon as fuel enters the combustion chamber, a spark is formed between the spark plug electrodes. The fuel ignites and the engine starts. The injectors are electromagnetic valves, and the control unit is responsible for their operation. He is also responsible for the quality of the mixture, the ratio of air and gasoline. Sometimes problems arise and you have to disassemble the fuel system for repairs.
Self-replacement
Replacing the exhaust manifold of a VAZ 2110
- the car needs to be driven into the garage;
- hang a lamp with a safety light under the hood;
- before starting repairs, antifreeze must be drained from the tank;
- disconnect the battery terminals;
- take it out;
- put on a rack;
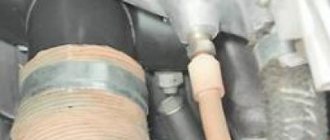
- disconnect the vacuum booster hose from the receiver;
- also disconnect the hoses of the electric pneumatic valve cover and the ramp pressure regulator;
- disconnect the chips of the throttle sensor, idle air control;
- disconnect the throttle valve cable;
- loosen the clamp on the air supply hose to the air flow sensor housing;
- disconnect it;
- loosen the clamps for attaching the hoses to the throttle pipe and ventilation of crankcase gases on the cylinder head cover;
Removing the intake manifold
We remove it to replace or repair the ramp and injectors. It would be a good idea to polish the intake manifold; this will make it easier for fuel to flow into the combustion chambers. As a result, the power will increase. It is necessary to begin work by reducing the pressure in the fuel system. This can be done by removing the fuse on the fuel pump and starting the engine.
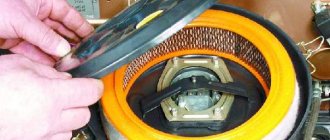
Wait until the engine stops on its own. This will mean that there is no gasoline left in the system and that the pressure has dropped. Now disconnect the battery and begin disassembling the system elements. First you need to remove the decorative cover, which is located at the top of the engine. Attaches in three places. Then proceed to disassemble the air filter. Remove the tubes that go to it.
Having freed up space, you can begin to remove the throttle valve. There will be no problems disassembling it, the main thing is not to unscrew the shock absorber mounting screws. Otherwise, if it is not screwed on and secured well, it may fall and hit the engine. Then you will have to carry out large-scale repairs, which can be compared to the main one. After removing the throttle body, you can begin removing the intake manifold. Installation is carried out in reverse order.
To seal the joint between the cylinder head flanges and the intake manifold, as well as between the throttle unit flanges and the intake manifold, O-rings are installed in the grooves of the intake manifold pipes.
If the seal of these rings is broken, the motor runs unevenly (“triple”).
When air leaves the intake manifold, a clicking noise may occur from the exhaust pipe.
In addition, there are interruptions in engine operation and loss of power. During this breakdown, the engine consumes more gasoline.
You will need: flat-blade and Phillips-blade screwdrivers, wire cutters or a knife, keys “10”, “13”.
1. Lift the hood and disconnect the cable from the negative terminal of the battery.
2. Remove the decorative engine cover.
3. Remove the throttle body from the intake manifold (see “Removing and installing the throttle body”).
Remove the inlet o-rings.
Remove the gasket with a screwdriver
. and remove the gasket on the throttle body mounting flange.
Install new O-rings into the manifold grooves.
Cover the intake ports with a rag and clean the O-ring seat before installing the intake manifold
Install the removed parts in the reverse order of removal.
The intake manifold, or as it is commonly called the receiver, is a device that ensures a uniform flow of purified air into the cylinder head. The Priora receiver is subject to tuning and modifications, we will talk about this in this article.
In addition, the receiver accumulates air and dampens its vibrations, ensuring smooth engine operation due to a uniform (drip-free) supply of air masses. When the unit operates correctly, a highly saturated air-fuel mixture is ensured, and lower fuel consumption is achieved when the engine is running.
Comparative characteristics
So that you can understand which group of pistons is better, consider the comparative characteristics of all three manufacturers with photos:
- Let's start with STI products. Forged STI pistons are produced in Togliatti and they are made by hot pressing. As reviews from consumers who have already installed STI show, these forged pistons largely reduce the efficiency of the engine. This is due to the fact that STI parts have a lower compression ratio and a larger combustion chamber. It should also be noted that the alloy of STI pistons contains less silicon, as a result of which the strength of the components at high temperatures will be lower.
In addition, as a result of the reduced nickel content in the alloy, the service life of the element can be significantly reduced. With all this, STI plugless pistons are more expensive than STK and Avtramata.
Avtramat cast pistons are produced in Kharkov, Ukraine. In the production of pistons, an alloy identical to the original parts on Priora is used. However, unlike the latter, Ukrainian-made products can have deep countersinks, and this is an undoubted advantage of the Avtramat compared to standard pistons. In this case, we are talking about safety in the event of a timing belt break. As for the compression ratio, in the case of the Avtramat it has not changed.
Reasons for replacing the Lada Priora receiver
There are many types of intake manifolds, such as those made from different metals or composite materials. However, the Priora's receiver is entirely made of plastic. This material prevents excessive heating of the manifold due to a hot car engine.
This improves the air flow characteristics, which has a positive effect on the proportions and quality of the air-fuel mixture. However, plastic also has a major drawback - fragility. As a result, numerous failures occur both due to the fault of the car owner and due to low temperatures at which the plastic loses its drag coefficient.
The most common damage can be caused by: - road traffic accidents (even minor ones); — accidental impacts during any repair work in the engine compartment; - other reasons;
If your car's radio has holes through it or any other leaks, it will need to be repaired (if possible) or replaced. If the part is faulty, air leakage will occur due to improper operation of the engine.
When is it necessary to replace and remove the exhaust manifold on a VAZ-2114
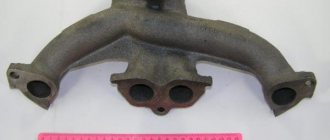
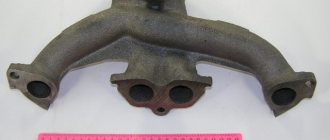
Huge temperature changes are the main problem faced by the exhaust manifold and the gasket, for which it is removed. The collector itself is made of a special grade of cast iron; it can withstand high temperatures (up to 800-900 degrees) , however, these are critical values, after which the collector may warp or crack.
Exhaust manifold VAZ-2114
Its main task is to collect exhaust gases and distribute them into the exhaust pipe of the muffler.
Replacing or dismantling the VAZ-2114 exhaust manifold is necessary in the following cases:
- Mechanical damage to the collector.
- Warping and loss of tightness at the junction with the cylinder head.
- Burnout of the gasket between the head and the manifold.
- The appearance of cracks as a result of engine overheating.
- Replacing the collector with a device of a different configuration, adapted to a more severe operating mode.
In the event that we are not going to participate in high-speed races for the prize of the head of the regional traffic police, replacing or dismantling the collector may be necessary in a number of cases.
Tools and materials for dismantling
There are a number of symptoms that will indicate that you need to prepare to remove the exhaust manifold:
- increased noise level in the engine compartment , the engine produces a characteristic, loud sound in any operating mode;
- breakthrough of exhaust gases into the engine compartment and sometimes into the cabin;
- reduction in engine power due to a mismatch between the exhaust gas outlets in the cylinder head and in the manifold.
Many people decide to replace the standard manifold with a “tuning” one, made of stainless steel and having a different configuration, thereby wanting to increase engine power and reduce the resistance that the standard manifold provides to exhaust gases. As a rule, the most common reason for dismantling a unit is gasket burnout .
Exhaust manifold gasket
The manifold gasket on the VAZ-2114 is made of pressed reinforced asbestos and is designed to ensure a tight connection between the block head and the manifold flanges. Asbestos is used to correct the coefficient of thermal expansion of the aluminum alloy from which the head is cast and the cast iron from which the manifold is cast. At high speeds and under prolonged loads, the gasket may burn out. Then its replacement and dismantling of the collector are inevitable.
To dismantle the manifold, you will need a standard set of tools, a set of sockets with extensions, and WD-40 penetrating lubricant or its equivalent. In case of broken studs, a stud extractor, drill, drill bits and a set of taps will be useful. A day or two before dismantling the collector, it is worth moistening all the fasteners several times, this will significantly simplify the removal procedure .
After installing new gaskets (they are different for an 8-valve engine and a 16-valve engine) and fixing the manifold, you should make sure that the unit does not come into contact with electrical wiring, hoses, or touch the stabilizer. Good luck to everyone!
How to remove the receiver on a Priora
Tools that may come in handy: - 10 heads; - key 13; - Screwdriver.
To remove the intake manifold you will need:
- Due to the fact that in the subsequent steps of the instructions there will be manipulations with electrical wiring, it is necessary to remove the negative terminal of the battery.
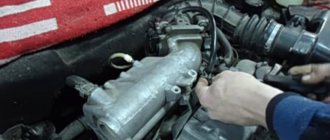
- The next step is to remove the plastic casing (cover) from the motor housing. This is done so that it does not interfere with you while working.
- Next, you need to remove power from the four ignition coils and disassemble them. To do this, remove the contact parts. Take a 10 mm socket (or a wrench of the same size) and remove the retaining bolt on each coil. Simply pull the coils upward with the required force. Now they can be removed. There is no need to remove the candles themselves; they will not interfere with removal. On the other hand, it is advisable to take advantage of the situation and check its condition (gap and spark quality).
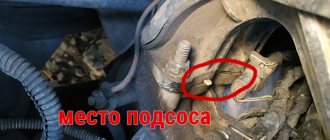
Determining whether the engine is sucking in air
Before you start removing more than half the engine parts to get to the manifold, you should check other parts of the air system.
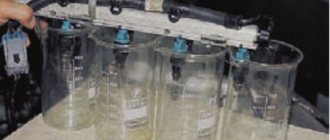
And after that, carry out a complete tuning of the car. First of all, you need to inspect all the hoses and gaskets located on the cylinder block. The most common method of finding air leaks is to spray the hoses with plain water; if there is a hole in one of them, the engine speed will decrease when water enters.
Detailed instructions for removing the intake manifold on a new Priora
It is necessary to remove parts from a cooled engine. It will take about an hour, provided that you have at least a little understanding of the injection system. The following sequence of actions must be followed:
- First of all, you need to remove the throttle. There is no need to completely remove it, just move the assembly connecting it to the manifold to the side. You also need to remove the throttle valve to thoroughly clean everything;
- disconnect the drive throttle cable from the manifold;
- disconnect the connectors from each other to remove the wires from the ignition coils;
- on the camshaft, disconnect the sensor wires;
- disconnect all canister wires;
- disconnect the brake booster vacuum hose going to the manifold;
- then unscrew the clamp and remove the ventilation pipe;
- Unscrew the self-tapping screw of the oil level indicator guide tube;
- remove the dipstick with the guide tube;
- using sockets and a ten-size wrench, unscrew the nuts and bolts securing the exhaust module and coils from cylinders 1-2-3;
- remove the coils;
- then you need to unscrew the collector fasteners;
- slide it forward and remove the manifold.
Installing a receiver on a Priora
As a rule, installation is carried out in a mirror image of removal, but during its manufacture it is necessary to pay maximum attention so as not to damage the receiver body. It is extremely important to guide the parts being installed into the connecting pins of the cylinder block, after which the manifold is directed to the mounting points on the engine.
Small but important points for installation:
- Always clean or lubricate the seals located at the contact points between the crankcase and the cylinder block;
- Tighten the nuts well at the joints of the elements.
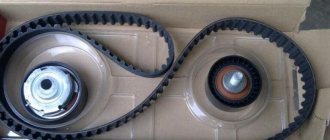
Repairing engine 21126 VAZ 2170 Priora after timing belt break
Today we brought one of the old clients to the Priora, as it turned out, the jammed pump broke the belt and, as a result, the valves were bent.
But progress at AvtoVAZ does not stand still, and if on the engines of the tenth family the valves were simply bent, then on the Priora 126s the connecting rods also lose alignment and, if they are not changed, there is a high probability that the engine will begin to eat oil and, accordingly, your money. Glory to the designers of AvtoVAZ!
But every cloud has a silver lining, there are sets of pistons for 126 engines with grooves that do not bend the valves. In this article we will describe the procedure for repairing the cylinder head after a broken timing belt, as well as replacing the piston. Removing and installing the timing belt is described in this article, so we will not dwell on it in detail.
To perform this procedure, torque wrenches are required!
I use two keys: 28-210 Nm with a 1/2 square and 5-25 Nm with a 1/4 square.
- Let's start to disassemble
- Cylinder head repair
- Video of manually grinding valves
- Let's move on to the cylinder block
- Eliminating longitudinal play of the crankshaft
- Assembling the piston
- Checking the thermal gap in the piston rings
- Installing new rings
- Engine assembly
Which receiver is better for Priora?
There is no clear answer to this question. Each situation is individual. However, a comparison can be made between plastic and aluminum receivers.
Advantages of aluminum products:
- increased strength and wear resistance;
- increased engine power due to design features, larger volume of supplied air;
- Some models are easier to install and therefore easier to remove.
In addition, the shape of the collector itself, which should not contain sharp edges or transitions, plays an important role in ensuring increased power. The most important difference between plastic and metal is the strength and durability of the latter. Therefore, we can recommend installing metal types of intake manifolds on Lada Priora cars.
Operations performed when replacing the cathode collector on a VAZ 2170 2171 2172 Lada Priora
The nuts securing the manifold to the head are difficult to access. In addition, the manifold flange is sealed with a metal-reinforced gasket. The gasket must be replaced each time the connection is disassembled. Before removing the manifold, it is necessary to remove the intake manifold - this will facilitate access to its mounting.
1. Remove the decorative engine cover (see “Removing and installing the decorative engine cover on the VAZ 2170 2171 2172 Lada Priora”). 2. Remove the cable from the negative terminal of the battery. 3. Disconnect the exhaust pipe of the additional muffler from the manifold, while unscrewing the nuts securing the inlet pipe flange to the manifold flange and remove the inlet pipe flange from the studs of the manifold flange (see "Replacing the additional muffler on a VAZ 2170 2171 2172 Lada Priora"). 4. Remove the air filter (see “Removing and installing the air filter on the VAZ 2170 2171 2172 Lada Priora)”).
5. Remove the air supply tube and three tubes of the crankcase ventilation system (see “Cleaning the crankcase ventilation system on a VAZ 2170 2171 2172 Lada Priora)”).
6. Disconnect the four ignition module wiring harness blocks and move the harness to the side. Remove the ignition modules (see “Removing and installing ignition coils on a VAZ 2170 2171 2172 Lada Priora)”).
7. Remove the throttle valve (see “Removing and installing the throttle valve on the VAZ 2170 2171 2172 Lada Priora”). 8. Remove the intake manifold (see “Replacing the cylinder head cover gasket on a VAZ 2170 2171 2172 Lada Priora)”).
9. Disconnect the control and diagnostic oxygen concentration sensors from the engine wiring harness...
10... and disconnect the cable holders of the control and diagnostic oxygen concentration sensors from the heat shield of the steering mechanism.
11. Unscrew the three nuts securing the steering gear heat shield to the engine shield and remove it.
12. Unscrew the two nuts securing the water pump inlet bracket, unscrew the bolts securing the manifold to the bracket for its fastening, unscrew the eight nuts securing the manifold to the head and remove the manifold. Disconnecting the manifold from the cylinder head and troubleshooting are described in detail in the subsection “Replacing the manifold gasket on a VAZ 2170 2171 2172 Lada Priora)”.
13. Remove the manifold gasket from the cylinder head pins.
Warning The manifold and intake pipe gasket must be replaced with a new one each time the connection is disassembled.
14. Clean the block head and manifold flanges from the remains of the old gasket and carbon deposits. Unscrew both oxygen sensors from the manifold and install them on the new manifold.
16. Install the manifold and all removed parts and assemblies in the reverse order of removal.
Helpful Hints To avoid the gasket sticking and improve its tightness, it is recommended to lubricate the gasket on both sides with a thin layer of graphite grease before installation. Lubricate the exhaust manifold mounting studs with graphite grease.
The sequence of work is as follows
First, the pipe of the additional muffler, which is connected to the catalytic collector, is disconnected. To do this, you need to bend the edges of the plate and unscrew the fastening nuts. Is this where you need a key for 13? with additional extension cord. After this, the locking plate is removed. Once the locking plate is removed, the heat shield is removed. The flange of the muffler pipe is moved, after which the sealing gasket is removed from the studs of the catalyst manifold. After this, the blocks with contact wires are disconnected from the oxygen concentration control and diagnostic sensors installed on the catenary collector. To remove the exhaust manifold, you need to unscrew the two bolts that secure the exhaust manifold to the car engine cylinder block. For these purposes, a 13? key head is used. After the bolts are unscrewed, the catcollector bracket is removed.
By the way, if the starter fails, we recommend looking for it on the website https://www.startvolt.com/catalogue/startery/gaz/.
To remove the collector, you need to unscrew the nut on the rear engine mount and loosen the bolt securing the engine mount to the car body. After this, you need to remove the bolt on the engine mount. Unscrew the three nuts securing the support bracket to the cylinder head. After loosening the nuts, the bracket moves along the cylinder head studs.
The fastening nut on the supply pipe of the coolant supply pump is unscrewed. After loosening the fastening of the bracket to the pump pipe stud, the bracket is moved away from the cylinder head. The eight nuts securing the exhaust manifold are removed. For this purpose, a 13? head is used. The exhaust manifold of the Lada Priora car moves along the cylinder head studs and is pulled down.
Review of the exhaust system of Lada Priora
The exhaust gas exhaust system on the Lada Priora performs the following functions:
- exhaust gas discharge;
- suppression of noise when the engine is running;
- neutralization of dangerous toxic substances in exhaust gases.
The basis of the Priora exhaust system includes:
- 1. Exhaust manifold with converter;
- 2. Resonator;
- 3. Main muffler;
- 4. Additional muffler;
- 5. Connecting pipes.
The manifold is used to drain exhaust gases from the cylinders into the exhaust pipe. The tightness of the connections is ensured by a seal with a two-layer metal gasket between the block head and the exhaust manifold. The mount of the exhaust manifold with the cylinder head on one side is connected to the catalyst on the other. Connecting the collector and the neutralizer into one block allows you to reduce the heating time to the operating temperature of the latter, which significantly increases the efficiency of the neutralizer.
Installation of oxygen concentration sensors at the inlet and outlet of the catalytic converter ensures constant monitoring of the quality of exhaust gases. The connection between the suction pipe and the collector has a heat-resistant gasket in the form of a metal-asbestos gasket. And the metal compensator connecting the additional muffler to the intake pipe acts as a vibration damper from the engine to the body and the entire exhaust system.
The exhaust system is connected by attaching it to the body brackets using 4 rubber shock absorber rings. On the main muffler, the suspension cushion has a reinforced structure due to the increased load on it.
What is a cylinder head?
The cylinder head is one of the main components of the engine. It consists of a cover that serves to protect internal parts from external environmental influences. The cylinder head is made by spot casting from cast iron or aluminum alloy. To remove residual stress that occurs during the casting stage, the product is artificially aged using mechanical processing.
The lower part of the cylinder head is more expanded, thus it more reliably protects the insides of the block. The inside of the head is perfectly smooth. The unit consists of a large number of elements.
Structure of the Lada Priora cylinder head
In the upper part of the cylinder head there is space for camshaft bearing housings, valve springs, bushings and support washers, as well as for the gas distribution mechanism. Since the head consists of a large number of parts, the process of assembling and disassembling the cylinder head is very labor-intensive. Together, the parts of the unit convert the energy from fuel combustion into mechanical energy, which allows the vehicle to move.
What is a “spider” for Priora and what is it for?
Tuning the exhaust system of the Lada Priora includes replacing the exhaust manifold with a similar sports version, called the “spider”. The main difference between the original manifold and the crosspiece is that the latter has a larger diameter and the same length as the pipes, which facilitates the rapid release of exhaust gases from the cylinders into the exhaust pipe.
This crosspiece design prevents exhaust gases from flowing back into the combustion chamber, increasing engine power and performance. In addition, the manifold performs the function of purging the combustion chamber and filling it with a combustible mixture due to the pressure created at the outlet of the exhaust gases.
To tune the Priora exhaust system, a ready-to-install Stinger direct exhaust kit is often used with additional components perfectly connected to each other. As a rule, the tuning kit includes the following parts:
- new muffler with nozzle;
- spider;
- Stinger Sport resonator with a tube diameter of 51 mm.
The need to install a “spider” on Priora arises when:
- long car acceleration time;
- indicators of low engine power;
- failure of the old exhaust system, where installing a spider on a Priora is considered an alternative to the old one.
There are many modifications of “spiders” from different manufacturers on the tuning parts market. Some models are produced without oxygen sensors, which requires flashing the engine ECU.
There is a spider with a long and a short tube, which is indicated by the corresponding numbers 4-2-1 and 4-1. These designations reflect the shape of the spider's tubes, that is, 4 tubes merge into 2, and then into 1, in the second option, respectively, 4 tubes are combined into one at once, which significantly reduces the length.
The most popular among motorists has become the long 4-2-1 spider, which, unlike the short one, shows good results in a wide range of turns. The 4-1 short spider is best suited for boosted engines running 6-10k rpm.
General information and piston design
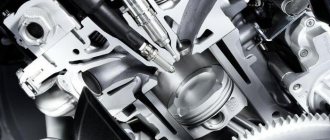
The purpose of the piston is to transfer the energy produced by the combustible mixture to the crankshaft. When combustion products expand, enormous loads are placed on the surface of the part. The maximum pressure in this case can be 80 bar, and this is comparable to a force of several tons.
The temperature in the cylinders during combustion of the mixture can reach 2,600 degrees, which is several times higher than the temperature at which the piston melts. As a result, at this moment the strength of the alloy decreases, and thermal stress occurs along the surface of the element due to the temperature difference. In order for the piston to function under such harsh operating conditions, it must not only be lightweight, but also sufficiently resistant to wear. In addition, a high-quality forged group of pistons must also have a high thermal conductivity, which will allow the elements to quickly cool when operating at high temperatures.
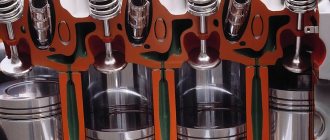
As for the surface itself, it must be formed in such a way that the piston does not jam in the cylinder under any circumstances. Otherwise, hot gases may enter the crankcase. Since the components are barrel shaped as you can see in the photo, even a large temperature difference between the bottom and skirt will not affect its functionality. It should also be noted that these parts are produced using an “anti-ellipse”, which makes it possible to compensate for the deformation of the skirt.
The top element of the pistons is the head, which consists of a bottom and grooves through which the seal rings are installed. The head should be more reliable, since most of the loads fall on it. Therefore, the piston heads are treated with an additional protective coating. The grooves for the O-rings themselves are made at a slight angle, as a result of which the outer edges of the rings will be slightly higher than the inner ones. As a result, the slope of the cross-section of the groove will not appear, and this is quite possible.
To make the piston slide better, its surface is also opened with additional materials. For greater break-in, the manufacturer usually uses phosphating or tin, which also reduces the likelihood of scratches when starting a cold engine. But such a coating usually wears out during running-in. Another coating - anti-friction - remains for the entire service life, it helps prevent the appearance of rust and erosion on working surfaces.
The piston skirt must be processed with special cutters to ensure the creation of microrelief. This way, the motor lubricating fluid will adhere better to the surface of the element, and the friction will be much less. So what are the best pistons to put on your car?
You will choose the manufacturer yourself, but on our own behalf we would like to add that all of the above requirements are met by the companies’ products:
Installation of “spider” 4-2-1 on Lada Priora: step-by-step instructions and price
To install the new collectible "spider" you will need:
- flat screwdriver;
- 13mm head with extension;
- WD-40 lubricant.
It is recommended to carry out work in the following sequence:
- 1. Remove the auxiliary muffler from the manifold by bending the edges of the plate and unscrewing the three fastening nuts on the pipe, after making sure that the Priora exhaust system has cooled down;
- 2. Remove the protective shield and locking plate;
- 3. Gradually remove the old factory manifold from the cylinder head. First of all, you need to separate the pads from the oxygen sensors. Then unscrew the cylinder block mounting bolts and remove the bracket. Unscrew the eight nuts connecting the manifold and the block head and remove it;
- 4. Free the head holes from carbon deposits, lubricate the open fingers with graphite grease;
- 5. Place the 4-2-1 spider on the open pins and mount the exhaust system in the reverse order;
- 6. Make sure that the spider does not touch the wiring and housing parts, which can lead to their deformation when exposed to high heat.
Before installing a spider on a Priora, you should pay attention to the cost of this design. The price range for various modifications of spiders varies from 2 to 7 thousand rubles, taking into account consumables and labor. The installation process takes no more than an hour.
How to change pistons to plug-in or Avtramat pistons with your own hands?
Thus, we approached the issue of replacing pistons on a VAZ Priora car with our own hands.
Prepare a set of wrenches in advance:
- In the event that the replacement of elements is carried out on a car with high mileage, using an internal meter you will have to measure the distances from the upper edge of the cylinder in the transverse and longitudinal direction of the engine. In this case, you need to deviate from the top edge by 3, 10, 60 and 112 mm, respectively, you should end up with four values. This way you can determine how worn the cylinders are. If the wear is small and amounts to 0.05 mm, then this distance can be compensated for by installing elements with a slightly larger diameter. However, if the wear is 0.15 mm or more, then your cylinders will need boring. To do this, we recommend combining this process with the installation of plug-in elements. Immediately before disassembly, the motor should be cleaned. Use wrenches to unscrew the screws that secure the right engine support, as well as the front support and generator bracket. All brackets are dismantled.
- Then you should disconnect the pipeline, the block head, the flywheel, and the filter element. The pump supply pipe to the cylinder head is also disconnected. Now you will need a workbench or a suitable stand.
- Next, the oil pan, oil pump and oil receiver are dismantled. The screws securing the rear crankshaft oil seal are also unscrewed using a wrench. The holder itself can be dismantled by prying it with a screwdriver into the grooves on the body.
- Then you should unscrew all the bolts of the connecting rod caps one by one, and the connecting rods themselves with the pistons should be dismantled.
- After this, the piston rings are removed. The ring itself is removed from its installation location using the same screwdriver. Here, pay attention to the condition of the rings - if they are worn out, then it is better to change them.
- Using a mandrel, the piston pin is pushed out, after which the piston itself can be removed. After replacement, all assembly steps are carried out in the reverse order. Make sure that the mark on the bottom of the element is directed in the same direction as the arrows on the connecting rod are pointing.